1. Introduction
Thank you for purchasing the WMQ MM1949 5.1 Surround Sound Speaker System. This manual provides essential information for setting up, operating, and maintaining your new home theater system. Please read this manual thoroughly before use to ensure proper functionality and to maximize your audio experience. Keep this manual for future reference.
2. Product Overview
The WMQ MM1949 is a 5.1 home music system designed to deliver a professional-grade surround sound experience. It features a powerful 6.5-inch subwoofer, five 1-inch tweeters, and ten 2.5-inch midrange speakers. The system allows for adjustable tweeter and woofer volumes via dedicated knobs and incorporates aluminum heatsinks for enhanced performance. It supports multiple connection methods including RCA, Coaxial, Optical, Bluetooth 5.3, and TF card playback, making it suitable for various audio sources such as TVs, PCs, and mobile phones.

Figure 2.1: WMQ MM1949 5.1 Surround Sound Speaker System components.
3. Package Contents
Please check the box for the following items:
- WMQ MM1949 5.1 Surround Sound Speaker System (Subwoofer, Center Speaker, 2 Front Speakers, 2 Surround Speakers)
- Instruction Manual
- Warranty Card
- Remote Control (not explicitly listed but implied for home theater systems)
- Audio Cables (RCA, Optical, Coaxial - specific types and quantities may vary)
4. Components and Controls
4.1 Subwoofer and Speaker Configuration
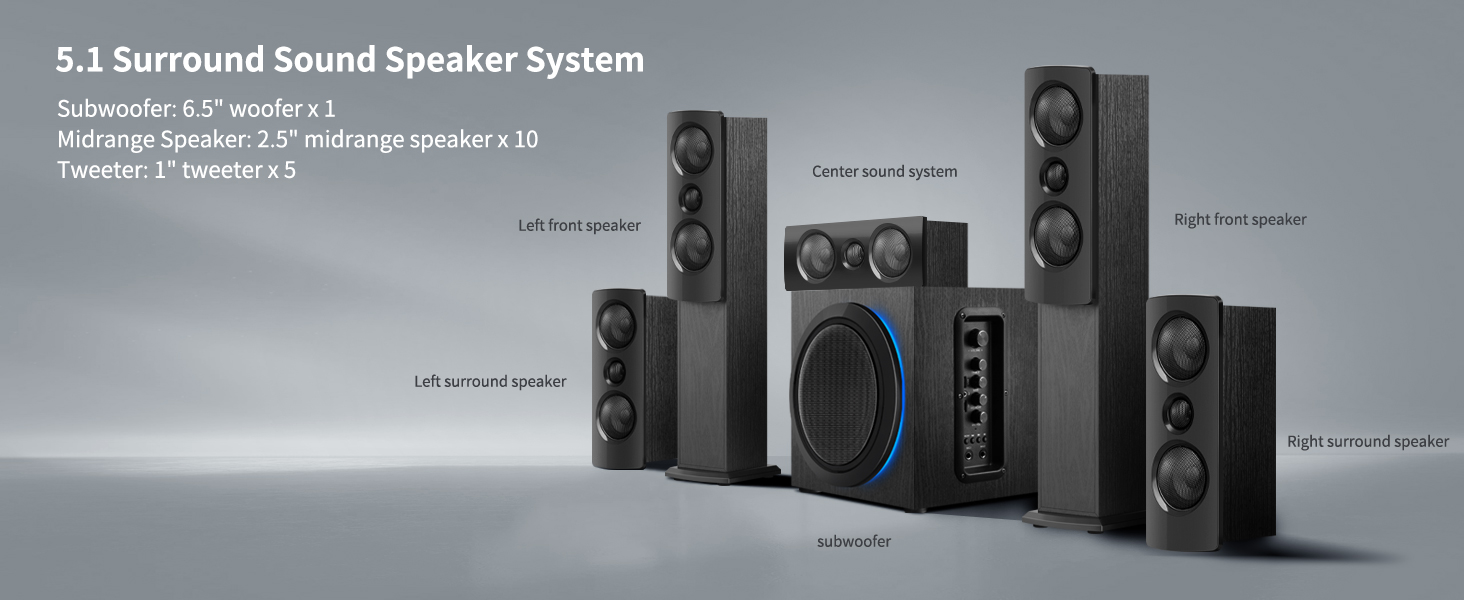
Figure 4.1: Diagram illustrating the components of the 5.1 Surround Sound Speaker System, including the subwoofer, center sound system, left front speaker, right front speaker, left surround speaker, and right surround speaker.
4.2 Rear Panel Connections

Figure 4.2: Detailed view of the subwoofer's rear panel, showing power input, speaker outputs, and various audio input ports including Optical, Coaxial, RCA (AUX/Audio In), and speaker terminals for Left/Right Surround and Center Speaker.
4.3 Side Panel Controls

Figure 4.3: The side panel of the subwoofer features controls for master volume, treble, bass, USB input, AUX input, MIC.ECHO, TF card slot, microphone volume, previous track, next track, play/pause, mode selection, and two microphone inputs (MIC1, MIC2).
5. Setup
5.1 Speaker Placement
Optimal speaker placement is crucial for achieving the best 5.1 surround sound experience. Refer to Figure 4.1 for a visual guide.
- Subwoofer: Place the subwoofer on the floor, ideally in a corner or near a wall, to enhance bass response.
- Center Speaker: Position the center speaker directly above or below your TV/display, centered with the screen.
- Front Speakers (Left & Right): Place these speakers to the left and right of your TV, equidistant from the screen and at ear level when seated. They should form an equilateral triangle with your primary listening position.
- Surround Speakers (Left & Right): Position the surround speakers to the sides or slightly behind your primary listening position, typically at or slightly above ear level.
5.2 Connections
Before making any connections, ensure the system is powered off and unplugged from the main power outlet.
- Connect Satellite Speakers: Connect the satellite speakers (Front Left, Front Right, Center, Surround Left, Surround Right) to the corresponding speaker output terminals on the rear of the subwoofer. Ensure correct polarity (+ to + and - to -).
- Connect Audio Source: Choose one of the following input methods based on your audio source (TV, PC, DVD player, etc.):
- RCA (AUX/Audio In): Use standard RCA cables to connect the audio output of your device to the 'AUX/AUDIO IN' ports on the subwoofer.
- Optical Input: Connect an optical cable from your device's optical output to the 'OPTICAL' port on the subwoofer.
- Coaxial Input: Connect a coaxial cable from your device's coaxial output to the 'COAXIAL' port on the subwoofer.
- Bluetooth: For wireless connection, refer to Section 6.3 for Bluetooth pairing instructions.
- TF Card: Insert a TF card into the designated slot for direct music playback.
- Power Connection: Once all audio connections are made, connect the power cord to the subwoofer and then to a wall outlet.
6. Operating Instructions
6.1 Power On/Off
Locate the power switch on the rear panel of the subwoofer. Flip the switch to the 'ON' position to power on the system. Flip to 'OFF' to power off.
6.2 Volume and Tone Control
Use the 'VOLUME' knob on the side panel (Figure 4.3) to adjust the overall master volume. The 'TREBLE' and 'BASS' knobs allow you to fine-tune the high and low frequencies to your preference.
6.3 Input Selection
Press the 'MODE' button on the side panel or remote control to cycle through available input sources: RCA, Optical, Coaxial, Bluetooth, and TF Card.
6.4 Bluetooth Pairing
- Switch the system to Bluetooth mode using the 'MODE' button.
- On your mobile device, enable Bluetooth and search for available devices.
- Select 'WMQ MM1949' (or similar name) from the list to pair.
- Once paired, you can stream audio wirelessly from your device.
6.5 TF Card Playback
Insert a TF card with audio files into the 'TF' slot on the side panel. The system will automatically switch to TF card mode and begin playback. Use the 'PREVIOUS', 'NEXT', and 'PLAY/PAUSE' buttons to control playback.
6.6 Microphone Usage
Connect microphones to the 'MIC1' or 'MIC2' inputs. Adjust microphone volume using the 'MIC.VOL' knob and echo effect with the 'MIC.ECHO' knob.
7. Maintenance
To ensure the longevity and optimal performance of your speaker system, follow these maintenance guidelines:
- Cleaning: Use a soft, dry cloth to clean the surfaces of the speakers and subwoofer. Avoid using liquid cleaners, aerosols, or abrasive materials, as they may damage the finish.
- Ventilation: Ensure that the heatsinks on the rear panel of the subwoofer are not obstructed to allow for proper airflow and prevent overheating.
- Placement: Avoid placing the system in direct sunlight, near heat sources, or in areas with high humidity or dust.
- Cables: Periodically check all cable connections for secure fit and any signs of damage.
8. Troubleshooting
If you encounter any issues with your WMQ MM1949 system, please refer to the following common problems and solutions:
| Problem | Possible Cause | Solution |
|---|---|---|
| No sound from any speaker | Power not connected; incorrect input selected; volume too low; mute activated. | Check power connection and switch; select correct input mode; increase volume; check if mute is active. |
| No sound from specific speakers | Loose speaker cable connection; damaged speaker cable. | Ensure speaker cables are securely connected to the correct terminals; inspect cables for damage. |
| Poor sound quality/distortion | Incorrect audio source settings; high volume level causing clipping; improper speaker placement. | Adjust audio output settings on your source device; reduce volume; review speaker placement. |
| Bluetooth pairing failure | System not in Bluetooth mode; device too far; interference. | Ensure system is in Bluetooth mode; move device closer; restart both devices. |
9. Specifications
| Feature | Detail |
|---|---|
| Brand Name | WMQ |
| Model Number | MM1949 |
| Speaker Configuration | 5.1 Surround Sound |
| Subwoofer Size | 6.5 inches |
| Tweeter Size | 1 inch (x5) |
| Midrange Speaker Size | 2.5 inches (x10) |
| Connectivity | RCA, Optical, Coaxial, Bluetooth 5.3, TF Card |
| Color | Black Textured Wood Case |
| Item Weight | 28.5 pounds |
| Package Dimensions | 22.68 x 18.78 x 15.86 inches |
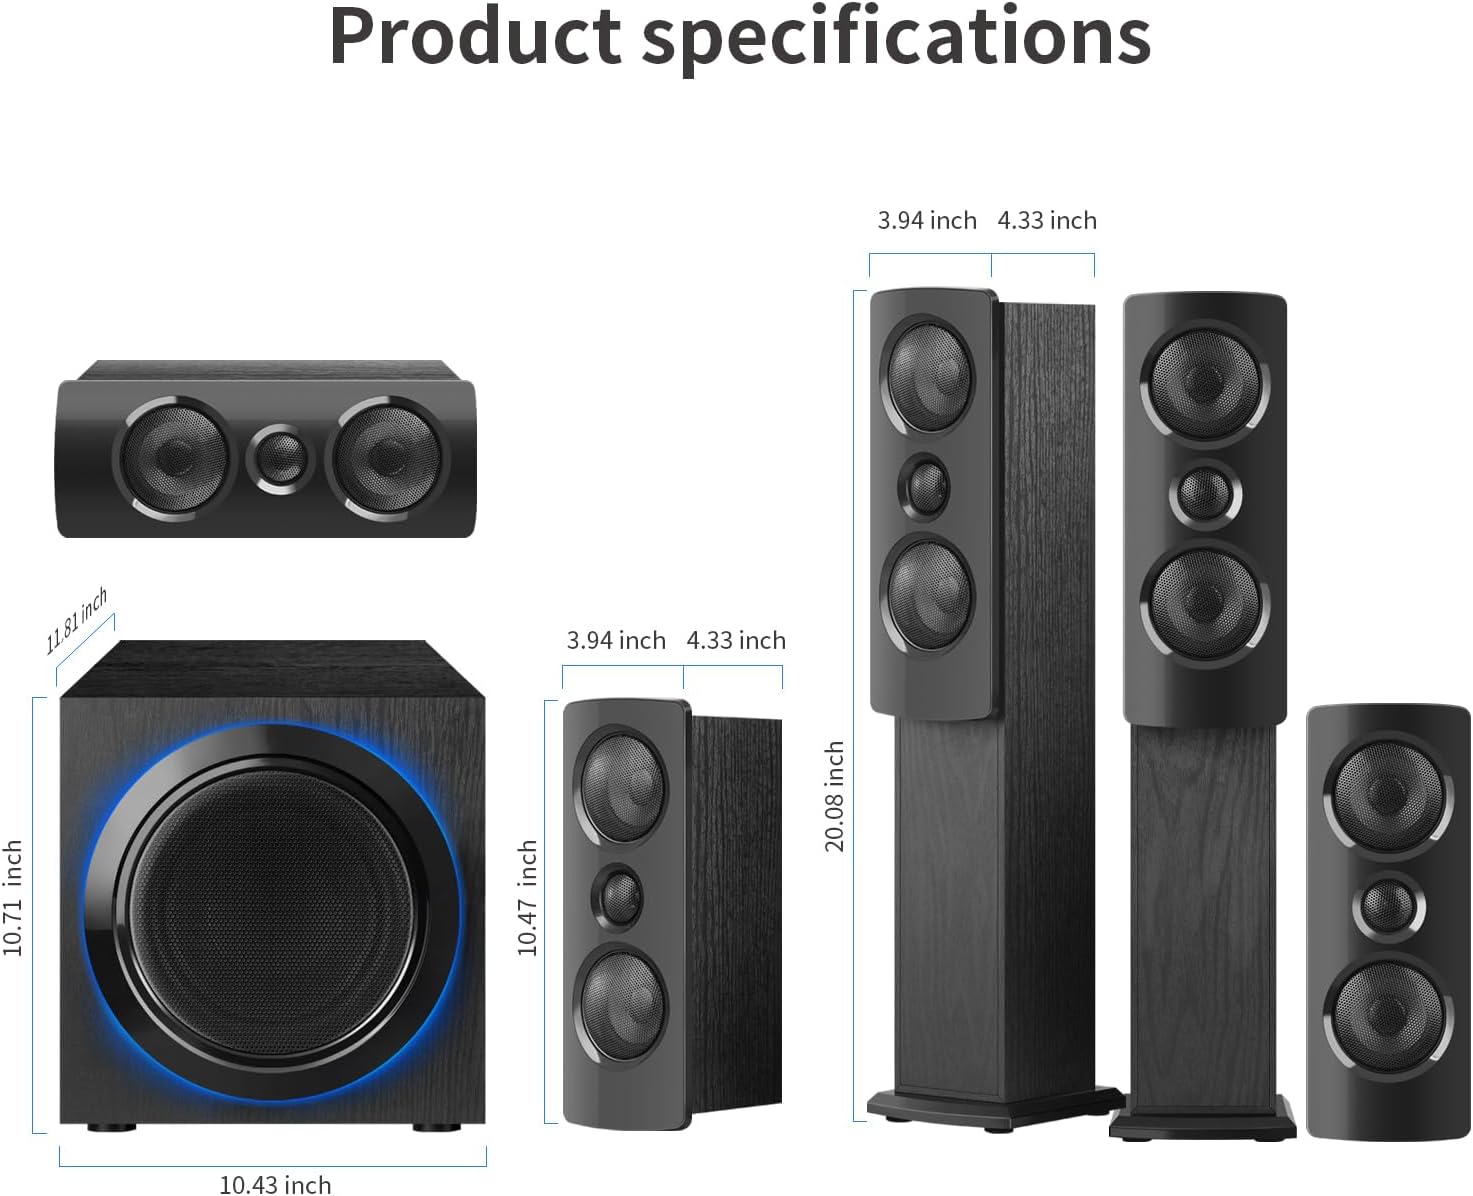
Figure 9.1: Dimensions of the WMQ MM1949 speaker components.
10. Product Video Overview
Video 10.1: A brief overview of the WMQ MM1949 5.1 Surround Sound Speaker System, demonstrating its components and highlighting key features and the immersive sound experience it provides.
11. Warranty and Support
This product comes with a warranty as detailed in the included Warranty Card. For any issues or technical problems with your home theater sound system during use, please submit an after-sales request through Amazon's order details page. Your request will be processed in accordance with Amazon's official policies, and we will assist in facilitating the resolution through the platform's established channels.