Tolatoyus TL16LCD
Tolatoyus TL16LCD 4K Camera GPS Drone User Manual
Model: TL16LCD | Brand: Tolatoyus
Introduction
This manual provides detailed instructions for the safe and effective operation of your Tolatoyus TL16LCD 4K Camera GPS Drone. Please read this manual thoroughly before operating the drone to ensure proper usage and to prevent damage or injury.
1. Setup
1.1 Package Contents
Verify that all items are present in the package:
- Drone *1
- Remote Control *1
- Battery *1
- Propeller *4
- USB Cable *1
- Screwdriver *1
- User Manual *1

Image: Contents of the Tolatoyus TL16LCD Drone package.
1.2 Propeller Installation
Ensure correct propeller installation for stable flight. Each propeller is marked 'A' or 'B' and must match the corresponding arm of the drone.
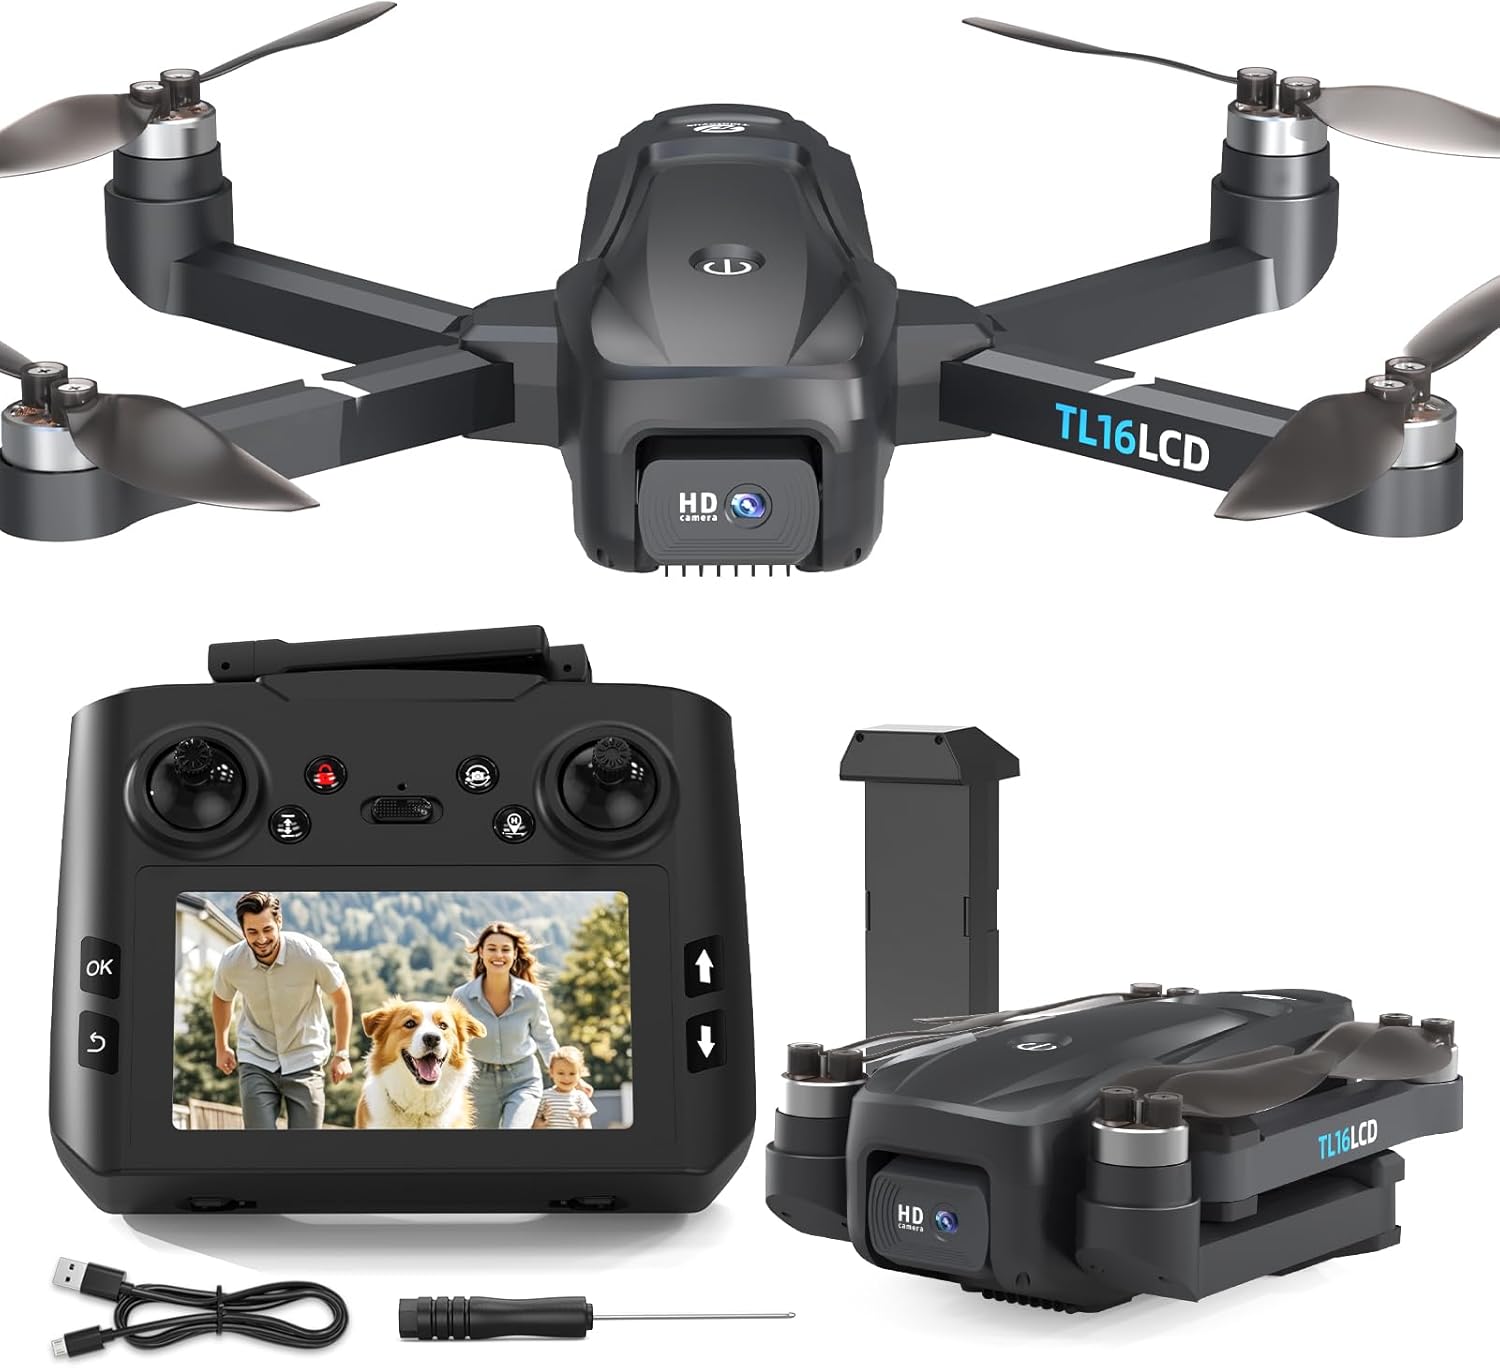
Image: The Tolatoyus TL16LCD drone with its propellers correctly installed on the designated arms.
To install: Match propeller 'A' to arm 'A' and propeller 'B' to arm 'B'. Secure each propeller with the provided screws using the screwdriver. Incorrect installation will prevent normal flight.
To remove: Use the screwdriver to loosen the screws and carefully detach the propellers.
1.3 Remote Control and App Pairing & Calibration
Before first flight, the drone and remote control must be paired and calibrated. This process differs slightly for outdoor (GPS mode) and indoor (non-GPS mode) environments.
1.3.1 Outdoor Pairing and Calibration (GPS Mode)
- Power On: Press and hold the drone's power button until the indicator lights flash.
- Remote Control Power On: Press and hold the remote control's power button. A "di" sound indicates successful pairing. The remote's screen will display the image transmission.
- Satellite Search: The drone will search for satellites. The drone's indicator lights will be fixed green and slowly flashing red. After approximately 15 seconds, a longer "di" sound will be emitted, and all four drone lights will become fixed, indicating successful satellite acquisition (more than 7 satellites).
- Gyroscope Calibration: Simultaneously push both joysticks on the remote control to the 5 o'clock position. The drone's four indicator lights will flash rapidly. Wait a few seconds until a "di" sound is heard, and the lights become fixed, indicating successful gyroscope calibration.
- Compass Calibration (Horizontal): Simultaneously push both joysticks on the remote control to the 7 o'clock position. The remote control screen will display "Horizontal Calibration Operation". Lift the drone to about 1.2 meters and rotate it horizontally approximately three times. A "di" sound from the remote and fixed green/flashing red lights on the drone indicate successful horizontal calibration.
- Compass Calibration (Vertical): The remote screen will immediately display "Vertical Calibration Operation". Lift the drone to about 1.2 meters and rotate it vertically approximately three times. A "di-di" sound from the remote and fixed green/flashing red lights on the drone indicate successful vertical calibration. The drone lights will then become fixed.
1.3.2 Indoor Pairing and Calibration (Indoor Mode)
For indoor use, GPS signal is unavailable. Ensure the drone is in Indoor Mode.
- Place Drone: Place the drone on a flat surface.
- Power On: Press and hold the drone's power button until the indicator lights flash.
- Remote Control Power On: Press and hold the remote control's power button. A "di" sound indicates successful pairing. The remote's screen will display the image transmission.
- Indoor Mode Activation: If the drone is in GPS mode (default), press and hold the "GPS/Indoor Mode" button on the remote control to switch to Indoor Mode. The remote screen will display "Indoor Mode".
- Gyroscope Calibration: Simultaneously push both joysticks on the remote control to the 5 o'clock position. The drone's four indicator lights will flash rapidly. Wait a few seconds until a "di" sound is heard, and the lights become fixed, indicating successful gyroscope calibration.
- Compass Calibration: Simultaneously push both joysticks on the remote control to the 7 o'clock position. The remote control screen will display "Horizontal Calibration Operation". Lift the drone to about 1.2 meters and rotate it horizontally and vertically as indicated. A "di-di" sound from the remote and fixed green/flashing red lights on the drone indicate successful compass calibration. The drone lights will then become fixed.
1.4 App Download and Connection
To utilize advanced features and FPV transmission, download the companion app.
- Download App: Scan the QR code provided in the drone manual with your phone to access the app download interface. Click to download the "LW Pro" app.
- App Permissions: Upon first use, the app will request network and storage access. Accept all permissions for normal operation.
- Connect to Drone Wi-Fi: In your phone's Wi-Fi settings, enable WLAN. Wait for the drone's access point network (DRONE-XXXXXX) to appear. Click on this network (no password required) to connect automatically.

Image: The remote control with its integrated LCD screen, showing the real-time FPV feed from the drone.
2. Operating Instructions
2.1 Take-off and Landing
2.1.1 Using the Remote Control
- Unlock Propellers: Briefly press the "Unlock by simple pressure" button. The drone's propellers will start spinning.
- One-Touch Take-off: Briefly press the "One-touch take-off and landing" button. The drone will take off and hover at approximately 1 meter.
- One-Touch Landing: Briefly press the "One-touch take-off and landing" button again. The drone will automatically land and stop.
- Joystick Control: Alternatively, after unlocking, push the left joystick up to take off. Push it down to land.
2.1.2 Using the App
- Unlock Propellers (Joystick Method): Click the "Joystick On/Off" button to display the joysticks. Push the left joystick on the screen to the 7 o'clock position and the right joystick to the 5 o'clock position simultaneously to unlock the drone's propellers.
- Take-off (Joystick Method): Push the left joystick on the screen upwards once. The drone will take off and ascend to a certain height.
- Landing (Joystick Method): Continue pushing the left joystick on the screen downwards. The drone will land.
- Unlock and One-Touch Take-off (Button Method): Click the "Unlock" button, then the "One-touch take-off and landing" button. A safety confirmation message will appear. Slide the bar to the right to confirm. The drone will take off and hover at approximately 1.2 meters.
- One-Touch Landing (Button Method): Click the "One-touch take-off and landing" button again. A safety confirmation message will appear. Slide the bar to the right to confirm. The drone will land automatically.
2.2 Basic Flight Controls
2.2.1 Using the Remote Control
- Left Joystick Up/Down: Controls drone ascent/descent.
- Left Joystick Left/Right: Controls drone rotation (yaw) left/right.
- Right Joystick Up/Down: Controls drone forward/backward movement.
- Right Joystick Left/Right: Controls drone left/right sideward movement.
2.2.2 Using the App
- Left Joystick Up/Down: Controls drone ascent/descent.
- Left Joystick Left/Right: Controls drone rotation (yaw) left/right.
- Right Joystick Up/Down: Controls drone forward/backward movement.
- Right Joystick Left/Right: Controls drone left/right sideward movement.
2.3 Speed Adjustment
The drone offers three adjustable speed levels.
2.3.1 Using the Remote Control
Use the speed adjustment button (wheel) on the top right corner of the remote control. Slide it right to increase speed (up to level 3), and left to decrease speed (down to level 1). The remote will emit "di-di" sounds to indicate speed changes.
2.3.2 Using the App
Click the "Speed Change" button in the app to toggle between 50% and 100% speed levels.

Image: Illustrates the drone's three speed modes and altitude hold feature.
2.4 Return to Home (RTH) Function
The RTH function allows the drone to automatically return to its take-off point.
2.4.1 Using the Remote Control
If the drone flies too far or becomes difficult to control, briefly press the "Return with one button" button on the remote control. The remote will emit a "di" sound, followed by intermittent "di" sounds, indicating the drone is in RTH mode. The drone will automatically return to its take-off point and land.
2.4.2 Using the App
If the drone flies too far or is difficult to maneuver, click the "Return" button in the app. The drone will use its initial take-off point as the "return point" and automatically return and land.

Image: The drone utilizing its GPS capabilities for intelligent return functions.
2.5 Camera Operation (Photo/Video)
2.5.1 Adjusting Camera Angle
The drone's 4K camera has a 45° electric adjustment range.
- Remote Control: Use the camera adjustment wheel on the left side of the remote control. Slide it left to tilt the camera up, and right to tilt it down. The remote will emit a "di" sound with each adjustment.
- App: Slide the "Camera Adjustment" button in the app downwards to tilt the camera down, and upwards to tilt it up.

Image: Close-up of the drone's 4K HD camera with 45° motorized adjustment capability.
2.5.2 Taking Photos and Recording Videos
- Remote Control:
- Photo: Briefly press the "Photo button". The remote will emit a "di" sound, and a photo will be taken. The screen will confirm successful capture.
- Video: Press and hold the "Video button". The remote will emit a "di-di" sound, and video recording will begin. The video recording icon on the screen will flash. Press and hold again to stop recording.
- App:
- Photo: Click the "Photo button" in the app. A photo will be taken, and a thumbnail will appear.
- Video: Click the "Video button" in the app to start recording. "Recording in progress" will be displayed. Click again to stop.
- Gesture Photo/Video: Stand approximately 2m from the drone. Make a "scissors" gesture for a photo (3-second countdown). Make a "palm" gesture for video recording (3-second countdown). Repeat the gesture to stop recording.
2.6 Intelligent Flight Modes
The TL16LCD drone features several intelligent flight modes for enhanced aerial photography and videography.
- Follow Me Mode: The drone automatically follows the person holding the remote control or smartphone.
- Waypoint Flight: Define a flight path by tapping points on the app map. The drone will automatically fly along the specified path.
- Circular Flight: Mark a point on the map and define the flight diameter. The drone will automatically fly in a circle around the defined position.

Image: The drone executing a circular flight pattern, capturing a panoramic view.
2.7 App Interface Functions
The app provides various functions to enhance your drone experience.
- Zoom Function: Click the "Zoom" button to open zoom settings. Adjust the focal length by sliding the bar or pinch the screen with your fingers.
- Resolution Function: Click the "Resolution" button to select desired photo and video resolutions (e.g., 4K).
- Album Function: Click the "Album" button to view captured photos and videos. You can swipe to navigate or delete unsatisfactory files.
- MV Function: Click the "MV Function" button to enter the MV interface. Here you can apply filters, rotate the screen, take photos/videos, and add music to your footage.
- Other Indicators: The app displays Wi-Fi signal strength, GPS mode/optical flow mode, number of satellites, battery level, magnetic interference, and flight information (distance, altitude, speed).
3. Maintenance
3.1 Propeller Replacement
If propellers are damaged, replace them with new ones. Ensure correct matching of 'A' and 'B' propellers to their respective arms.
3.2 Battery Care
- Always use the original charger.
- Do not overcharge or over-discharge the battery.
- Store batteries in a cool, dry place away from direct sunlight.
- If not used for extended periods, charge the battery to 50-60% every three months.
3.3 Cleaning
- Wipe the drone body with a soft, dry cloth.
- Avoid using harsh chemicals or solvents.
- Ensure no dust or debris accumulates in the motors or camera lens.
4. Troubleshooting
- Drone not powering on: Ensure the battery is fully charged and correctly inserted.
- No GPS signal: Ensure you are flying outdoors in an open area. If indoors, switch to Indoor Mode.
- Unstable flight: Perform gyroscope and compass calibration as described in the setup section. Check for damaged propellers.
- No image transmission to remote/app: Ensure proper pairing and Wi-Fi connection. Check for signal interference.
- Drone not responding to controls: Re-pair the remote control with the drone. Check battery levels of both drone and remote.
5. Specifications
| Feature | Specification |
|---|---|
| Brand | Tolatoyus |
| Model | TL16LCD |
| Video Recording Resolution | 4K |
| Connectivity Technology | Wi-Fi |
| Battery Capacity | 2200 Milliampere-hour (mAh) |
| Battery Composition | Lithium-polymer |
| Product Dimensions (L x W x H) | 22.5 x 18.5 x 5.5 cm |
| Item Weight | 1.04 Kilograms |
| Flight Time | Up to 20 minutes |
| Motor Type | Brushless |
Note: Specifications are subject to change without prior notice.

Image: The drone's key features including 20 minutes of flight time and a durable brushless motor.
6. Warranty and Support
For warranty information, technical support, or service inquiries, please refer to the contact details provided with your purchase or visit the official Tolatoyus website. Keep your proof of purchase for warranty claims.
Ask a question about this manual
Ask about setup, troubleshooting, compatibility, parts, safety, or missing instructions. Manuals+ will review the question and use this page’s manual context to help answer it.