1. Introduction and Overview
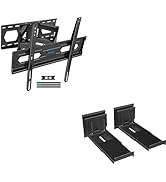
This manual provides detailed instructions for the installation, operation, and maintenance of your USX STAR Corner Full Motion TV Wall Mount. This mount is designed to securely hold televisions ranging from 37 to 84 inches and weighing up to 100 lbs. Its articulating arm allows for flexible viewing angles, making it suitable for various room layouts, including corner installations.
2. Safety Information
- Weight Capacity: Do not exceed the maximum weight capacity of 100 lbs (45.3 kg). Overloading can result in serious injury or property damage.
- TV Size: Ensure your TV size is within the recommended range of 37-84 inches.
- Wall Type: This mount is designed for installation on single wood studs, solid brick, or concrete walls. DO NOT install on drywall alone. If mounting to concrete or brick, ensure appropriate anchors are used. Concrete anchors (10x50mm) are available upon request.
- Professional Installation: If you are unsure about the installation process or wall type, consult a qualified professional.
- Cable Management: Use the integrated cable management features to prevent tripping hazards and ensure cables are not pinched.
- Regular Checks: Periodically check all screws and connections to ensure the mount remains secure.
3. Package Contents
Verify that all components are present before beginning installation:
- TV Wall Mount Assembly
- Standard Mounting Hardware (pre-labeled bags)
- Bubble Level
- Cable Storage Manager (Velcro straps)
- Detailed Instruction Manual
4. Specifications
| Mounting Type | Wall Mount |
| Movement Type | Rotate, Swivel, Tilt, Extend/Retract |
| Brand | USX STAR |
| Material | Metal |
| Color | Black |
| Compatible Devices | Television |
| Minimum Supported Screen Size | 37 Inches |
| Maximum Supported Screen Size | 84 Inches |
| Maximum Load Capacity | 100 lbs (45.3 kg) |
| VESA Compatibility | 200x100mm, 200x200mm, 200x300mm, 300x200mm, 300x300mm, 400x200mm, 400x300mm, 400x400mm, 600x400mm |
| Extension from Wall | 2.52 inches (retracted) to 32 inches (extended) |
5. Setup and Installation
5.1 Pre-Installation Checks
- Verify TV Compatibility: Confirm your TV's weight and VESA pattern are within the mount's specifications.
- Identify Wall Type: Determine if your wall is a wood stud, solid concrete, or brick. Do not install on drywall alone.
- Locate Mounting Position: Choose a suitable location on your wall, considering viewing angles and power/cable access.

This image illustrates the wide TV compatibility (37-84 inches, Max Load 100 lbs) and the supported wall types: Concrete Wall, Single Wood Stud, and Brick Wall. It also lists compatible VESA patterns. A warning states: "Please do not install alone on the drywall!"
This image details the VESA pattern compatibility, showing various dimensions from 200x100 mm to 600x400 mm. It clarifies the top-to-bottom (vertical) hole distance as 100-400mm and left-to-right (horizontal) hole distance as 200-600mm.

This image displays the TV mount installed on a wall, demonstrating its appearance and extension capabilities.
5.2 Mounting the Wall Plate
- Mark the desired height and center of your TV on the wall.
- Use the provided template (if applicable) or the wall plate itself to mark drilling locations for the mounting holes.
- Drill pilot holes according to the instructions, ensuring correct drill bit size for your wall type.
- Secure the wall plate to the wall using the appropriate fasteners. Use the included bubble level to ensure the plate is perfectly horizontal.
5.3 Attaching TV Brackets to TV
- Carefully place your TV face down on a soft, clean surface.
- Attach the TV brackets to the back of your TV using the correct screws and spacers from the pre-labeled hardware bags. Ensure the brackets are centered and securely tightened.
5.4 Hanging the TV on the Wall Mount
- With assistance, carefully lift the TV and hook the TV brackets onto the wall plate.
- Secure the TV to the wall plate using the locking mechanisms or screws as indicated in the detailed instructions.
This video, titled "Corner Full Motion TV Wall Mount 32inch Long Arm by USX STAR," demonstrates the installation process and features of the USX STAR TV wall mount, including its full motion capabilities and long articulating arm.
6. Operating Instructions
6.1 Adjusting Viewing Angle
- Tilt: The mount allows for a tilt range of +5° to -15° to reduce glare. Loosen the tilt adjustment knobs, adjust to the desired angle, and re-tighten.
- Swivel: The mount offers a +/-90° swivel range. Gently push or pull the TV to achieve the desired horizontal viewing angle. The maximum swivel angle depends on your TV's size.
- Level Adjustment: After installation, you can adjust the TV level by +/-4°. This feature helps correct any minor leveling discrepancies.

This image illustrates the flexible viewing options, including a tilt range of +5° to -15° and the ability to extend up to 32.05 inches and retract to 2.52 inches from the wall. It highlights the easy tilt adjustment mechanism.

This image demonstrates the 180° swivel capability of the TV mount, allowing for comfortable viewing from various positions, including corner setups. It emphasizes the smooth motion of the swivel mechanism.
This image highlights the post-installation adjustable leveling feature, allowing for a +/-4° adjustment to ensure the TV is perfectly level after mounting.
6.2 Extending and Retracting
The mount features a 32-inch long articulating arm. To extend or retract the TV, gently pull or push the TV from its sides. Avoid pushing or pulling on the screen directly.
6.3 Cable Management
Use the built-in Velcro cable ties to organize and conceal cables along the mount's arms. This helps maintain a tidy appearance and prevents cable damage.

This image demonstrates the cable management feature, showing how cables can be neatly routed along the mount's arm to avoid clutter.
7. Maintenance
- Cleaning: Wipe the mount with a soft, dry cloth. Avoid abrasive cleaners or solvents.
- Connection Checks: Periodically inspect all mounting screws and bolts to ensure they are tight and secure.
- Movement: If the arm movement becomes stiff, apply a small amount of silicone-based lubricant to the pivot points.
8. Troubleshooting
- TV Not Level: Use the post-installation level adjustment feature (+/-4°) to correct any tilt. Ensure the wall plate was installed level initially.
- Difficulty Moving TV: Check for any obstructions. Ensure all pivot points are free of debris. If necessary, apply lubricant as described in the maintenance section.
- Mount Feels Unstable: Immediately remove the TV from the mount. Re-check all wall and TV connections. Ensure the wall type is appropriate and fasteners are correctly installed and tightened. Do not re-mount the TV until stability is confirmed.
- Cable Blockage: Ensure cables are routed correctly using the cable management system and are not interfering with the mount's movement or being pinched.

This image illustrates a common issue of potential cable blockage if cables are not properly managed, showing a red 'X' over a blocked port on the TV's back.
9. Warranty and Support
USX STAR provides a 10-year product warranty for this TV wall mount, ensuring durability and peace of mind. For any questions, installation assistance, or to request concrete anchors, please contact USX STAR customer service. Our US-based customer service team is available to provide quick responses and support for all warranty-backed products.
For support, please refer to the contact information provided with your purchase or visit the official USX STAR website.