1. Introduction
This manual provides instructions for the installation, operation, and maintenance of your new carburetor replacement kit. This kit is designed for specific Craftsman lawn tractor models, including 917.287140 and 917287140 with 20hp engines and 46-inch decks. Proper installation and maintenance are crucial for optimal engine performance and longevity.
2. Safety Information
- Always disconnect the spark plug wire and the battery ground cable before performing any service or maintenance to prevent accidental engine starting.
- Work in a well-ventilated area when handling fuel. Fuel is highly flammable; keep away from open flames, sparks, and heat sources.
- Wear appropriate personal protective equipment, including safety glasses and gloves, to protect against fuel, oil, and sharp edges.
- Allow the engine to cool completely before working on it to avoid burns from hot components.
- Dispose of old fuel and parts according to local environmental regulations.
3. Package Contents
Verify that all components listed below are present in your kit before beginning installation.
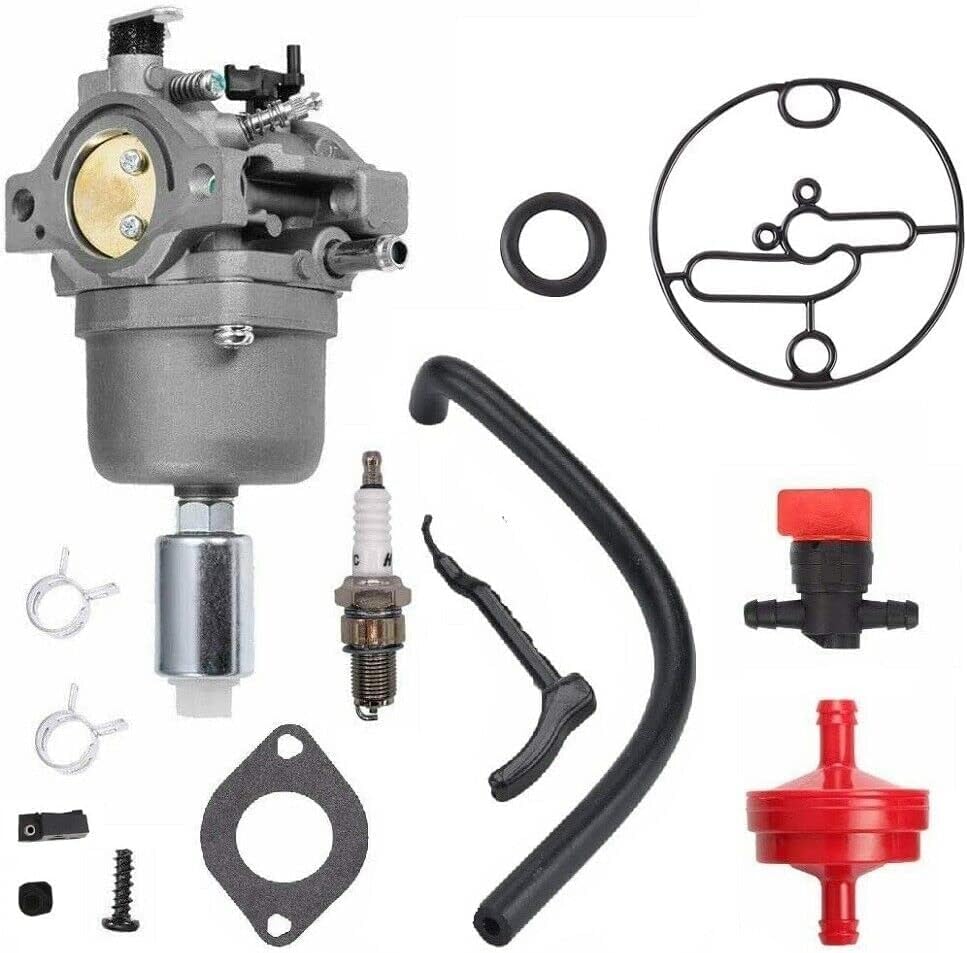
Image 3.1: Overview of the carburetor replacement kit components. This image displays the main carburetor unit, a fuel filter, a fuel line, a spark plug, various gaskets, and hose clamps, all necessary for a complete replacement.
- Carburetor Assembly
- Fuel Filter
- Fuel Line
- Spark Plug
- Gaskets (various)
- Hose Clamps
4. Setup and Installation
Follow these steps carefully for proper carburetor replacement. Refer to your lawn tractor's specific service manual for detailed instructions on accessing the carburetor.
- Preparation: Park the lawn tractor on a level surface, engage the parking brake, and turn off the engine. Disconnect the spark plug wire and the battery ground cable. Allow the engine to cool.
- Drain Fuel: Close the fuel shut-off valve (if equipped) and drain the fuel tank into an approved container. Disconnect the fuel line from the carburetor.
- Remove Air Filter Assembly: Carefully remove the air filter housing and air filter element to gain access to the carburetor.
- Disconnect Linkages: Note the position and connection of all throttle and choke linkages, springs, and fuel lines attached to the old carburetor. Take photos if necessary for reassembly.
- Remove Old Carburetor: Unbolt the old carburetor from the engine intake manifold. Remove any old gaskets.
- Install New Carburetor: Place new gaskets on the intake manifold and then mount the new carburetor. Ensure proper alignment. Secure with bolts, tightening them evenly.
- Reconnect Linkages and Fuel Line: Reattach all throttle and choke linkages and springs to the new carburetor in their original positions. Install the new fuel line and fuel filter, securing them with the provided clamps.
- Install Spark Plug: Replace the old spark plug with the new one provided in the kit. Tighten to the manufacturer's specifications.
- Reassemble Air Filter: Reinstall the air filter element and housing.
- Refill Fuel: Refill the fuel tank with fresh, clean fuel. Open the fuel shut-off valve.
- Reconnect Battery and Spark Plug: Reconnect the battery ground cable and the spark plug wire.

Image 4.1: Side view of the carburetor, showing the fuel inlet and mounting points. This view helps in identifying the correct orientation during installation.
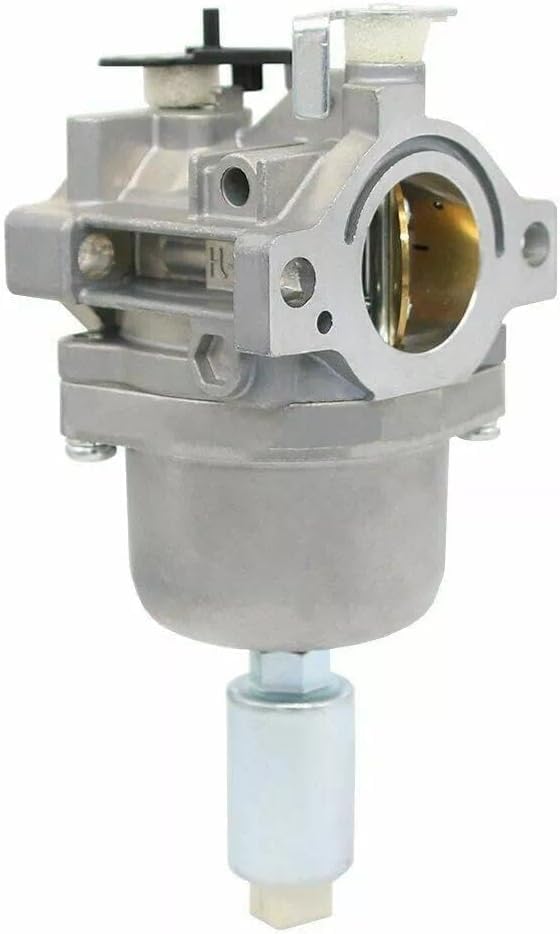
Image 4.2: Front view of the carburetor, highlighting the air intake and choke mechanism. This perspective is useful for connecting the air filter housing.
5. Operating Instructions
After installation, perform the following checks before operating the lawn tractor:
- Check for Leaks: Inspect all fuel line connections for any signs of fuel leakage. Address any leaks immediately.
- Initial Start-up: Start the engine according to your tractor's operating manual. The engine may take a few extra cranks to start as the fuel system primes.
- Idle Adjustment: Once the engine is running, allow it to warm up. If necessary, adjust the idle speed according to your tractor's specifications.
- Test Operation: Operate the tractor briefly to ensure smooth running, proper throttle response, and no unusual noises or smoke.
6. Maintenance
Regular maintenance helps ensure the longevity and performance of your carburetor.
- Fuel Filter Replacement: Replace the fuel filter annually or more frequently if operating in dusty conditions or if fuel contamination is suspected.
- Air Filter Inspection: Regularly inspect and clean or replace the air filter as recommended by your tractor's manufacturer. A dirty air filter can restrict airflow and affect carburetor performance.
- Fuel Quality: Always use fresh, clean, and stabilized fuel. Stale or contaminated fuel is a primary cause of carburetor issues.
- Carburetor Cleaning: If performance issues arise, the carburetor may require cleaning. This typically involves disassembling the carburetor, cleaning jets and passages with carburetor cleaner, and replacing gaskets. This task is recommended for experienced individuals or professional service.
7. Troubleshooting
Refer to these common issues and solutions before seeking professional assistance.
| Problem | Possible Cause | Solution |
|---|---|---|
| Engine will not start | No fuel, clogged fuel filter, spark plug issue, incorrect choke setting | Check fuel level, replace fuel filter, inspect/replace spark plug, ensure choke is set correctly for starting. |
| Engine runs rough or stalls | Dirty air filter, stale fuel, carburetor adjustments needed, fuel line obstruction | Clean/replace air filter, use fresh fuel, check for fuel line kinks, consider professional carburetor adjustment. |
| Fuel leaks | Loose fuel line connections, damaged gaskets, cracked fuel line | Tighten hose clamps, inspect and replace gaskets, replace damaged fuel lines. |
8. Specifications
| Feature | Detail |
|---|---|
| Brand | Generic |
| Manufacturer | Senrenn |
| UPC | 776728414572 |
| ASIN | B0FGXKGWV |
| Compatibility | Craftsman 917.287140, 917287140 20hp 46'' Lawn Tractor |
9. Warranty and Support
For warranty information or technical support, please refer to the seller or manufacturer directly. Keep your purchase receipt as proof of purchase.