1. Introduction and Product Overview
The QKMPOM K7 Portable Tire Inflator is a versatile and efficient air compressor designed for various inflation needs, including car tires, motorcycle tires, bicycle tires, and sports balls. It features a powerful motor for fast inflation, a large-capacity battery for cordless operation, and an intelligent digital display for precise pressure monitoring. This manual provides essential information for safe and effective use of your device.
Key features include:
- 6X Faster Inflation: Equipped with an advanced pump core and a 25,000 RPM motor, capable of inflating a tire from 28 PSI to 36 PSI in approximately 1 minute.
- 180 PSI Maximum Pressure: Suitable for a wide range of vehicles and inflatables.
- Automatic Shut-Off: Automatically stops inflation once the preset pressure is reached, preventing over-inflation.
- Dual Power Supply: Operates cordlessly with its built-in battery or via a 12V DC car cigarette lighter port.
- 5 Preset Modes: Dedicated modes for Car, Motorcycle, Bicycle, Ball, and a Custom mode for specific pressure requirements.
- LCD Display Screen: Provides real-time and preset pressure values with an accuracy of ±1%.
- Emergency Power Bank: Features a 5V/2A USB output/input port for charging mobile devices.
- Integrated Flashlight: Three modes (SOS, NORMAL, EMERGENCY) for illumination in low-light conditions.

Image 1.1: The QKMPOM K7 Portable Tire Inflator Air Compressor, showcasing its compact design and digital display.
2. Package Contents
Please check the package contents upon unboxing to ensure all items are present:
- Portable Tire Inflator (x1)
- Air Hose (x1)
- DC Cigarette Lighter Cable (x1)
- Atmospheric Nozzle (x1)
- Stingy Mouthpiece (x1)
- French Adapter (x1)
- Ball Needle (x1)
- USB Cable (x1)
- User Manual (x1)
- Storage Bag (x1)

Image 2.1: All accessories included with the QKMPOM K7 Tire Inflator, neatly arranged.
3. Safety Information
To ensure safe operation and prevent damage to the device or injury, please observe the following safety guidelines:
- Read this entire manual before operating the device.
- Keep the device out of reach of children.
- Do not operate the inflator in wet conditions or near flammable liquids or gases.
- Ensure the inflation hose is securely connected to both the inflator and the item being inflated to prevent air leakage or detachment.
- Do not overinflate items. Always refer to the manufacturer's recommended pressure for tires and other inflatables.
- Allow the device to cool down after prolonged use to prevent overheating.
- Use only the provided accessories and charging cables.
- If the device shows signs of damage or malfunction, discontinue use immediately and contact support.
4. Setup
4.1 Charging the Device
Before first use, fully charge the portable tire inflator using the provided USB cable and a compatible USB power adapter (not included). The battery indicator on the LCD screen will show the charging status.
4.2 Dual Power Supply Options
The K7 inflator can be powered in two ways:
- Cordless Operation: Use the built-in lithium-ion battery for maximum portability. Ensure the battery is sufficiently charged.
- 12V DC Car Power: If the battery is low or for extended use, connect the inflator to your vehicle's 12V DC cigarette lighter port using the provided DC cigarette lighter cable. This allows for continuous operation without relying on the internal battery.

Image 4.1: Illustration of the dual power supply options: cordless battery operation and connection to a 12V DC car port.
5. Operating Instructions
5.1 Basic Inflation Steps
- Connect the Inflation Tube: Screw the air hose securely onto the inflator's air outlet. Then, attach the other end of the air hose to the valve stem of the item you wish to inflate. Ensure a tight connection to prevent air leaks.
- Power On and Select Mode: Press the power button to turn on the device. The LCD screen will display the current pressure. Use the mode selection button (often indicated by a gear or 'M' icon) to cycle through the 5 preset modes: Car, Motorcycle, Bicycle, Ball, or Custom.
- Set Desired Pressure: Once a mode is selected, the preset pressure for that mode will be displayed. Use the '+' and '-' buttons to adjust the target pressure to your desired value. You can also switch between pressure units (PSI, KPa, BAR, KG/CM²) if available.
- Start Inflation: Press the start/stop button (often indicated by a play/pause icon or a power symbol) to begin inflation. The device will automatically stop once the preset pressure is reached.
- Disconnect: Carefully disconnect the air hose from the valve stem and then from the inflator. Some air may escape during disconnection, which is normal.

Image 5.1: Visual guide demonstrating the three main steps for operating the tire inflator: connecting the tube, selecting mode/setting pressure, and initiating inflation.
5.2 Preset Modes and Pressure Adjustment
The K7 offers convenient preset modes:
- Car: Typically 26-50 PSI
- Motorcycle: Typically 26-45 PSI
- Bicycle: Typically 30-120 PSI
- Ball: Typically 4-16 PSI
- Custom: Allows manual setting of any pressure within the device's range.
Always verify the recommended pressure for your specific item before inflating.
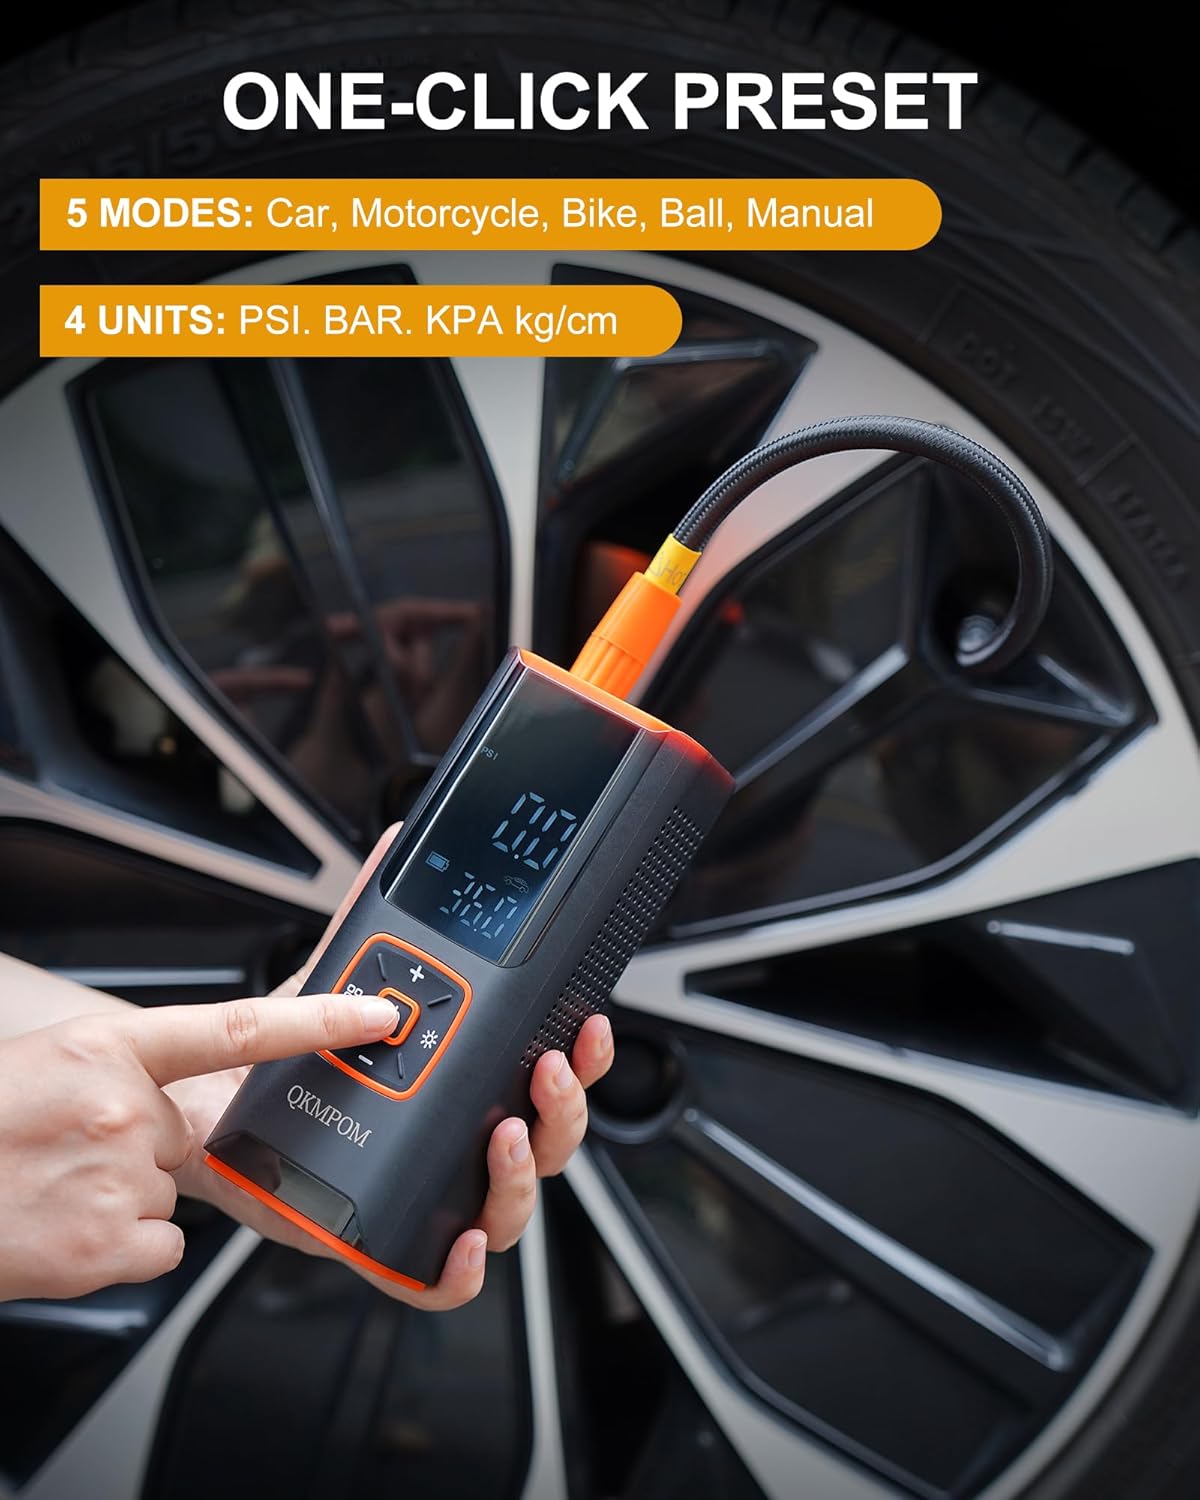
Image 5.2: The inflator's display showing the one-click preset modes and pressure units.
5.3 Using the Flashlight
The built-in LED flashlight has three modes:
- Normal: Steady illumination for general use.
- SOS: Flashing pattern for emergency signaling.
- Emergency: Rapid flashing for roadside alerts.
Activate and cycle through modes using the dedicated flashlight button.

Image 5.3: A person using the inflator's LED light to inspect a car engine at night, illustrating the utility of its lighting features.
5.4 Power Bank Function
The K7 can serve as an emergency power bank. Connect your mobile device to the inflator's 5V/2A USB output port using your device's charging cable to charge it.
6. Maintenance
Proper maintenance ensures the longevity and optimal performance of your QKMPOM K7 Tire Inflator:
- Cleaning: Wipe the device with a soft, dry cloth. Do not use harsh chemicals or abrasive cleaners. Ensure no water enters the device.
- Storage: Store the inflator and its accessories in the provided storage bag in a cool, dry place, away from direct sunlight and extreme temperatures.
- Battery Care: If not used for extended periods, charge the battery every 3-6 months to maintain its health.
- Hose Inspection: Periodically check the air hose for any signs of wear, cracks, or damage. Replace if necessary.
7. Troubleshooting
If you encounter issues with your QKMPOM K7 Tire Inflator, refer to the following common troubleshooting steps:
- Device Not Turning On:
- Ensure the battery is charged. Connect to a power source (USB or 12V DC car port) and try again.
- Press and hold the power button for a few seconds.
- No Air Output / Slow Inflation:
- Check if the air hose is securely connected to both the inflator and the item's valve stem.
- Verify that the desired pressure is set correctly and is higher than the current pressure.
- Ensure the inflator is in the correct mode for the item being inflated.
- Check for any blockages in the air hose or nozzles.
- Inaccurate Pressure Reading:
- Ensure the air hose is fully connected to the valve stem.
- Compare the reading with a known accurate pressure gauge if available.
- Device Overheating:
- If the device feels excessively hot, turn it off and allow it to cool down for at least 15-20 minutes before resuming use. Prolonged continuous operation can cause overheating.
If these steps do not resolve the issue, please contact customer support for further assistance.
8. Specifications
| Feature | Specification |
|---|---|
| Brand | QKMPOM |
| Model Name | K7 |
| Maximum Pressure | 180 PSI |
| Power Source | Battery Powered (Lithium Ion), 12V DC |
| Voltage | 12 Volts |
| Sound Level | 35 Decibels |
| Special Features | Automatic Shut-Off, Cordless, Power Bank, LED Light |
| Item Weight | 830 g |
| Parcel Dimensions | 21 x 10.6 x 9.4 cm |
| Battery Type | Lithium Ion (1 included) |
| Country of Origin | China |
9. Warranty and Support
Information regarding specific warranty terms or direct customer support contact details was not provided in the product data. For warranty claims or technical assistance, please refer to the documentation included with your purchase or contact the retailer where the product was acquired. Keep your purchase receipt as proof of purchase.


