1. Introduction
This manual provides detailed instructions for the installation, operation, and maintenance of your Hodozzy Android 15 Single Din Flip Out Car Stereo. This advanced car stereo features a 7-inch retractable touchscreen, Android 15 operating system, 6GB RAM, 128GB ROM, Wireless CarPlay, Android Auto, Bluetooth 5.0, FM/AM/RDS radio, DSP sound processing, GPS navigation, Steering Wheel Control (SWC) support, USB connectivity, and compatibility with a reversing camera.
2. Safety Information
- Always operate the device responsibly and in accordance with local traffic laws. Distracted driving can lead to accidents.
- Ensure proper installation by a qualified professional to prevent damage to the vehicle or the stereo unit.
- Do not attempt to disassemble or modify the unit. This may void the warranty and cause electrical hazards.
- Keep the screen clean and free from obstructions to maintain clear visibility.
- Avoid exposing the unit to extreme temperatures, direct sunlight for prolonged periods, or excessive moisture.
3. Package Contents
Verify that all items are present in the package before installation:
- Hodozzy Android 15 Single Din Car Stereo Unit
- Power Cable
- GPS Antenna
- 4G Module (if included)
- Microphone (MIC)
- Mounting Brackets
- Antenna Head
- User Manual (this document)
- AHD Rear Camera
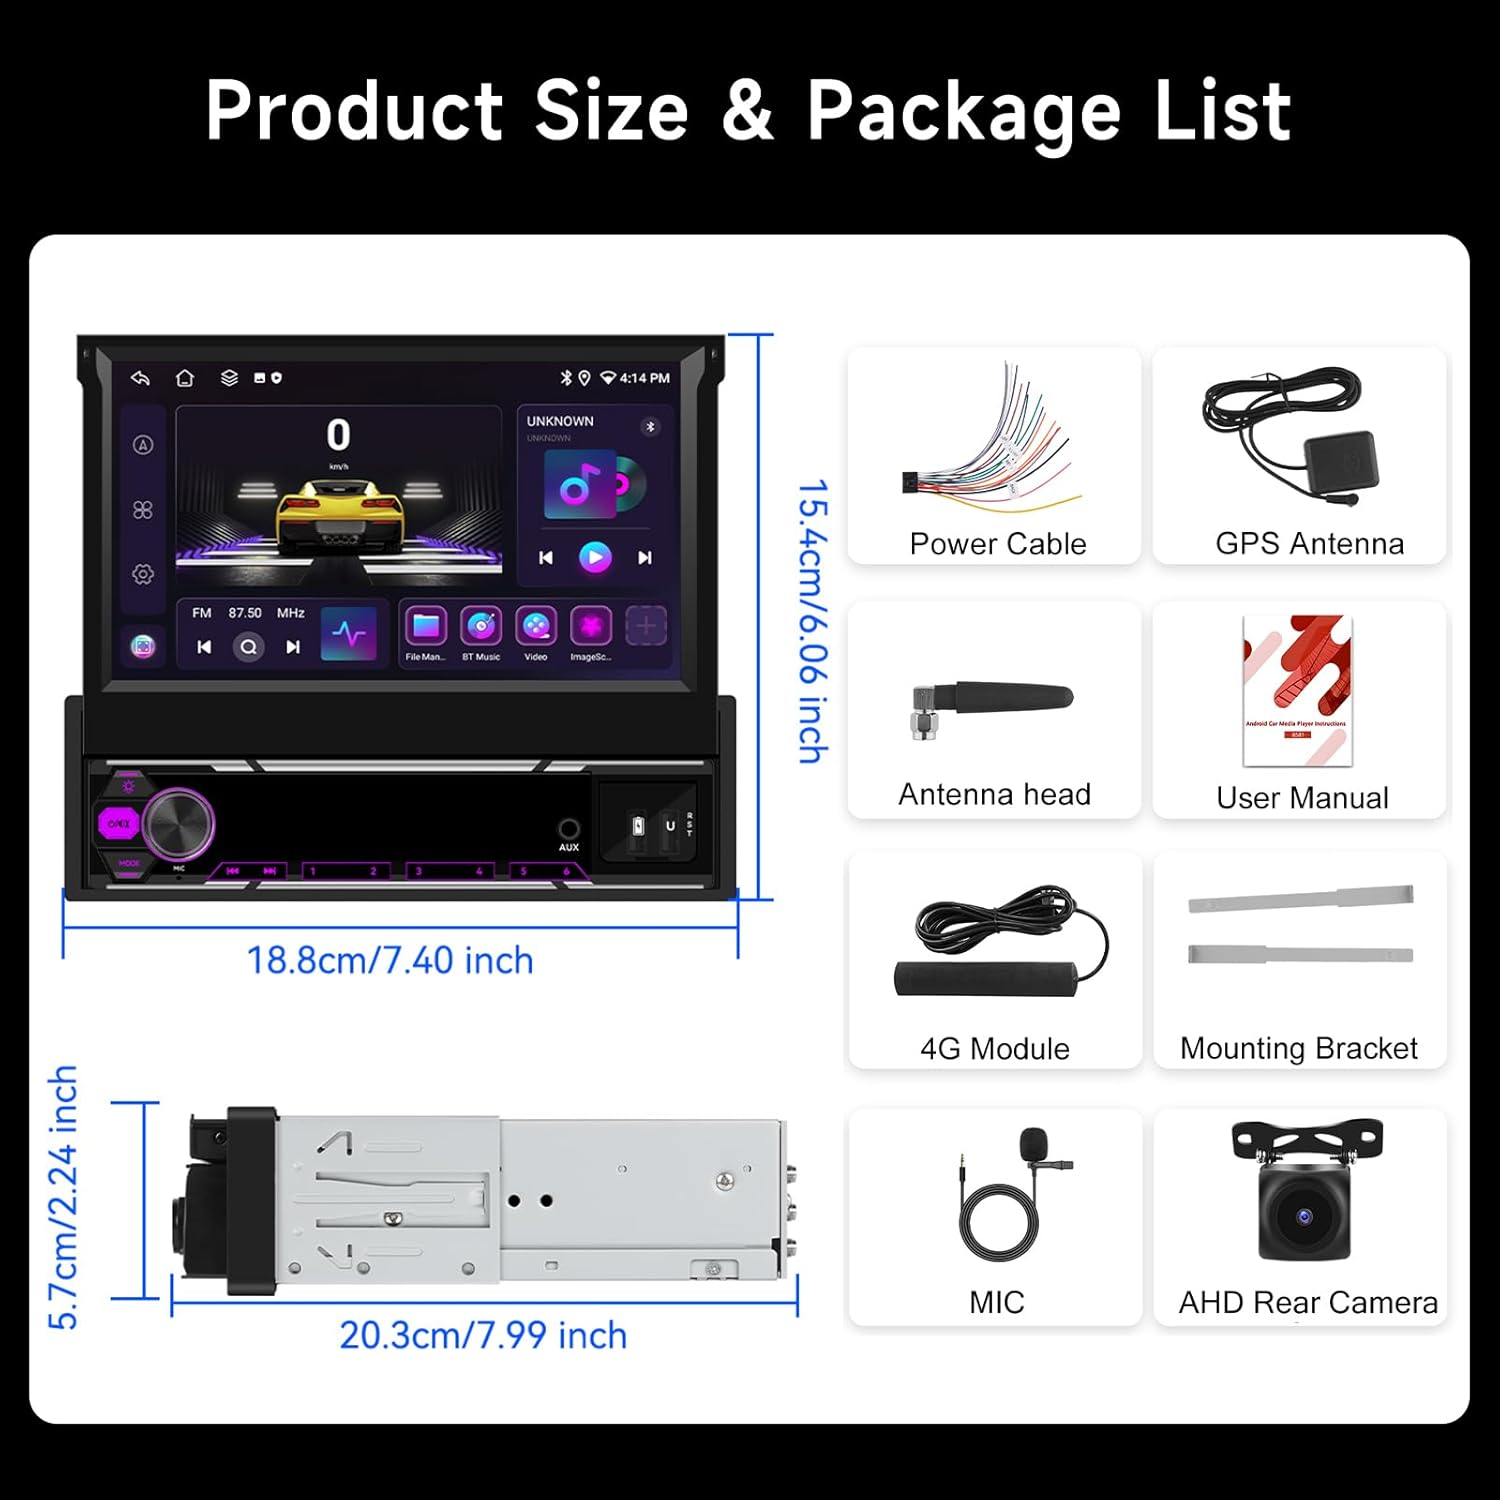
Figure 3.1: Product dimensions and included accessories.
4. Product Overview
The Hodozzy Android 15 Single Din Car Stereo features a retractable 7-inch touchscreen and a standard single DIN chassis. The front panel includes essential controls and ports.

Figure 4.1: Hodozzy Car Stereo with extended screen and accessories.
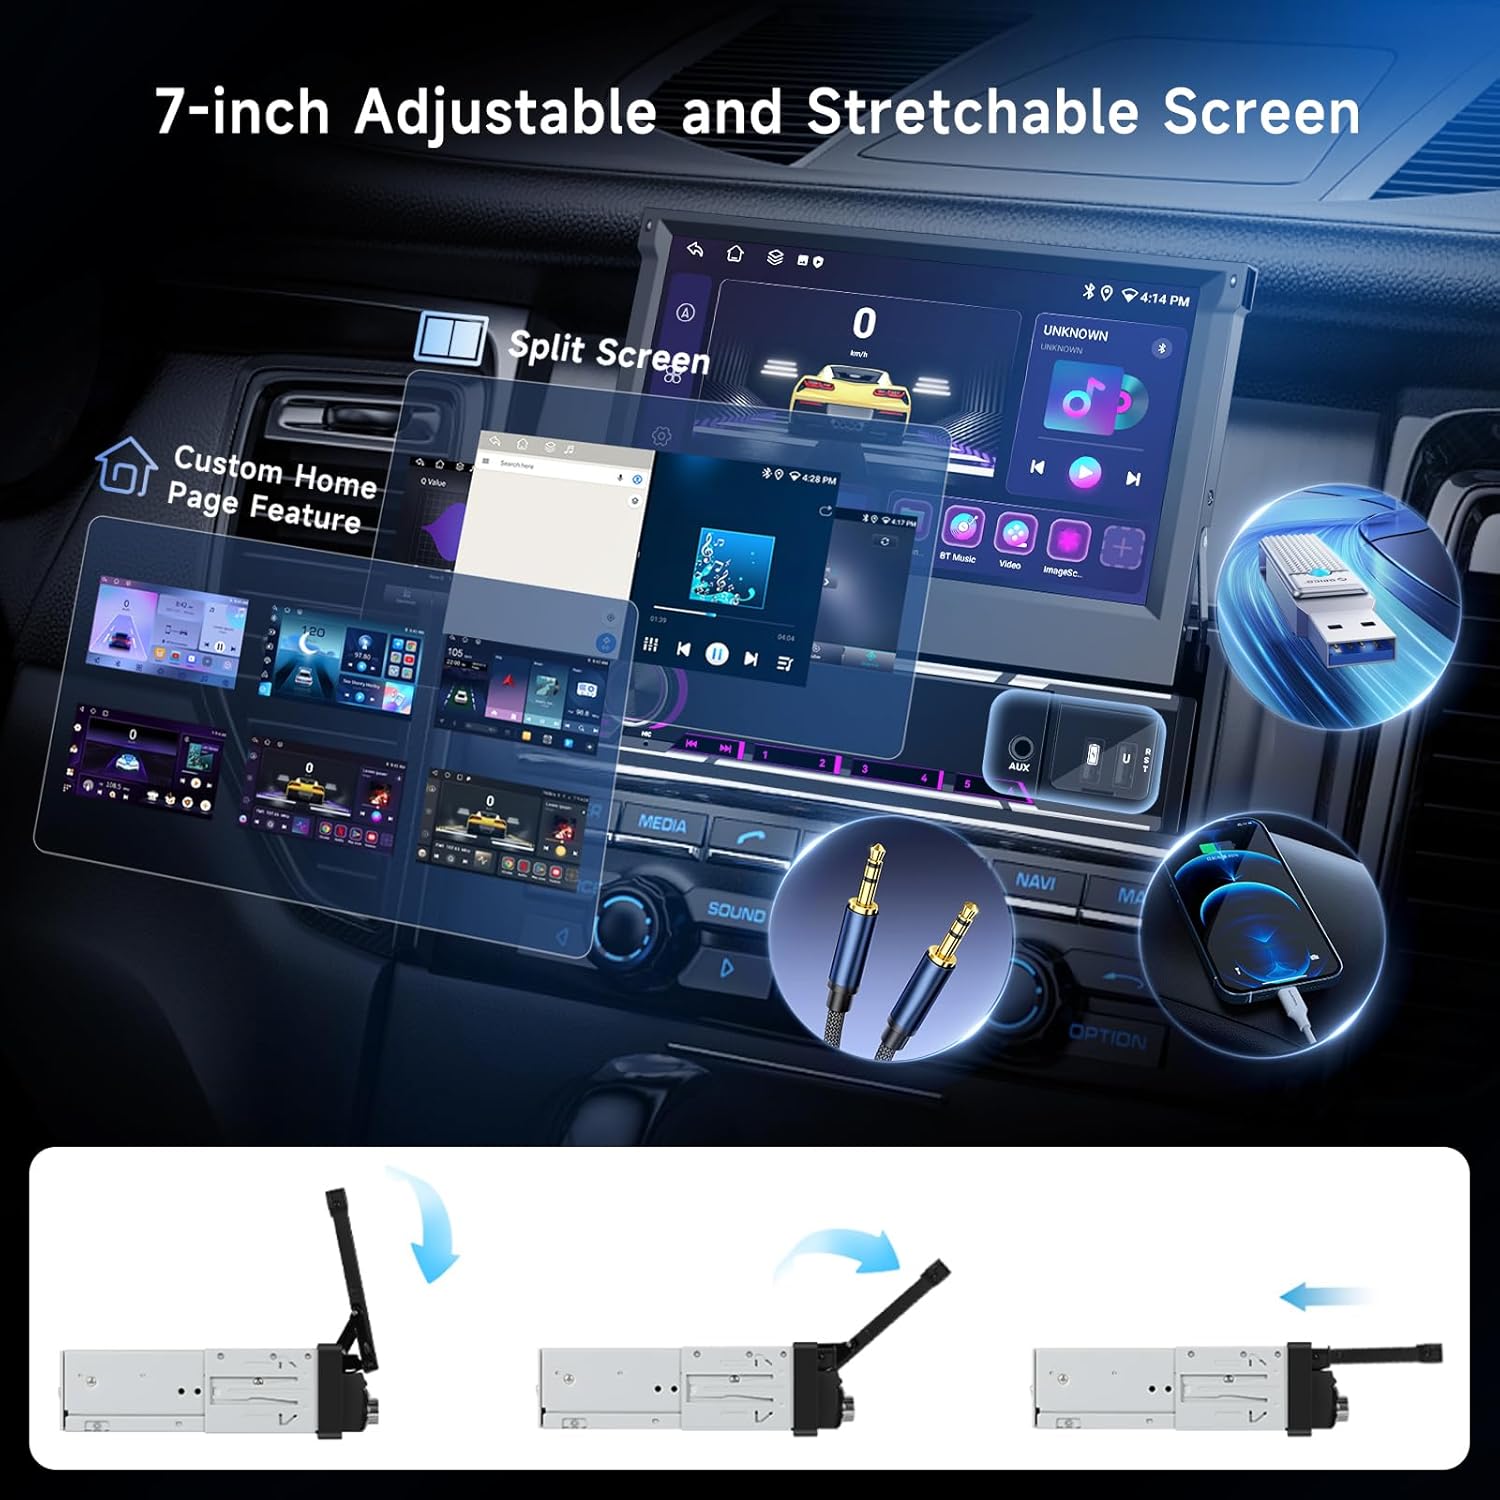
Figure 4.2: Adjustable screen features and multimedia inputs.
5. Installation
Installation of this car stereo requires technical knowledge. It is recommended to have it installed by a professional to ensure correct wiring and functionality. Refer to the wiring diagram provided with the unit for specific connections.
5.1 Wiring Connections
- Power Connection: Connect the yellow wire to the constant 12V power supply, the red wire to the accessory (ACC) 12V power supply, and the black wire to ground.
- Speaker Connections: Connect the speaker wires according to their polarity (positive and negative) to the corresponding vehicle speakers.
- GPS Antenna: Mount the GPS antenna in a location with a clear view of the sky, typically on the dashboard or windshield.
- Rear Camera: Connect the video input from the AHD rear camera to the designated camera input on the stereo. Ensure the reverse trigger wire is connected to the vehicle's reverse light circuit.
- Steering Wheel Control (SWC): Connect the SWC wires to your vehicle's steering wheel control interface, if applicable.
5.2 Mounting
Secure the single DIN chassis into your vehicle's dashboard opening using the provided mounting brackets. Ensure the unit is firmly in place before connecting all wires.
6. Initial Setup
6.1 Powering On
After installation, turn on your vehicle's ignition. The stereo should power on automatically. If not, press the power button on the unit.
6.2 Wi-Fi Connection
- Navigate to the 'Settings' menu on the stereo.
- Select 'Network & Internet' or 'Wi-Fi'.
- Turn on Wi-Fi and select your desired network from the list.
- Enter the password if prompted and connect.
6.3 GPS Setup
The unit comes with pre-installed GPS capabilities. Ensure the GPS antenna is properly connected and positioned for optimal signal reception. You can use both online and offline navigation applications.

Figure 6.1: Wi-Fi and GPS navigation interface.
7. Operating Instructions
7.1 Touch Screen Operation
The 7-inch touchscreen supports standard touch gestures such as tap, swipe, and pinch-to-zoom for navigation and control.
7.2 Wireless CarPlay & Android Auto
Connect your smartphone wirelessly for seamless integration of CarPlay or Android Auto features.
- Ensure Bluetooth and Wi-Fi are enabled on your smartphone and the car stereo.
- On the car stereo, open the CarPlay or Android Auto application.
- Follow the on-screen prompts to pair your phone via Bluetooth. Once paired, the system will establish a Wi-Fi connection for data transfer.
- Alternatively, you can connect via USB for wired CarPlay/Android Auto.

Figure 7.1: Wireless and wired integration for CarPlay, Android Auto, and MirrorLink.
7.3 Bluetooth Functionality
Bluetooth 5.0 allows for hands-free calling and high-quality audio streaming.
- Go to the Bluetooth settings on the stereo.
- Enable Bluetooth and search for available devices.
- Select your smartphone from the list and pair.
- Once connected, you can make/receive calls and stream music.
7.4 Radio (FM/AM/RDS)
Access the Radio application to listen to FM or AM stations. RDS (Radio Data System) displays station and song information where available.
- Auto Scan: Use the auto-scan function to find and save available stations.
- Manual Tuning: Manually tune to specific frequencies.
- Presets: Save your favorite stations to preset buttons for quick access.
7.5 DSP Sound & EQ
The Digital Sound Processor (DSP) and Equalizer (EQ) allow for advanced audio customization.
- Access the 'Sound Settings' or 'DSP' app.
- Adjust equalizer bands, balance, fader, and subwoofer settings to optimize your audio experience.

Figure 7.2: DSP, Radio, and Bluetooth interfaces.
7.6 USB & AUX Input
Connect USB drives to the USB ports for media playback (audio/video) or charging devices. The AUX-in port allows connection of external audio sources.
7.7 Steering Wheel Controls (SWC)
If your vehicle supports SWC, you can program the stereo to respond to your steering wheel buttons for functions like volume control, track skipping, and call management.
- Go to 'Settings' and find 'Steering Wheel Control' or 'SWC'.
- Follow the on-screen instructions to map your vehicle's steering wheel buttons to the stereo's functions.
7.8 Split Screen Functionality
The split-screen feature allows you to run two applications simultaneously on the 7-inch display, for example, navigation and music playback.
7.9 Customizing Home Screen
Personalize your home screen by arranging app icons and widgets according to your preference.
7.10 Reversing Camera
When the vehicle is shifted into reverse gear, the stereo automatically displays the feed from the connected AHD rear camera, providing a clear view for parking and maneuvering.

Figure 7.3: Reversing camera view and steering wheel controls.
8. Maintenance
- Cleaning: Use a soft, dry cloth to clean the screen and unit. For stubborn marks, slightly dampen the cloth with water. Avoid harsh chemicals or abrasive materials.
- Software Updates: Periodically check for software updates through the system settings or the manufacturer's website to ensure optimal performance and access to new features.
- Screen Care: When retracting the screen, ensure no objects obstruct its path.
9. Troubleshooting
| Problem | Possible Cause | Solution |
|---|---|---|
| Unit does not power on | Incorrect wiring; Blown fuse; Vehicle power issue | Check power connections (constant 12V, ACC, ground). Inspect vehicle fuses. Consult a professional installer. |
| No sound | Speaker wires disconnected; Volume too low; Mute activated | Verify speaker wire connections. Increase volume. Check if mute is active. |
| GPS signal lost or inaccurate | GPS antenna obstructed or disconnected | Ensure GPS antenna has a clear view of the sky and is securely connected. |
| CarPlay/Android Auto not connecting | Bluetooth/Wi-Fi off; Phone not paired; USB cable faulty | Enable Bluetooth and Wi-Fi on both devices. Re-pair the phone. Try a different USB cable if using wired connection. |
| Rear camera not displaying | Camera not connected; Reverse trigger wire issue | Check camera video input and reverse trigger wire connection. Ensure camera is powered. |
10. Specifications
- Operating System: Android 15
- RAM: 6 GB
- ROM: 128 GB
- Display Size: 7 Inches
- Display Resolution: 1024x600
- Connectivity: Wi-Fi, Bluetooth 5.0
- Special Features: Wireless CarPlay, Android Auto, MirrorLink, FM/AM/RDS Radio, GPS Navigation, DSP Sound, Steering Wheel Control (SWC), Split Screen, Custom Home Page, Reversing Camera Support
- Included Components: Backup camera
- Mounting Type: Dashboard Mount (Single Din)
- Item Weight: Approximately 4.02 pounds
- Package Dimensions: 11.1 x 10.98 x 3.82 inches
11. Warranty and Support
For warranty information and technical support, please refer to the documentation included with your purchase or visit the official Hodozzy website. Keep your proof of purchase for warranty claims.