1. Introduction
The Generic V100 Professional OBD2 Scanner is a versatile diagnostic tool designed to assist in identifying and resolving vehicle issues. This manual provides detailed instructions for the proper use and maintenance of your V100 scanner, ensuring accurate diagnostics and efficient operation.
The V100 scanner is compatible with most vehicles manufactured after 1996, including American cars (1996+), European vehicles (2002+), and Asian vehicles (2008+). It supports multiple OBD protocols, offering a broad range of diagnostic capabilities.

Figure 1.1: The V100 OBD2 Scanner in use within a vehicle, demonstrating its compact and portable design for convenient diagnostics.
2. Safety Information
Before operating the V100 OBD2 Scanner, please read and understand all safety precautions. Failure to do so may result in injury or damage to the vehicle or scanner.
- Always perform automotive testing in a safe environment.
- Wear safety eye protection that meets ANSI standards.
- Keep clothing, hair, hands, tools, test equipment, etc., away from all moving or hot engine parts.
- Operate the vehicle in a well-ventilated work area; exhaust gases are poisonous.
- Put blocks in front of the drive wheels and never leave the vehicle unattended while running tests.
- Be extremely cautious when working around the ignition coil, distributor cap, ignition wires, and spark plugs. These components create hazardous voltages when the engine is running.
- Keep a fire extinguisher suitable for gasoline/chemical/electrical fires nearby.
- Do not connect or disconnect any test equipment while the ignition is on or the engine is running.
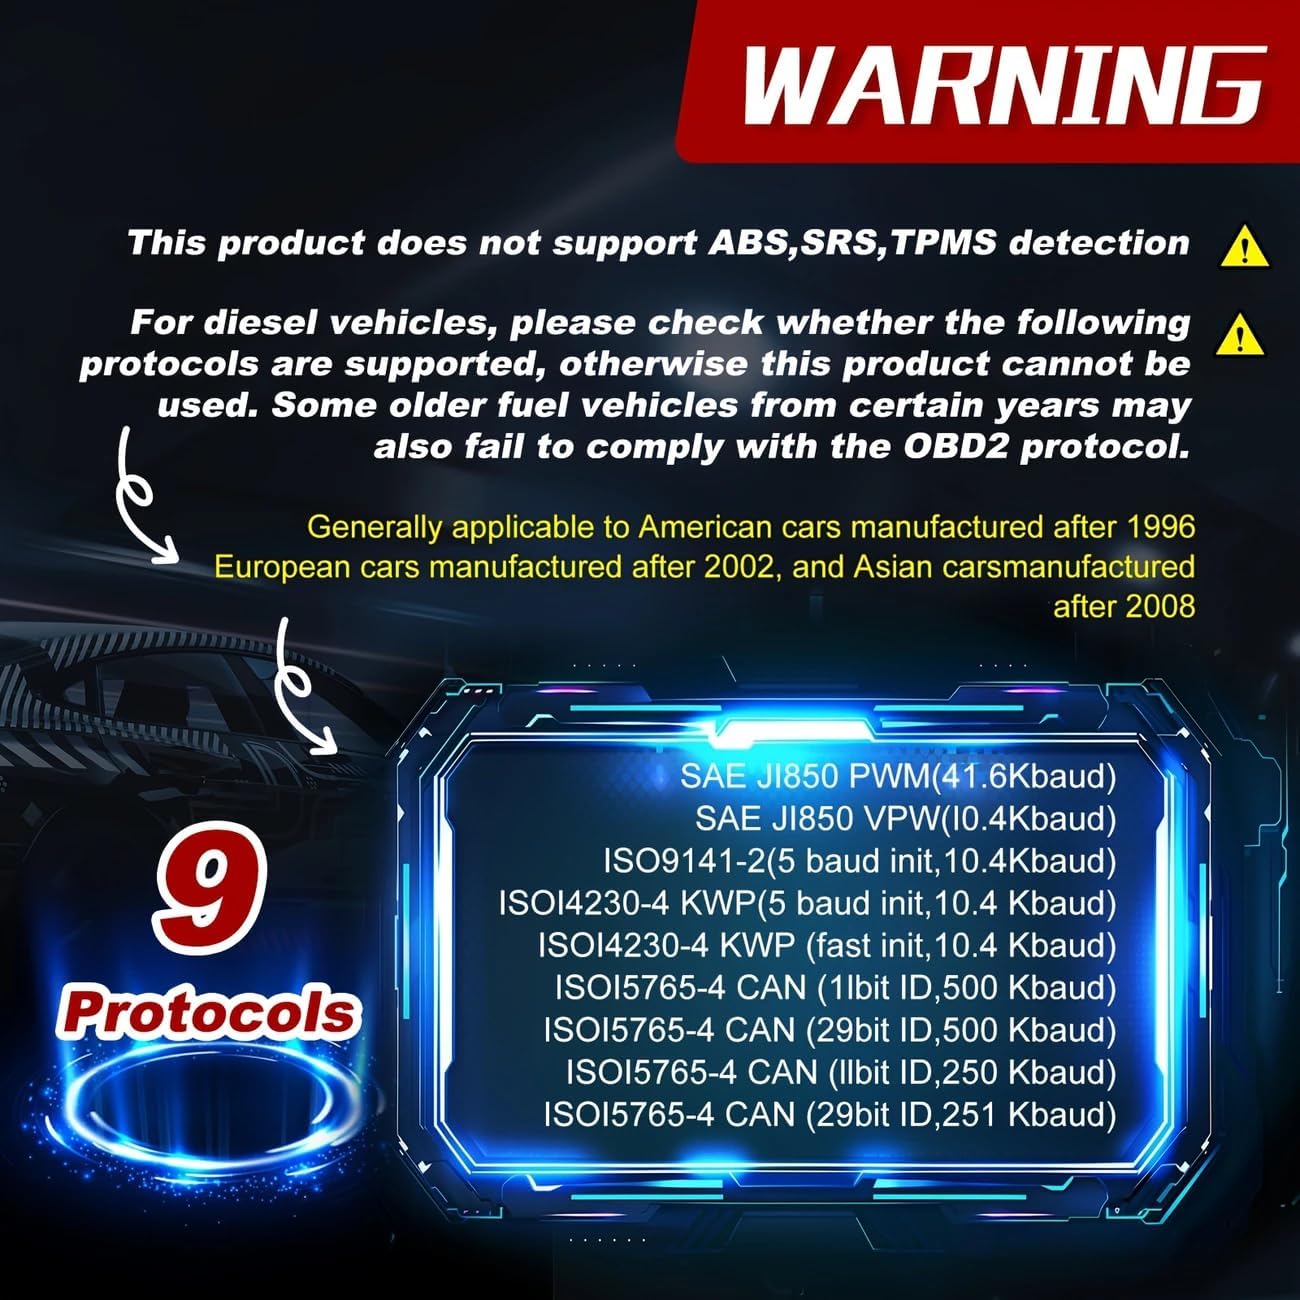
Figure 2.1: Important warning regarding the V100 scanner's limitations. This device does not support ABS, SRS, or TPMS detection. For diesel vehicles, protocol compatibility must be verified before use. Some older fuel vehicles may also fail to comply with the OBD2 protocol.
3. Product Overview
The V100 Professional OBD2 Scanner is designed for ease of use, featuring a clear LCD display and intuitive navigation buttons. It connects directly to your vehicle's OBD2 port for power and data transfer.

Figure 3.1: The V100 OBD2 Scanner displaying its main menu, including options for 'Read Codes', 'Erase Codes', 'View Freeze Frame', and 'I/M Readiness'.
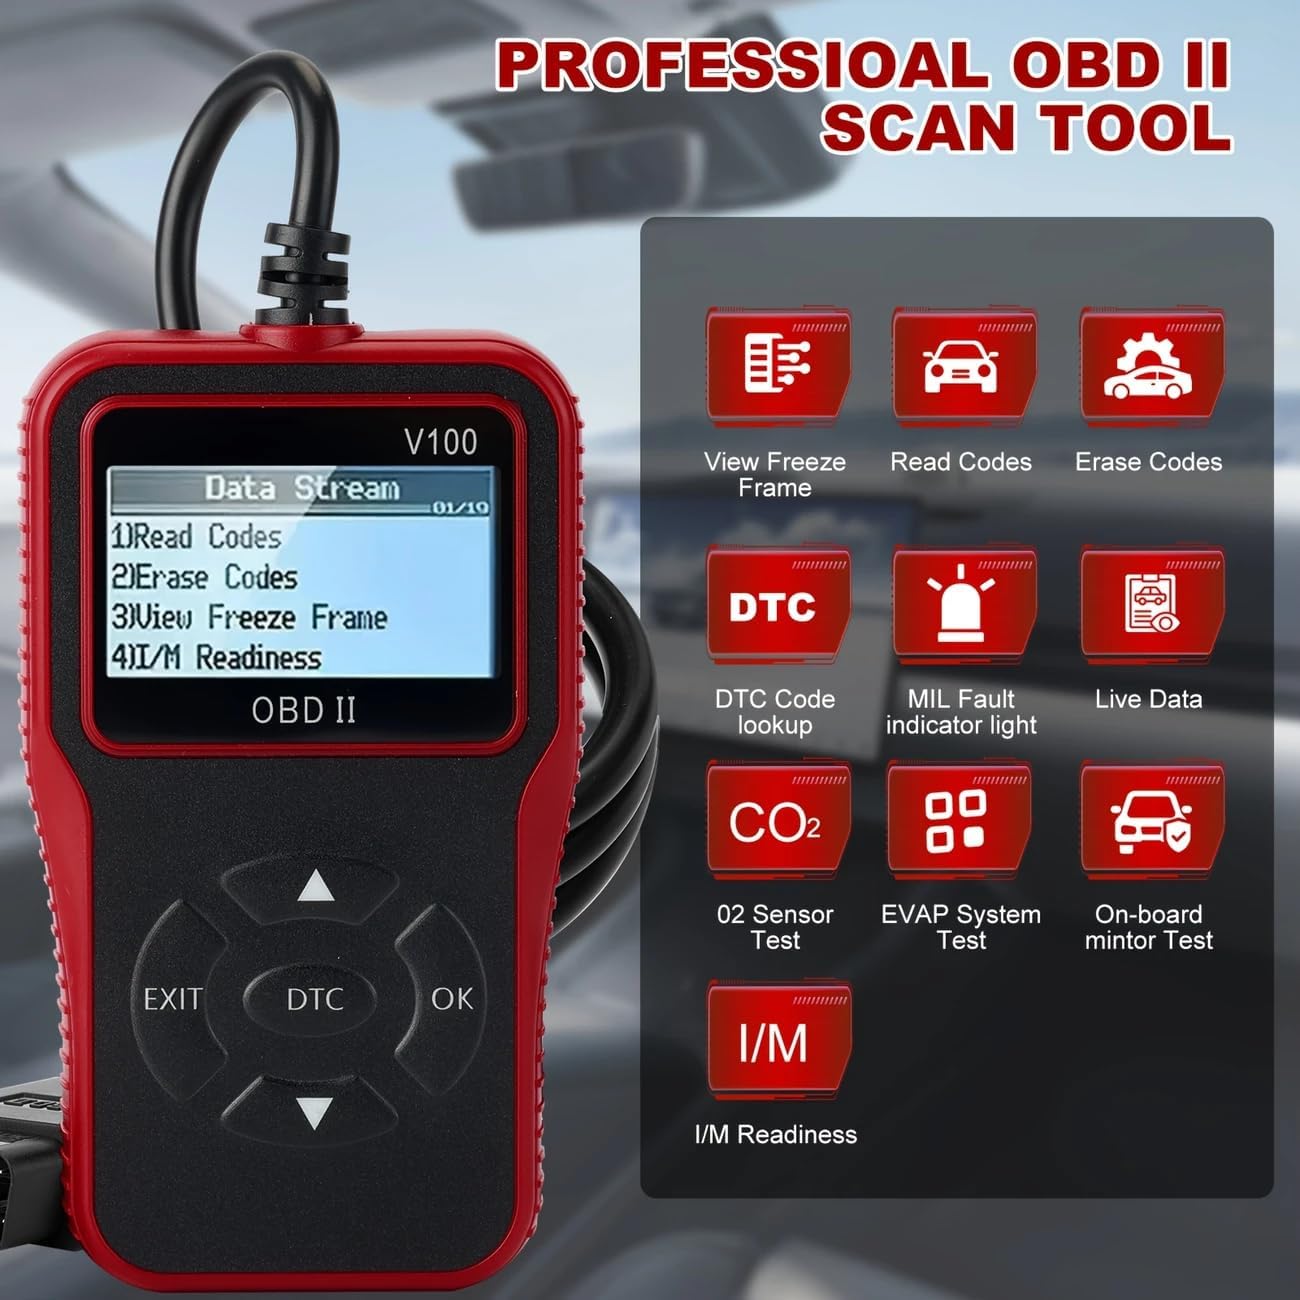
Figure 3.2: The V100 scanner's interface highlighting key diagnostic functions such as View Freeze Frame, Read Codes, Erase Codes, DTC Code Lookup, MIL Fault Indicator Light, Live Data, O2 Sensor Test, EVAP System Test, and On-board Monitor Test.
4. Setup
Setting up your V100 OBD2 Scanner is a straightforward process:
- Locate the vehicle's 16-pin Data Link Connector (DLC). This is typically found under the dashboard on the driver's side.
- Ensure the vehicle's ignition is in the OFF position.
- Firmly plug the scanner's OBD2 connector into the vehicle's DLC.
- Turn the vehicle's ignition to the ON position (engine off). The scanner will automatically power on and begin linking to the vehicle's system.
5. Operating Instructions
The V100 scanner offers several key functions accessible via its main menu:
5.1. Reading Diagnostic Trouble Codes (DTCs)
To read codes, navigate to the 'Read Codes' option on the main menu and press the 'OK' button. The scanner will display any stored, pending, or permanent DTCs, along with a brief description of each code.
5.2. Erasing Diagnostic Trouble Codes (DTCs)
After addressing a vehicle issue, you can clear the DTCs. Select 'Erase Codes' from the main menu and confirm your selection. This action will turn off the Check Engine Light (MIL) and clear all diagnostic data.

Figure 5.1: The V100 scanner's interface illustrating its capability to identify engine problems and quickly erase fault codes, thereby turning off the check engine light.
5.3. Viewing Live Data Stream
The 'Live Data' function allows you to view real-time operational parameters from the vehicle's sensors. This can be crucial for diagnosing intermittent problems or verifying repairs. Select 'Live Data' and scroll through the available parameters.
5.4. I/M Readiness Status
The I/M Readiness function checks the status of the emission-related monitoring systems. This is useful for determining if the vehicle is ready for an emissions test. A 'Ready' status indicates all monitors have completed their diagnostic cycles.
5.5. Vehicle Information
Access the 'Vehicle Info' option to retrieve important vehicle identification details, including the Vehicle Identification Number (VIN), Calibration ID, and Calibration Verification Number (CVN).

Figure 5.2: The V100 scanner's display showing various system diagnostic tools, including options to Read Codes, Clear Codes, view Live Data, and access Vehicle Info, useful for diagnosing issues like engine shut-off solenoid problems, unpleasant odors, or high intake air temperature.
5.6. Battery & Alternator Check
The scanner can also provide basic battery and alternator voltage readings. This helps in assessing the health of your vehicle's electrical system and preventing unexpected power issues.

Figure 5.3: The V100 scanner's screen indicating a battery and alternator check, allowing users to monitor the battery's readiness and the alternator's output to prevent power issues.
6. Maintenance
To ensure the longevity and optimal performance of your V100 OBD2 Scanner, follow these maintenance guidelines:
- Keep the scanner clean by wiping it with a soft, damp cloth. Do not use abrasive cleaners or solvents.
- Store the scanner in a dry, cool environment away from direct sunlight and extreme temperatures.
- Avoid dropping the device or subjecting it to strong impacts.
- Regularly check the OBD2 cable for any signs of damage (fraying, cuts, bent pins). Replace if necessary.
7. Troubleshooting
If you encounter issues while using your V100 OBD2 Scanner, refer to the following common problems and solutions:
| Problem | Possible Cause | Solution |
|---|---|---|
| Scanner does not power on. | Loose connection to DLC; Vehicle ignition not ON; Blown fuse in vehicle's OBD2 circuit. | Ensure secure connection; Turn ignition to ON; Check vehicle's fuse box for a blown fuse. |
| Linking error / Cannot connect to vehicle. | Incorrect protocol; Vehicle not OBD2 compliant; Faulty DLC connection. | Verify vehicle compatibility (post-1996); Check DLC for damage; Try on another compatible vehicle. |
| No codes found, but MIL is on. | Pending codes not yet stored; Intermittent issue. | Check 'Pending Codes' menu; Drive vehicle under various conditions to allow monitors to run. |
| Screen is blank or frozen. | Software glitch; Power interruption. | Disconnect and reconnect the scanner; If issue persists, contact support. |
8. Specifications
- Model: V100
- Brand: Generic
- Product Dimensions: 6.5"L x 4.5"W x 3"H
- Operating System: Android (Note: This refers to the internal system, not user-facing OS)
- Automotive Fit Type: Universal Fit
- Power Source: OBD-II Port Powered
- Screen Size: 2.8 Inches LCD
- Supported Protocols:
- SAE J1850 PWM (41.6 Kbaud)
- SAE J1850 VPW (10.4 Kbaud)
- ISO9141-2 (5 baud init, 10.4 Kbaud)
- ISO14230-4 KWP (5 baud init, 10.4 Kbaud)
- ISO14230-4 KWP (fast init, 10.4 Kbaud)
- ISO15765-4 CAN (11bit ID, 500 Kbaud)
- ISO15765-4 CAN (29bit ID, 500 Kbaud)
- ISO15765-4 CAN (11bit ID, 250 Kbaud)
- ISO15765-4 CAN (29bit ID, 250 Kbaud)
- Supported Languages: English, German, French, Dutch, Italian, Spanish, Chinese, Japanese, Portuguese
- What's in the Box: OBD2 Scanner

Figure 8.1: The V100 scanner's screen detailing its extensive multi-protocol support, including various SAE J1850, ISO, and CAN standards, ensuring broad vehicle compatibility.

Figure 8.2: The V100 scanner's display emphasizing its wide compatibility with vehicles manufactured after 1996 and its support for 9 different languages, making it accessible to a diverse user base.
9. Warranty and Support
For warranty information or technical support, please refer to the contact details provided with your product packaging or visit the manufacturer's official website. Keep your purchase receipt as proof of purchase for any warranty claims.


