1. Introduction
Thank you for choosing the Hansnoktech MIG-500 Pro 5-in-1 Welder. This advanced welding machine is designed for versatility and precision, offering Pulse MIG, MIG, Flux Core, Stick, and Lift TIG welding capabilities. Equipped with the ArcGenius AI system, it provides intelligent parameter management, real-time data visualization, and multi-modal human-computer interaction for an enhanced welding experience. This manual provides essential information for the safe and efficient operation, maintenance, and troubleshooting of your welding machine. Please read it thoroughly before use.
2. Safety Information
Always prioritize safety when operating welding equipment. Failure to follow safety guidelines can result in serious injury or death.
- Eye and Face Protection: Always wear a welding helmet with appropriate shade lenses to protect against arc flash and sparks.
- Body Protection: Wear flame-resistant clothing, heavy-duty gloves, and safety shoes to protect against burns and electrical shock.
- Ventilation: Ensure adequate ventilation to remove welding fumes, which can be hazardous to your health.
- Electrical Safety: Never operate the welder in wet conditions. Ensure proper grounding and inspect cables for damage before each use.
- Fire Prevention: Keep a fire extinguisher nearby. Remove flammable materials from the welding area.
- Gas Cylinders: Secure gas cylinders properly and handle them with care.
3. Product Overview
The Hansnoktech MIG-500 Pro is a robust and intelligent welding solution. Below are its key features and components.
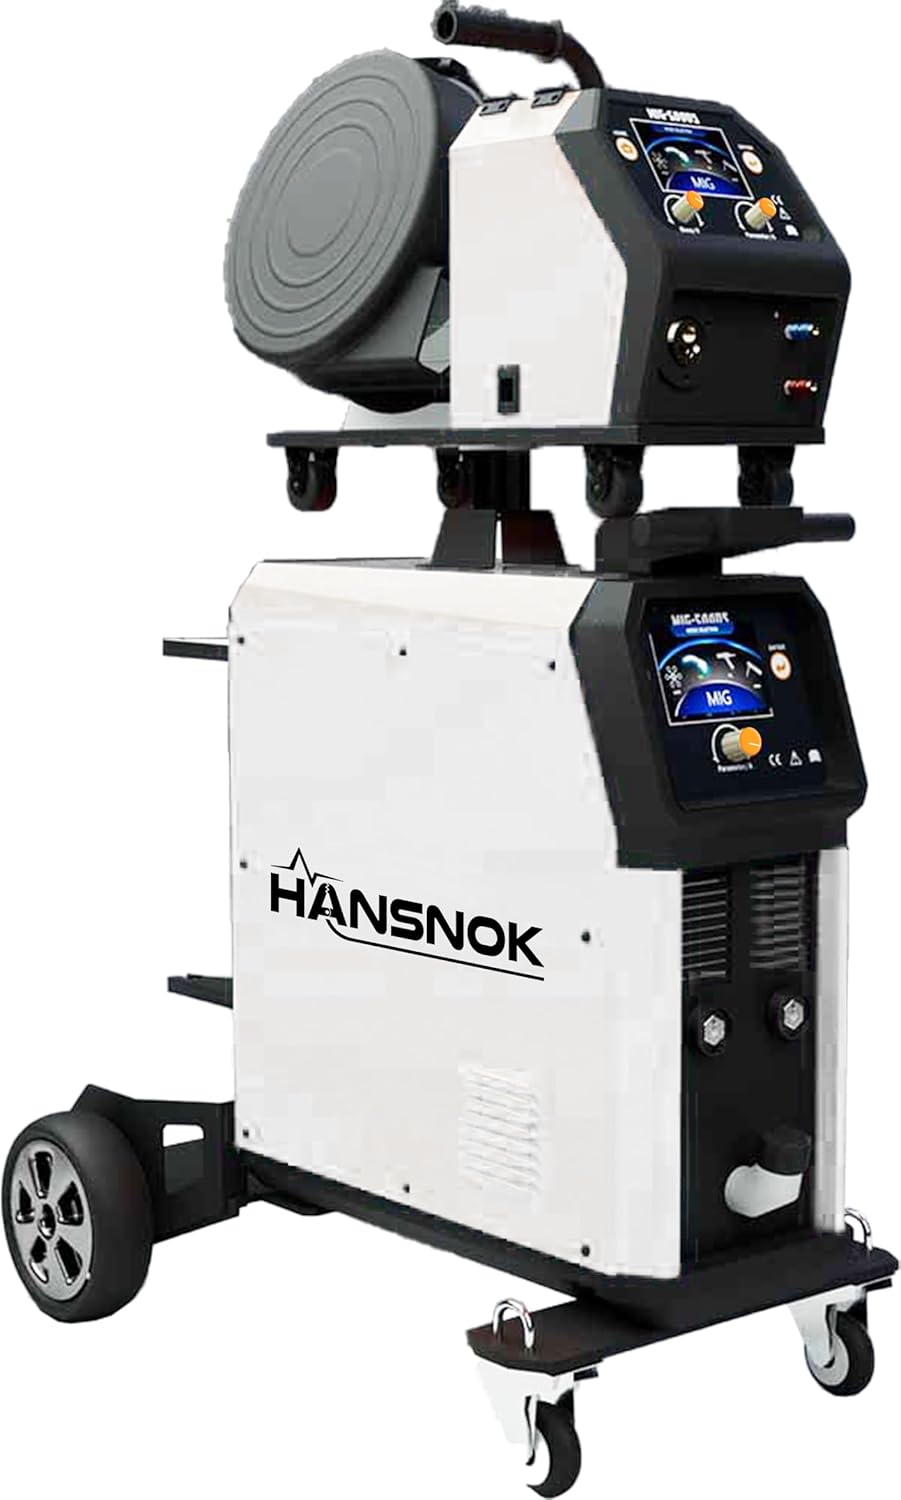
Figure 3.1: The Hansnoktech MIG-500 Pro 5-in-1 Welder, a versatile welding machine with a wire feeder unit mounted on top of the main power source, all on a wheeled cart for mobility.
3.1 Key Features
- ArcGenius AI System: Cloud-based knowledge base for welding expertise, remote parameter management, and real-time data visualization.
- Multi-modal Human-Computer Interaction: Intuitive graphical interface, text menus, and integrated voice recognition for ease of use.
- Intelligent Parameter Recommendation: AI algorithms suggest optimized welding parameters based on basic conditions.
- Personalized Parameter Database: Users can create and manage their own 'golden parameters' for specific tasks and materials.
- 5-in-1 Welding Modes: Supports Pulse MIG, MIG, Flux Core, Stick, and Lift TIG welding.
- Dual Voltage: Operates on 220V/400V power supplies.
- LCD Screen Display: Provides clear display of welding parameters and settings.

Figure 3.2: A close-up image of the ArcGenius AI system chip, highlighting the advanced technology integrated into the welder for intelligent operation and control.
4. Setup
Proper setup is crucial for safe and effective welding. Follow these steps to prepare your MIG-500 Pro welder for operation.
- Unpacking and Inspection: Carefully unpack all components. Inspect the welder and accessories for any shipping damage. Report any damage to your supplier immediately.
- Placement: Position the welder on a stable, level surface. Ensure adequate clearance around the machine for ventilation and access.
- Power Connection: Connect the welder to an appropriate 220V or 400V power supply. Ensure the power outlet is properly grounded and capable of handling the welder's power requirements.
- Gas Cylinder Connection (for MIG/Pulse MIG): Secure the shielding gas cylinder to the welder cart. Connect the gas hose from the regulator to the gas inlet on the welder. Ensure all connections are tight to prevent leaks.
- Wire Feeder Setup (for MIG/Flux Core): Install the appropriate welding wire spool into the wire feeder unit. Thread the wire through the drive rolls and into the torch liner according to the instructions in the wire feeder manual. Adjust drive roll tension.
- Torch and Ground Clamp Connection: Connect the MIG torch, TIG torch, or electrode holder to the appropriate terminals on the welder. Attach the ground clamp to the workpiece, ensuring a clean, secure connection.
5. Operating Instructions
The MIG-500 Pro offers multiple welding processes. Select the desired mode and adjust parameters using the LCD screen and controls.
5.1 General Operation Steps
- Power On: Turn on the main power switch of the welder. The LCD screen will illuminate.
- Select Welding Mode: Use the control panel to select the desired welding process (Pulse MIG, MIG, Flux Core, Stick, or Lift TIG).
- Set Parameters: Adjust welding current, voltage, wire feed speed, and other relevant parameters based on the material thickness, type, and welding process. Utilize the ArcGenius AI system for recommended settings or access your personalized parameter database.
- Test Weld: Perform a test weld on scrap material to verify settings and ensure proper arc stability and weld quality.
- Begin Welding: With proper safety gear and settings confirmed, proceed with your welding task.
- Power Off: After completing welding, turn off the welder and close the gas cylinder valve (if applicable).
5.2 ArcGenius AI System Usage
- Remote Management: Access the ArcGenius system via a central console (PC, tablet, mobile phone) to view, batch set, or fine-tune parameters of networked welding machines.
- Real-time Data Visualization: Monitor instantaneous changes in arc parameters (current, voltage) through waveform graphs on the display or connected devices.
- Voice Control: Utilize integrated voice recognition for hands-free control and setting adjustments.
- AI Parameter Recommendation: Input basic welding conditions, and the system will recommend optimized parameter combinations.
- Golden Parameters: Save and recall your preferred welding settings for recurring tasks. The system learns your habits and preferences over time.
6. Maintenance
Regular maintenance ensures the longevity and optimal performance of your MIG-500 Pro welder.
- Daily: Clean the welding torch nozzle and contact tip. Check all cables for damage.
- Weekly: Inspect the wire feeder drive rolls for wear and cleanliness. Clean the cooling fan vents to ensure proper airflow.
- Monthly: Blow out dust and debris from inside the machine using dry, compressed air. Check all electrical connections for tightness.
- Periodically: Replace worn-out consumables such as contact tips, nozzles, and liners. Have the machine inspected by a qualified technician annually.
Caution: Always disconnect the welder from the power supply before performing any maintenance or cleaning.
7. Troubleshooting
This section addresses common issues you might encounter with your MIG-500 Pro welder.
| Problem | Possible Cause | Solution |
|---|---|---|
| No power to the welder | Power cord unplugged, circuit breaker tripped, faulty power switch | Check power cord connection, reset circuit breaker, contact service if switch is faulty |
| No arc | Poor ground connection, incorrect settings, faulty torch/electrode holder | Ensure clean and secure ground connection, verify welding parameters, inspect torch/holder for damage |
| Wire feeding issues (MIG/Flux Core) | Incorrect drive roll tension, clogged liner, wrong size contact tip, tangled wire | Adjust drive roll tension, clean or replace liner, use correct contact tip, untangle wire spool |
| Poor weld quality | Incorrect parameters, improper technique, contaminated workpiece, insufficient shielding gas | Adjust settings, review welding technique, clean workpiece, check gas flow and cylinder level |
| Overheating | Exceeding duty cycle, blocked ventilation, high ambient temperature | Allow welder to cool down, clear ventilation openings, operate in a cooler environment |
If you encounter a problem not listed here or if the suggested solutions do not resolve the issue, please contact Hansnoktech customer support.
8. Specifications
Detailed technical specifications for the Hansnoktech MIG-500 Pro welder.
| Feature | Specification |
|---|---|
| Model Number | MIG-500 PRO |
| Manufacturer | HASNOKTECH |
| Item Weight | 170 pounds |
| Package Dimensions | 51.2 x 43.3 x 31.5 inches |
| Power Source | AC (220V/400V Dual Voltage) |
| Material | Iron |
| Color | Grey |
| Included Components | MIG Torch |
| ASIN | B0FGQ4FKRF |
| Date First Available | July 4, 2025 |
9. Warranty and Support
For information regarding product warranty, please refer to the documentation provided with your purchase or visit the official Hansnoktech website. For technical support, troubleshooting assistance, or to inquire about replacement parts, please contact Hansnoktech customer service. You can typically find contact information on the product packaging or the brand's official website.
Hansnoktech is committed to providing reliable products and excellent customer support. Please retain your proof of purchase for warranty claims.