Introduction
This manual provides comprehensive instructions for the Vilfet Dual Carbon Monoxide (CO) and Natural Gas (NG) Detector, Model KH218A. This device is engineered to provide early warning of dangerous levels of carbon monoxide and natural gas, enhancing safety in your home, RV, or other applicable environments. Please read this manual thoroughly before installation and use to ensure proper operation and safety.
Safety Information
Your safety is paramount. Please observe the following precautions:
- This detector is designed to detect carbon monoxide and natural gas. It is not designed to detect smoke, fire, propane, or other gases.
- Regular testing of the alarm is crucial to ensure its functionality.
- Do not block the detection ports on the device.
- Do not paint the device. Paint can clog the sensor openings and prevent the unit from functioning properly.
- This device is not a substitute for proper appliance maintenance, ventilation, or a smoke detector.
- In case of an alarm, immediately ventilate the area and investigate the source of the gas. If the alarm persists, evacuate the premises and contact emergency services.
Product Features
The Vilfet KH218A detector offers the following key features:
- 2-in-1 Detection: Integrates advanced sensors for both carbon monoxide and natural gas in a single compact unit.
- Rapid Response & Dual Alarm: Activates instantly with a loud audible alarm (≥ 85 dB) and flashing red lights when dangerous levels of CO (≥ 150 PPM) or natural gas (≥ 5% LEL) are detected.
- Energy-Saving Design: Plugs into standard 110-220V AC outlets with a standby power consumption of less than 2W.
- Long-Lasting Sensor: Equipped with a durable sensor designed for years of reliable operation.
- Versatile Application: Ideal for use in various locations including homes, RVs, hotels, kitchens, and cruise cabins.

Image: The Vilfet detector highlighting its dual sensor capabilities for carbon monoxide and natural gas, with visual indicators for sound and light alarms.
Product Components
Familiarize yourself with the components of your detector:

Image: Detailed diagram of the detector, pointing out the digital display for CO and gas concentration, self-test button, alarm speaker, red warning lights, power plug, and gas/CO detection port.
- Digital Display: Shows current CO concentration in PPM (Parts Per Million) or gas concentration in %LEL (Lower Explosive Limit).
- Self-Test Button: Used to manually test the alarm function.
- Alarm Speaker: Emits a loud audible warning during an alarm event.
- Red Warning Lights: Flashes during an alarm event for visual indication.
- Power Plug: For connecting to a standard electrical outlet.
- Gas & CO Detection Port: Area where air samples are taken for analysis. Keep clear of obstructions.
Setup and Installation
Follow these steps for proper installation:
- Unpack: Carefully remove the detector from its packaging.
- Plug In: Insert the detector into a standard 110-220V AC electrical outlet. Ensure the outlet is not controlled by a switch that could accidentally turn off power to the detector.
- Calibration: Upon first power-up, the detector will undergo an initial calibration period. This typically takes approximately 180 seconds (3 minutes). During this time, the display may show a countdown or specific indicators. Do not unplug the device during calibration.
- Test: After calibration is complete, press the 'SELF-TEST' button to confirm the alarm function. The device should emit an audible alarm and flash its red warning lights. If it does not, refer to the Troubleshooting section.
Placement Guidelines
Optimal placement is crucial for effective detection:
- Carbon Monoxide (CO): CO is slightly lighter than air and mixes readily. For CO detection, place the unit at breathing height (e.g., near a bed in a bedroom, or at eye level in a living area).
- Natural Gas (NG): Natural gas (methane) is lighter than air and rises. For natural gas detection, place the unit higher than the potential gas source, ideally near the ceiling (but not directly in a corner).
- Avoid: Do not place the detector near windows, doors, exhaust fans, air vents, or in areas with high humidity (like bathrooms directly above a shower) or extreme temperatures. Keep it away from direct sunlight.
- General Rule: For combined detection, a good compromise is to place the detector at a medium height, approximately 1.5 to 2 meters (5 to 6.5 feet) from the floor.
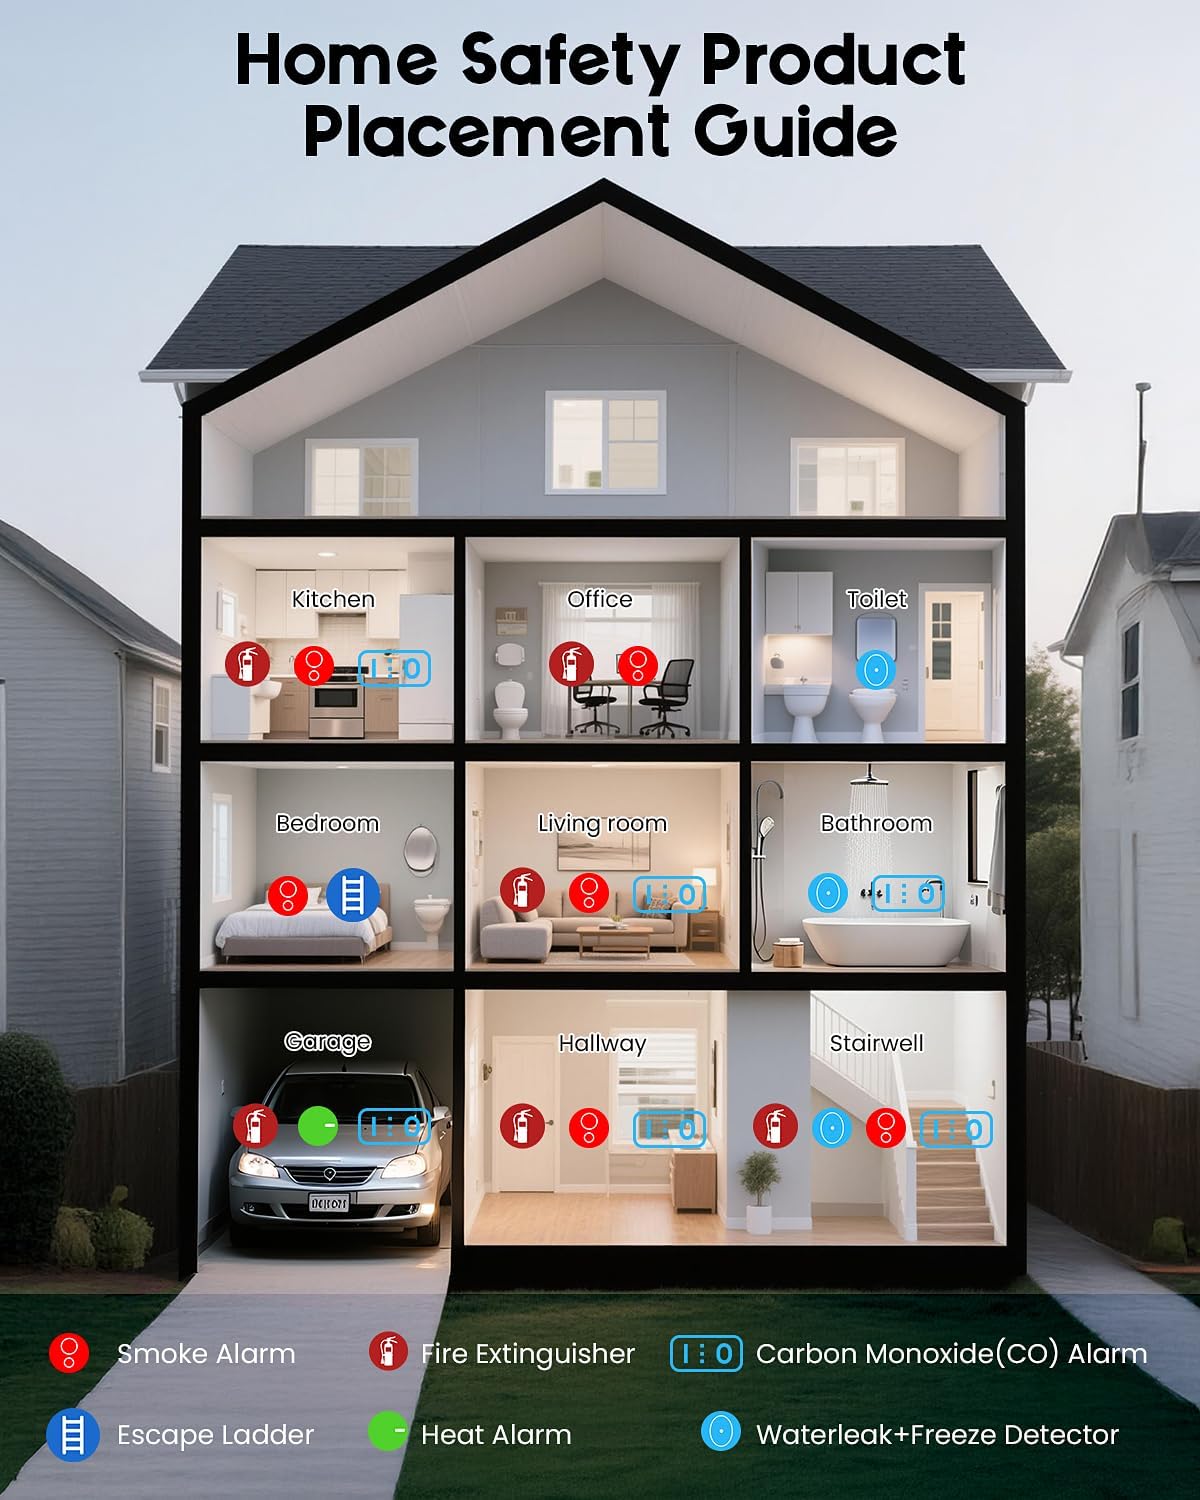
Image: A visual guide illustrating recommended placement locations for various home safety products, including CO alarms, within different rooms of a typical house.
Operating Instructions
Once installed and calibrated, the Vilfet detector operates continuously:
- Normal Operation: The digital display will typically show '0' or a low reading in a safe environment. The 'POWER' indicator light will be green.
- CO Detection: If carbon monoxide is detected, the display will show the CO concentration in PPM. If the concentration reaches or exceeds 150 PPM, the alarm will sound, and red warning lights will flash.
- Natural Gas Detection: If natural gas is detected, the display will show the gas concentration in %LEL. If the concentration reaches or exceeds 5% LEL, the alarm will sound, and red warning lights will flash.
- Alarm Response: When an alarm sounds, immediately take the following actions:
- Open windows and doors to ventilate the area.
- Turn off any gas appliances.
- Evacuate the premises if the alarm persists or if you feel unwell.
- Contact your gas provider or emergency services if a gas leak is suspected.
- Self-Test: Press the 'SELF-TEST' button periodically (e.g., weekly) to ensure the alarm and lights are functioning correctly.

Image: The detector in an alarm state, showing flashing red lights and an indication of an audible alarm exceeding 85dB, demonstrating its real-time monitoring capabilities.

Image: A detailed view of the detector's visual and audible alarm system, featuring the digital display and the prominent red warning lights.
Maintenance
Proper maintenance ensures the longevity and reliability of your detector:
- Regular Cleaning: Gently wipe the exterior of the detector with a soft, dry cloth to remove dust. Do not use water, cleaning sprays, or solvents, as these can damage the sensor or electronic components.
- Test Weekly: Press the 'SELF-TEST' button at least once a week to verify the alarm and lights are working.
- Keep Ports Clear: Ensure the gas and CO detection ports are free from dust, debris, or any obstructions.
- Avoid Relocation: Once installed and calibrated, avoid frequently moving the detector to prevent false alarms or requiring recalibration.
Troubleshooting
If your detector is not functioning as expected, refer to the following:
| Problem | Possible Cause | Solution |
|---|---|---|
| False Alarm | Temporary presence of gas/CO, strong fumes (e.g., cleaning products), or sensor interference. | Ventilate the area. Remove sources of fumes. If alarm persists without clear cause, evacuate and contact professionals. |
| No Alarm During Self-Test | Unit not powered, faulty sensor, or internal malfunction. | Ensure unit is securely plugged in. If still no alarm, the unit may be faulty and requires replacement. |
| FAULT Indicator Light On | Sensor malfunction or internal error. | Unplug and re-plug the unit. If the FAULT light remains on, the unit is faulty and requires replacement. |
| Power Indicator Light Off | No power to the outlet, loose connection, or internal power failure. | Check the electrical outlet with another device. Ensure the detector is firmly plugged in. If power is present and light is off, the unit is faulty. |
Specifications
- Model Number: KH218A
- Power Supply: 110-220V AC
- Standby Power Consumption: < 2W
- Alarm Volume: ≥ 85 dB
- Carbon Monoxide Alarm Threshold: ≥ 150 PPM
- Natural Gas Alarm Threshold: ≥ 5% LEL
- Material: ABS
- Dimensions: 13.89 x 11.1 x 6.81 cm
- Weight: 159 g
Warranty and Support
For warranty information, technical support, or service inquiries, please contact the manufacturer or your point of purchase. Keep your purchase receipt as proof of purchase.