ANJIELO SMART 60220S-2W+67010W-2W
ANJIELO SMART 2-Wired Video Intercom System User Manual
Model: 60220S-2W+67010W-2W
1. Introduction
This manual provides detailed instructions for the installation, operation, and maintenance of your ANJIELO SMART 2-Wired Video Intercom Apartment System. Please read this manual thoroughly before installation and use to ensure proper functionality and safety.
2. Package Contents
Verify that all components are present in the package:
- 1 x Intercom Panel (Doorbell)
- 2 x 7-Inch Touch Monitors
- 1 x Power Supply
- 1 x 32GB Micro SD Card
- RFID Badges (Quantity as supplied)
- Mounting Screws and Anchors
- User Manual (This document)
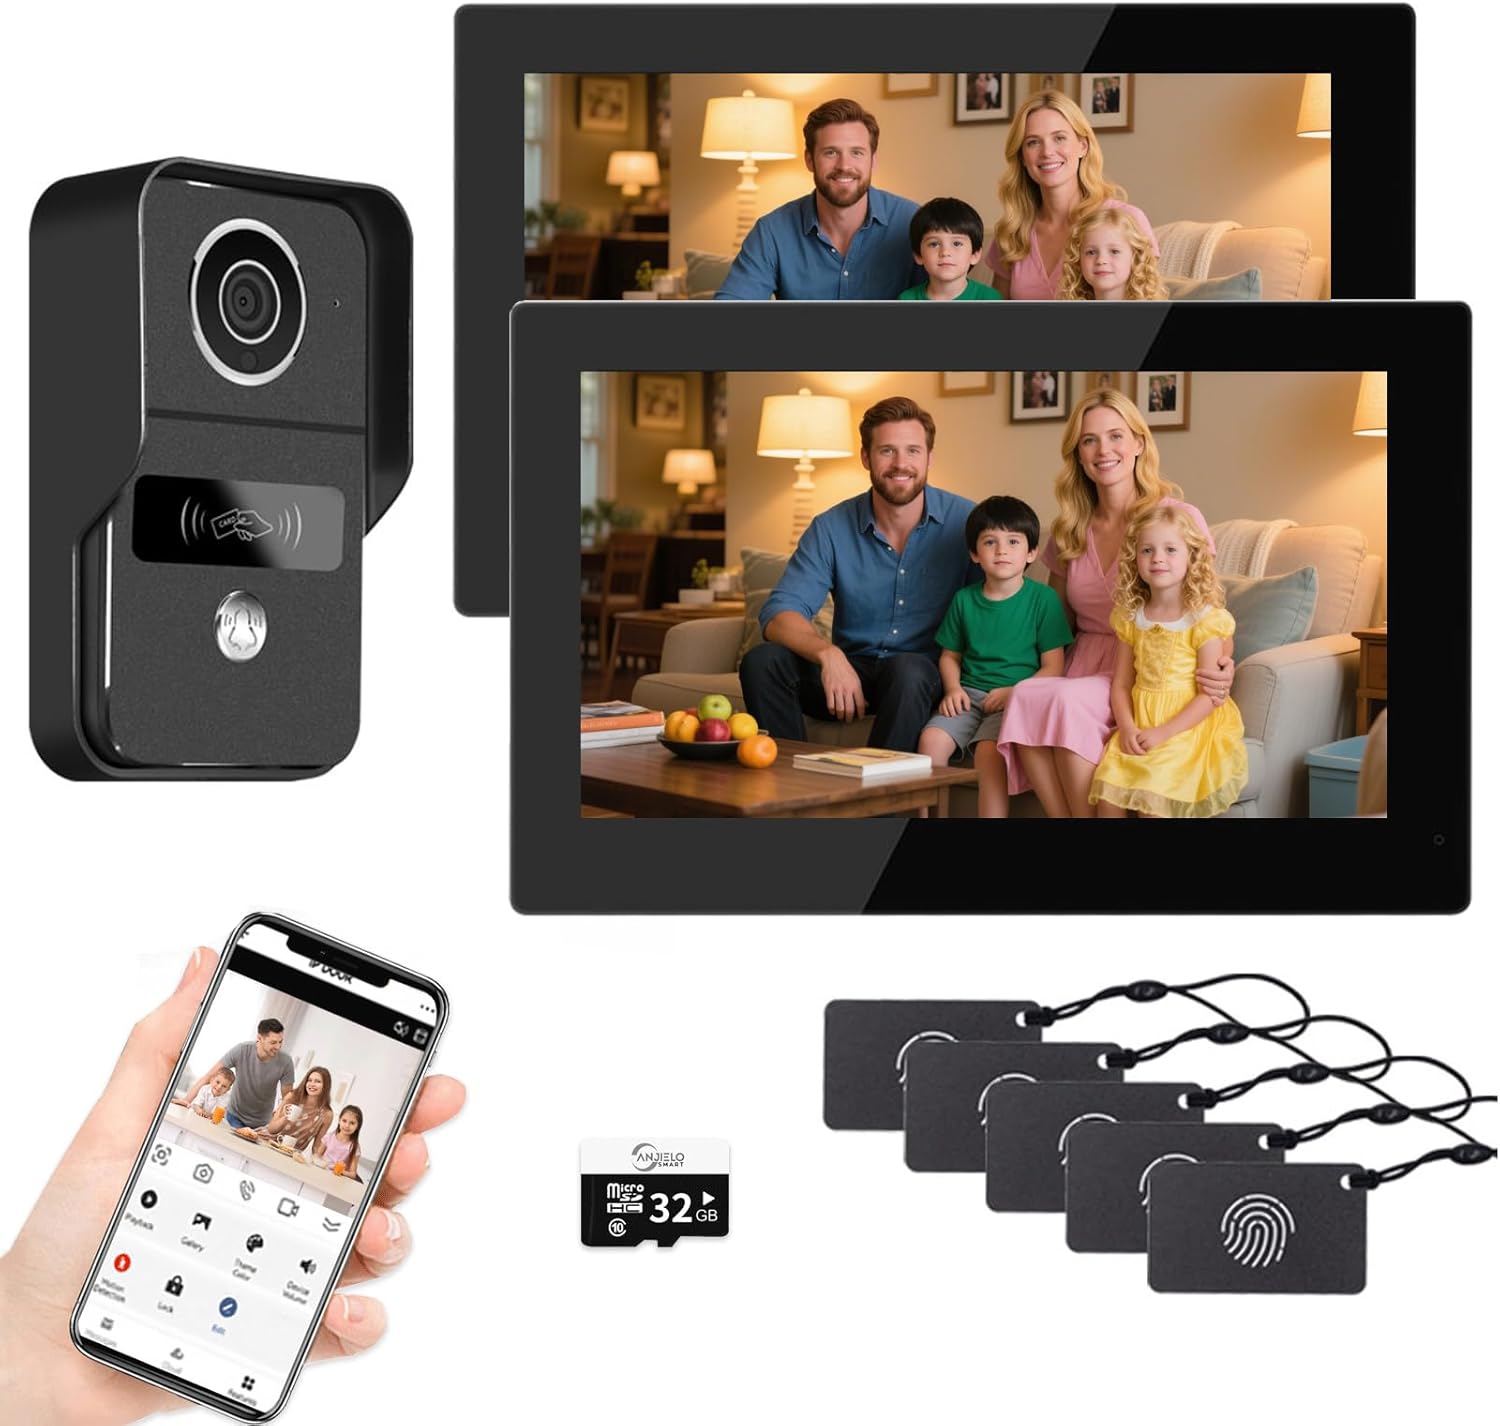
Image 1: Overview of the ANJIELO SMART 2-Wired Video Intercom System components. This includes the outdoor doorbell unit, two indoor 7-inch touch monitors, a smartphone displaying the Tuya app interface, a 32GB Micro SD card, and several RFID key fobs for access control.
3. Specifications
3.1. Monitor Specifications
- Screen: 7-inch 1024x600px IPS touch screen
- Storage: Micro SD card class 10, up to 512GB (32GB included)
- Connectivity: 2.4 GHz WiFi (IEEE 802.11 b/g/n)
- Current Consumption: 150mA
- Power Consumption: 3.5W
- Dimensions: 119 (h) x 188 (w) x 18.5 (d) mm
- Video Decoding: H.264
- Features: Photo/video capture, dual lock/gate control, human detection, weather display, inter-monitor communication, video recording on human detection or call.
3.2. Intercom Panel (Doorbell) Specifications
- Camera: CMOS color sensor, 2 Megapixels
- Viewing Angle: Horizontal ~130°, Diagonal ~165°
- Current Consumption: 220mA
- Power Consumption: 5.5W
- Night Vision: IR CUT with 4 IR LEDs
- Image Enhancement: Wide dynamic range, distortion correction
- Detection: Human detection with settable motion zones
- Access Control: RFID 13.56MHz, up to 100 badges
- Environmental Rating: IP54
- Operating Temperature: -30°C to +70°C
- Dimensions: 145 (h) x 92 (w) x 39 (d) mm
3.3. App Integration (Tuya Smart / Smart Life)
- Compatibility: Tuya Smart or Smart Life App
- Users: Supports up to 20 App users
- Features: Remote communication with visitors, photo/video capture, monitoring, remote unlock (lock and gate), cloud storage, video recording on human detection or call.
3.4. System Connectivity
- Wiring: 2-wire, non-polarity connection between intercom panel and monitors.
- Power: 1 intercom panel and 2 monitors share one power supply.
- Camera Integration: Connect up to 24 Onvif cameras in the same LAN.

Image 2: Technical drawing illustrating the dimensions of the outdoor doorbell unit and the indoor 7-inch IPS touchscreen monitor. Measurements are provided in millimeters for installation planning.
4. Setup and Installation
Before beginning installation, ensure all power is disconnected from the installation area. Professional installation is recommended.
4.1. Wiring Diagram
The system uses a 2-wire non-polarity connection for communication and power between the doorbell and monitors. This allows for flexibility in replacing existing 4-wire intercom systems.

Image 3: Detailed wiring diagram for the intercom system. It illustrates the 2-wire connections between the outdoor doorbell panel and the indoor monitors, the power supply, and optional connections for an electronic gate, door lock, and an exit button. It also shows how to integrate with a router for ONVIF/RTSP cameras.
Note on Wiring Distance: The maximum signal transmission distance depends on the wire material and gauge. Refer to the table below for guidance:
| Wire Type | Doorbell to Monitor Distance | Monitor to Gate/Lock Distance |
|---|---|---|
| Parallel 2-core cable (D 0.3mm) | 50 m | 10 m |
| 2-core RVV (D 0.5mm) | 100 m | 15 m |
| 2-core RVV (D 0.75mm) | 120 m | 15 m |
| 2-core RVV (D 1.5mm) | 200 m | 15 m |
| Standard Category 5 cable (Twist pair) | 250 m | 20 m |

Image 4: This diagram highlights the 2-wire installation method, emphasizing its polarity protection feature. It also includes a table detailing recommended maximum wire lengths for different cable types when connecting the doorbell to monitors and monitors to gate/lock mechanisms.
4.2. Physical Installation
- Mount the Doorbell: Choose a suitable location at your entrance, typically at eye level. Use the provided mounting screws and anchors to securely attach the doorbell unit. Ensure it is protected from direct heavy rain if possible, despite its IP54 rating.
- Mount the Monitors: Install the indoor monitors in desired locations within your home. Ensure they are within reach of the 2-wire connection from the doorbell and a power outlet.
- Connect Wiring:
- Connect the 2-wire cable from the doorbell to the designated terminals on the first monitor.
- If using multiple monitors, daisy-chain them using the 2-wire connection.
- Connect the power supply to the system as per the wiring diagram.
- Connect any optional door locks, gate controls, or exit buttons to the appropriate terminals on the doorbell or monitor, following the wiring diagram.
- Power On: Once all connections are secure, connect the power supply to an electrical outlet. The system should power on.
4.3. App Setup (Tuya Smart / Smart Life)
- Download App: Search for "Tuya Smart" or "Smart Life" in your mobile device's App Store (iOS) or Google Play Store (Android) and download the application. Alternatively, scan the QR code displayed on the monitor's menu to download.
- Register/Login: Open the app and register a new account or log in with an existing one.
- Add Device: Follow the in-app instructions to add your ANJIELO SMART intercom system. This typically involves putting the monitor into pairing mode (refer to monitor settings) and connecting it to your 2.4 GHz Wi-Fi network.
- Configuration: Once connected, you can configure settings such as motion detection zones, notification preferences, and access control for additional users within the app.
5. Operating Instructions
5.1. Using the Indoor Monitor
- Answering a Call: When a visitor presses the doorbell, the monitor will ring and display the camera feed. Tap the "Answer" icon on the touchscreen to communicate.
- Monitoring: Tap the "Monitor" icon on the main screen to view the doorbell camera feed at any time.
- Unlocking: During a call or while monitoring, tap the "Unlock" icon to remotely open a connected door or gate.
- Photo/Video Capture: Tap the "Photo" or "Record" icon to capture images or video of the visitor. These are saved to the Micro SD card.
- Inter-Monitor Communication: If you have multiple indoor monitors, you can initiate a call between them for internal communication.
- Settings: Access the settings menu to adjust volume, display brightness, Wi-Fi settings, motion detection sensitivity, and review recorded media.
5.2. Using the Mobile App (Tuya Smart / Smart Life)
- Remote Notifications: Receive push notifications on your smartphone when a visitor presses the doorbell or motion is detected.
- Remote Communication: Tap the notification to open the app and communicate with the visitor in real-time, from anywhere with an internet connection.
- Remote Unlock: Use the "Unlock" function within the app to open connected doors or gates remotely.
- Live View & Recording: Access the live camera feed from the doorbell. You can manually capture photos or record videos directly from the app.
- Playback: Review recorded videos and photos stored on the Micro SD card or cloud storage (if subscribed) directly through the app.
- Motion Detection: Configure motion detection zones and sensitivity. When motion is detected, the system can automatically record video and send notifications.

Image 5: Screenshot of the mobile application interface, demonstrating the controls available to the user. These include buttons for initiating full-duplex two-way audio communication, capturing still photos, recording video, and remotely unlocking a connected door or gate.

Image 6: A smartphone displaying a series of motion detection alerts from the doorbell camera. The alerts show timestamps and thumbnail images of a person approaching the house, indicating the system's ability to detect and log activity.
5.3. RFID Access Control
- Adding RFID Badges: Refer to the monitor's settings menu or the app for instructions on how to enroll new RFID badges. Typically, this involves entering a programming mode and scanning the badge.
- Using RFID Badges: To unlock a connected door or gate, simply present an enrolled RFID badge to the designated reader area on the intercom panel.

Image 7: This image illustrates multiple ways to control access with the system. It shows a physical door exit button, an RFID key fob being used to unlock the door via the doorbell unit, a live video call displayed on the indoor monitor, and the smartphone application interface with separate controls for door and gate locks.
6. Motion Detection Configuration
The system features advanced human detection and customizable motion zones to minimize false alarms.
- Human Detection: The system is designed to differentiate between human activity and other movements like pets, insects, or car passing, reducing unnecessary alerts.
- Setting Motion Zones: Through the monitor's settings or the mobile app, you can define specific areas within the camera's view where motion detection should be active. This helps focus detection on critical entry points and ignore irrelevant areas.

Image 8: This graphic demonstrates the system's intelligent human detection feature, which aims to filter out non-human movements such as pets, insects, or vehicles. Below, a screenshot shows the user interface for defining custom motion detection zones, allowing specific areas of interest to be monitored.
7. Maintenance
- Cleaning: Use a soft, dry cloth to clean the monitor screen and doorbell camera lens. Avoid abrasive cleaners or solvents.
- Firmware Updates: Periodically check for firmware updates through the monitor's settings or the mobile app to ensure optimal performance and access to new features.
- SD Card Management: Regularly review and back up important recordings from the Micro SD card. If the card becomes full, older recordings may be overwritten. Consider replacing the SD card if performance degrades.
- Power Supply: Ensure the power supply is securely connected and free from damage.
8. Troubleshooting
| Problem | Possible Cause | Solution |
|---|---|---|
| No power to monitor/doorbell | Loose power connection, faulty power supply, no electricity. | Check all power connections. Ensure the power outlet is functional. Test the power supply if possible. |
| No video/audio from doorbell | Incorrect 2-wire connection, damaged cable, doorbell camera malfunction. | Verify 2-wire connections between doorbell and monitor. Check for cable damage. Restart the system. |
| Monitor not connecting to Wi-Fi | Incorrect Wi-Fi password, 5GHz network, weak signal, router issues. | Ensure correct 2.4GHz Wi-Fi network and password. Move monitor closer to router. Restart router. |
| App notifications not received | App permissions, notification settings, network issues, app not running in background. | Check app notification permissions on your phone. Verify app settings for notifications. Ensure phone has internet access. |
| Door/gate unlock not working | Incorrect wiring to lock/gate, faulty lock/gate mechanism, insufficient power. | Review wiring diagram for lock/gate connections. Test the lock/gate mechanism independently. Ensure adequate power supply. |
| Poor video quality | Dirty camera lens, poor lighting, network bandwidth issues. | Clean camera lens. Ensure adequate lighting. Check network speed if streaming remotely. |
9. Warranty and Support
For warranty information and technical support, please refer to the ANJIELO SMART official website or contact your retailer. Keep your purchase receipt as proof of purchase.
Manufacturer: ANJIELO SMART
Model Number: 60220S-2W+67010W-2W
Date First Available: July 4, 2025
Related Documents - 60220S-2W+67010W-2W
 |
anjielosmart HD Wireless Video Door Phone User Manual User manual for the anjielosmart HD Wireless Video Door Phone system, detailing product features, safety warnings, installation guide, setup instructions, network configuration with Tuya Smart app, device pairing, packing list, product parameters, and troubleshooting tips. |
 |
Anjielo Smart Video Intercom System - Outdoor Camera User Manual Comprehensive user manual for Anjielo Smart video intercom systems, detailing operation, installation, and specifications for outdoor camera units. Covers models 94209, 94207, and 94206-IC, including wiring, video mode selection, RFID keyfob usage, and AHD compatibility. |
 |
Anjielosmart 4-Wire Video Door Phone: User Manual and Installation Guide Comprehensive guide for the Anjielosmart 4-Wire Video Door Phone, covering installation, setup, features, packing list, and app integration with Tuya Smart for smart home security. |
 |
Anjielo Smart 4-Wire Villa Video Intercom System Indoor Monitor User Manual Comprehensive user manual for the Anjielo Smart 4-Wire Villa Video Intercom System, covering installation, operation, wiring, and specifications for the indoor monitor. Learn how to set up and use your video intercom. |
 |
Anjielo Smart 2-Wire Digital Video Intercom Kit User Manual | Installation & Features User manual for the Anjielo Smart 2-Wire Digital Video Intercom Kit (Model KW06). Covers features of the monitor and intercom panel, connectivity, app integration with Tuya Smart/Smart Life, kit contents, wiring diagrams, installation steps, monitor interface, settings, and smartphone app usage for home security and communication. |
 |
Anjielo Smart Home Video Intercom System - User Manual & Installation Guide Comprehensive guide for the Anjielo Smart Home hybrid digital-analog 4-wire video intercom system. Learn about installation, configuration, app integration with Tuya Smart/Smart Life, and troubleshooting. |
Ask a question about this manual
Ask about setup, troubleshooting, compatibility, parts, safety, or missing instructions. Manuals+ will review the question and use this page’s manual context to help answer it.