1. Introduction
The OLIGHT ArkPro is a versatile Everyday Carry (EDC) flat flashlight designed for various applications, from outdoor adventures to emergency situations. It integrates multiple light sources and configurations into a compact, durable, and user-friendly device.
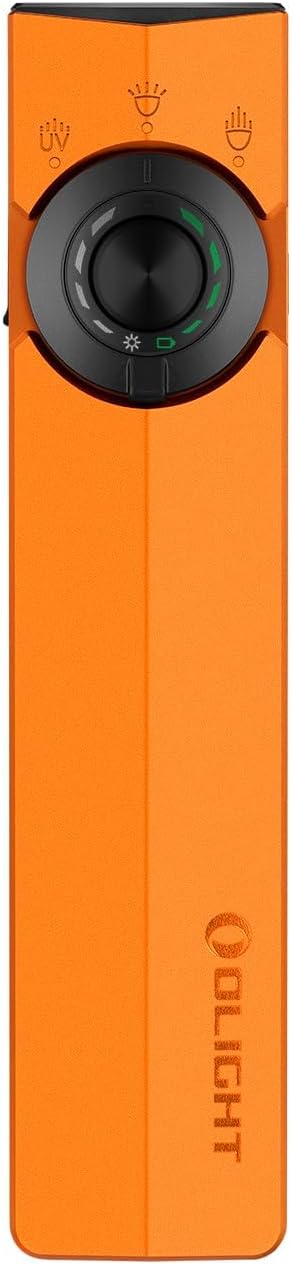
Figure 1: Front view of the OLIGHT ArkPro EDC Flat Flashlight.
2. Product Features
- Multiple Light Sources: Equipped with a 1,500-lumen floodlight, an 800-lumen long-range spotlight (205m reach), a powerful UV light, and a green beam.
- Versatile Configurations: The green beam can be independently controlled and combined with the other three light sources, offering 7 distinct lighting configurations.
- Compact and Portable: Flat design for comfortable pocket carry, built for ease of transport.
- Ergonomic Control: Features a textured side surface for secure grip, concave buttons for ease of use, and an intuitive circular selector for mode switching.
- Convenient Mounting: Includes a dual-direction clip for attachment to shirts, pockets, or hats, and a built-in magnetic base for effortless attachment to metal surfaces.
- Dual Charging Options: Supports charging via USB-C and a Magnetic Charging Cable (MCC).
- Clear Status Indicators: Color-coded indicators display brightness levels (white) and battery status (green). A lockout indicator shows when the device is in lock mode.

Figure 2: Overview of ArkPro's primary light outputs and range.

Figure 3: Visual representation of the three main light outputs.
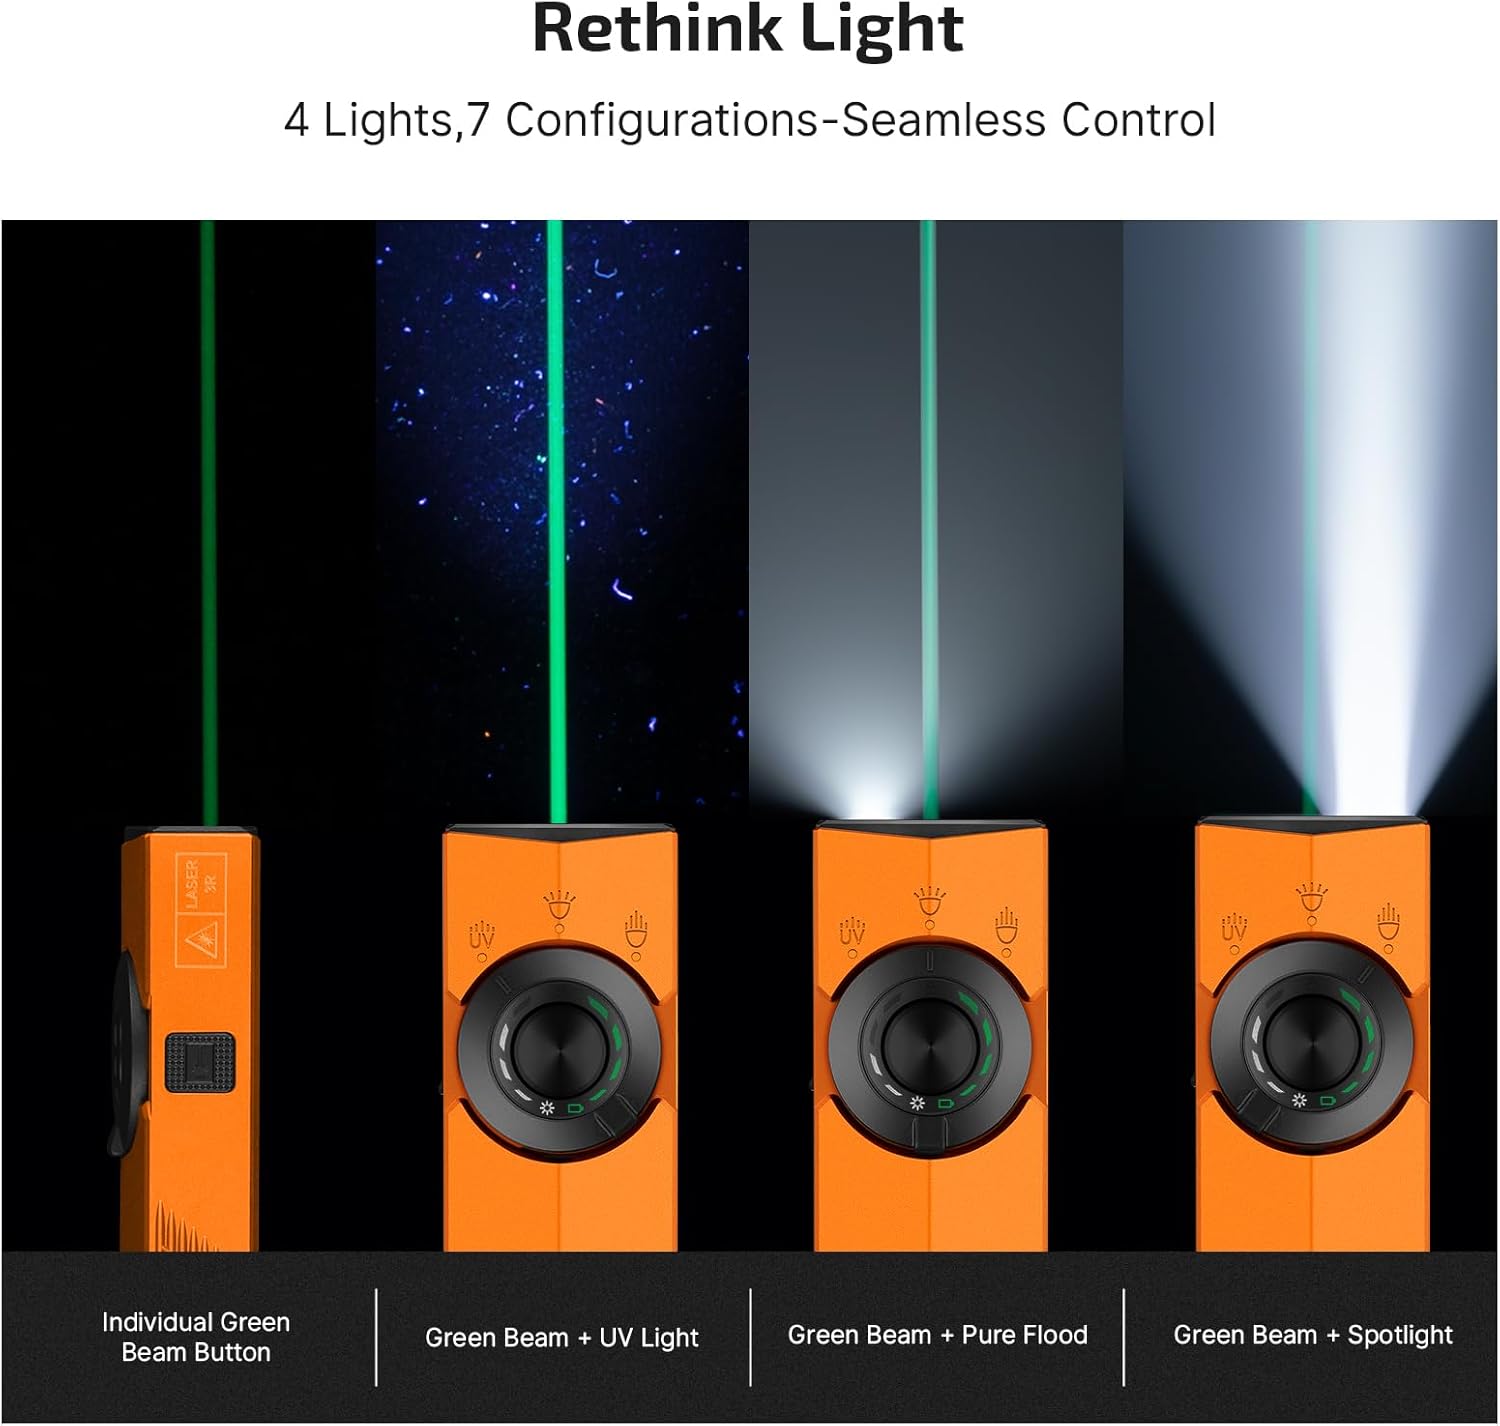
Figure 4: Illustration of the ArkPro's versatile light combinations.
3. Setup
3.1 Initial Use
Before first use, please remove any protective film from the lens and insulating film from the battery compartment. Ensure the tailcap is screwed back on tightly.
3.2 Charging
The ArkPro offers two convenient charging methods:
- USB-C Charging: Open the rubber cover on the side of the flashlight to access the USB-C port. Connect a USB-C cable (not included) to charge.
- Magnetic Charging: Attach the provided Magnetic Charging Cable (MCC) to the magnetic base of the flashlight. The magnetic connection will secure the cable for charging.
The color-coded indicators will show charging status. Green indicates sufficient charge, while red indicates low battery.

Figure 5: Dual charging options for the ArkPro flashlight.
4. Operating Instructions
4.1 Power On/Off
- To Turn On: Press the central button on the circular selector once.
- To Turn Off: Press the central button once while the light is on.
4.2 Switching White Light Modes (Floodlight/Spotlight)
Rotate the circular selector to choose between Floodlight (wide beam) and Spotlight (focused beam).
4.3 Adjusting White Light Brightness
While the white light (Floodlight or Spotlight) is on, press and hold the central button to cycle through brightness levels (Moonlight, Low, Medium, High). Release the button to select the desired brightness.
4.4 Activating UV Light
Rotate the circular selector to the UV light icon. Press the central button to turn the UV light on/off. Hold the central button to cycle between High and Low UV brightness.
4.5 Activating Green Beam
Press the dedicated green beam button located on the side of the flashlight. The green beam can be used independently or in combination with the white light or UV light.
4.6 Lockout Mode
To prevent accidental activation, the ArkPro features a lockout mode. The lockout indicator will clearly show when the flashlight is in this mode. Refer to the included user manual for specific instructions on activating and deactivating lockout mode.

Figure 6: Color-coded indicators for status and lockout feature.
4.7 SOS/Strobe Mode
Triple-press the central button to activate SOS/Strobe mode. This mode provides a flashing signal for emergency situations.
5. Maintenance
- Cleaning: Regularly clean the lens and body of the flashlight with a soft, damp cloth. Avoid using abrasive materials or harsh chemicals.
- Battery Care: Charge the flashlight regularly to maintain battery health. Avoid fully discharging the battery for extended periods.
- Storage: Store the flashlight in a cool, dry place away from direct sunlight and extreme temperatures.
6. Troubleshooting
If your ArkPro flashlight is not functioning as expected, consider the following:
- No Light: Ensure the battery is charged. Check if the device is in lockout mode.
- Dim Light: The battery may be low. Recharge the flashlight.
- Intermittent Operation: Ensure the tailcap is screwed on tightly. Clean the contact points if necessary.
For further assistance, please refer to the detailed troubleshooting section in the included user manual or contact OLIGHT customer support.
7. Specifications
| Feature | Specification |
|---|---|
| Material | 6061 Aluminum Alloy |
| Max Floodlight Output | 1500 Lumens |
| Max Spotlight Output | 800 Lumens (205m) |
| Green Beam Output | ≤5mW (Class 3R) |
| UV Light Wavelength | 365 nm |
| Battery Type | 1 Nonstandard Lithium Polymer (2000mAh) |
| Max Runtime (Moonlight) | 14 Days |
| Water Resistance | IPX7 Waterproof |
| Dimensions (D x W x H) | 0.63" x 1.06" x 4.88" |
| Weight | 6.7 ounces |

Figure 7: Comprehensive performance specifications for the ArkPro.
8. What's in the Box
- OLIGHT ArkPro EDC Flat Flashlight x 1
- Magnetic Charging Cable (MCC) x 1
- User Manual x 1
9. Warranty and Support
The OLIGHT ArkPro EDC Flat Flashlight comes with a Lifetime Warranty, ensuring long-term reliability and customer satisfaction. For any product-related inquiries, technical support, or warranty claims, please visit the official OLIGHT website or contact their customer service department.
10. Media Resources
10.1 Product Images


10.2 Official Product Videos
Olight New ArkPro 1500 Lumens EDC flashlight!
Video: An overview and demonstration of the Olight ArkPro EDC flashlight's features and capabilities.
Outdoor Lights Test: Spotlight vs Floodlight in Action!
Video: A short demonstration comparing the spotlight and floodlight modes in an outdoor setting.
Field Test of the ArkPro White Light Features
Video: A brief field test showcasing the white light features of the ArkPro flashlight.


