
Introduction
Thank you for choosing the Cleyver DECT Office Mono Headset ODHW20V2. This manual provides detailed instructions for the proper setup, operation, and maintenance of your new headset. Please read this manual carefully before using the product to ensure optimal performance and longevity.
Package Contents
Please check the package contents to ensure all items are present:
- Cleyver DECT Office Mono Headset
- DECT Base Station
- Power Adapter for Base Station
- Telephone Connection Cable (RJ11)
- USB Connection Cable (Type-C to Type-A)
- User Manual (this document)
Product Overview
Headset Components
The Cleyver DECT Office Mono Headset is designed for comfortable, single-ear communication. Key components include:
- Adjustable Headband: For a secure and comfortable fit.
- Ear Cushion: Soft padding for extended wear.
- Microphone Boom: Flexible arm with an anti-snore microphone for clear voice transmission.
- Volume Controls: Buttons on the earcup for adjusting listening volume.
- Mute Button: To temporarily disable the microphone.
- Call Control Button: For answering and ending calls.
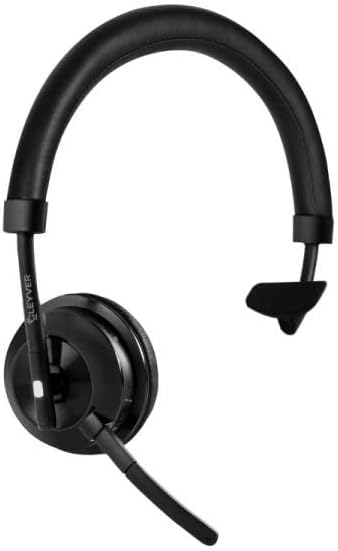
Image 1: Cleyver DECT Office Mono Headset. This image shows the mono headset with an adjustable headband, ear cushion, and a flexible microphone boom.
Base Station Components
The DECT Base Station serves as the charging dock and connection hub for your headset.
- Charging Cradle: Where the headset rests for charging.
- Power Port: For connecting the power adapter.
- Telephone Port (RJ11): For connecting to a DECT telephone.
- USB Port (Type-C): For connecting to a computer for softphone applications (if supported).
- AUX Port: Additional connection option (if available).
- Pairing Button: To initiate pairing with the headset.
- Status Indicators: LEDs to show power, charging, and connection status.
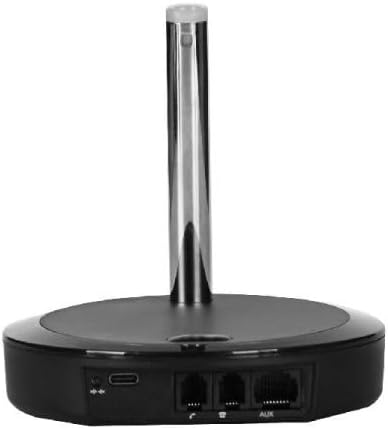
Image 2: Rear view of the Cleyver DECT Base Station. This image highlights the various connection ports including USB-C, telephone (RJ11), and AUX ports.
Setup
1. Connecting the Base Station
- Connect Power: Plug the power adapter into the base station's power port and then into a wall outlet. The power indicator LED on the base station should illuminate.
- Connect to Telephone:
- For DECT Phones: Connect one end of the telephone connection cable (RJ11) to the "TEL" port on the base station and the other end to the headset port on your DECT telephone.
- For USB Connection (Softphone): Connect the USB-C end of the USB cable to the base station's USB port and the USB-A end to an available USB port on your computer.
2. Charging the Headset
Place the Cleyver DECT Office Mono Headset into the charging cradle on the base station. Ensure it is seated correctly. The charging indicator LED on the base station should light up, indicating that the headset is charging. For first use, charge the headset for at least 2 hours.
3. Pairing the Headset with the Base Station
The headset and base station are usually pre-paired from the factory. If pairing is lost or you are setting up for the first time and the headset does not connect:
- Ensure the headset is charged and powered on.
- Press and hold the pairing button on the base station for approximately 3 seconds until the pairing indicator LED starts flashing.
- On the headset, press and hold the call control button for approximately 3 seconds until the headset's indicator light flashes rapidly.
- Once paired, the indicator lights on both the headset and base station will become solid, or flash slowly, indicating a successful connection.
Operating Instructions
Wearing the Headset
Adjust the headband for a comfortable fit. Position the microphone boom approximately 2 cm (0.8 inches) from the corner of your mouth for optimal voice pickup. The microphone boom is flexible and can be adjusted.
Power On/Off
- To Power On: Press and hold the Call Control button on the headset for approximately 2 seconds.
- To Power Off: Press and hold the Call Control button on the headset for approximately 3 seconds.
Making and Receiving Calls
- Answering a Call: When an incoming call rings, press the Call Control button on the headset.
- Ending a Call: During a call, press the Call Control button on the headset.
- Making a Call: Dial the number on your connected DECT phone or softphone. The call will automatically route to the headset once connected.
Volume Control
Use the Volume Up (+) and Volume Down (-) buttons located on the earcup of the headset to adjust the listening volume during a call or for media playback (if connected to a computer).
Mute Function
Press the Mute button on the headset to temporarily disable the microphone. Press it again to unmute. A tone or indicator light on the headset may confirm the mute status.
Maintenance
- Cleaning: Use a soft, dry cloth to clean the headset and base station. Do not use abrasive cleaners or solvents. Avoid getting moisture into any openings.
- Storage: When not in use, store the headset on its base station or in a cool, dry place away from direct sunlight and extreme temperatures.
- Battery Care: For optimal battery life, avoid fully discharging the headset frequently. Charge it regularly, especially if it will be stored for an extended period.
Troubleshooting
| Problem | Possible Solution |
|---|---|
| No sound from headset. |
|
| Microphone not working. |
|
| Headset not charging. |
|
| Cannot pair headset. |
|
Specifications
- Brand: Cleyver
- Model Number: ODHW20V2
- Connectivity: DECT, Wired (RJ11, USB-C)
- Headset Type: Mono, Over-the-head
- Microphone: Anti-snore, Noise-cancelling
- Compatibility: DECT Phones, PCs (via USB for softphones)
- ASIN: B0FGJLNGRM
Warranty and Support
Cleyver products are designed for reliability and performance. This product is covered by a standard manufacturer's warranty against defects in materials and workmanship. For specific warranty terms and conditions, please refer to the warranty card included with your purchase or visit the official Cleyver website.
For technical support, troubleshooting assistance, or to inquire about replacement parts, please contact Cleyver customer service through their official website or the contact information provided in your product packaging. Please have your model number (ODHW20V2) and proof of purchase ready when contacting support.