Introduction
Thank you for choosing SZPOWER Mini Solar Ground Lights. These lights are designed to provide efficient and aesthetic outdoor illumination for pathways, gardens, patios, and driveways. Utilizing solar power, they offer an eco-friendly and convenient lighting solution with automatic operation from dusk till dawn.
This manual provides detailed instructions for the setup, operation, maintenance, and troubleshooting of your solar ground lights to ensure optimal performance and longevity.

Image: SZPOWER Mini Solar Ground Lights installed along a garden pathway, providing ambient illumination.
Product Features
- Automatic Operation: Integrated light sensors activate lights at dusk and turn them off at dawn.
- Solar Powered: Charges fully in 4-6 hours of direct sunlight, providing 8-10 hours of illumination.
- Durable & Waterproof: IP65 rated for resistance against rain, snow, and extreme temperatures.
- Easy Installation: No wiring required; simply push into the ground.
- Low-Profile Design: Sits flush with the ground to avoid interference with lawnmowers.
- Versatile Use: Ideal for pathways, sidewalks, gardens, patios, and driveways.

Image: The solar ground light demonstrating its IP65 waterproof rating and resistance to cold, heat, and rust.
Package Contents
- 12 x SZPOWER Mini Solar Ground Lights (Cool White)
- 12 x Ground Spikes (2 per light, for assembly)
- Instruction Manual (this document)
Specifications
| Attribute | Detail |
|---|---|
| Brand | SZPOWER |
| Model | B0FGJ6Y7KX |
| Color | Cool White |
| Material | Plastic (Stainless Steel+ABS for housing) |
| Light Fixture Form | Path |
| LEDs per Light | 8 |
| Beam Angle | 120° |
| Color Temperature | 6000K |
| Waterproof Rating | IP65 |
| Charging Time | 4-6 hours (direct sunlight) |
| Lighting Duration | 8-10 hours (after full charge) |

Image: Detailed product specifications including dimensions, number of LEDs, power source, and material.
Setup and Installation
The SZPOWER Mini Solar Ground Lights are designed for quick and easy installation without the need for tools or wiring. Follow these steps:
- Activate the Light: Locate the power switch on the underside of the light unit. Slide the switch to the "ON" position.
- Assemble Ground Spikes: Each light comes with two ground spikes. Carefully attach these spikes to the designated slots on the back of the light unit. Ensure they are securely fastened.
- Select Location: Choose a location that receives at least 4-6 hours of direct sunlight daily. Avoid areas shaded by trees, buildings, or other obstructions, as this will affect charging efficiency.
- Install in Ground: With the spikes assembled, gently push the light unit into the soil until the top surface is flush with the ground. Ensure the light is stable and upright.
For best performance, allow the lights to charge for a full day in direct sunlight before their first use.
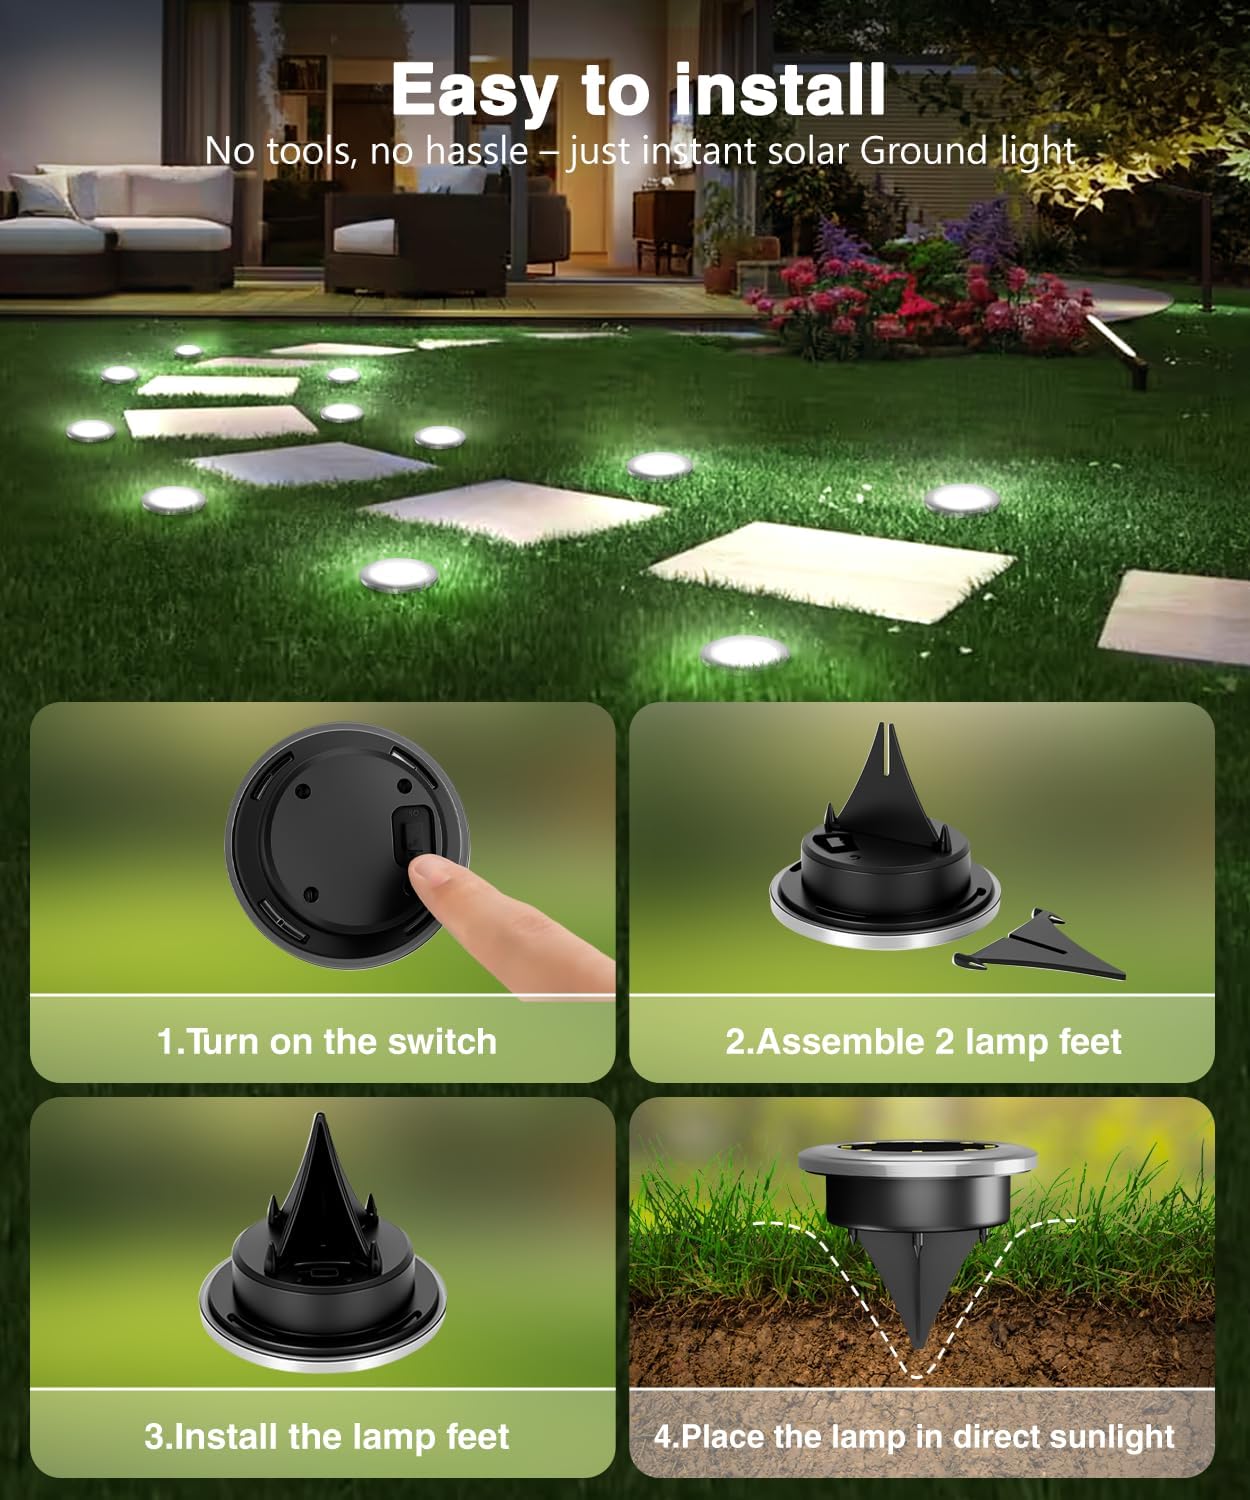
Image: Visual guide demonstrating the simple four-step installation process for the solar ground lights.
Operating Instructions
Once installed and activated, your SZPOWER Mini Solar Ground Lights operate automatically:
- Automatic Charging: During daylight hours, the integrated solar panel converts sunlight into electricity, charging the internal battery.
- Automatic Illumination: At dusk, the built-in light sensor detects the decrease in ambient light and automatically turns on the LEDs.
- Automatic Shut-off: At dawn, as ambient light increases, the sensor will turn off the LEDs and resume charging.
- Duration: A full charge (4-6 hours of direct sunlight) provides approximately 8-10 hours of continuous illumination. Performance may vary based on weather conditions and seasonal sunlight availability.

Image: Illustration of the solar light's daily cycle: charging during the day and illuminating at night.
Maintenance
To ensure the longevity and optimal performance of your solar ground lights, follow these simple maintenance guidelines:
- Clean Solar Panel: Regularly wipe the solar panel surface with a soft, damp cloth to remove dust, dirt, leaves, or snow. A clean panel ensures maximum sunlight absorption and charging efficiency.
- Clear Obstructions: Ensure no foliage, debris, or other objects are shading the solar panel during daylight hours.
- Seasonal Storage: If storing the lights for an extended period, turn them off and store them in a dry place. It is recommended to fully charge them before storage and recharge them every few months to maintain battery health.
- Battery Replacement: While the internal battery is designed for long-term use, its capacity may decrease over time. If the light duration significantly shortens after several years, the battery may need replacement. Consult the manufacturer for compatible replacement batteries.
Troubleshooting
If your solar ground lights are not functioning as expected, try the following troubleshooting steps:
- Light Does Not Turn On:
- Ensure the power switch on the underside of the light is in the "ON" position.
- Verify the light is placed in a location that receives ample direct sunlight (4-6 hours daily).
- Check if the solar panel is clean and free from dirt or obstructions.
- Test the light in a completely dark environment to ensure the light sensor is not detecting ambient light.
- Light Duration is Short:
- The lights may not be receiving enough direct sunlight to fully charge. Relocate them to a sunnier spot.
- Clean the solar panel to improve charging efficiency.
- Cloudy weather or shorter winter days will naturally reduce charging time and subsequent illumination duration.
- If the lights are several years old, the internal battery may be nearing the end of its lifespan and may require replacement.
- Light Flickers:
- This could indicate a low battery charge. Allow the light to charge for a full day in direct sunlight.
- Ensure connections are secure (if applicable, though these are sealed units).
Warranty and Support
For warranty information or technical support, please refer to the product packaging or contact SZPOWER customer service directly through the retailer where the product was purchased. Please have your model number (B0FGJ6Y7KX) and purchase date available when contacting support.