
Relybo GT221
Relybo GT221 High-Power Rechargeable LED Flashlight User Manual
Model: GT221
1. Introduction
Thank you for choosing the Relybo GT221 High-Power Rechargeable LED Flashlight. This manual provides detailed instructions for the safe and efficient use of your new flashlight. Please read it thoroughly before operation and retain it for future reference.

Image 1: Relybo GT221 LED Flashlight. This image shows the flashlight itself, highlighting its robust design and the digital display.
2. Package Contents
Please verify that all items listed below are included in your package:
- 1 x Relybo GT221 Rechargeable USB Flashlight
- 1 x Rechargeable Battery
- 1 x USB-C Charging Cable
- 1 x Lanyard
- 1 x Battery Holder and Battery Tube
- 1 x Gift Box (Packaging)
- 1 x Instruction Manual

Image 2: Package Contents. This image displays all items included in the Relybo GT221 flashlight package, such as the flashlight, battery, charging cable, lanyard, and manual.
3. Product Overview
The Relybo GT221 flashlight features advanced technology for powerful and versatile illumination. Key components and features include:
- XHM100 Chip: Delivers an extremely bright, uniform, and highly penetrating light beam.
- Variable Focus Design: Allows adjustment between a wide floodlight for illuminating areas up to 280 square meters and a focused spotlight for objects over 1600 meters away.
- Dual Switch System: Separate switches for different lighting modes and functions.
- Continuous Dimming: Adjust brightness smoothly from 500 to 1,000,000 lumens.
- Digital LCD Display: Shows real-time battery charge level.
- USB-C Charging Port: Supports various charging methods and can act as a power bank for mobile devices.
- Durable Construction: Made from aluminum alloy, resistant to pressure and impact.
- IPX6 Waterproof Rating: Suitable for use in complex outdoor environments.

Image 3: Exploded View of Relybo GT221. This diagram illustrates the internal components and durable construction, including the double switch, LCD indicator, gold-plated spring, advanced P9 lamp beads, and light transmission lens.
4. Setup
4.1 Battery Installation
- Remove the protective film covering the battery.
- Unscrew the rear cover of the flashlight.
- Distinguish between the positive (+) and negative (-) poles of the battery.
- Insert the battery correctly into the flashlight, ensuring the positive end faces the head of the flashlight.
- Tighten the rear cover of the flashlight securely.

Image 4: Battery Installation Guide. This image provides a step-by-step visual guide for correctly installing the rechargeable battery into the flashlight.
4.2 Initial Charging
Before first use, fully charge the flashlight battery. Connect the provided USB-C cable to the flashlight's charging port and to a compatible USB power source (e.g., wall charger, car charger, computer USB port). The LCD display will show the charging progress.
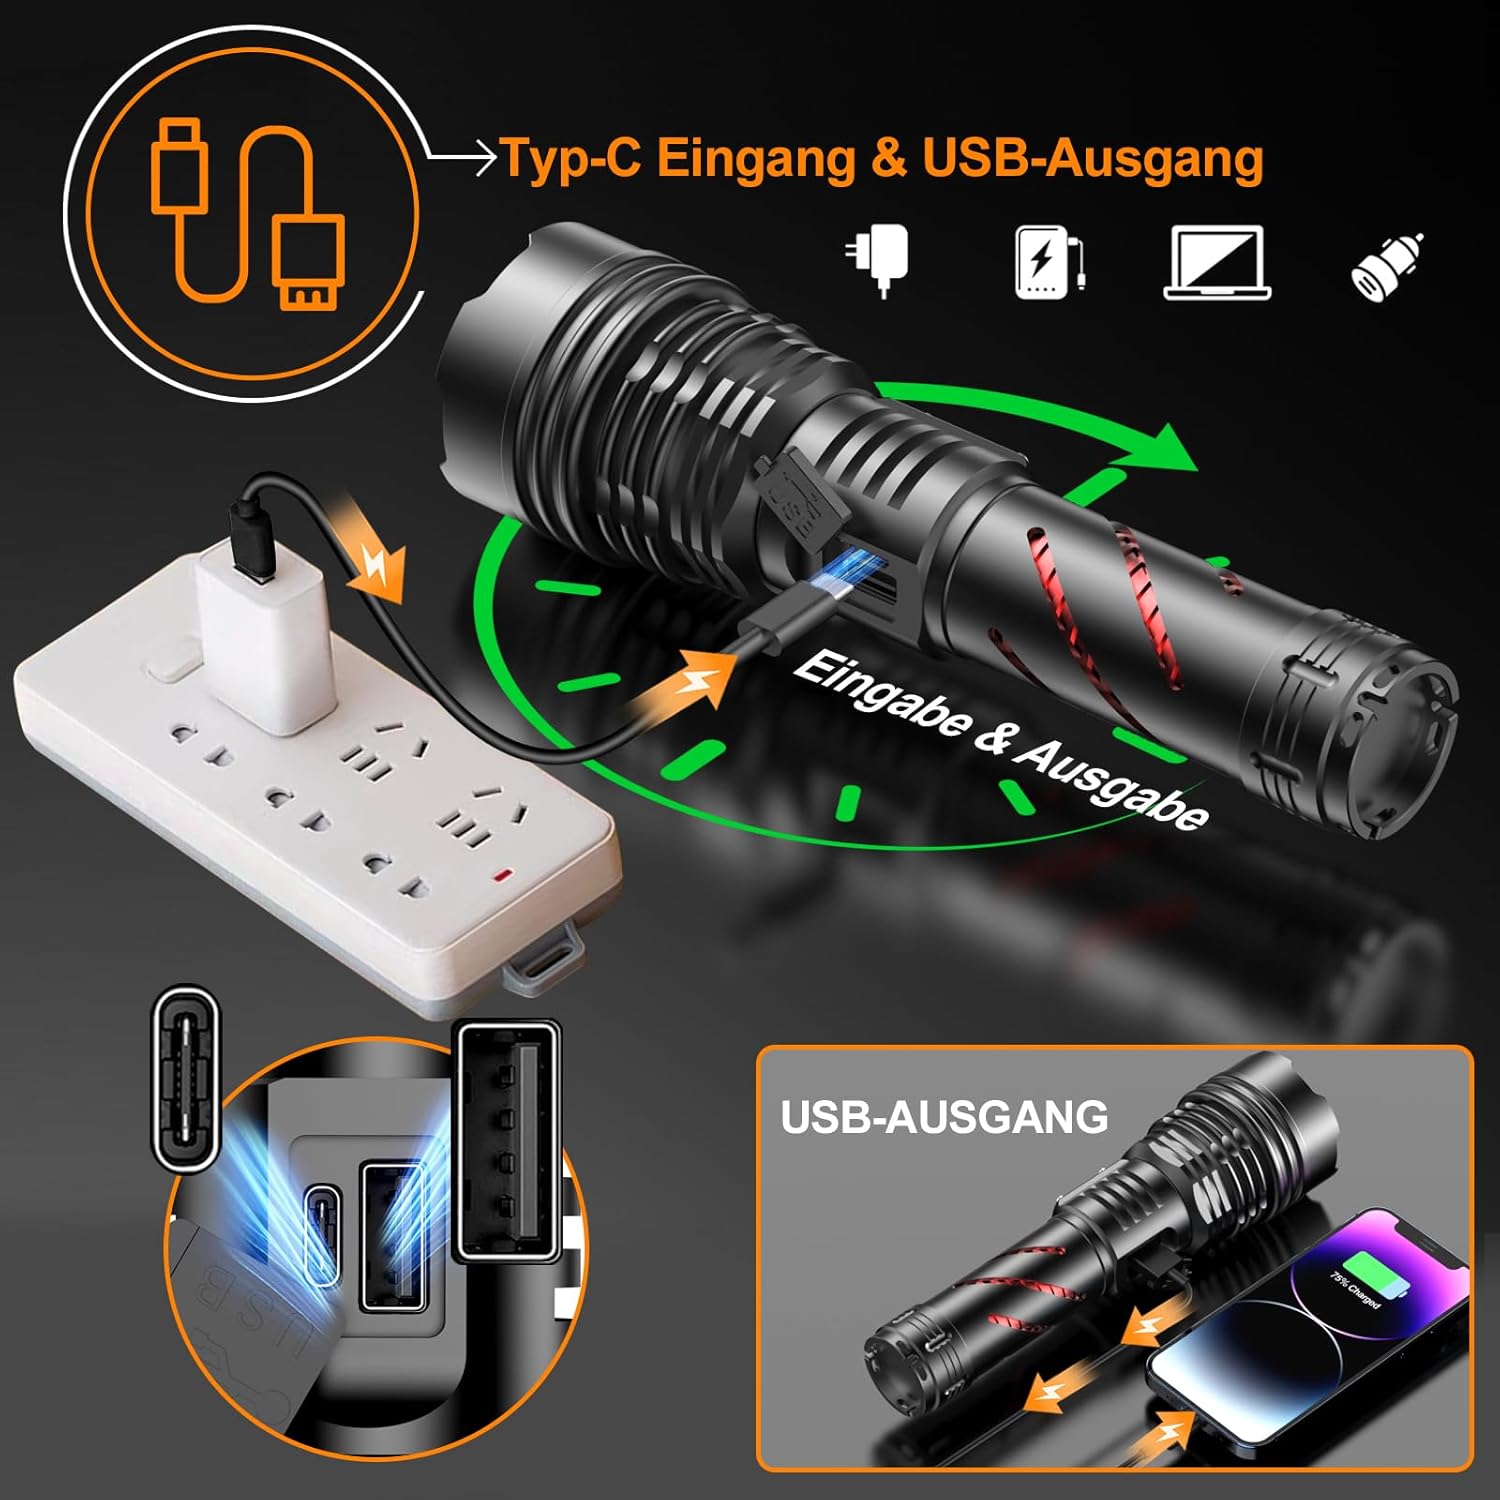
Image 5: Charging and USB Output. This image demonstrates how to charge the flashlight using the USB-C input and how to use its USB-A output to charge other devices like a smartphone.
5. Operating Instructions
5.1 Power On/Off and Mode Selection
The flashlight features two distinct switches for various functions:
- Left Switch (Strobe/SOS): Press once to activate Strobe mode. Press again to activate SOS mode. This switch is designed for quick activation in emergency situations.
- Right Switch (High Intensity/Continuous Dimming):
- Press once to turn on the flashlight in High Intensity mode.
- Press and hold to activate the Continuous Dimming mode. Release the button when the desired brightness level is reached.
- Press again to turn off the flashlight from High Intensity or Continuous Dimming mode.

Image 6: Dual Switch Operation. This image illustrates the two separate switches and their respective functions: Strobe, SOS, High Intensity, and Continuous Dimming.
5.2 Continuous Dimming
To adjust the brightness continuously, press and hold the Right Switch. The light output will smoothly transition between 500 and 1,000,000 lumens. Release the button once your desired brightness is achieved.

Image 7: Continuous Dimming. This image shows the process of pressing and holding the right switch to smoothly adjust the flashlight's brightness.
5.3 Focus Adjustment (Zoom Function)
To switch between floodlight and spotlight modes, gently pull or push the head of the flashlight. Pulling the head forward will narrow the beam for a focused spotlight, while pushing it back will widen the beam for a broad floodlight.
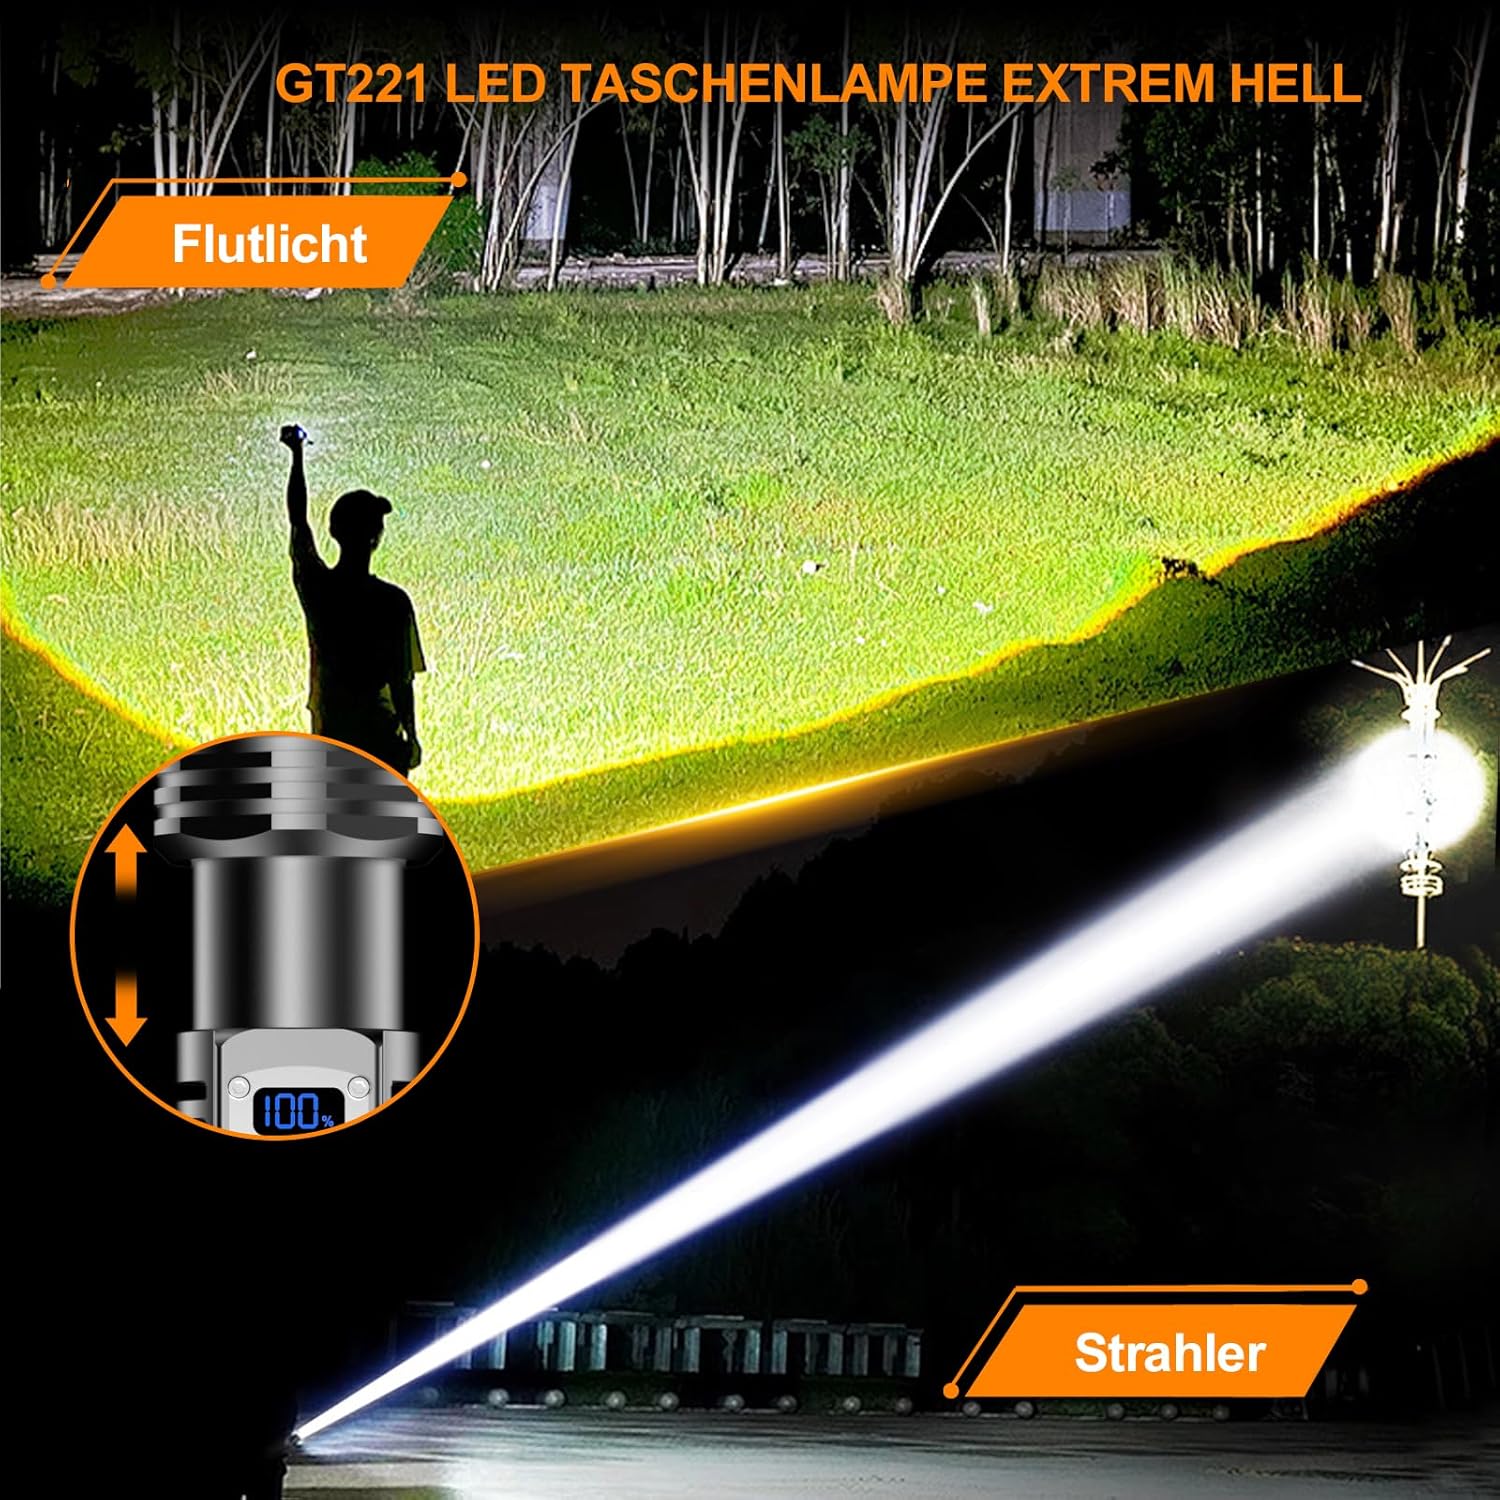
Image 8: Adjustable Focus. This image demonstrates the flashlight's ability to switch between a wide floodlight beam and a narrow, long-distance spotlight beam by adjusting the head.
5.4 Battery Level Display
The integrated LCD digital display shows the current battery charge level as a percentage. This allows you to monitor the battery status at all times.

Image 9: LCD Battery Display. This image highlights the digital LCD screen on the flashlight that indicates the battery's charge percentage.
5.5 Power Bank Function
In emergency situations, the flashlight can be used to charge your mobile phone or other small USB-powered devices. Connect your device to the flashlight's USB-A output port using an appropriate cable.
6. Maintenance
- Cleaning: Wipe the flashlight with a clean, soft cloth. Do not use abrasive cleaners or solvents.
- Lubrication: Periodically apply silicone grease to the O-rings to maintain water resistance.
- Battery Care: If the flashlight will not be used for an extended period, remove the battery to prevent leakage. Store the battery in a cool, dry place.
- Storage: Store the flashlight in a dry, well-ventilated area, away from direct sunlight and extreme temperatures.

Image 10: Waterproof Design. This image illustrates the IPX6 waterproof rating of the flashlight, showing it being splashed with water and its robust construction.

Image 11: High Performance Cooling. This image highlights the flashlight's cooling system, designed to dissipate heat and extend the product's lifespan.
7. Troubleshooting
| Problem | Possible Cause | Solution |
|---|---|---|
| Flashlight does not turn on. |
|
|
| Light is dim or flickers. |
|
|
| Cannot charge external devices. |
|
|
8. Specifications
| Feature | Detail |
|---|---|
| Brand | Relybo |
| Model Number | Relybo-GT221-DE |
| Light Source Type | LED (XHM100 chip) |
| Luminous Flux | Up to 1,000,000 lumens |
| Material | Aluminum Alloy |
| Color | Black |
| Dimensions (L x W x H) | 18.2 x 4.3 x 5.8 cm |
| Weight | 540 g |
| Power Source | Battery Powered (Rechargeable Battery) |
| Waterproof Rating | IPX6 |
| Special Features | 2 Switches & 4 Modes, Adjustable Lighting Modes, Anti-slip Grip, High Lumens, High Power, Rechargeable, Continuous Dimming |
Note: The product specifications in the source data mention "1 AAA pile necessarie. (incluse)". However, a flashlight with 1,000,000 lumens typically uses a larger rechargeable lithium-ion battery. Please refer to the actual battery included with your product, which is a larger rechargeable type as shown in the images.
9. Safety Information
- Do not look directly into the LED light when it is on, as it can cause temporary vision impairment or eye damage.
- Keep out of reach of children.
- Do not disassemble the flashlight head or modify the internal components, as this may damage the device and void the warranty.
- Use only the specified battery type and charging cable.
- Avoid exposing the flashlight to extreme temperatures or direct flame.
- If the flashlight becomes hot during prolonged use, this is normal due to its high power output. Allow it to cool down.
10. Warranty and Customer Support
We have carefully checked all components before shipment. If you have any questions or encounter any issues with your Relybo GT221 flashlight, please contact our customer service. We are committed to providing you with the best possible solution in the shortest time.
For customer service inquiries, please refer to the contact information provided with your purchase or on the Relybo official website.
Ask a question about this manual
Ask about setup, troubleshooting, compatibility, parts, safety, or missing instructions. Manuals+ will review the question and use this page’s manual context to help answer it.