MAHVEC 4Core 4G+64G
MAHVEC 4G+64G Car Radio Stereo for Honda Odyssey 2005-2010 Instruction Manual
Model: 4Core 4G+64G
Introduction
This manual provides detailed instructions for the installation, operation, and maintenance of your MAHVEC 4G+64G Car Radio Stereo. Designed specifically for Honda Odyssey models from 2005 to 2010, this unit features a 10.1-inch IPS touchscreen, Android 15 operating system, Wireless CarPlay, Android Auto, DSP 32 EQ, GPS Navigation, WiFi, Bluetooth 5.0, FM/RDS radio, Steering Wheel Control (SWC) compatibility, and an AHD backup camera. Please read this manual thoroughly before installation and use to ensure proper function and safety.

Image: MAHVEC car radio stereo seamlessly integrated into a Honda Odyssey dashboard.
Safety Information
- Professional Installation Recommended: Due to the complexity of car audio systems, professional installation is highly recommended to prevent damage to the vehicle or the unit.
- Disconnect Battery: Before installing or removing the unit, always disconnect the vehicle's battery to prevent electrical shorts or damage.
- Check Vehicle Compatibility: This unit is compatible with Honda Odyssey 2005-2010 models. It is incompatible with original car systems featuring large screens. Verify compatibility before proceeding.
- Wiring: Ensure all wiring connections are secure and correctly matched according to the wiring diagrams provided. Incorrect wiring can cause damage or fire.
- Airbag Safety: When routing cables, ensure they do not interfere with airbag deployment paths. Do not block side curtain airbags.
- Driving Safety: Do not operate the unit's complex functions or watch videos that distract from driving. Always prioritize road safety.
- Parking Brake: When performing tasks that require shifting gears during installation or testing, ensure the parking brake is engaged.
Package Contents
The package includes the following items:
- MAHVEC 10.1-inch Car Radio Stereo Unit
- AHD Backup Camera
- External Microphone
- Power Cable
- RCA Cable
- USB Cable
- Radio Antenna
- GPS Antenna
- Rear Camera Input Cable
- Canbus (if applicable for your vehicle model)
- Installation Tool
- User Manual (this document)

Image: Overview of all components included in the MAHVEC car radio stereo package.
Setup and Installation
This section guides you through the installation process. It is highly recommended to watch the provided installation video for visual assistance. Ensure the vehicle's battery is disconnected before starting any electrical work.
1. Disassembly of Original Unit
- Prepare Tools: Use plastic trim removal tools to prevent damage to your vehicle's interior.
- Remove Center Stack Trim:
- Start on the driver's side. Insert a pry tool and gently leverage until you hear the first pop.
- Move inch by inch across to the passenger side, releasing clips one at a time.
- Once all clips are free, the trim will slide out.
- Disconnect Connectors: Disconnect the light switch, hazard switch, and AC controls from the back of the trim. Each connector has a tab that needs to be depressed to release it.
- Remove Radio Unit:
- Locate and remove the Phillips screws holding the radio unit in place. There are screws on the outside and one deeper inside.
- Shift Lever Position: To access the radio unit, the shift lever needs to be moved out of the "Park" position. Engage the parking brake before doing this. Use a small tool or screwdriver to pry open the shift lock release slot and push the lever down to a lower gear (e.g., "1").
- Carefully pull the radio unit out.
- Disconnect all remaining connectors from the back of the original radio unit.
2. Initial Wiring and Preparation
- Review Wiring Diagram: Consult the provided user manual and wiring diagrams for your new MAHVEC unit.
- Connect Harnesses:
- Connect the main power harness to the back of the new unit. Ensure it clicks securely.
- Connect the RCA cluster cable.
- Connect the USB ports.
- Connect the GPS antenna.
- If using an external microphone, connect it to the designated port.
- Connect the rearview camera RCA cable to the unit. The brown "BACK" wire on the main harness connects to the red wire for reverse detection.
3. Testing the Unit
- Temporary Connection: Before fully installing, connect the new unit's main harness to the vehicle's wiring.
- Power On: Reconnect the car battery. Turn the ignition to ACC or ON (do not start the engine).
- Basic Functionality Check: Verify the touchscreen powers on, responds to touch, and basic audio functions work.
- Rearview Camera Test: Shift the vehicle into reverse (with parking brake engaged) to confirm the rearview camera display activates.
4. Rearview Camera Wiring and Routing
- Route Camera Cable:
- Route the long rearview camera cable from the front of the vehicle (behind the head unit) to the rear.
- On the driver's side, carefully pull back the weather strip along the door frame.
- Tuck the cable under the A-pillar trim, ensuring it does not interfere with the side curtain airbag. Route it along the headliner or under the floor trim to the rear.
- At the rear, open the tailgate. Carefully remove the plastic trim panels on the tailgate to expose the wiring.
- Pass the camera cable through the rubber grommet connecting the tailgate to the vehicle body. If difficult, a small slit in the grommet or using a fishing wire can help.
- Locate the license plate light housing. Remove it. You may need to drill a small hole for the camera cable to pass through.
- Connect the camera's power wire (red) to the positive wire of the vehicle's reverse light (typically green). Use a quick splice connector for a secure connection.
- Connect the camera's ground wire (black) to a suitable ground point on the vehicle chassis.
- Mount the rearview camera in the desired location (e.g., near the license plate).
5. Reassembly
- Secure Wiring: Ensure all cables are neatly tucked away and secured to prevent rattling or interference.
- Reinstall Trim Panels: Carefully reattach all removed trim panels, ensuring all clips align and snap into place.
- Final Check: Reconnect the battery. Start the car and perform a full functionality test of the head unit, including all audio, navigation, CarPlay/Android Auto, and rearview camera features.
Video: Detailed installation guide for a car stereo compatible with Honda Odyssey 2005-2010, demonstrating trim removal, wiring, and camera setup.
Operating Instructions
1. Wireless CarPlay & Android Auto
The unit supports wireless CarPlay and Android Auto for seamless smartphone integration.
- Open the "S-Play" application on the car stereo.
- On your smartphone, enable Bluetooth and connect to the car stereo's Bluetooth name (e.g., "BLINK_UNW2652").
- Confirm the pairing request on both devices.
- Once connected via Bluetooth, the system will prompt you to connect to CarPlay or Android Auto. Confirm the connection.
- Your phone's interface will now be mirrored on the car stereo, allowing access to navigation, music, calls, and other compatible apps.
Video: Demonstration of Wireless CarPlay and Android Auto connectivity with the car stereo.
2. GPS Navigation (Online & Offline)
The unit features a built-in GPS chip for offline navigation and supports online maps via WiFi.
- Offline Maps: Pre-downloaded maps ensure navigation even without an internet connection. Access through the "Maps" application.
- Online Maps: Connect to a WiFi hotspot (e.g., from your smartphone) to download online navigation software and receive real-time traffic updates.

Image: Visual representation of online and offline GPS navigation capabilities.
3. Bluetooth 5.0
Bluetooth 5.0 provides faster pairing and stable connectivity for hands-free calls and music streaming.
- Pairing: Go to "Settings" > "Bluetooth" on the stereo and enable Bluetooth. Search for available devices on your smartphone and select the stereo's name to pair.
- Hands-Free Calling: Once paired, you can make and receive calls directly from the stereo's interface.
- Music Streaming: Stream audio from your smartphone to the car speakers.

Image: Bluetooth interface for hands-free calls and music playback.
4. DSP 32 EQ & Audio Settings
The built-in Digital Sound Processor (DSP) with a 32-band equalizer allows for personalized audio tuning.
- Access the "EQ" or "Sound Settings" application.
- Adjust the 32-band equalizer to fine-tune frequencies.
- Select from various preset sound modes (e.g., Pop, Rock, Classical, Jazz) or create custom profiles.
- Adjust sound field settings to optimize audio for different seating positions.

Image: Detailed view of the DSP 32-band equalizer for audio customization.
5. FM/RDS Radio
Tune into your favorite FM radio stations with RDS (Radio Data System) support.
- Open the "Radio" application.
- Use the on-screen controls to scan for stations, save presets, and view RDS information (station name, song title, etc.).

Image: FM/RDS radio interface showing frequency and station information.
6. Steering Wheel Controls (SWC)
The unit is compatible with your vehicle's existing steering wheel controls for added convenience.
- Go to "Settings" > "Car Settings" > "SWC Type" and select "Learning Type".
- Enter the "SWC setting interface".
- Follow the on-screen prompts to assign functions (e.g., volume up/down, track next/previous) to your steering wheel buttons.
7. AHD Backup Camera
The included AHD backup camera provides a wide-angle view with night vision and IP69 waterproofing.
- When the vehicle is shifted into reverse, the camera feed will automatically display on the screen.
- Adjustable reversing assist lines provide guidance for parking.
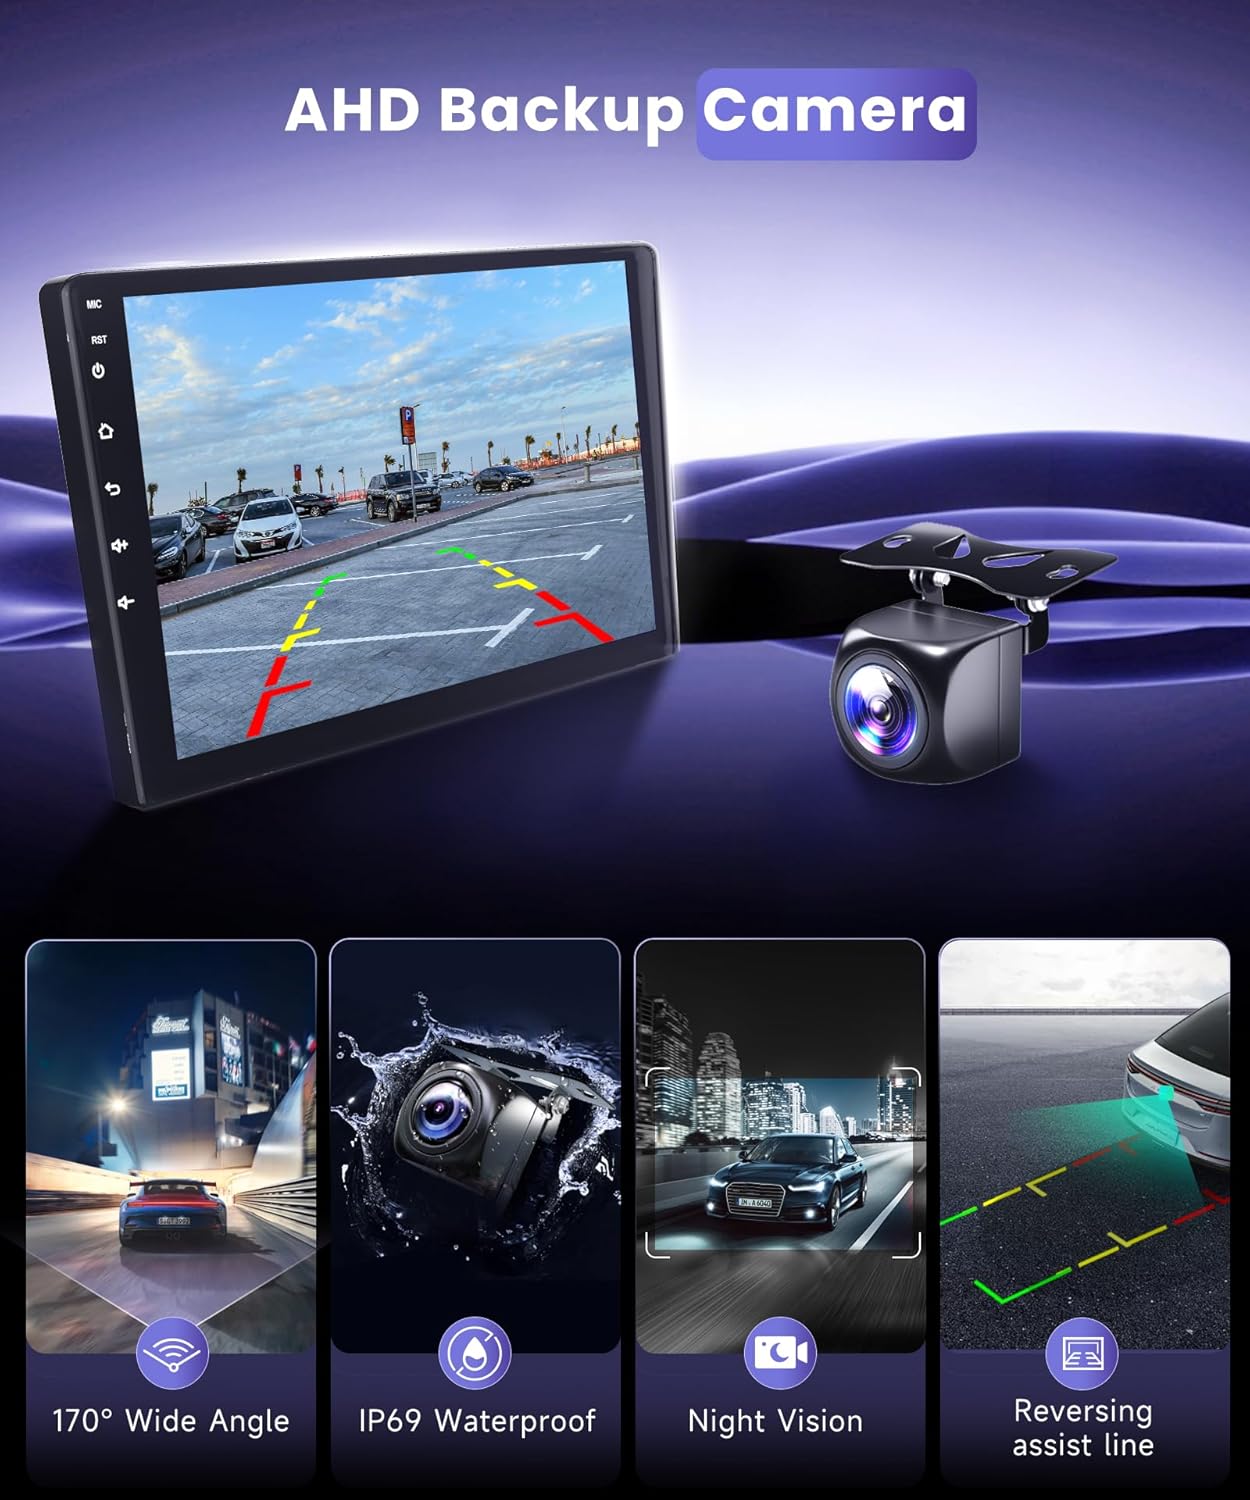
Image: AHD backup camera view with 170° wide-angle and parking guidelines.
Maintenance
- Screen Cleaning: Use a soft, lint-free cloth to clean the touchscreen. For stubborn smudges, lightly dampen the cloth with water or a screen-safe cleaner. Avoid harsh chemicals.
- Software Updates: Periodically check for software updates via the unit's settings or the manufacturer's website to ensure optimal performance and access to new features.
- Cable Inspection: Regularly inspect all visible cables and connections for wear, damage, or loose fittings.
- Environmental Care: Avoid exposing the unit to extreme temperatures, direct sunlight for prolonged periods, or excessive moisture.
Troubleshooting
| Problem | Possible Cause | Solution |
|---|---|---|
| Unit does not power on. | Loose power connection, blown fuse, disconnected battery. | Check all power cables and connections. Inspect vehicle fuses. Ensure battery is properly connected. |
| No sound from speakers. | Incorrect speaker wiring, volume too low, mute activated, incorrect audio source. | Verify speaker wiring. Increase volume. Check if mute is active. Select correct audio source. |
| CarPlay/Android Auto not connecting. | Bluetooth not paired, WiFi not connected (for Jlink), app not open on stereo. | Ensure Bluetooth is paired and WiFi is connected. Open the "S-Play" or "Jlink" app on the stereo. Restart phone and stereo. |
| Rearview camera not displaying. | Incorrect camera wiring, reverse signal not detected, camera faulty. | Check camera RCA and reverse signal wire connections. Ensure the reverse light is functioning. Verify camera functionality. |
| Steering Wheel Controls not working. | SWC not configured, incorrect SWC type selected. | Go to "Settings" > "Car Settings" > "SWC Type" and perform the learning process as described in the Operating Instructions. |
| GPS signal weak or inaccurate. | GPS antenna not properly placed, environmental interference. | Ensure the GPS antenna has a clear view of the sky. Avoid placing it under metal objects. |
Specifications
| Feature | Detail |
|---|---|
| Brand | MAHVEC |
| Model | 4Core 4G+64G |
| Compatible Vehicle | Honda Odyssey 2005-2010 (Minivan) |
| Operating System | Android 15 |
| Memory (RAM) | 4GB |
| Storage (ROM) | 64GB |
| Display Size | 10.1 Inches |
| Screen Resolution | 1280x720P IPS Touchscreen with 2.5D Tempered Glass |
| Connectivity Technology | Bluetooth 5.0, USB, Wi-Fi |
| Special Features | Wireless CarPlay/Android Auto, DSP 32 Band EQ, GPS Navigation (Online/Offline), FM/RDS, SWC, AHD Backup Camera |
| Audio Output Mode | Stereo |
| Included Components | AHD Backup Camera, External Mic |
| Item Weight | 1.76 pounds |
| Package Dimensions | 15.24 x 8.58 x 4.8 inches |
Warranty and Support
Warranty Information
The MAHVEC Car Radio Stereo comes with a 2-Year Warranty. For specific details regarding coverage and claims, please refer to the warranty card included in your product packaging or contact MAHVEC customer service.
Customer Support
For any questions, technical assistance, or troubleshooting not covered in this manual, please contact MAHVEC customer support:
- Via Amazon: Go to the product page, select "Sold by MAHVEC" and then "Ask a question."
- Refer to the product packaging or official MAHVEC website for additional contact methods (email, phone, etc.).
Ask a question about this manual
Ask about setup, troubleshooting, compatibility, parts, safety, or missing instructions. Manuals+ will review the question and use this page’s manual context to help answer it.