GarveeLife Power Cage User Manual
Model: WqQU0gbFRoMrDOusgZav-AhfVWj2i
1. Introduction
This manual provides essential information for the safe and effective use of your GarveeLife Power Cage. Please read this manual thoroughly before assembly and operation. Retain this manual for future reference.
The GarveeLife Power Cage is a robust strength training solution designed for home gym environments. It offers a versatile platform for various exercises, including squats, pull-ups, dips, and bench presses, supporting a maximum load capacity of 1100 lbs.

Image 1.1: GarveeLife Power Cage in use, demonstrating a squat exercise. This image highlights the primary function and robust design of the power cage.
2. Safety Information
Always prioritize safety when using any fitness equipment. Failure to follow these safety guidelines may result in serious injury.
- Consult with a healthcare professional before starting any new exercise program.
- Ensure all bolts, nuts, and connections are securely tightened before each use. Regularly inspect the equipment for wear and tear.
- Do not exceed the maximum weight capacity of 1100 lbs for the power cage.
- Use the adjustable safety bars at an appropriate height to prevent injury during heavy lifts.
- Perform exercises with controlled movements. Avoid sudden jerking or dropping weights.
- Keep children and pets away from the equipment during use.
- Assemble the power cage on a flat, stable surface.
- It is recommended to have two people for assembly for safety and ease.
3. Package Contents
Before beginning assembly, verify that all components listed below are present and undamaged. If any parts are missing or damaged, contact customer support immediately.
- 1x Power Cage Frame (various steel tubes and uprights)
- 1x Pull-Up Bar (Wide & Narrow Grip)
- 2x Dip Bars
- 2x Adjustable Safety Bars
- Weight Plate Holders (multiple)
- Hardware Pack (bolts, nuts, washers, pins)
- 1x User Manual (this document)

Image 3.1: Overview of the GarveeLife Power Cage components. This diagram labels key parts such as the wide & narrow pull-up bar, hooks, 2"x2" steel tube, weight plate holder, dip bar, safety bar, and foot pads.
4. Assembly Instructions
Assembly requires two people and approximately 1-2 hours. Lay out all parts and hardware before starting to ensure nothing is missing and to streamline the process.
- Step 1: Unpack and Identify Components. Carefully remove all parts from the packaging. Refer to the parts list and diagrams to identify each component.
- Step 2: Assemble the Base Frame. Connect the horizontal base beams to the vertical uprights using the provided bolts and nuts. Do not fully tighten bolts until the entire frame is assembled.
- Step 3: Attach the Top Frame. Secure the top horizontal beams to the vertical uprights. Ensure the frame is square and stable before proceeding.
- Step 4: Install the Pull-Up Bar. Attach the pull-up bar to the designated mounting points on the top frame.
- Step 5: Install Weight Plate Holders and Dip Bars. Secure the weight plate holders and dip bars to the uprights at your desired heights. These can be adjusted later.
- Step 6: Insert Safety Bars. Place the adjustable safety bars into the desired height positions.
- Step 7: Final Tightening. Once all components are in place and the frame is aligned, systematically tighten all bolts and nuts securely.

Image 4.1: Detailed view of key components for assembly. This image shows the top pull-up bar, 2-inch weight plate holder, dip bar, and pipe safety set, illustrating their attachment points.

Image 4.2: Visual representation of two-person assembly, emphasizing the ease of setup with a detailed user manual and available installation videos.
5. Operation and Usage
The GarveeLife Power Cage is designed for a variety of strength training exercises. Always warm up before your workout and cool down afterward.
5.1 Adjusting Safety Bars and J-Hooks
The safety bars and J-hooks can be adjusted to various heights to accommodate different exercises and user heights. Ensure both sides are set to the same height for stability and safety.
5.2 Exercise Examples
- Squats: Position the J-hooks at shoulder height. Load the barbell and perform squats within the cage, utilizing the safety bars for protection.
- Bench Press: Position a weight bench inside the cage. Adjust J-hooks and safety bars to appropriate heights for bench pressing.
- Pull-Ups: Use the integrated pull-up bar for wide-grip, narrow-grip, or neutral-grip pull-ups.
- Dips: Utilize the dip bars for triceps dips and chest dips.
- Rows: Perform various rowing exercises using the barbell or resistance bands attached to the cage.
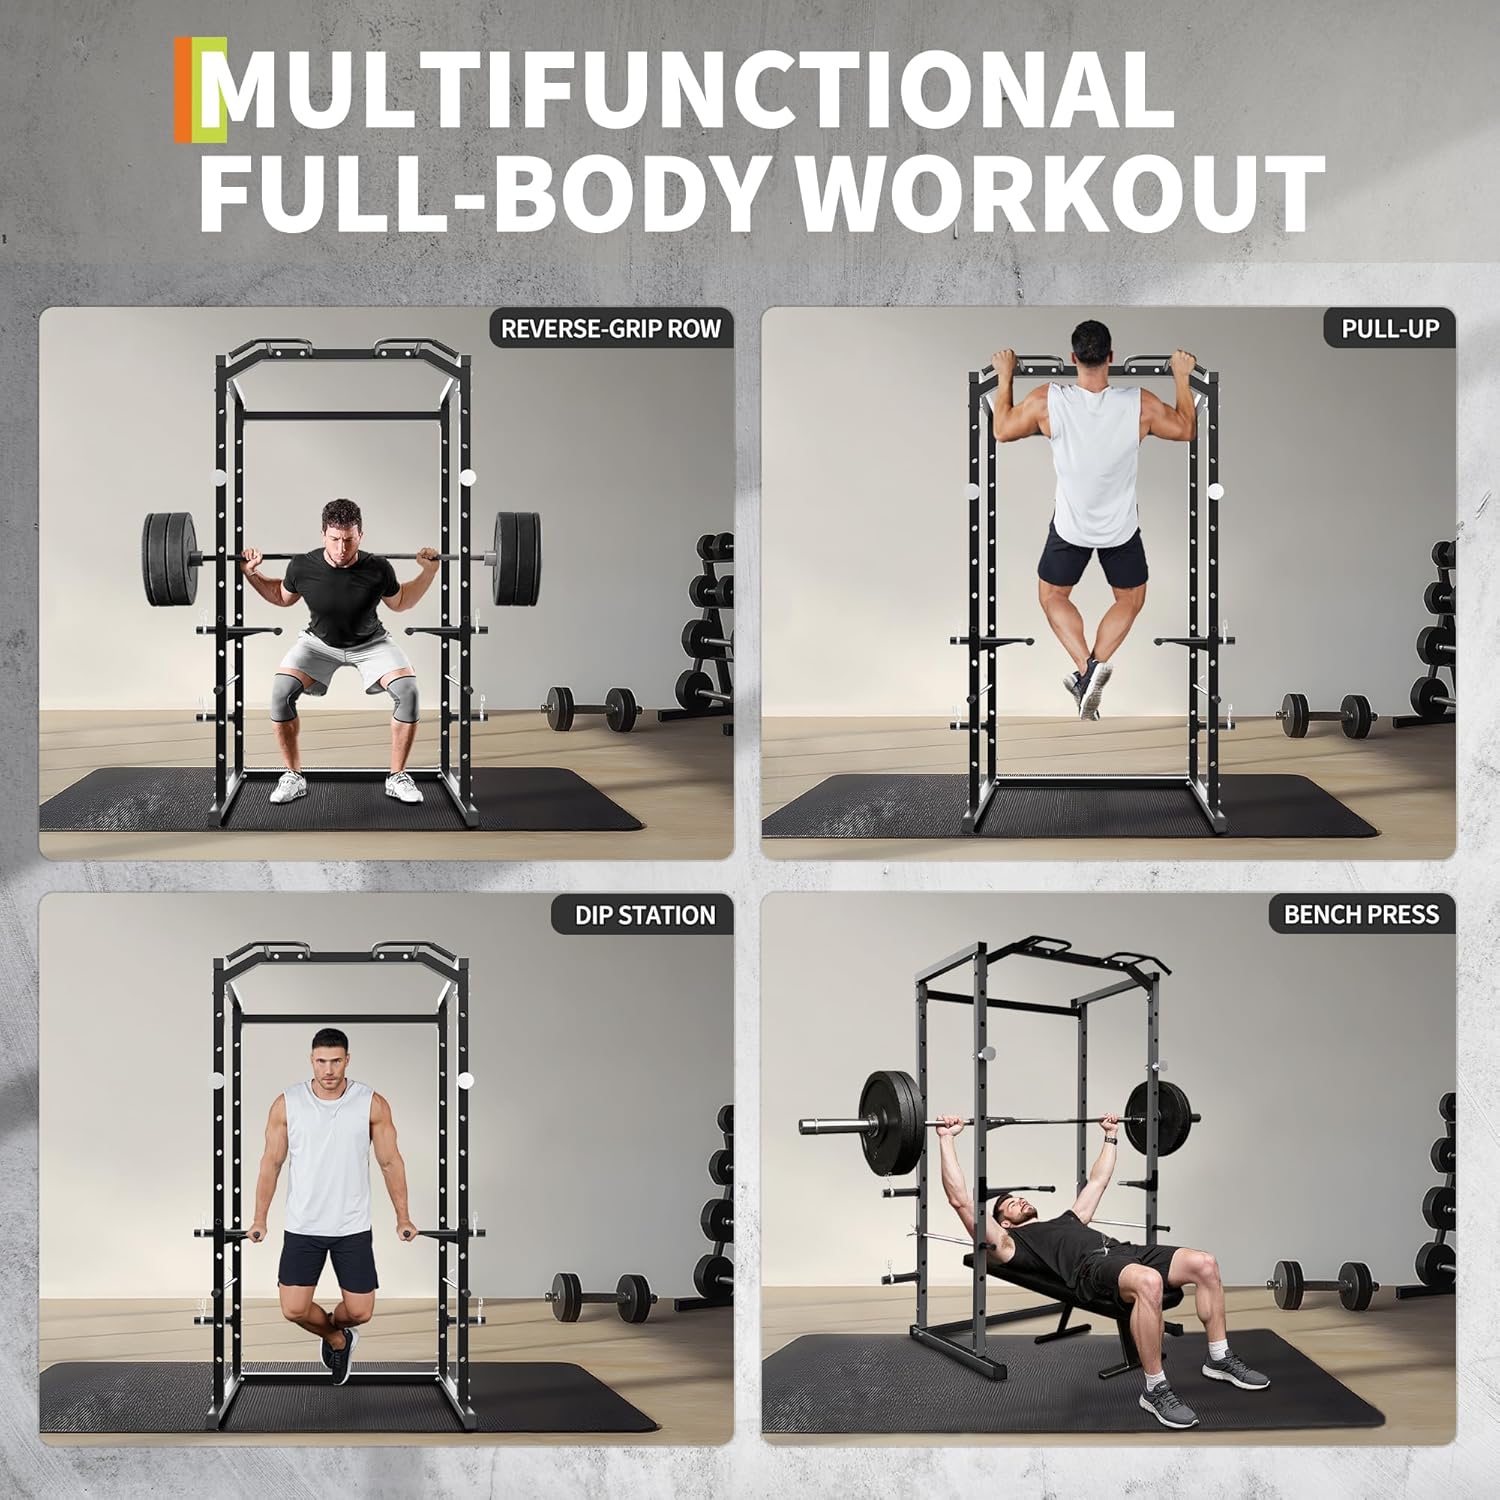
Image 5.1: Examples of exercises possible with the GarveeLife Power Cage, including reverse-grip rows, pull-ups, dips, and bench presses, demonstrating its versatility.

Image 5.2: Demonstrations of reverse-grip row and pull-up exercises, highlighting the cage's functionality for upper body and back training.

Image 5.3: Demonstrations of dip station and bench press exercises, showcasing the cage's utility for chest and triceps workouts.
6. Maintenance
Regular maintenance ensures the longevity and safe operation of your power cage.
- Daily: Wipe down the frame and bars with a clean, damp cloth after each use to remove sweat and dust.
- Weekly: Inspect all bolts, nuts, and connections for tightness. Retighten any loose fasteners.
- Monthly: Check for any signs of rust, cracks, or damage to the steel frame. If damage is found, discontinue use and contact customer support.
- Storage: Store the power cage in a dry environment to prevent rust. Utilize the integrated weight plate storage to keep your workout area tidy.

Image 6.1: Illustration of the power cage's robust construction, featuring 2"x2" square frame and 1.5mm thickness steel, designed for durability and supporting up to 1100 lbs.
7. Troubleshooting
| Problem | Possible Cause | Solution |
|---|---|---|
| Power cage feels unstable or wobbly. | Loose bolts or uneven assembly. | Ensure all bolts are fully tightened. Verify the cage is on a flat, level surface. |
| Difficulty inserting safety bars or J-hooks. | Holes not perfectly aligned or minor manufacturing variations. | Slightly adjust the frame by loosening some bolts, inserting the components, then retightening. Ensure no debris is in the holes. |
| Squeaking noises during use. | Loose connections or friction between metal parts. | Check and tighten all bolts. Apply a small amount of silicone lubricant to contact points if necessary. |
8. Specifications
| Feature | Detail |
|---|---|
| Model Name | Power Cage |
| Model Number | WqQU0gbFRoMrDOusgZav-AhfVWj2i |
| Dimensions (L x W x H) | 42.52 x 44.41 x 83.98 inches |
| Load Capacity | 1100 lbs |
| Material | Steel (2"x2" square frame, 1.5mm thickness) |
| Color | Black |
| Item Weight | 115.7 Pounds |
| Included Components | Power Cage, Pull-Up Bar, Dip Bars, Safety Bars, Weight Plate Holders, Hardware Pack, User Manual |
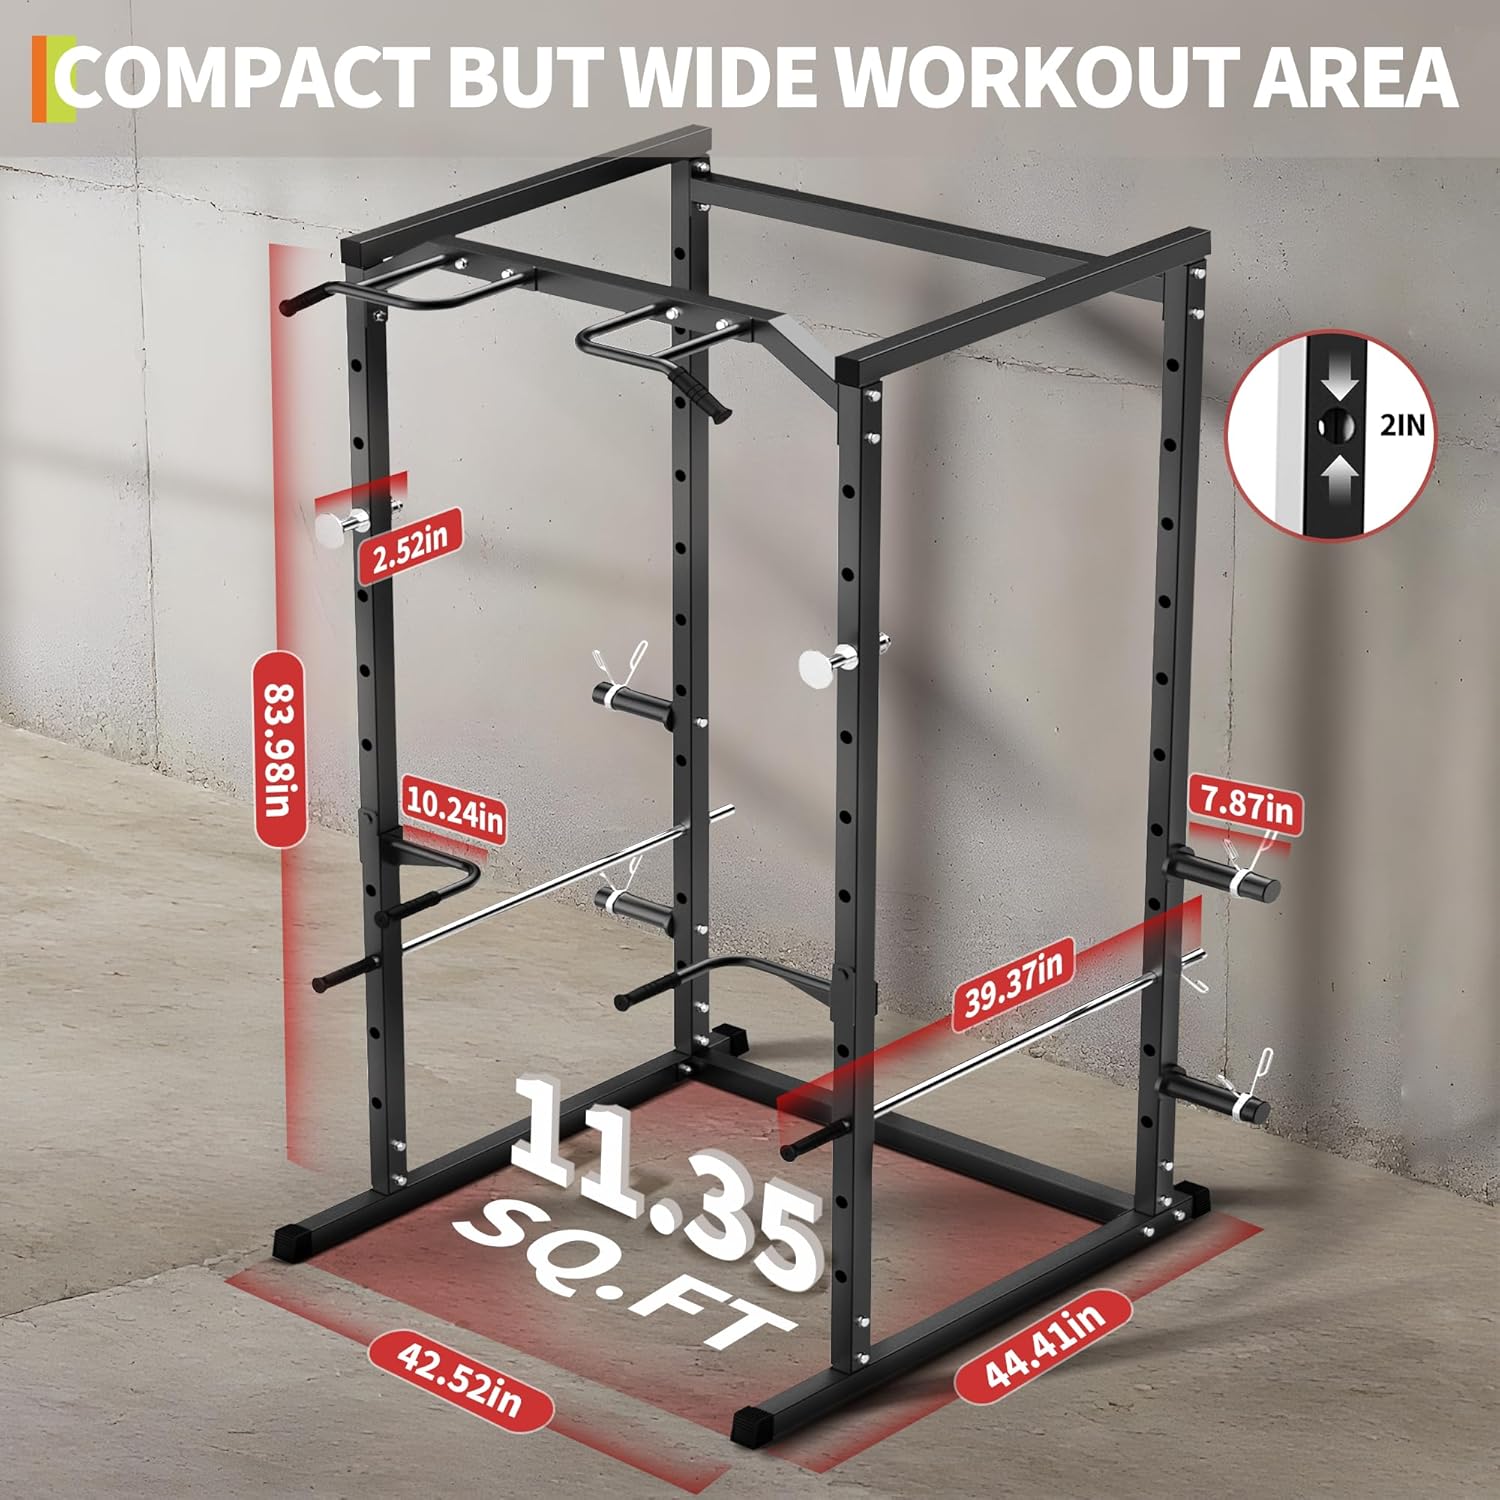
Image 8.1: Dimensional diagram of the GarveeLife Power Cage, indicating its compact footprint of 11.35 sq. ft. and overall height, width, and depth measurements.
9. Support
For any questions regarding assembly, operation, or maintenance of your GarveeLife Power Cage, please contact our customer support team. We are committed to providing satisfactory solutions and typically reply within 24 hours.
Please have your model number (WqQU0gbFRoMrDOusgZav-AhfVWj2i) ready when contacting support to expedite assistance.

Image 9.1: GarveeLife customer service team ready to assist with inquiries, emphasizing professional support and quick response times.