1. Introduction
Thank you for choosing the MAMNV D13S MAX Robot Vacuum and Mop. This device is designed to provide efficient and convenient cleaning for your home, combining vacuuming, sweeping, and mopping functionalities. This manual provides essential information for the safe and effective use, maintenance, and troubleshooting of your robot vacuum. Please read it thoroughly before operation and retain it for future reference.
2. Safety Instructions
To reduce the risk of injury or damage, read these safety instructions carefully and keep them accessible for future reference. This appliance is for household use only.
- Do not allow children to play with the robot. Supervise children and pets when the robot is operating.
- Ensure the robot is used and stored at room temperature. Avoid extreme hot or cold environments.
- Do not operate the robot in areas with exposed electrical outlets in the floor.
- Do not use the robot to pick up large objects, sharp objects, liquids, or burning/smoking materials.
- Keep hair, loose clothing, fingers, and all body parts away from openings and moving parts.
- Do not use the robot on wet surfaces or in environments with standing water.
- Before using the robot, remove loose items such as clothing, loose papers, pull cords for blinds or curtains, power cords, and any fragile objects.
- Do not move the charging base or interrupt the machine's operation before it completes scanning the map.
- Only use the provided power adapter.
- Do not use detergents or disinfectants in the water tank, as they may corrode the tank and clog the water outlet pipes.
3. Package Contents
Verify that all items are present in the package:
- MAMNV D13S MAX Robot Vacuum
- Dust Collection Station
- 2-in-1 Water Tank and Dustbin
- Dust Bags x5
- Rolling Brush x1
- Side Brushes x2
- Mop Holder
- Mops x2
- Filters x2
- User Manual
- FQA (Frequently Asked Questions)
- App Connection Guide

Image: Contents of the MAMNV D13S MAX package, including the robot vacuum, dust collection station, and various accessories.
4. Product Overview
4.1 Robot Vacuum Components
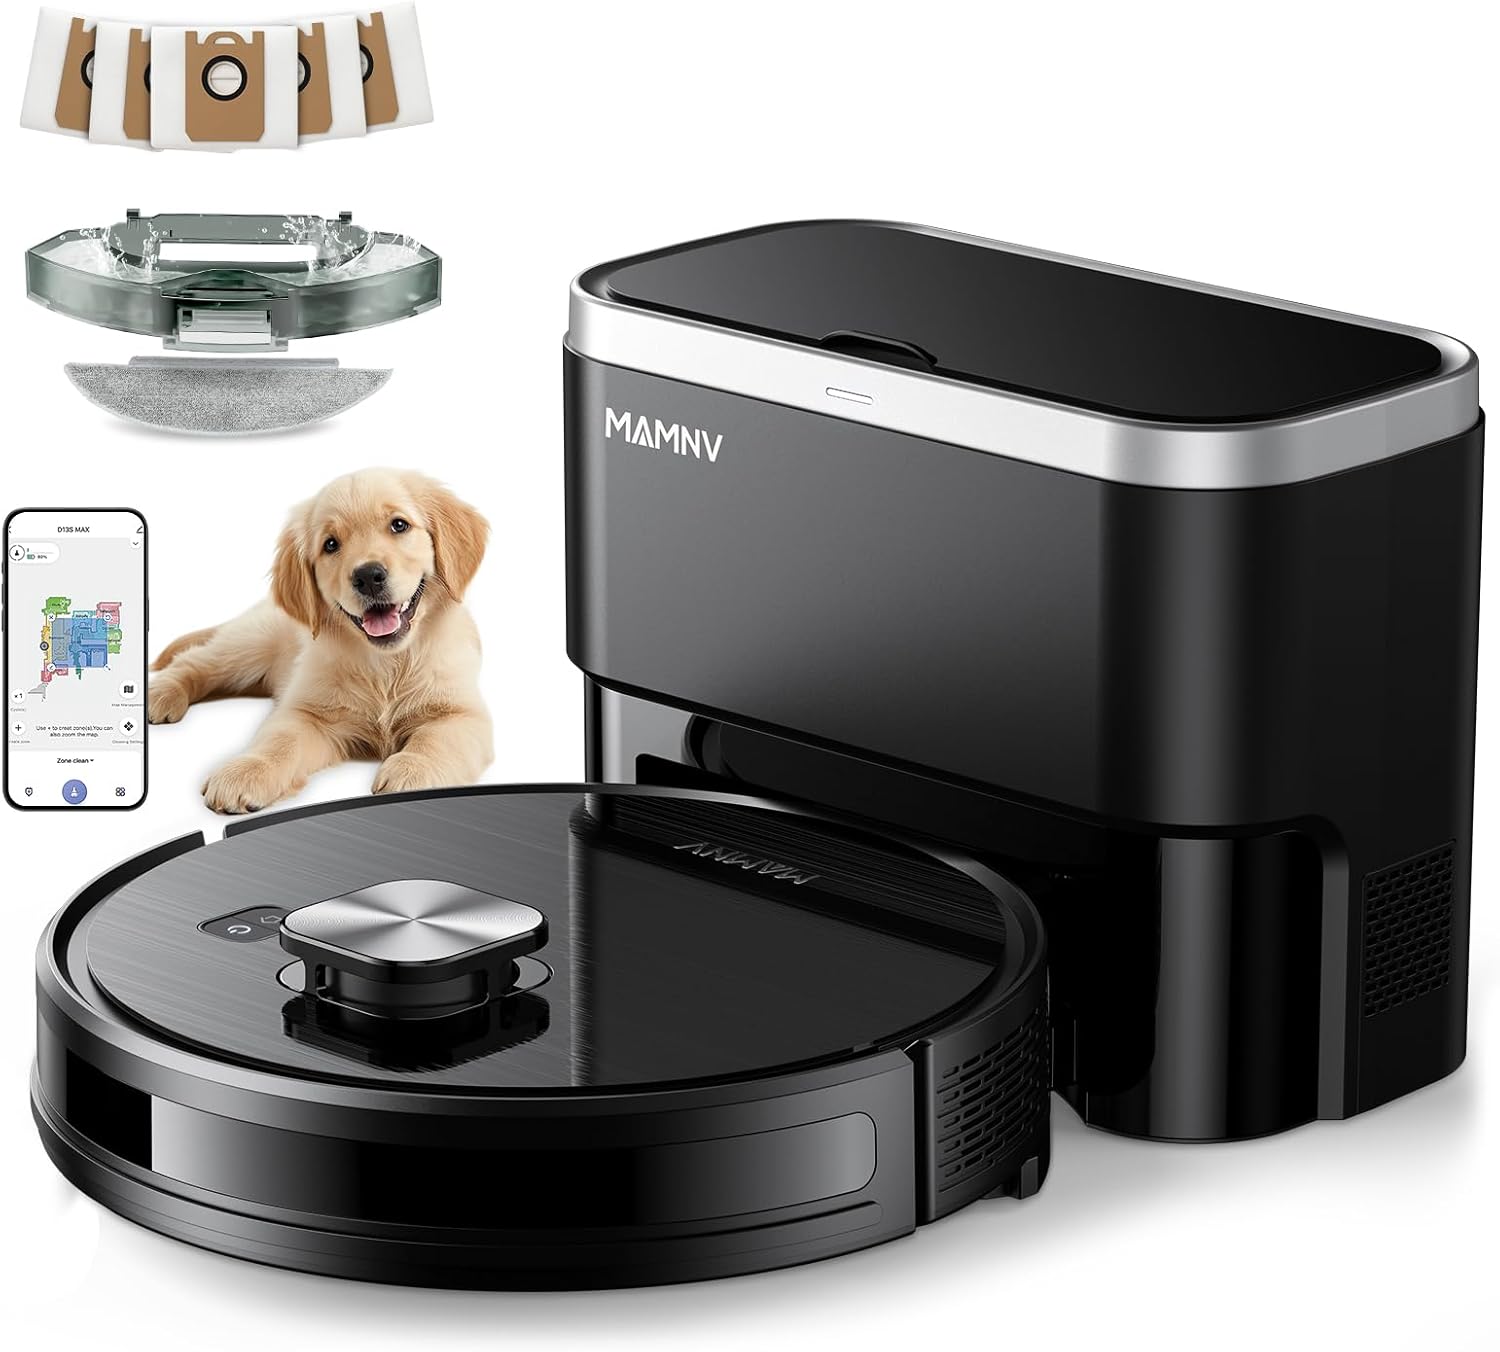
Image: The MAMNV D13S MAX Robot Vacuum alongside its self-emptying dust collection station.
- Lidar Sensor: For 360° scanning and precise navigation.
- Control Buttons: Power/Clean, Recharge.
- Collision Sensors: Detect obstacles to prevent impact.
- Drop Sensors: Prevent the robot from falling down stairs.
- Side Brushes: Sweep debris from edges and corners.
- Rolling Brush: Main brush for deep cleaning carpets and hard floors.
- Driving Wheels: For movement across various surfaces and over thresholds.
- Dustbin/Water Tank Combo: Collects dust and holds water for mopping.
4.2 Dust Collection Station
- Dust Bag Compartment: Houses the disposable dust bag for automatic emptying.
- Charging Contacts: Connects with the robot for charging.
- Dust Suction Port: Transfers debris from the robot's dustbin to the station's dust bag.

Image: The robot vacuum automatically docking with the self-emptying station to transfer collected debris.
5. Setup
5.1 Charging Station Placement
- Place the dust collection station against a wall in an open, uncluttered area.
- Ensure there is at least 0.5 meters (1.6 feet) of clear space on both sides and 1.5 meters (4.9 feet) in front of the station.
- Connect the power adapter to the station and plug it into a wall outlet.
5.2 Initial Charge
- Place the robot onto the charging contacts of the dust collection station.
- Ensure the robot is properly aligned and charging. The indicator light on the robot will show charging status.
- Allow the robot to fully charge before its first use (approximately 6 hours).
5.3 App Connection
The MAMNV D13S MAX can be controlled via the Tuya Smart or Smart Life app. Download the app to unlock full features, including mapping, scheduling, and zone management.
- Download the "Tuya Smart" or "Smart Life" app from your device's app store (Google Play or Apple App Store).
- Register and log into your account.
- To enter Distribution Mode: Press and hold the power button on the robot for 3-5 seconds to turn it on. Then, press and hold the home button for 3-5 seconds until the home button light flashes white and you hear a corresponding prompt.
- Follow the in-app instructions to connect your robot to your home's 2.4GHz Wi-Fi network. Ensure Bluetooth is enabled on your phone during the connection process.

Image: Visual guide for connecting the robot vacuum to the Tuya Smart or Smart Life application, including QR codes for app download.
Download Tuya Smart: https://smartapp.tuya.com/tuyasmart
Download Smart Life: https://smartapp.tuya.com/smartlife
6. Operating Instructions
6.1 Cleaning Modes
The D13S MAX offers 3-in-1 cleaning: vacuuming, sweeping, and mopping. You can select modes via the app.
- Vacuum & Sweep: Standard cleaning mode for daily debris.
- Mop: For light mopping of hard floors. Ensure the water tank is filled and the mop pad is attached.
- Vacuum & Mop Simultaneously: The robot can perform both functions in a single pass.

Image: The robot vacuum demonstrating its 3-in-1 vacuum and mop capabilities, showing the dustbin and water tank combo.
6.2 LiDAR Navigation and Smart Mapping
The robot uses LiDAR navigation to create a precise map of your home for efficient cleaning paths.
- Initial Mapping: The robot will perform an initial mapping run to learn your home layout. Do not interrupt this process.
- Multi-Floor Mapping: The robot can save up to 5 different floor maps.
- No-Go Zones & Virtual Walls: Use the app to define areas the robot should avoid (e.g., pet bowls, fragile items) or virtual boundaries.
- Targeted Zone Cleaning: Select specific areas on the map for the robot to clean.
- Custom Cleaning Plans: Adjust suction level, water level, and cleaning times for individual rooms via the app.

Image: The robot vacuum utilizing its LiDAR sensor to navigate and map a room, illustrating its smart mapping capabilities.

Image: Illustration of the robot vacuum's ability to map and store multiple floor plans within a multi-story home.

Image: Demonstrates setting up No-Go Zones and Virtual Walls via the app to restrict the robot's access to certain areas.

Image: The app interface showing options for customizing cleaning plans for specific rooms, including suction and water levels.
6.3 Scheduling and Voice Control
- Scheduling: Set daily or weekly cleaning schedules through the app.
- Voice Control: The robot is compatible with Amazon Alexa and Google Assistant. Link your account in the respective voice assistant app to control the robot with voice commands (e.g., "Alexa, clean the kitchen!").

Image: Demonstrates controlling the robot vacuum via the Tuya app for setting No-Go Zones, editing rooms, and scheduling, as well as voice control compatibility with Alexa and Google Assistant.
6.4 Carpet Auto-Boost
The D13S MAX automatically detects carpets and increases suction power for deeper cleaning on these surfaces. This feature can be managed via the app.

Image: Illustrates how the robot vacuum plans carpet areas and automatically boosts suction power when transitioning from hard floor to carpet.
6.5 Obstacle Avoidance and Anti-Fall
Built-in infrared and collision sensors help the robot detect and avoid obstacles and stairs, ensuring safe operation.

Image: Shows the robot vacuum detecting a step to prevent falling and navigating around furniture legs using its sensors.
6.6 Threshold Crossing
The robot is designed to climb over obstacles and mats up to 0.79 inches (20mm) for uninterrupted cleaning across different rooms.

Image: Illustrates the robot vacuum's capability to smoothly cross door thresholds and adapt to various home environments.
7. Maintenance
Regular maintenance ensures optimal performance and extends the lifespan of your robot vacuum.
7.1 Dustbin and Water Tank
- Emptying: The robot automatically empties its dustbin into the dust collection station. The station's dust bag can hold up to 70 days of debris.
- Cleaning: Periodically remove the 2-in-1 dustbin/water tank from the robot. Empty any remaining debris and rinse the dustbin and water tank with clean water. Allow to air dry completely before reinserting.
- Water Tank Refill: For mopping, fill the water tank with clean water only. Do not use detergents or disinfectants.
7.2 Brushes and Filters
- Rolling Brush: Remove the rolling brush cover and lift out the brush. Use the cleaning tool to remove hair and debris tangled around the brush.
- Side Brushes: Check side brushes regularly for wear or damage. Remove any tangled hair or debris. Replace if worn.
- Filters: Tap the filters to remove dust. Rinse the primary filter and sponge filter with water if necessary, but do not rinse the HEPA filter. Allow all washable filters to dry completely before reinstallation.
Image: A collection of replacement parts for the robot vacuum, including side brushes, rolling brush, mop pads, and filters, indicating components that require regular maintenance or replacement.
7.3 Mop Pad
- Remove the mop pad from the mop holder after each mopping session.
- Wash the mop pad by hand or machine wash with mild detergent. Allow it to air dry completely.
- Replace mop pads when they show signs of wear or reduced cleaning effectiveness.
7.4 Dust Collection Station
- Dust Bag Replacement: Replace the dust bag in the station when the indicator light signals it is full, or approximately every 70 days.
- Suction Port Cleaning: Periodically check the dust suction port on the station for any blockages and clear them.
8. Troubleshooting
Refer to this section for solutions to common issues.
| Problem | Possible Cause | Solution |
|---|---|---|
| Robot does not turn on. | Low battery or not charged. | Place the robot on the charging station and ensure it is charging. Allow to charge fully. |
| Robot gets stuck frequently. | Obstacles, tangled wires, or low clearance. | Clear the cleaning area of loose cables, small objects, and thick rugs. Use No-Go Zones for problematic areas. |
| Poor cleaning performance. | Full dustbin, clogged filters, or worn brushes. | Empty the dustbin. Clean or replace filters and brushes as needed. |
| Robot does not mop or wet the mop pad. | Incorrect mop module installation, dry mop pad, or incorrect app settings. |
|
| Robot cannot connect to Wi-Fi. | Incorrect Wi-Fi band (only 2.4GHz supported), incorrect password, or robot too far from router. | Ensure your router is broadcasting a 2.4GHz network. Verify Wi-Fi password. Move robot closer to the router during setup. Re-enter distribution mode if necessary. |

Image: Troubleshooting steps for when the mop pad does not wet, including checking installation and app settings.
9. Specifications
| Feature | Detail |
|---|---|
| Brand | MAMNV |
| Model Name | D13S MAX Robot Vacuum and Mop |
| Special Features | Advanced Custom Cleaning, LiDAR Navigation, Precision Laser Mapping & Navigation, Self-Emptying, Smart Mapping |
| Product Dimensions | 12.59"L x 12.59"W x 3.82"H (Robot) |
| Item Weight | 18.26 pounds (Total package) |
| Suction Power | 11500 Pa |
| Dustbin Capacity | 230 ml (Robot) |
| Water Tank Capacity | 240 ml (Robot) |
| Self-Emptying Dust Bag Capacity | Up to 70 days (3.5L x 5 bags included) |
| Battery Life | Up to 160 minutes runtime (5000mAh battery) |
| Filter Type | HEPA Triple-stage Filtration, Primary Filter, Sponge |
| Control Method | App, Voice (Amazon Alexa, Google Assistant) |
| Wi-Fi Compatibility | 2.4GHz only |
| Obstacle Crossing Ability | 0.79 inches (20mm) |

Image: Diagram showing the dimensions of the MAMNV D13S MAX robot vacuum and its charging station.
10. Warranty and Support
MAMNV provides professional customer service and a 12-month service period for the D13S MAX Robot Vacuum and Mop. For any issues or inquiries, please refer to the FQA document included in your package or contact MAMNV customer support.


