MNP-XH01
Motor Nucleartoys MNP-XH01 Yellow Dragon Model Kit and Cloak Set Instruction Manual
Model: MNP-XH01 | Brand: Generic
Introduction
This manual provides detailed instructions for the assembly, operation, and maintenance of your Motor Nucleartoys MNP-XH01 Yellow Dragon Model Kit with Cloak Set. Please read this manual thoroughly before beginning assembly to ensure correct construction and optimal enjoyment of your model.
Safety Information
- Recommended Age: This product is recommended for individuals 16 years and up.
- Small Parts Warning: This kit contains small accessories. Keep out of reach of young children to prevent accidental ingestion.
- Sharp Edges: Some parts may have sharp edges. Handle with care during assembly.
- Material: The model is constructed from ABS plastic.
Package Contents
Upon opening the package, verify that all components are present. The kit includes:
- Yellow Dragon Model Kit components (ABS plastic)
- Cloak Set components
- Instruction sheet (if included by manufacturer)
Note: Due to manufacturer reasons, there may be minor changes in design and color. The completeness of all small accessories cannot always be guaranteed.
Assembly Instructions
Follow these steps carefully for the assembly of your Yellow Dragon Model Kit. It is recommended to lay out all parts and organize them before starting.
Step 1: Assemble the Main Body
Begin by assembling the core structure of the Yellow Dragon model. Refer to the included instruction sheet for specific part identification and connection points. Ensure all joints are securely fitted.
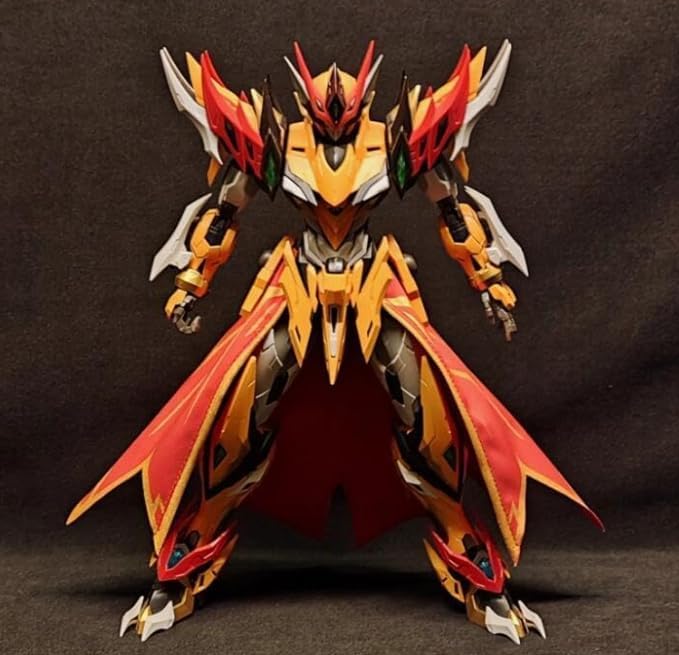
Image: The assembled main body of the Yellow Dragon model kit, showcasing its intricate details and articulation points before the cloak is attached. This view highlights the primary yellow and orange color scheme and the mechanical design.
Step 2: Attach Wings and Appendages
Carefully attach the wings and any other major appendages to the main body. Pay close attention to the orientation and ensure they are firmly secured. Some parts may require gentle pressure to snap into place.
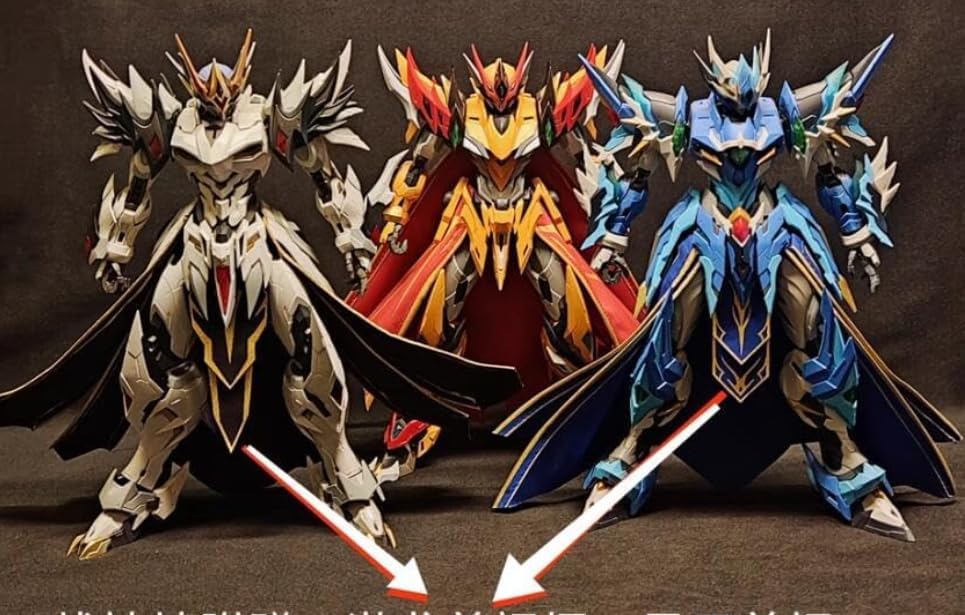
Image: A comparison view of the Yellow Dragon model (center) alongside other color variants. This image illustrates the fundamental structural design shared across the models, providing a visual reference for the overall assembly of the main body, wings, and leg components.
Step 3: Install the Cloak Set
Once the main model is assembled, proceed to attach the cloak. The cloak is designed to fit specific attachment points on the model's back or shoulders. Align the cloak's connectors with the corresponding slots on the model and gently press until secured. Ensure the cloak drapes naturally.

Image: The Motor Nucleartoys MNP-XH01 Yellow Dragon Model Kit with its distinctive red and gold cloak fully attached. This image displays the complete aesthetic of the model, highlighting the intricate design of the cloak and how it integrates with the dragon's form.
Operating and Display
Your Yellow Dragon Model Kit is designed for display and light posing. While articulated, avoid excessive force when adjusting poses to prevent damage to joints or parts.
- Posing: Gently manipulate joints to achieve desired poses. Do not force movement beyond the intended range of articulation.
- Display: Place the model on a stable, flat surface away from direct sunlight, extreme temperatures, and high humidity to preserve its condition.
Maintenance
- Cleaning: Use a soft, dry cloth or a soft brush to gently remove dust from the model. Avoid using harsh chemicals or abrasive materials, which can damage the paint or plastic.
- Storage: If storing the model, ensure it is in a clean, dry environment, preferably in its original packaging or a protective display case, to prevent dust accumulation and accidental damage.
Troubleshooting
If you encounter any issues during or after assembly, consider the following:
- Parts Not Fitting: Double-check the instruction sheet to ensure you are using the correct parts and attempting to connect them in the right orientation. Sometimes, a small amount of plastic flash may need to be carefully trimmed.
- Loose Joints: If a joint feels too loose, a small amount of clear nail polish or a specialized joint-tightening solution can be applied to the peg and allowed to dry before reassembly.
- Broken Parts: For minor breaks, plastic cement or super glue can be used. For significant damage, contact customer support.
Specifications
| Feature | Detail |
|---|---|
| Model Number | MNP-XH01 |
| Brand | Generic (Motor Nucleartoys) |
| Material | ABS Plastic |
| Product Dimensions | Approximately 4 x 3 x 5 inches (assembled) |
| Recommended Age | 16 years and up |
| ASIN | B0FGCWDPM2 |
Warranty and Support
This product is manufactured by Generic. For specific warranty information or customer support inquiries, please refer to the contact details provided with your purchase or reach out to the retailer from whom the product was acquired. Your satisfaction is important, and assistance is available for product-related questions.
Ask a question about this manual
Ask about setup, troubleshooting, compatibility, parts, safety, or missing instructions. Manuals+ will review the question and use this page’s manual context to help answer it.