1. Introduction
This manual provides detailed instructions for the installation, operation, and maintenance of your DIWEISHI Dash Cam X17. This device is designed to record video footage from your vehicle's front and rear perspectives, offering enhanced safety and evidence in case of incidents. Please read this manual thoroughly before using the product.
2. Package Contents
Please verify that all items listed below are included in your package:
- 1 x DIWEISHI X17 4K Dash Cam (Front Unit)
- 1 x 1080P In-car Rear Camera
- 1 x 11.5ft Power Supply Cable with Car Charger
- 1 x 21.3ft Rear Camera Cable
- 2 x Electrostatic Sticker
- 1 x Installation Tool
- 1 x 32GB Memory Card
3. Product Overview
3.1 Components
Familiarize yourself with the main components of your dash cam:
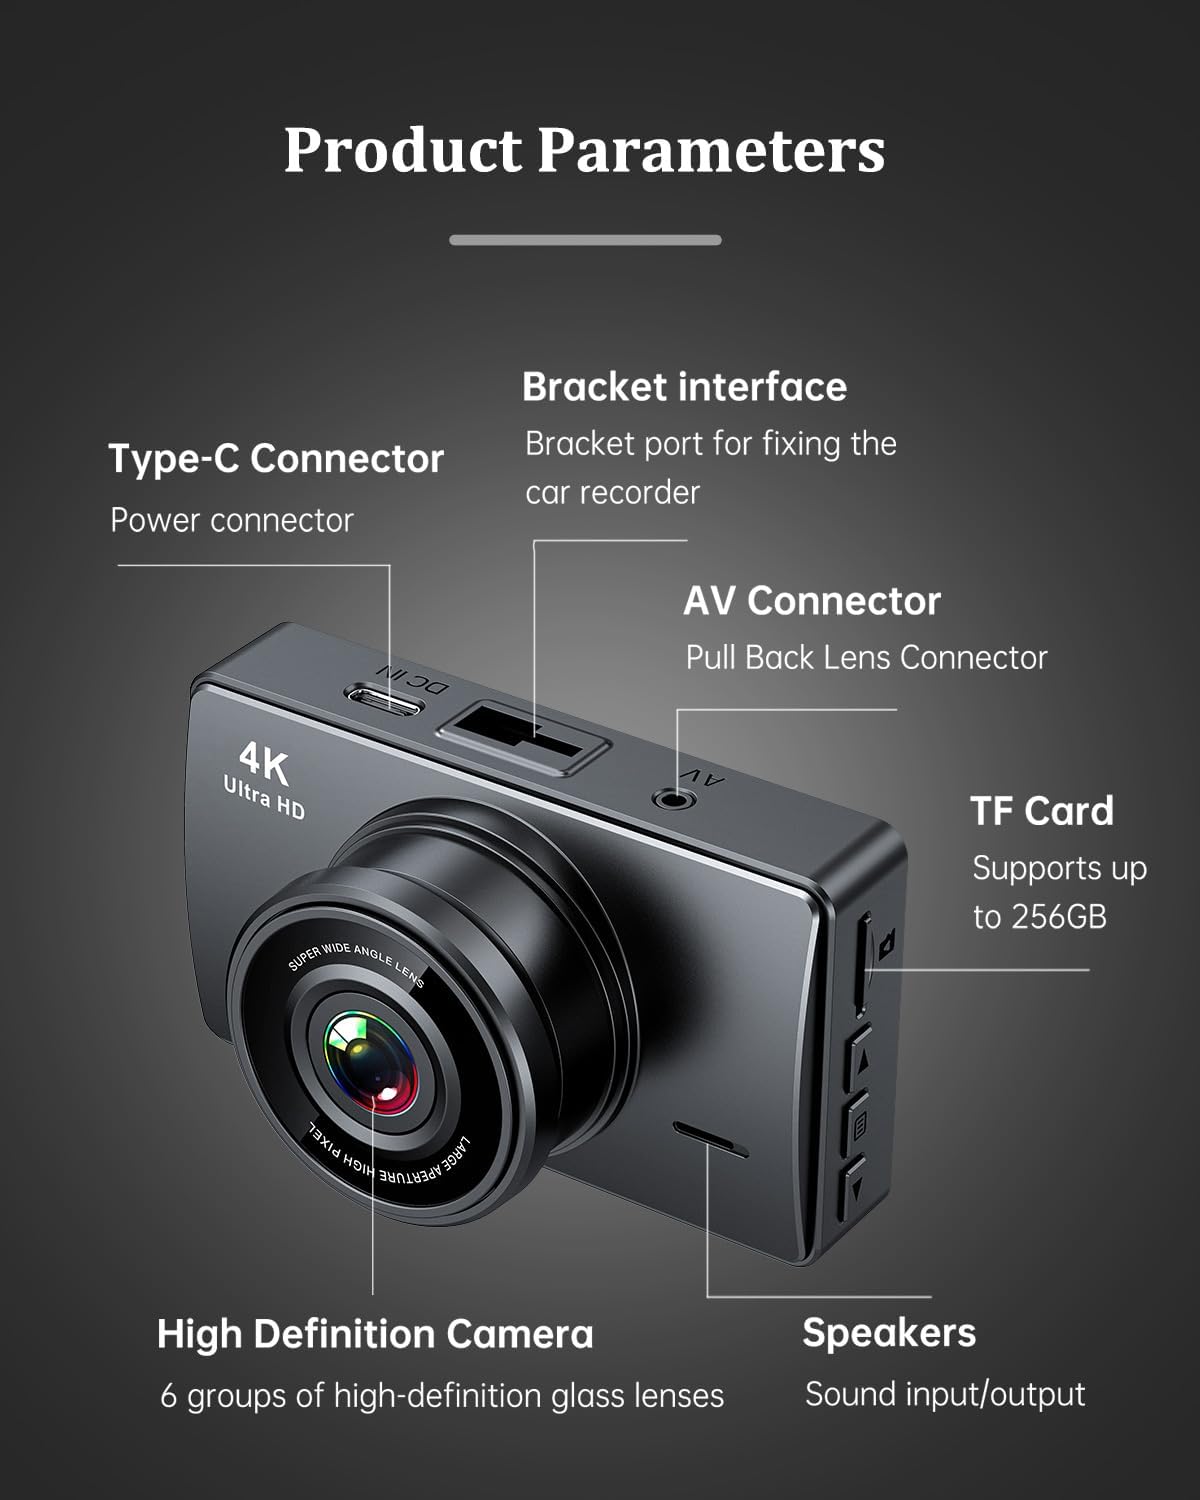
Image: Front dash cam unit with labeled components including Type-C power connector, bracket interface, AV connector for the rear camera, TF card slot, high-definition camera lens, and speakers.
- Type-C Connector: Power input port.
- Bracket Interface: Port for attaching the mounting bracket.
- AV Connector: Connects to the rear camera.
- TF Card Slot: Supports up to 256GB memory cards. A 32GB card is included.
- High Definition Camera: Features 6 groups of high-definition glass lenses.
- Speakers: For audio output.
- 3-inch IPS Touch Screen: For viewing footage and navigating settings.
3.2 Key Features
- Dual 4K+1080P Recording: Records front video in Ultra HD 4K (3840x2160P) and rear video in Full HD 1080P.
- Superior Night Vision: Equipped with an F1.8 large aperture lens and HDR/WDR technology for clear recording in low-light conditions.
- 170° Wide-Angle Front Camera: Provides a broad field of view to cover multiple lanes.
- 150° Wide-Angle Waterproof Rear Camera: Captures the view behind your vehicle.
- Built-in 5GHz Wi-Fi & App Control: Connects to the "Viidure" app for live streaming, video downloads, and settings adjustments.
- 24-Hour Parking Monitor: Provides continuous surveillance when the car is off (requires separate hardwire kit).
- Seamless Loop Recording: Automatically overwrites older files when the memory card is full, ensuring continuous recording.
- G-Sensor Protection: Detects collisions and locks current video footage to prevent overwriting.
- 3-inch IPS Touch Screen: Intuitive interface for easy operation.
- Compact Design: Discreetly mounts behind the rearview mirror.
4. Setup and Installation
4.1 Memory Card Preparation
Before first use, it is recommended to format the included 32GB SD card within the dash cam's settings. Regular formatting (every 2 weeks to 1 month) helps maintain optimal performance and prevents data corruption. The device supports SD cards up to 256GB.

Image: Illustration of inserting the 32GB SD card into the dash cam. Ensure proper orientation.
4.2 Mounting the Dash Cam
The dash cam is designed for discreet mounting on your vehicle's windshield.
- Clean the windshield area where you intend to mount the dash cam.
- Attach an electrostatic sticker to the chosen area on the windshield.
- Mount the main dash cam unit onto the electrostatic sticker using the provided bracket. Position it behind your rearview mirror to avoid obstructing your view.
- Install the rear camera in a suitable location, typically on the rear windshield, ensuring a clear view.
4.3 Wiring Options
Proper cable routing ensures a clean and secure installation.

Image: Wiring diagram showing two options: concealed routing to the fuse box for parking monitor functionality (red line) and routing to the cigarette lighter socket (blue line).
- Cigarette Lighter Power Option: Use the included 11.5ft power supply cable and car charger. Route the cable along the edge of the windshield, tucking it into the headliner, and then down to the passenger side to connect to the vehicle's cigarette lighter socket.
- Fuse Box Connection (for 24-Hour Parking Monitor): For continuous 24-hour parking monitoring, a dedicated Type-C hardwire kit (not included, purchased separately) is required. This kit connects to the vehicle's fuse box, providing constant power and voltage protection. It will automatically cut off power at low voltage to prevent draining the car battery.
Connect the rear camera cable from the main unit to the rear camera, routing it discreetly through the vehicle's interior.
5. Operation
5.1 Automatic Recording
Once installed and powered, the dash cam will automatically turn on and begin recording when you start your vehicle. It will automatically save footage in segments to the memory card.
5.2 Loop Recording
The dash cam features seamless loop recording. When the memory card reaches its capacity, the oldest unlocked video files will be automatically overwritten by new recordings. This ensures continuous recording without manual intervention.
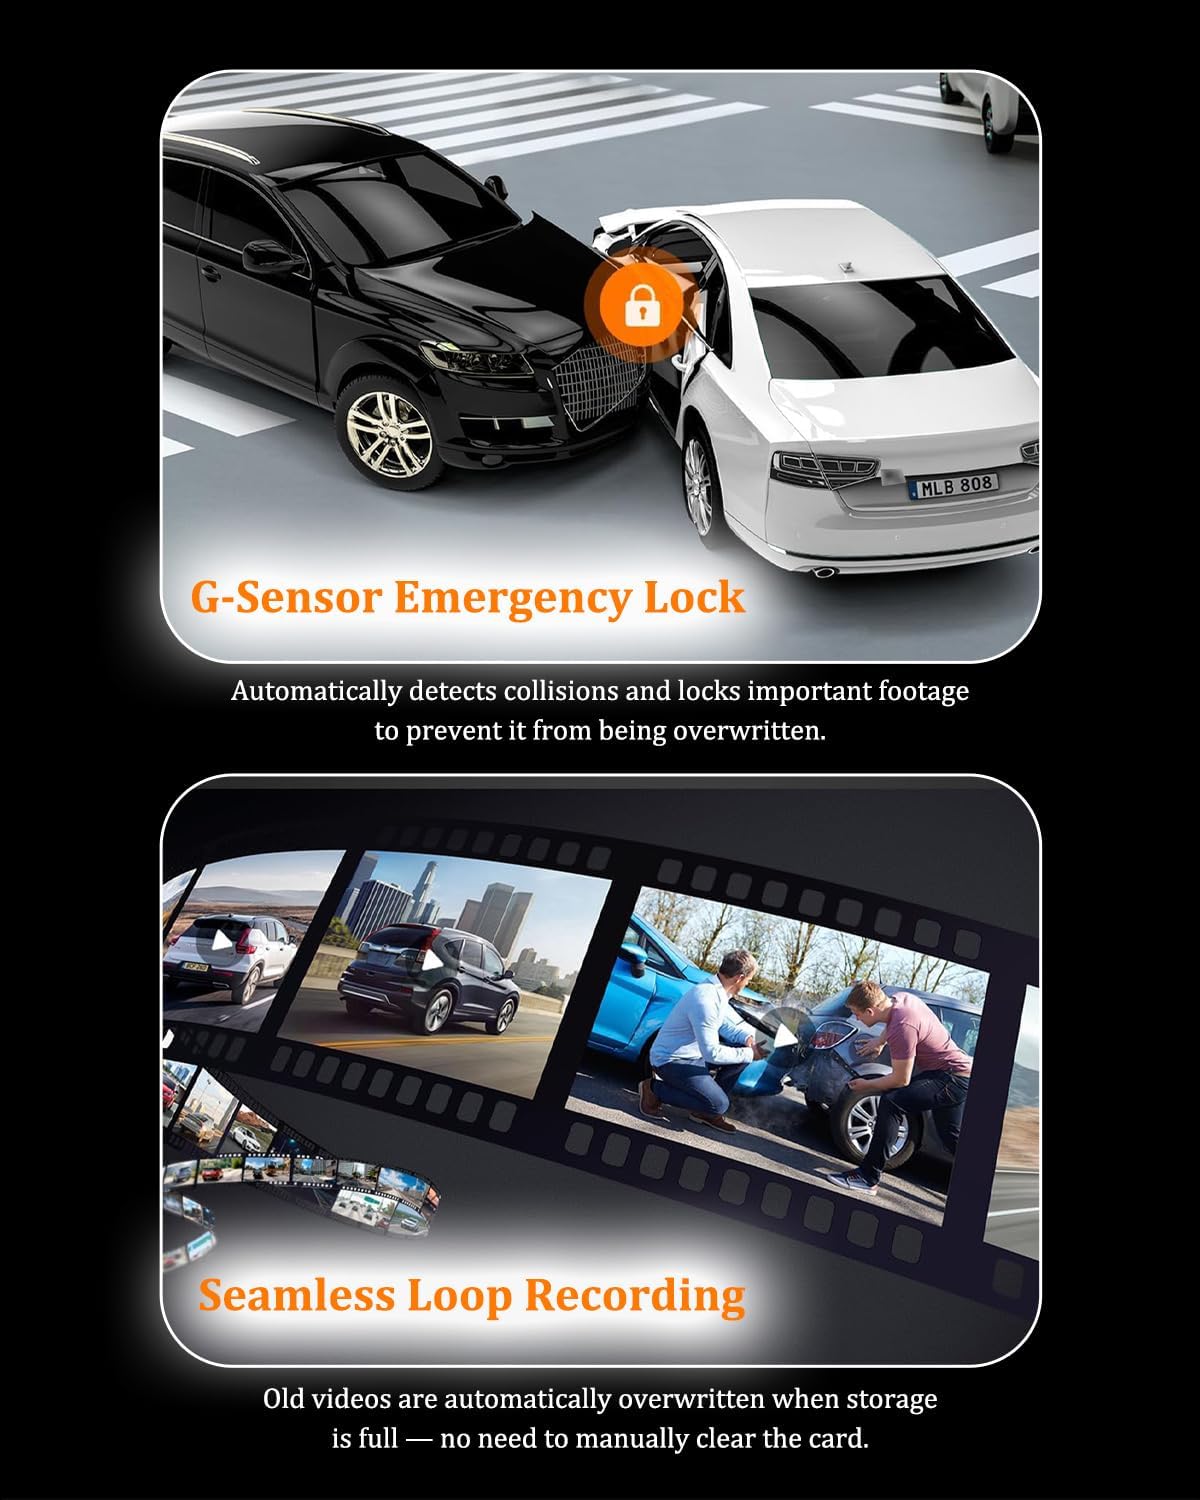
Image: Visual representation of G-Sensor Emergency Lock (a car collision with a lock icon) and Seamless Loop Recording (old videos being overwritten).
5.3 G-Sensor Emergency Lock
The built-in G-sensor detects sudden impacts or collisions. When triggered, it automatically locks the current video segment, protecting it from being overwritten by loop recording. This ensures critical evidence is preserved.
5.4 Night Vision
The dash cam utilizes an F1.8 large aperture lens and HDR/WDR technology to enhance video clarity in low-light conditions, ensuring important details like license plates are captured clearly at night.

Image: Comparison of night vision quality, highlighting the clarity achieved with the F1.8 large aperture lens in dark environments.
6. Mobile App Connectivity
The DIWEISHI Dash Cam X17 features built-in 5GHz Wi-Fi for seamless connection to your smartphone via the "Viidure" app.
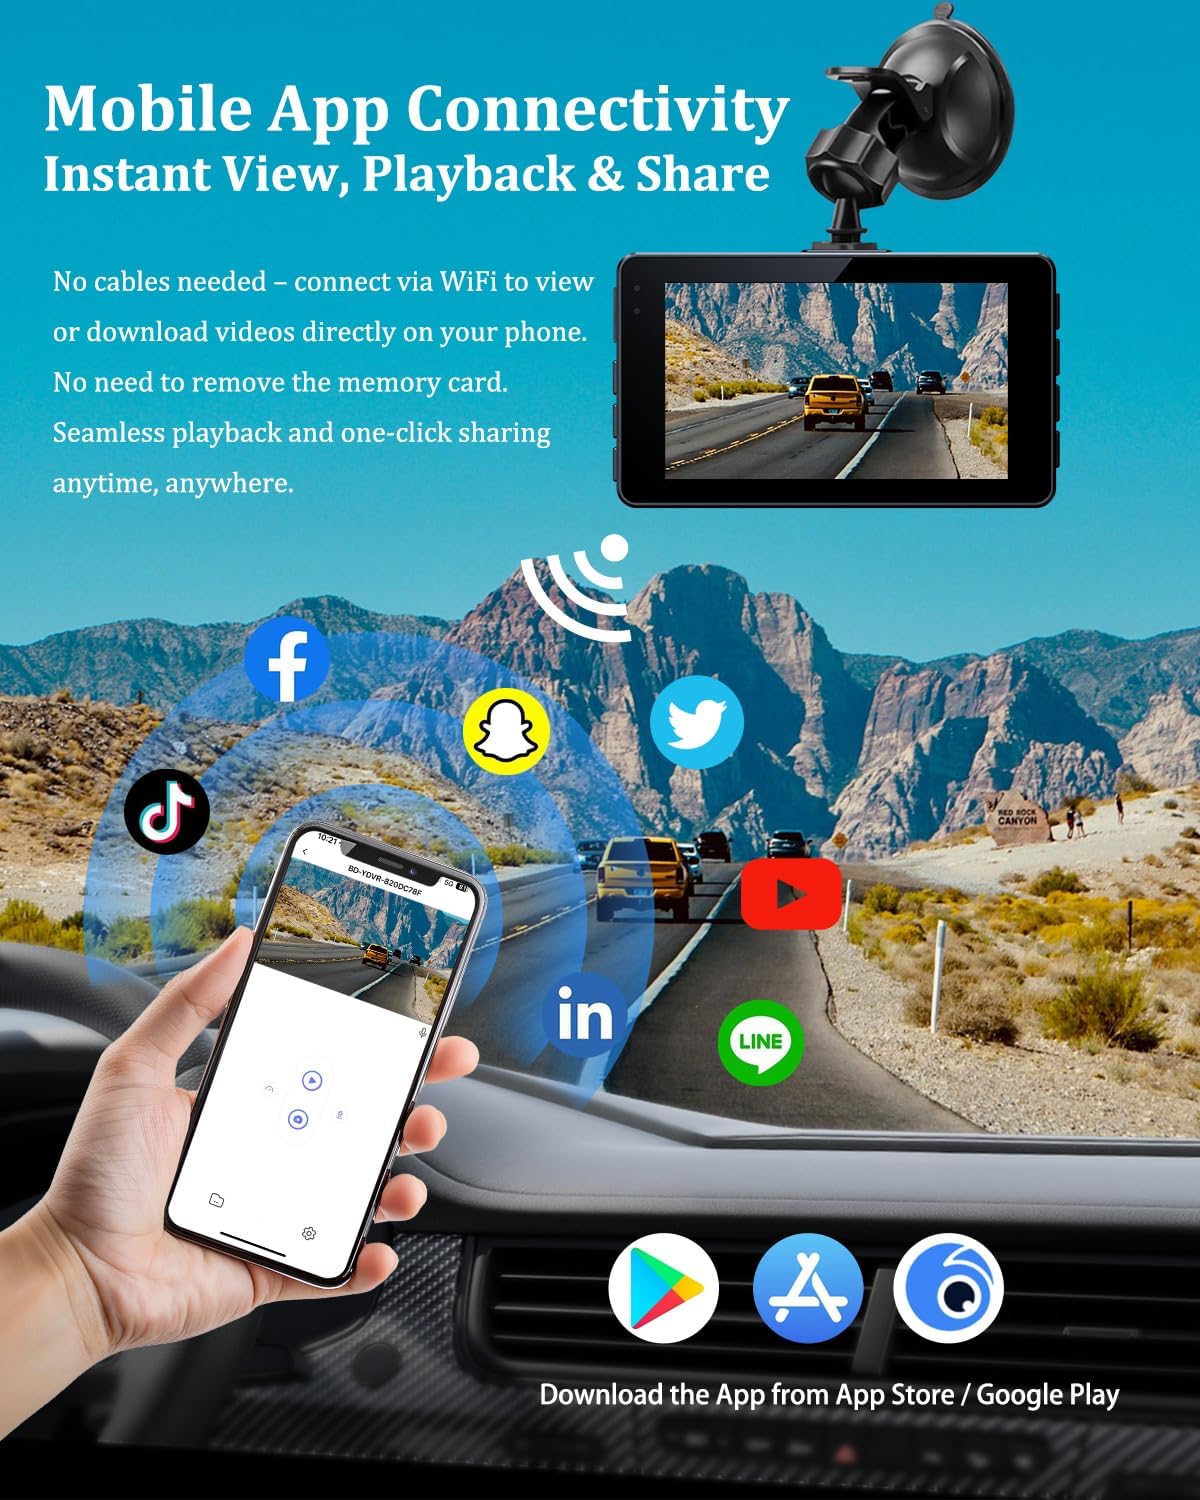
Image: A smartphone displaying the dash cam's live view, with Wi-Fi signals and various social media app icons, illustrating mobile app connectivity for viewing, playback, and sharing.
- Download the "Viidure" app from the App Store (iOS) or Google Play Store (Android).
- Turn on the dash cam and enable its Wi-Fi function through the device settings.
- On your smartphone, go to Wi-Fi settings and connect to the dash cam's Wi-Fi network (SSID and password will be displayed on the dash cam screen).
- Open the "Viidure" app. You can now view live footage, play back recorded videos, download files to your phone, and adjust dash cam settings directly from the app.
7. Parking Monitoring
The 24-hour parking monitor feature provides surveillance even when your vehicle is parked and the engine is off. This function requires a separate Type-C hardwire kit (not included) to be installed and connected to your vehicle's fuse box for continuous power.
Image: Diagram showing a car under 24-hour surveillance, with small images depicting potential parking incidents such as vehicle damage or theft, emphasizing the protective function of the parking monitor.
When activated with the hardwire kit, the dash cam can record in low FPS (frames per second) or trigger recording upon detecting impact, safeguarding your vehicle against vandalism or break-ins.
8. Maintenance
- SD Card Formatting: It is recommended to format the SD card every 2 weeks or 1 month to ensure optimal performance and prevent recording issues. This can be done through the dash cam's settings menu.
- Cleaning: Use a soft, dry cloth to clean the camera lenses and the screen. Avoid using abrasive cleaners or solvents.
- Firmware Updates: Check the manufacturer's website or the "Viidure" app periodically for any available firmware updates to improve performance and add new features.
9. Troubleshooting
If you encounter issues with your DIWEISHI Dash Cam X17, please refer to the following common solutions:
- Dash Cam Not Turning On: Ensure the power cable is securely connected to both the dash cam and the car's power source. Check the car charger or fuse connection.
- Recording Stops or Freezes: Format the SD card. If the issue persists, try a different high-speed (Class 10 or U3) SD card. Ensure the SD card is not full or corrupted.
- Poor Video Quality: Clean the camera lenses. Ensure the protective film has been removed from the lenses. Check the resolution settings in the dash cam menu.
- Wi-Fi Connection Issues: Ensure Wi-Fi is enabled on the dash cam and your phone. Restart both devices. Verify you are connecting to the correct Wi-Fi network.
- Parking Monitor Not Working: Confirm that a Type-C hardwire kit is correctly installed and connected to a constant power source in your vehicle's fuse box.
- G-Sensor Too Sensitive/Not Sensitive Enough: Adjust the G-sensor sensitivity setting in the dash cam menu.
If these steps do not resolve the issue, please contact DIWEISHI customer support for further assistance.
10. Specifications
| Feature | Specification |
|---|---|
| Resolution | Front: 4K (3840x2160P), Rear: 1080P |
| Display | 3.0" IPS Touch Screen |
| Front Wide Angle | 170 Degrees |
| Rear Wide Angle | 150 Degrees |
| Aperture | F1.8 |
| Connectivity Technology | Built-in 5GHz Wi-Fi |
| Memory Card Support | Up to 256GB (32GB included) |
| Special Features | App Control, Loop Recording, Night Vision, G-Sensor, Parking Monitor, WDR, Audio Recording |
| Operating Current | 5V/2A |
| Ambient Temperature | -20°C to +70°C |
| Product Dimensions | 0.8 x 3.9 x 3.9 inches |
| Item Weight | 6.4 ounces |
11. Warranty and Support
The DIWEISHI Dash Cam X17 comes with an 18-month reliable warranty. For warranty claims, technical support, or any inquiries, please contact DIWEISHI customer service through the retailer where you purchased the product or visit the official DIWEISHI website for contact information.