Garvee FSJAGVLB25070102y6v
Garvee Loft Bed Twin Size Instruction Manual
Model: FSJAGVLB25070102y6v
Introduction
Thank you for choosing the Garvee Twin Size Loft Bed. This manual provides detailed instructions for the safe assembly, operation, and maintenance of your new loft bed. Please read all instructions carefully before beginning assembly and retain this manual for future reference.
Important Safety Information
Your safety is paramount. Adhere to the following guidelines to prevent injury and ensure the longevity of your loft bed:
- Weight Capacity: Do not exceed the maximum weight capacity of 350 lbs.
- Mattress Placement: Ensure the mattress sits at least 5 inches below the top of the guardrail to prevent falls.
- Anti-Tip Brackets: Always use the provided heavy-duty anti-tip brackets to securely anchor the bed frame to the wall. Failure to do so may result in instability and injury.
- Assembly: Follow all assembly instructions carefully. Incorrect assembly can lead to structural instability.
- Regular Checks: Periodically check all bolts and connections to ensure they remain tight. Tighten as necessary.
- No Jumping: Do not jump on the bed.
- Children: This loft bed is suitable for both kids and adults, but ensure children are supervised, especially during initial use.
Package Contents
Before assembly, verify that all components are present and undamaged. If any parts are missing or broken, please contact customer support immediately.
- Bed Frame Components (various metal tubes and panels)
- Arched Guardrails
- Steel Slats
- Ladder
- Assembly Hardware (screws, bolts, Allen wrench)
- Plastic Foot Caps
- Anti-Tip Brackets
- Installation Manual (this document)

Figure 1: Overview of all packaged components before assembly. Note the instruction manual and various metal parts.
Assembly Instructions
Assembly is designed to be straightforward. All parts are numbered for easy identification. It is recommended to assemble with two people.
- Step 1: Identify Components. Unpack all components and lay them out. Refer to the parts list in the manual and ensure all numbered pieces are present. The pieces are number-coded to match the diagrams in the manual.
- Step 2: Assemble the Side Frames. Connect the vertical and horizontal bars to form the two side frames of the loft bed. Ensure all screws are tightened securely using the provided Allen wrench. The metal construction is designed for strength and durability.
- Step 3: Attach the Arched Guardrails. Secure the arched guardrails to the top of the side frames. These guardrails are 15 inches high, providing enhanced safety.
- Step 4: Connect the Side Frames. Use the longer support bars to connect the two assembled side frames, creating the main structure of the bed.
- Step 5: Install Steel Slats. Place the steel slats across the bed frame. The custom slat clips will lock them firmly in place, preventing squeaks and ensuring a silent sleep experience. No box spring is needed.
- Step 6: Attach the Ladder. Securely attach the ladder to the designated side of the bed frame. The ladder's position is interchangeable, allowing for flexible room arrangements.
- Step 7: Apply Plastic Foot Caps. Place the plastic foot caps on the bottom of each leg to protect your flooring from scratches.
- Step 8: Secure with Anti-Tip Brackets. For maximum stability and safety, attach the anti-tip brackets to the bed frame and securely anchor them to the wall. This is crucial to prevent wobbling, especially given the bed's height.
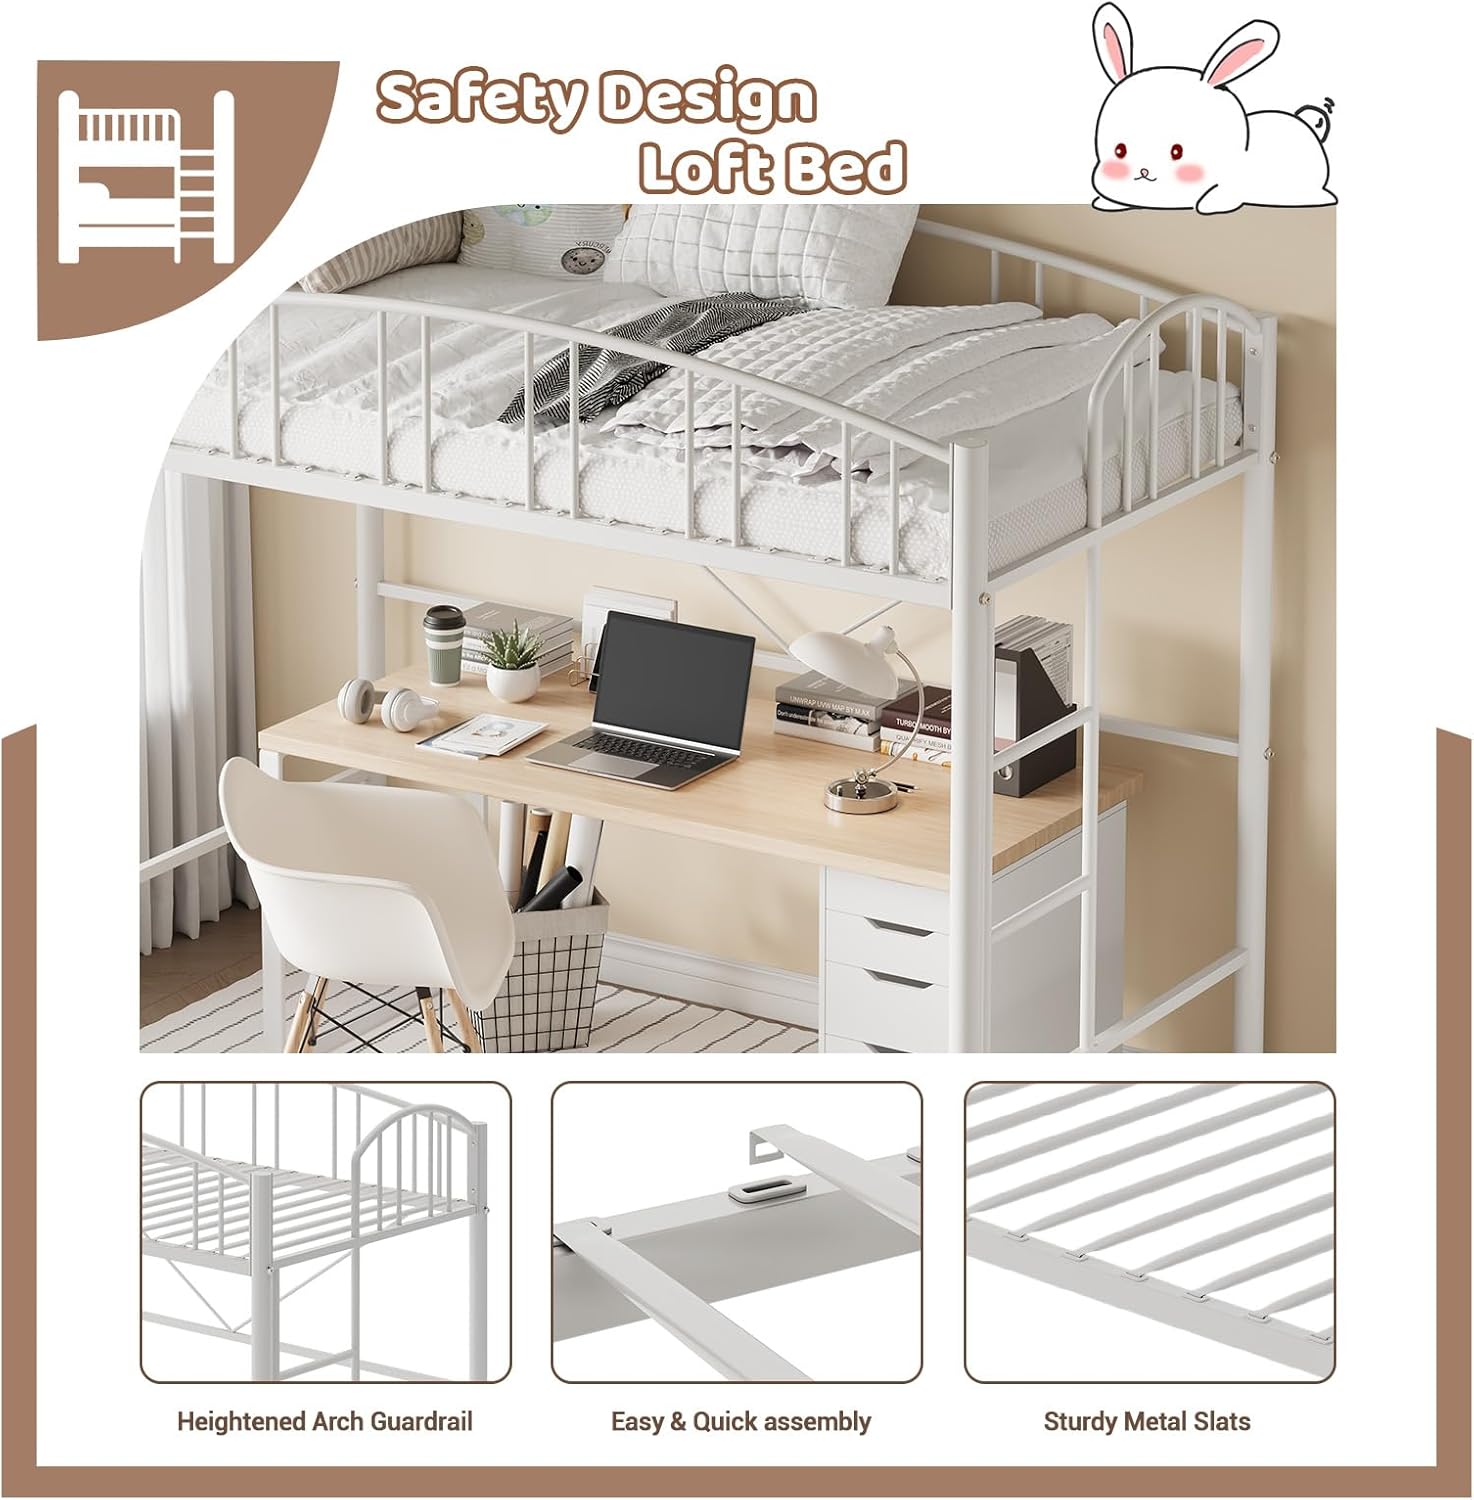
Figure 2: Matching numbered parts with the assembly diagram for easy identification.

Figure 3: Assembling one of the robust side frames of the loft bed.

Figure 4: Close-up of the anti-tip bracket mechanism, essential for securing the bed to the wall.
Once assembled, the loft bed provides approximately 46.5 inches of clearance underneath, ideal for creating a study area, play space, or additional storage.

Figure 5: The fully assembled Garvee Loft Bed, showcasing its space-saving design with a desk setup underneath.
Operating Instructions
The Garvee Loft Bed is designed for daily use by individuals requiring an elevated sleeping solution. To use the bed:
- Use the integrated ladder to safely ascend and descend from the top bunk.
- Ensure the mattress is properly seated within the bed frame and does not exceed the recommended height relative to the guardrail.
- The under-bed space can be utilized for various purposes, such as a study area, lounge, or storage, maximizing room efficiency.

Figure 6: Versatile uses of the under-bed space, including study, leisure, and storage.
Maintenance
Proper maintenance will extend the life of your Garvee Loft Bed:
- Cleaning: Wipe down the metal frame with a soft, damp cloth. Avoid abrasive cleaners or harsh chemicals that could damage the polished finish.
- Hardware Check: Every 3-6 months, inspect all bolts, screws, and connections. Tighten any loose hardware to maintain structural integrity and prevent squeaking.
- Floor Protection: Ensure the plastic foot caps are always in place to protect your flooring from scratches.
Troubleshooting
If you encounter any issues with your Garvee Loft Bed, consider the following common solutions:
| Problem | Possible Cause | Solution |
|---|---|---|
| Bed feels wobbly or unstable. | Loose hardware; Anti-tip brackets not installed or secured. | Tighten all bolts and screws. Ensure anti-tip brackets are properly installed and anchored to a sturdy wall. |
| Squeaking noises. | Loose connections; Slats not properly seated. | Check and tighten all connections. Verify that all steel slats are securely in their custom clips. |
| Missing or damaged parts upon arrival. | Shipping damage or packing error. | Contact Garvee customer support within 24 hours of delivery with your order number and details of the issue. |
Specifications
- Brand: Garvee
- Model: FSJAGVLB25070102y6v
- Size: Twin Loft Bed
- Color: White
- Product Dimensions: 41.7"L x 78.1"W x 61.5"H
- Item Weight: 57 pounds
- Weight Capacity: Up to 350 lbs
- Material: Heavy-Duty Metal (Steel)
- Finish Type: Polished
- Box Spring Required: No
- Included Components: Guardrails, Slats, Ladder
- Compatible Mattress Size: Twin
- Assembly Required: Yes

Figure 7: Detailed product dimensions for the Garvee Twin Loft Bed.
Warranty & Support
Garvee is committed to providing high-quality products. For any questions, concerns, or to report missing/broken parts, please contact our customer support team. We aim to respond within 24 hours.
- Customer Support: For assistance, please refer to the contact information provided in your purchase documentation or on the Garvee official website.
- Protection Plans: Additional protection plans may be available for purchase to extend coverage beyond the standard warranty. Please check your purchase details for options such as 2-Year or 3-Year Protection Plans.
- Returns: This product is eligible for 30-day easy returns. Please refer to the retailer's return policy for full details.
Ask a question about this manual
Ask about setup, troubleshooting, compatibility, parts, safety, or missing instructions. Manuals+ will review the question and use this page’s manual context to help answer it.