1. Introduction
This manual provides detailed instructions for the safe operation, setup, maintenance, and troubleshooting of your ikaufen S159 Drone. Please read this manual thoroughly before operating the drone to ensure proper function and to prevent damage or injury. Retain this manual for future reference.
2. Safety Precautions
- Flight Environment: Operate the drone in open, unobstructed areas, away from people, animals, buildings, and power lines. Avoid flying in strong winds, rain, or other adverse weather conditions.
- Battery Safety: Use only the provided charger and batteries. Do not overcharge or short-circuit batteries. Discontinue use if batteries show signs of swelling, leakage, or damage. Store batteries in a cool, dry place.
- Propeller Safety: Keep hands, face, and loose clothing away from rotating propellers. Ensure propellers are correctly installed before each flight.
- Line of Sight: Always maintain visual line of sight with the drone during flight.
- Age Recommendation: This product is intended for users aged 14 and above.
- Emergency Stop: Familiarize yourself with the emergency stop function on the remote control.
3. Package Contents
Verify that all items are present in the package:
- ikaufen S159 Drone x 1
- Remote Control with Built-in Screen x 1
- 7.4V 2200mAh Battery x 2
- USB Charging Cable x 1
- Screwdriver x 1
- Spare Fan Blades x 4
- Card Reader x 1
- Memory Card x 1
- Instruction Manual x 2 (Main Manual and Quick Start Guide)
4. Product Overview
4.1 Drone Components
The ikaufen S159 Drone features a foldable design for portability, integrated lighting, and an advanced camera system.

Figure 4.1: The ikaufen S159 Drone with its integrated screen remote control. The drone features a sleek black design with teal accents on the propellers and body, indicating its operational status and direction. The remote control is shown with its built-in display, providing real-time flight information and camera feed.
4.2 Remote Control Layout
The remote control is equipped with a 5.9-inch built-in screen for real-time image transmission and various control buttons for precise drone operation.

Figure 4.2: Detailed diagram of the ikaufen S159 Drone remote control. Key features include the telescopic phone holder (though this model has a built-in screen), power switch, camera up/down buttons, speed switching, throttle, GPS switch, take-off/land button, return/headless mode, function keys, screen switch, charging port, memory socket, and confirm key. The central screen displays flight data and camera view.
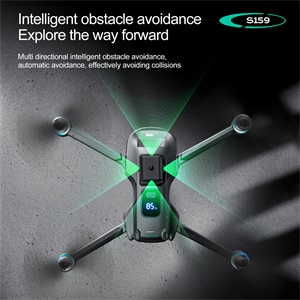
Figure 4.3: Close-up of the ikaufen S159 remote control, highlighting its 5G real-time image transmission capability and integrated LCD screen. This screen allows for direct viewing of the drone's camera feed without needing an external smartphone.
5. Setup
5.1 Charging the Battery
Before first use, fully charge the drone batteries and the remote control. The drone battery is a 7.4V 2200mAh capacity, requiring approximately 100-120 minutes for a full charge.
- Connect the USB charging cable to the drone battery.
- Plug the USB end into a 5V/2A USB power adapter (not included).
- The charging indicator will show the charging status. Once fully charged, disconnect the cable.
- For the remote control, connect the USB charging cable to its charging port.

Figure 5.1: The ikaufen S159 Drone displaying its modular battery and digital battery level indicator. This feature allows users to easily monitor the remaining power of the drone's battery during operation.
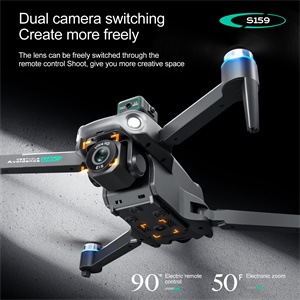
Figure 5.2: A close-up view of the ikaufen S159 Drone's 7.4V high-capacity modular battery. This design facilitates easy installation and removal, and its robust construction contributes to a longer battery life.
5.2 Battery Installation
- Ensure the drone is powered off.
- Insert the charged battery into the battery compartment on the drone until it clicks securely into place.
5.3 Propeller Installation
If propellers are not pre-installed or need replacement, ensure they are attached correctly according to their rotation direction (A and B propellers).
6. Operating Instructions
6.1 Power On and Pairing
- Place the drone on a flat, level surface.
- Press and hold the power button on the drone until the indicator lights turn on.
- Turn on the remote control. The remote will automatically search for the drone.
- Once paired, the drone's indicator lights will become solid, and the remote control screen will display the live feed.
6.2 Calibration
Perform gyroscope and geomagnetic calibration before each flight for stable operation, especially when flying in a new location.
- Gyroscope Calibration: Refer to the remote control diagram (Figure 4.2) for the specific button or joystick combination to initiate gyroscope calibration. The drone lights will flash during calibration and become solid upon completion.
- Geomagnetic Calibration (GPS Mode): For GPS-assisted flight, perform geomagnetic calibration. This typically involves rotating the drone horizontally and then vertically as instructed by the remote control or drone lights.
6.3 Take-off and Landing
- One-Key Take-off: Press the dedicated 'Take off/land' button on the remote control. The drone will automatically ascend to a safe hovering altitude.
- Manual Take-off: Push both joysticks down and outwards to start the motors. Then, slowly push the left joystick (throttle) upwards to ascend.
- One-Key Landing: Press the 'Take off/land' button again. The drone will automatically descend and land.
- Manual Landing: Slowly pull the left joystick (throttle) downwards until the drone lands. Once landed, pull both joysticks down and inwards to stop the motors.
6.4 Flight Modes and Functions
- GPS Positioning: The drone utilizes GPS for precise outdoor positioning, enabling features like one-key return, low power automatic return, and out-of-control automatic return.
- Optical Flow Positioning: For stable indoor flight, the optical flow sensor assists in maintaining position.
- Headless Mode: In headless mode, the drone's orientation is relative to the pilot, simplifying control regardless of the drone's front direction.
- Speed Switching: Adjust flight speed using the speed gear switch on the remote control.
- Trajectory Flight: Draw a desired flight path on the remote control screen (or connected app if applicable), and the drone will follow it.
- One-Key Surround: The drone can automatically circle a point of interest.
- Intelligent Follow: The drone can follow a designated subject.

Figure 6.1: Illustration of the ikaufen S159 Drone's 'Surround Shooting' feature. The drone can automatically orbit a central point, capturing a 360-degree view, which is useful for cinematic shots.
6.5 Camera Operation
The S159 drone is equipped with an ESC (Electronic Speed Control) camera with up to 8K interpolated pixels and EIS (Electronic Image Stabilization) for enhanced stability.
- Photo/Video Capture: Use the dedicated buttons on the remote control to take photos or start/stop video recording.
- Real-time Transmission: View the live camera feed directly on the remote control's built-in screen.
- Adjustable Lens: The camera lens can be adjusted electrically via the remote control, offering flexibility in capturing different angles.
- Dual Camera Switching: The drone supports switching between dual cameras, providing more creative shooting options.

Figure 6.2: Close-up of the ikaufen S159 Drone's high-definition electrically adjustable lens. This camera features EIS (Electronic Image Stabilization) for enhanced stability and natural imaging, allowing for the capture of wide shots with clarity.

Figure 6.3: The ikaufen S159 Drone demonstrating its dual camera switching capability. This feature allows the user to freely switch between cameras via the remote control, providing more creative flexibility for aerial photography and videography.

Figure 6.4: An illustration highlighting the ikaufen S159 Drone's dual camera system. This setup allows for versatile shooting perspectives and enhanced photographic capabilities.
6.6 Obstacle Avoidance
The S159 drone is equipped with an obstacle avoidance function to prevent collisions during flight.

Figure 6.5: Visual representation of the ikaufen S159 Drone's intelligent obstacle avoidance system. The drone uses sensors to detect obstacles in multiple directions, automatically adjusting its flight path to prevent collisions and ensure safer operation.
7. Maintenance
- Cleaning: Use a soft, dry cloth to clean the drone and remote control after each use. Avoid using harsh chemicals or solvents.
- Propeller Inspection: Regularly inspect propellers for any damage (cracks, bends). Replace damaged propellers immediately using the provided spare parts.
- Battery Care: Do not store batteries fully charged or completely depleted for extended periods. Charge them to about 50-60% for long-term storage.
- Storage: Store the drone and its accessories in a cool, dry place, away from direct sunlight and extreme temperatures.
8. Troubleshooting
| Problem | Possible Cause | Solution |
|---|---|---|
| Drone does not power on | Battery depleted or not installed correctly. | Charge the battery fully. Ensure battery is securely installed. |
| Unable to pair drone with remote | Drone or remote not powered on, or too far apart. | Ensure both are powered on and within close proximity. Re-attempt pairing sequence. |
| Unstable flight/Drifting | Drone not calibrated, or strong wind interference. | Perform gyroscope and geomagnetic calibration on a flat surface. Avoid flying in windy conditions. |
| Poor camera feed/No image | Weak Wi-Fi signal, or camera not connected properly. | Ensure drone and remote are within effective range. Check camera connection. |
| Drone does not respond to controls | Out of range, low battery, or interference. | Bring drone closer to remote. Check drone and remote battery levels. Fly in an open area away from interference. |
9. Specifications
Detailed technical specifications for the ikaufen S159 Drone:
| Feature | Specification |
|---|---|
| Model Name | S159 |
| Drone Dimensions | 5.11"L x 2.95"W x 2.16"H (folded) |
| Item Weight | 407 Grams (14.4 ounces) |
| Battery Capacity | 7.4V 2200mAh (Drone) |
| Charging Time | Approx. 100-120 minutes |
| Flight Endurance | Approx. 20-25 minutes |
| Remote Control Distance | Up to 2000 meters (length), 120 meters (height) |
| Video Capture Resolution | 4K (interpolated up to 8K) |
| Connectivity Technology | Bluetooth, Wi-Fi (5G signal for image transmission) |
| Control Type | Remote Control with Built-in Screen |
| Special Features | GPS Positioning, Optical Flow Positioning, Brushless Motor, ESC Camera, Obstacle Avoidance, First Person View (FPV), Headless Mode, One-Key Return, Trajectory Flight, One-Key Surround, Intelligent Follow |
| Material | Plastic |

Figure 9.1: A summary of the ikaufen S159 Drone's key product parameters, including product name, camera specifications (Electric dual camera/EIS electronic anti-shake), flight system (GPS/optical flow/brushless/obstacle avoidance), and product size details.

Figure 9.2: An overview of the ikaufen S159 Drone's characteristics and performance features. This includes intelligent obstacle avoidance, electrically adjustable dual lens, optical flow hover, GPS positioning, screen display, low battery/out-of-control/long-range return, one-click return, brushless power, gesture photography/recording, beauty filter addition, one-click start/stop, multi-speed, high-definition image transfer, surround shooting, waypoint flight, mobile control, and body battery display.
10. Warranty and Support
For warranty information and customer support, please refer to the documentation provided with your purchase or contact the seller directly. Keep your proof of purchase for any warranty claims.