1. Introduction
This manual provides comprehensive instructions for the assembly, operation, and maintenance of your Yardenaler 8x12 FT Greenhouse Kit. Designed for outdoor use, this wooden walk-in greenhouse features 6MM thick polycarbonate panels, an adjustable roof vent, and a lockable door, offering an ideal environment for plant cultivation and garden storage.

Image 1.1: The Yardenaler 8x12 FT Greenhouse Kit installed in a garden.
2. Safety Information
Please read and understand all safety warnings before assembly and use. Failure to follow these instructions may result in injury or damage to the product.
- Heavy Components: The greenhouse kit contains heavy components. Exercise caution during lifting and assembly. It is recommended to have at least two adults for assembly.
- Sharp Edges: Some components may have sharp edges. Wear appropriate protective gloves during handling and assembly.
- Stability and Anchoring: Ensure the greenhouse is assembled on a level, stable surface. Securely anchor the greenhouse to the ground as per assembly instructions to prevent wind damage.
- UV Exposure: Be aware of potential UV exposure inside the greenhouse, especially during prolonged periods. While panels offer some UV protection, direct exposure can still occur.
- Ventilation: Maintain proper ventilation to regulate temperature and humidity inside the greenhouse. Utilize the adjustable roof vent as needed.
3. Features
- Adjustable Roof Vent: The greenhouse features an adjustable roof vent, allowing you to control airflow and temperature. The maximum opening angle is 45 degrees, providing UV protection while ensuring air circulation and temperature balance.
- Heavy-Duty and Sturdy Frame: Constructed with a durable fir wood frame, designed to withstand various weather conditions including sunny, snowy, and rainy days. It includes sturdy base support and reinforced construction for enhanced stability.
- Upgraded Polycarbonate Panels: Equipped with multi-layer 6MM thick polycarbonate panels that offer high light transmission for plant growth while blocking harmful UV rays.
- Versatile Gardening Space: Provides ample space for growing flowers, vegetables, and plants. It can also be utilized for storing gardening equipment and tools, or as a relaxing outdoor retreat.
- Lockable Door: A secure, lockable door ensures the safety of your plants and belongings.
Feature Details

Image 3.1: 45° Adjustable Ventilation for optimal plant growth.

Image 3.2: Multi-layer 6MM thick polycarbonate panel for light transmission and UV protection.

Image 3.3: Natural Cedar Wood Frame, providing durability and aesthetic appeal.
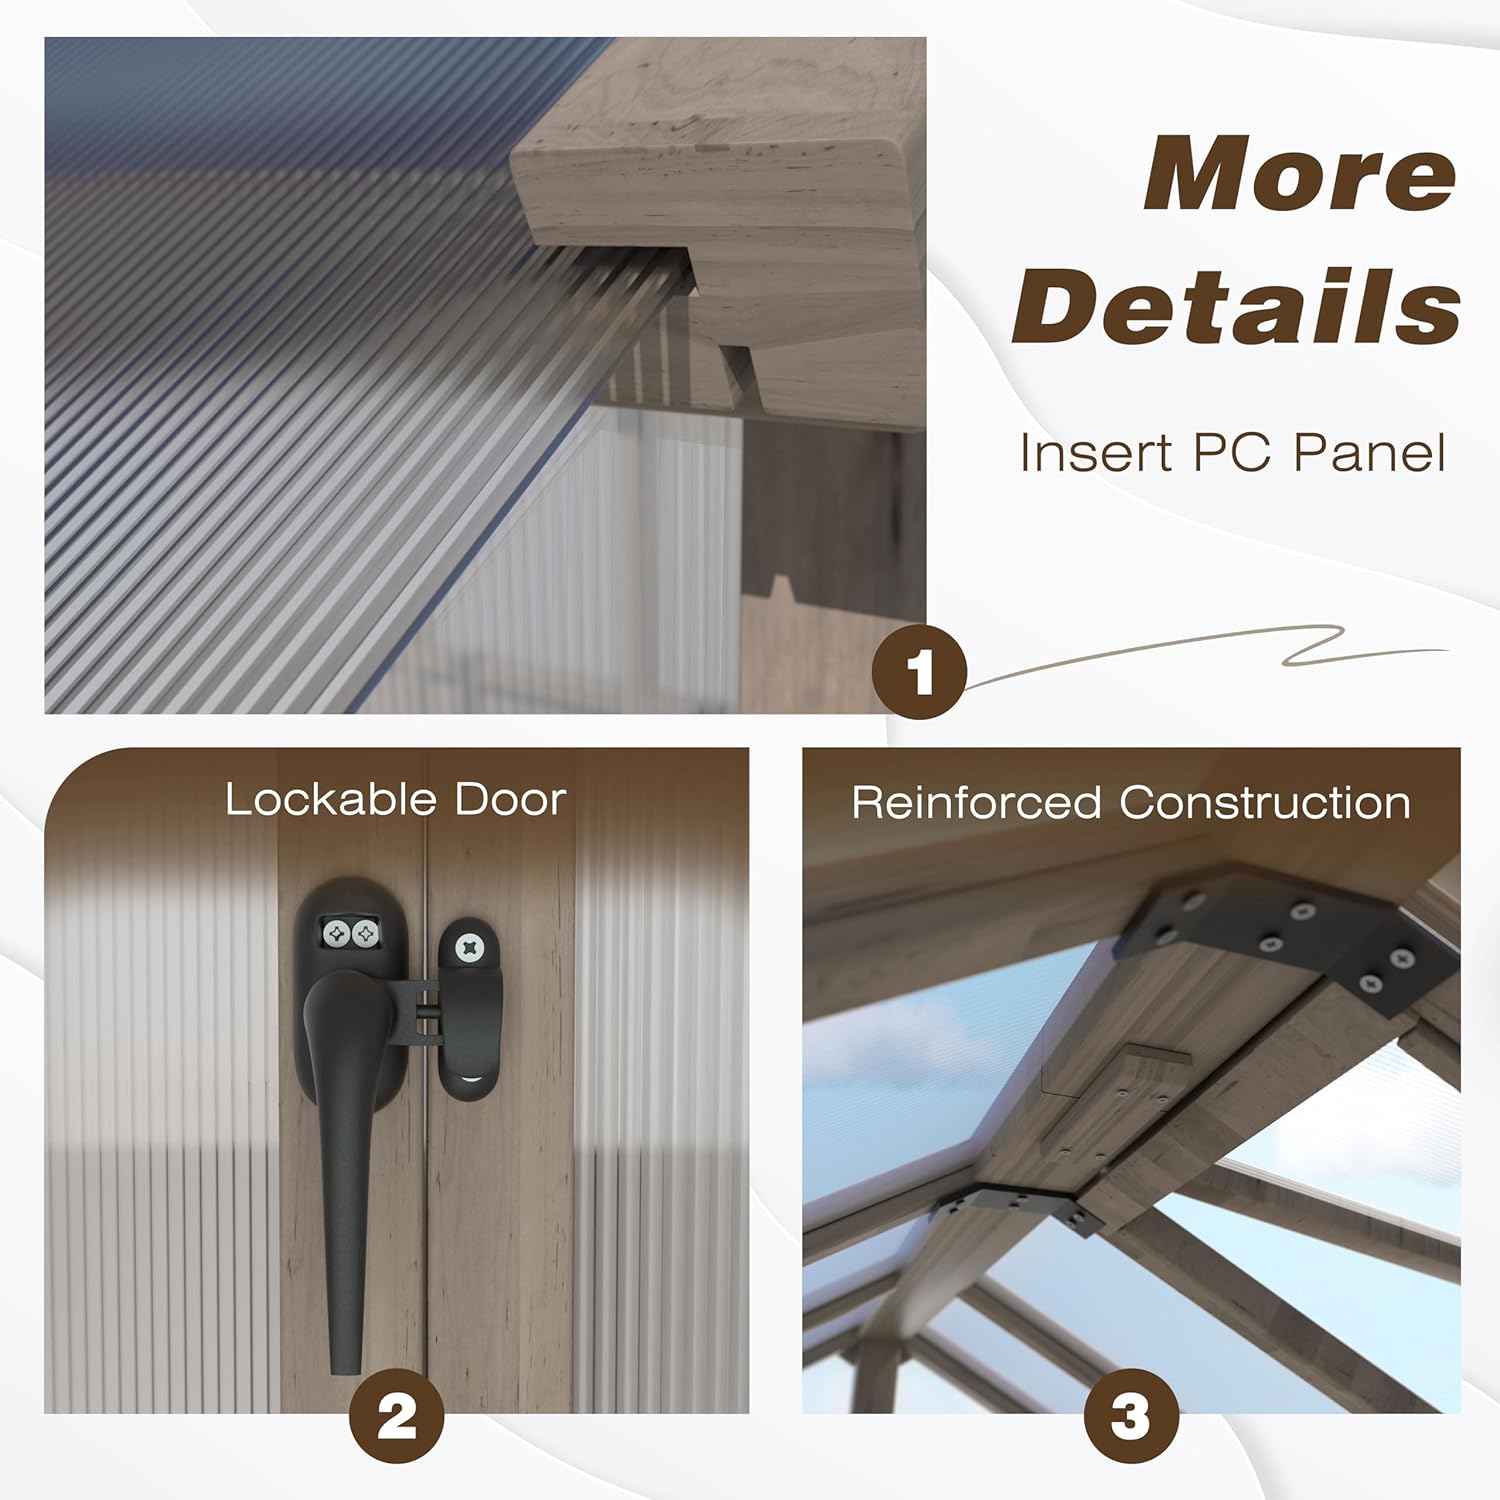
Image 3.4: Lockable Door for security and easy access.
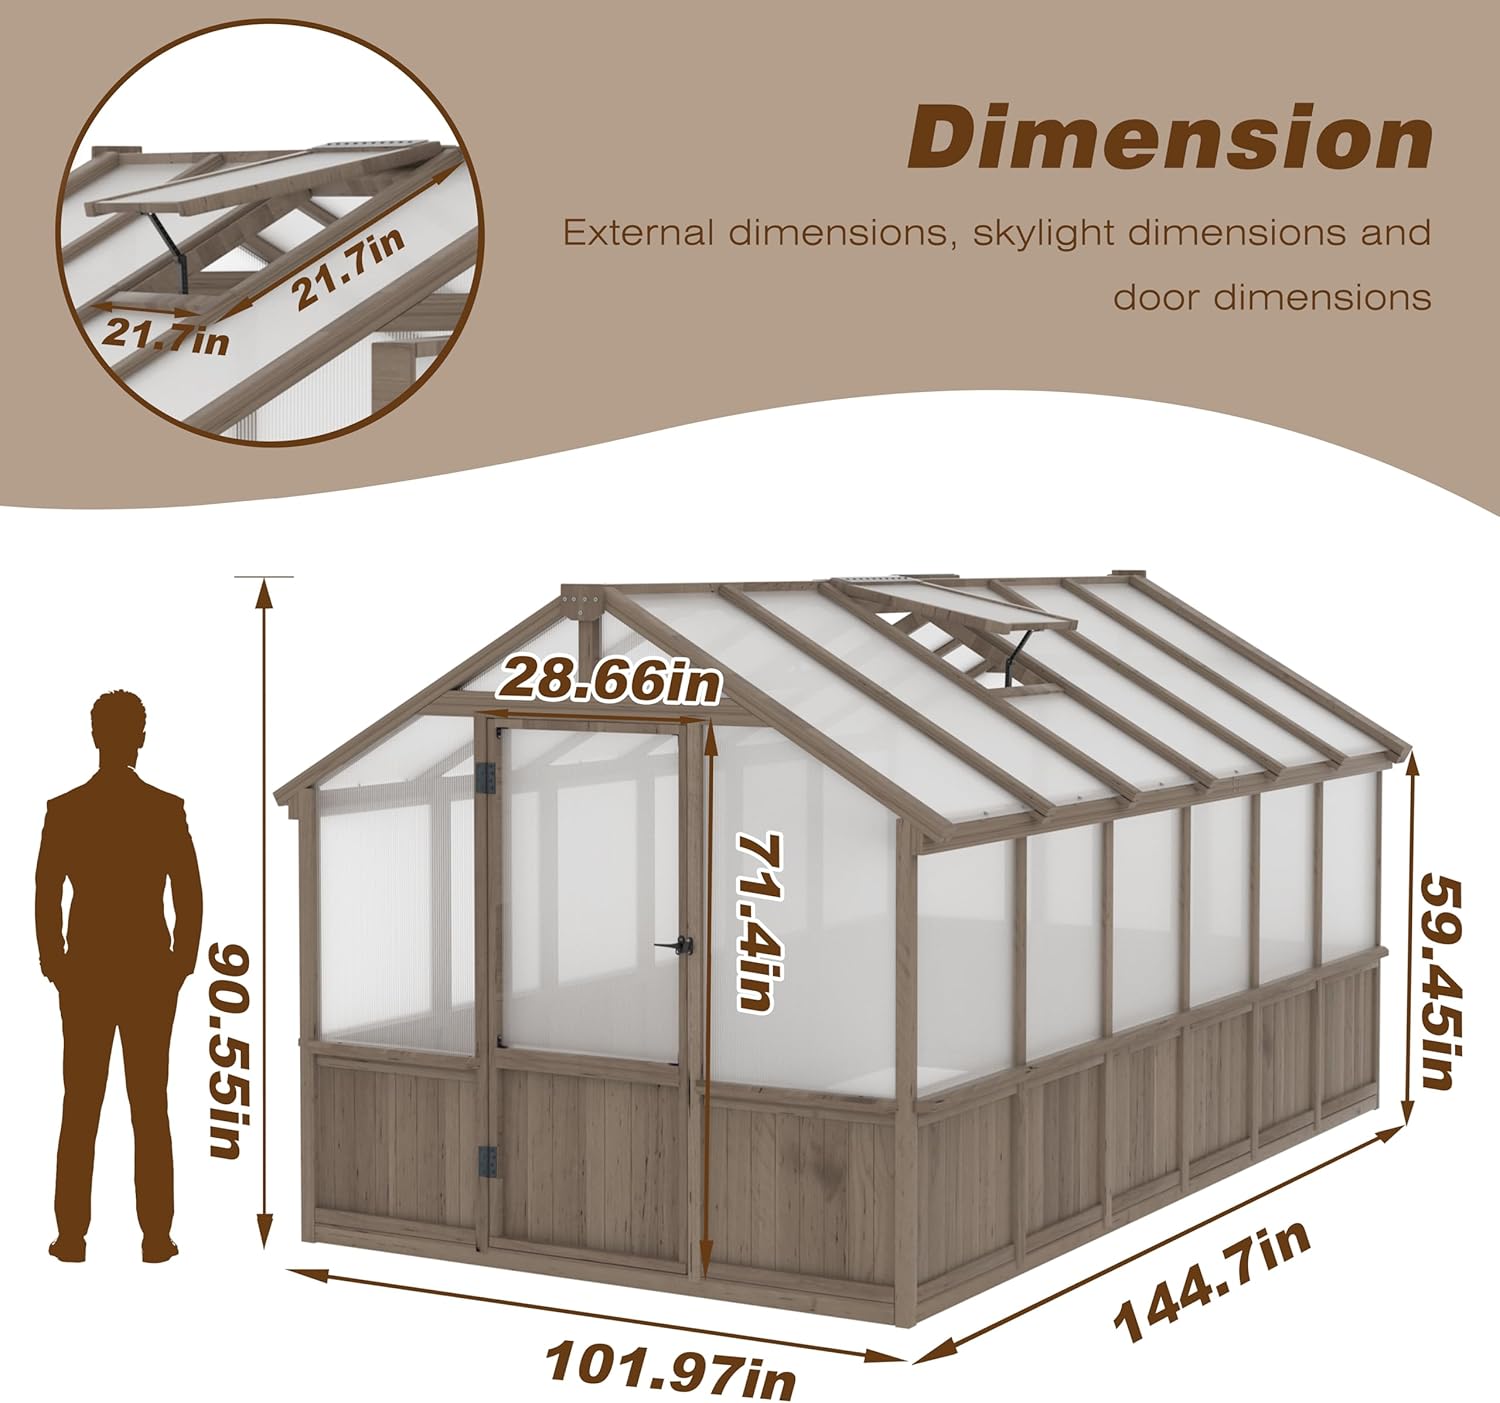
Image 3.5: Weatherproof design ensures protection in diverse climates.
4. Setup Instructions
Assembly of the Yardenaler Greenhouse Kit is designed to be straightforward. It is recommended to have at least two adults for assembly. Ensure all parts are present and clearly labeled before beginning.
- Unpack and Verify: Lay out all components and verify against the parts list provided in your separate assembly guide. Ensure all panels, wooden frames, and hardware are accounted for.
- Assemble Wall Panels: Begin by assembling the individual panels into complete wall sections. Pre-mounted fittings and hardware are designed to assist with alignment.
- Join Wall Sections: Connect the assembled wall sections to form the greenhouse structure.
- Attach Roof Sections: Secure each roof section to the main structure.
- Seal Gaps: Apply waterproof glue (not included) to fill any gaps between the boards and panels to prevent water leaks and enhance insulation.
- Secure Anchoring: Ensure the greenhouse is securely anchored to the ground using appropriate methods for your chosen site.
Assembly Visuals
Video 4.1: Assembly overview of a similar wooden greenhouse, demonstrating panel and frame construction.
Video 4.2: Product showcase of a wooden greenhouse, illustrating features and potential uses.
5. Operating Instructions
- Adjusting the Roof Vent: To adjust the roof vent, locate the joint mechanism. Gently push or pull the vent to your desired opening angle, up to 45 degrees. Ensure it is securely fixed in place to prevent accidental closing or opening due to wind.
- Using the Lockable Door: The door can be opened by turning the handle. To lock the door, ensure it is fully closed and engage the locking mechanism. For additional ventilation, the door can be propped open using the provided latch.
Video 5.1: Introduction to a greenhouse, highlighting its features including roof vents and door.
6. Maintenance
Regular maintenance will extend the lifespan and performance of your greenhouse.
- Cleaning Panels: Clean polycarbonate panels periodically with mild soap and water. Avoid abrasive cleaners or tools that could scratch the surface.
- Wood Frame Care: Inspect the wooden frame annually for any signs of wear, rot, or insect damage. Apply a wood sealant or stain as needed to protect the wood from moisture and UV degradation.
- Hardware Check: Periodically check all screws, bolts, and hinges to ensure they are tight and secure. Lubricate hinges if necessary.
- Vent and Door Functionality: Ensure the roof vent and door mechanisms operate smoothly. Clear any debris that may obstruct their movement.
7. Troubleshooting
If you encounter any issues with your greenhouse, refer to the following common troubleshooting tips:
- Water Leaks: If water leaks occur, re-inspect all panel seams and joints. Apply additional waterproof sealant where necessary. Ensure the roof vent and door are properly closed and sealed.
- Panel Instability: If panels feel loose, check the securing strips and ensure they are properly inserted and the frame is rigid. Verify all frame connections are tight.
- Door/Vent Sticking: Lubricate hinges and check for any obstructions. Ensure the frame is level, as an uneven base can cause alignment issues.
- Temperature Fluctuations: Adjust the roof vent to regulate internal temperature. Consider adding shading in very hot climates or supplemental heating in cold climates if plants require specific temperature ranges.
8. Specifications
| Feature | Detail |
|---|---|
| Brand | Yardenaler |
| Model Number | PG0101-26 |
| Size | 8x12 FT |
| Product Dimensions | 144.7"L x 101.97"W x 90.55"H |
| Item Weight | 376.18 Pounds |
| Frame Material | Fir Wood |
| Cover Material | Polycarbonate (PC) |
| Polycarbonate Thickness | 6MM |
| Number of Doors | 1 |
| Number of Vents | 1 |
| Color | Light Mocha Brown |
| Special Feature | Heavy Duty |
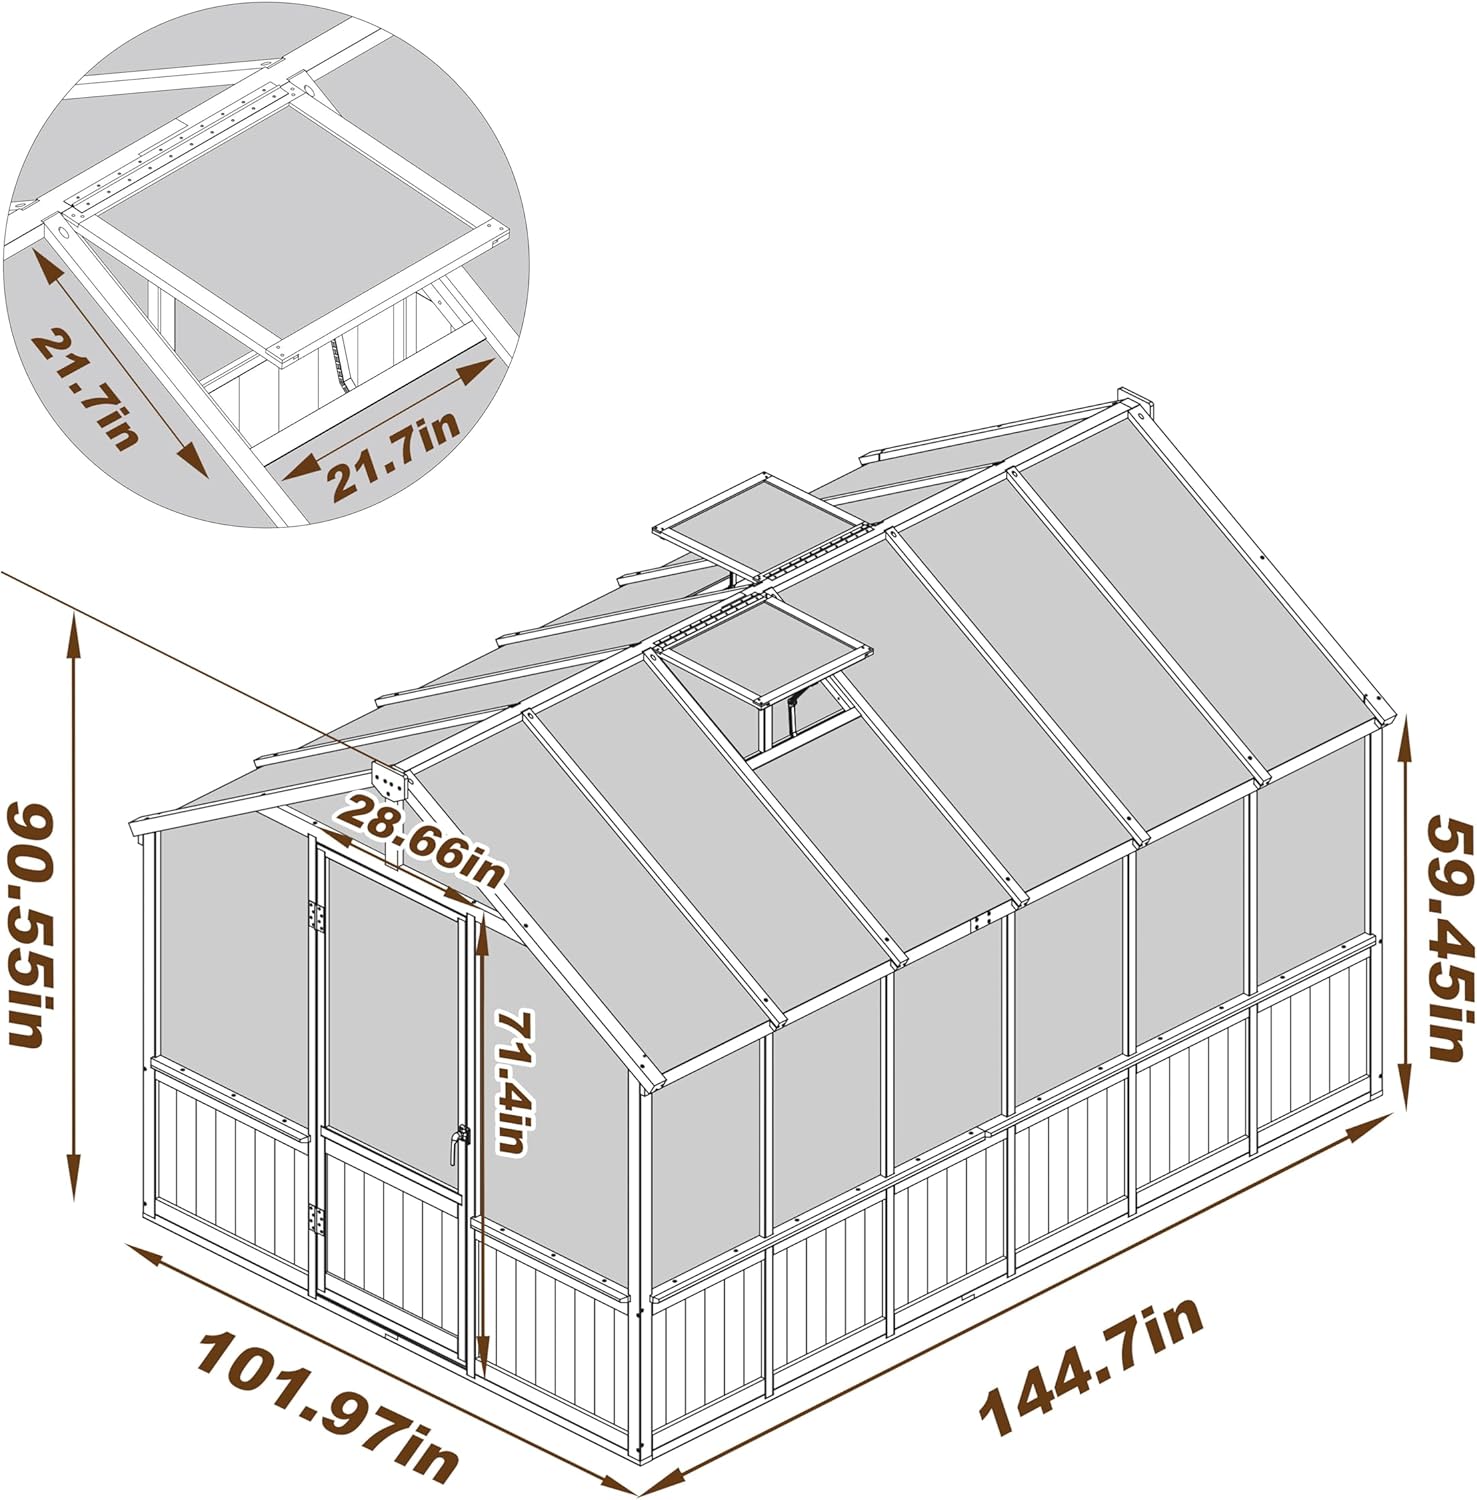
Image 8.1: Detailed dimensions of the Yardenaler 8x12 FT Greenhouse Kit.
9. Warranty & Support
For any questions, concerns, or support needs regarding your Yardenaler Greenhouse Kit, please contact our customer support team. While specific warranty details are not provided in this manual, general customer support is available to assist you.
Please refer to your purchase documentation or the retailer's website for detailed warranty information.
Customer Support: For assistance, please visit the Yardenaler Store on Amazon or contact the seller directly.


