1. Introduction
This manual provides essential instructions for the safe operation, maintenance, and troubleshooting of your AZQQ S6 Pro Robot Vacuum and Mop. Please read this manual thoroughly before using the product and retain it for future reference. The AZQQ S6 Pro is designed to provide efficient and automated cleaning for various floor types, combining powerful vacuuming with effective mopping capabilities and a convenient self-emptying station.

Image 1.1: The AZQQ S6 Pro Robot Vacuum and Mop with its self-emptying station and included accessories.
2. What's in the Box
Carefully unpack all components and check against the list below. If any items are missing or damaged, please contact customer support.
- S6 Pro Robot Vacuum
- Charging Base (Self-Emptying Station)
- Power Adapter
- 2-in-1 Dust & Water Bin
- Mop Board
- Mop Pad (x2)
- Side Brushes (x2)
- HEPA Filters (x2)
- Cleaning Tool
- User Manual
- 3L Dust Bags (x3, 1 pre-installed)

Image 2.1: All components included in the AZQQ S6 Pro packaging.
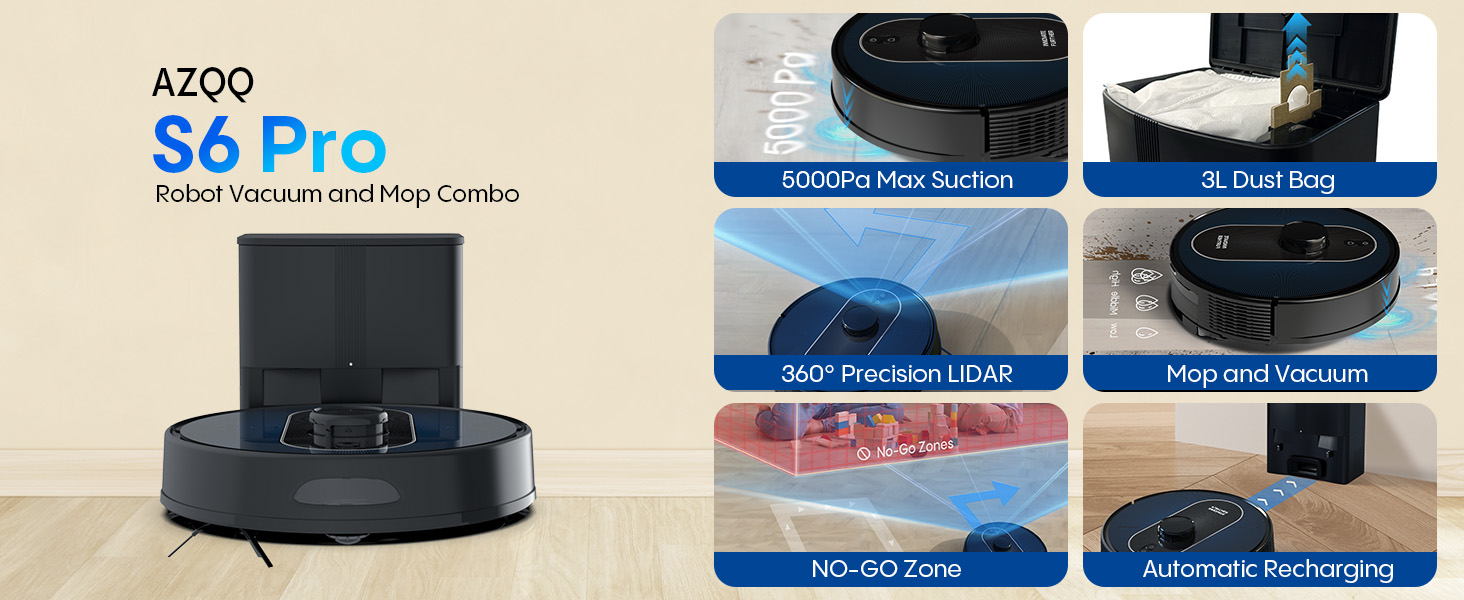
Image 2.2: A detailed layout of the AZQQ S6 Pro robot vacuum, self-emptying station, and all accessories.
3. Product Overview
Familiarize yourself with the main parts of your robot vacuum and self-emptying station.
3.1 Robot Vacuum
The robot features a LiDAR sensor for navigation, power/clean button, and various sensors for obstacle detection and anti-drop functionality.
3.2 Self-Emptying Station
The station serves as the charging dock and automatically empties the robot's dustbin into a larger disposable dust bag, providing up to 60 days of hands-free operation.
4. Setup
4.1 Charging Base Placement
- Place the charging base against a wall in an open area.
- Ensure there is at least 0.5 meters (1.6 feet) of clear space on both sides and 1.5 meters (4.9 feet) in front of the base.
- Connect the power adapter to the charging base and plug it into a wall outlet.
4.2 Initial Charge
Place the robot onto the charging base. Ensure the charging contacts on the robot align with those on the base. The robot will begin charging automatically. For optimal battery life, fully charge the robot before its first use.
4.3 App Connection
- Download the AZQQ app from your smartphone's app store.
- Register an account and log in.
- Follow the in-app instructions to add your S6 Pro robot vacuum. Ensure your Wi-Fi network is 2.4GHz.

Image 4.1: The AZQQ S6 Pro supports app control via 2.4GHz Wi-Fi and voice control with Amazon Alexa and Google Assistant.
5. Operating Instructions
5.1 Cleaning Modes
The S6 Pro offers multiple cleaning modes to suit your needs, controllable via the app or physical buttons.
- Auto Clean: The robot intelligently maps and cleans your entire home.
- Spot Clean: Cleans a specific small area with concentrated power.
- Zone Clean: Define specific rooms or areas in the app for targeted cleaning.
- No-Go Zones: Set virtual boundaries in the app to prevent the robot from entering certain areas.

Image 5.1: Illustration of various cleaning modes including edge, zigzag, spot, and manual cleaning paths.
5.2 Vacuuming
The S6 Pro features 5000Pa max suction for deep cleaning. It automatically increases suction on carpets when Carpet Boost Mode is enabled in the app.

Image 5.2: The robot vacuum performing sweeping, vacuuming, and mopping functions with adjustable suction and water levels.
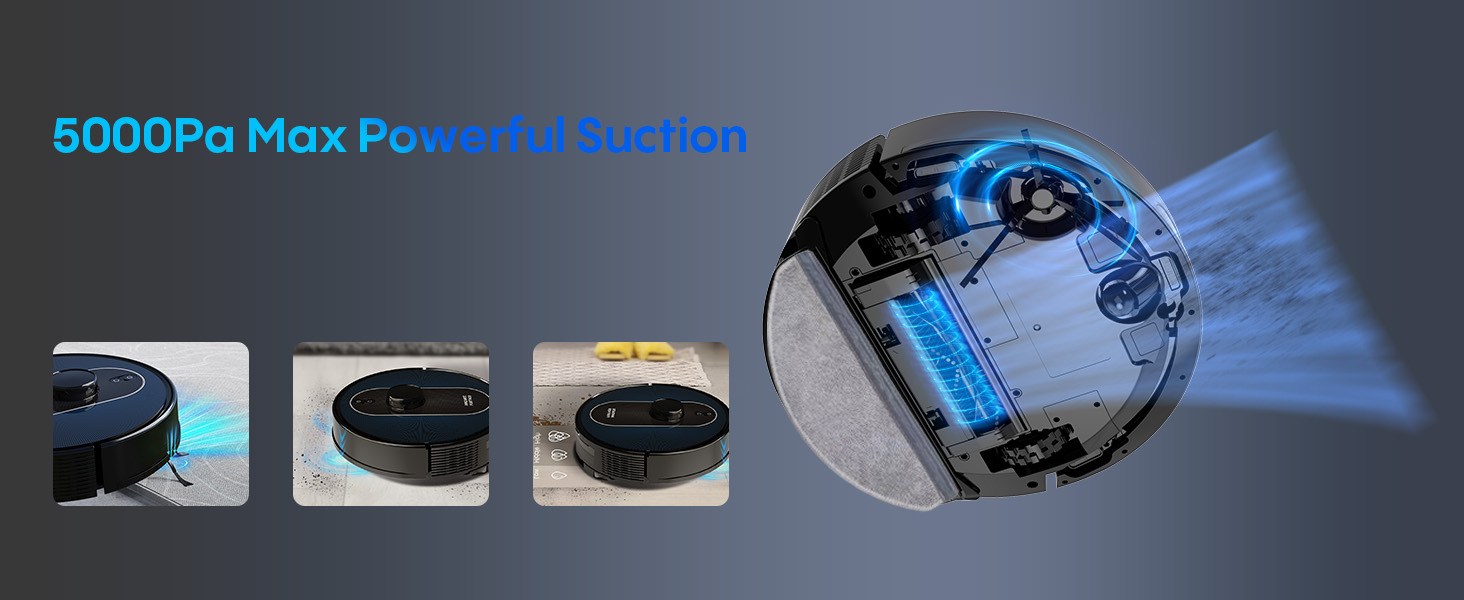
Image 5.3: The S6 Pro automatically detects carpets and boosts suction for deeper cleaning.
5.3 Mopping
Attach the mop board with a damp mop pad and fill the 2-in-1 dust & water bin with water. The app allows adjustment of 3 water levels for different floor types.
5.4 LiDAR Navigation and Mapping
The 360° LiDAR laser scanning system creates accurate maps of your home, enabling efficient cleaning routes and multi-floor mapping. Use the app to set virtual no-go zones.

Image 5.4: The robot uses LiDAR navigation to map the environment and avoid designated no-go zones.

Image 5.5: The robot's mapping capabilities allow for customized cleaning schedules and areas within the app.
5.5 Scheduling and Voice Control
Schedule cleaning tasks, adjust suction/water levels, and define cleaning areas remotely via the app. Control the robot using voice commands through Amazon Alexa or Google Home.
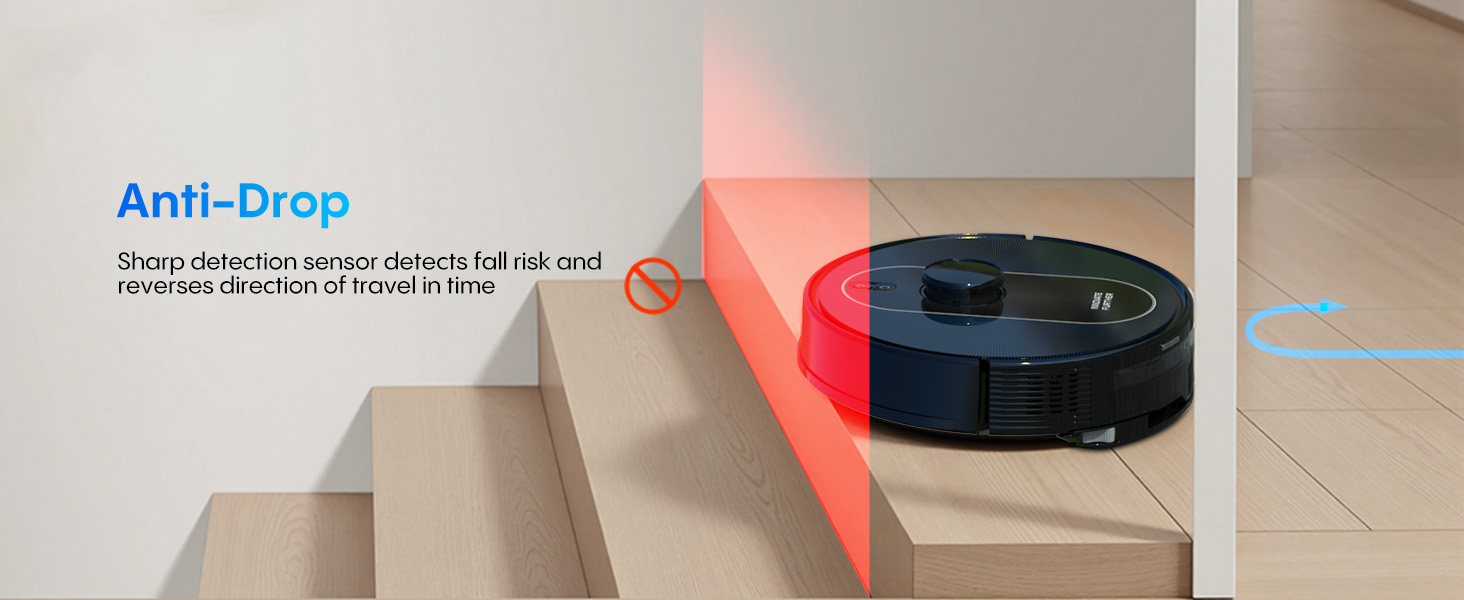
Image 5.6: The mobile app displays the cleaning map and allows for scheduling specific cleaning tasks for different rooms.
5.6 Automatic Recharging and Resume
The robot automatically returns to its charging base when the battery level drops below 20%. After recharging, it resumes cleaning from where it left off to complete the task.

Image 5.7: The robot automatically navigates back to its charging station when its battery is low.
6. Maintenance
Regular maintenance ensures optimal performance and extends the lifespan of your AZQQ S6 Pro.
6.1 Self-Emptying Station Dust Bag Replacement
The 3L dust bag in the self-emptying station typically lasts up to 60 days. Replace it when the indicator light or app notification prompts you.
- Open the lid of the self-emptying station.
- Carefully remove the full dust bag, ensuring the opening is sealed to prevent dust leakage.
- Insert a new 3L dust bag into the slot.
- Close the lid securely.

Image 6.1: The self-emptying station allows for up to 60 days of hands-free cleaning by automatically collecting debris into a 3L disposable dust bag.
6.2 Dust Bin and Filter Cleaning
Empty the robot's 2-in-1 dust & water bin after each cleaning cycle if not using the self-emptying feature, or as needed. Clean the HEPA filter regularly by tapping it to remove dust. Do not wash the HEPA filter with water.
6.3 Main Brush Cleaning
Remove the main brush cover and lift out the main brush. Use the provided cleaning tool to remove hair and debris tangled around the brush. Reinstall the brush and cover.
6.4 Side Brush Cleaning
Periodically check the side brushes for tangled hair or debris. Remove them if necessary, clean, and reattach. Replace worn brushes to maintain cleaning efficiency.
6.5 Water Tank and Mop Pad Cleaning
After mopping, empty any remaining water from the 2-in-1 dust & water bin. Remove and wash the mop pad by hand or machine. Allow it to air dry completely before reattaching.
6.6 Sensor Cleaning
Wipe all sensors (cliff sensors, wall sensors, charging contacts) on the robot and charging base with a clean, dry cloth to ensure proper operation.
7. Troubleshooting
If you encounter issues with your AZQQ S6 Pro, refer to the following common problems and solutions.
| Problem | Possible Cause | Solution |
|---|---|---|
| Robot does not turn on | Low battery; Power button not pressed | Charge the robot; Press and hold the power button |
| Robot cannot charge | Charging contacts dirty; Charging base not powered | Clean charging contacts; Ensure power adapter is plugged in |
| Poor cleaning performance | Dust bin full; Brushes tangled; Filter clogged | Empty dust bin; Clean main/side brushes; Clean/replace filter |
| Robot gets stuck frequently | Obstacles; Cliff sensors dirty | Clear obstacles; Clean cliff sensors |
| Self-emptying not working | Dust bag full; Suction port blocked | Replace dust bag; Clear any blockages in the station's suction port |
| App connection issues | Incorrect Wi-Fi; Robot offline | Ensure 2.4GHz Wi-Fi; Restart robot and router; Re-pair in app |
For further assistance, please refer to the app's help section or contact AZQQ customer support.
8. Specifications
| Feature | Specification |
|---|---|
| Brand | AZQQ |
| Model Name | S6Pro |
| Special Features | Anti-Fall, Automatic Dust Collection, Bagless, LiDAR Navigation, Self-Emptying |
| Color | Classic Black&blue |
| Product Dimensions | 12.99"L x 12.99"W x 3.93"H |
| Filter Type | Sponge (HEPA) |
| Battery Life | Up to 150 minutes |
| Cleaning Path Width | 12.5 Inches |
| Voltage | 110 Volts |
| Power Source | Battery Powered |
| Control Method | App, Push Button, Voice |
| Compatible Devices | Amazon Echo, Google Home, Smartphones |
| Item Weight | 13.97 pounds |
| Manufacture Year | 2025 |
9. Safety Information
Please read and follow all safety instructions to prevent injury or damage.
- This appliance can be used by children aged 8 years and above and persons with reduced physical, sensory or mental capabilities or lack of experience and knowledge if they have been given supervision or instruction concerning use of the appliance in a safe way and understand the hazards involved.
- Children should be supervised to ensure they do not play with the appliance.
- Cleaning and user maintenance shall not be made by children without supervision.
- Do not use the robot in wet environments or near water.
- Keep loose clothing, hair, and body parts away from openings and moving parts.
- Do not operate the robot in areas with open flames or explosive materials.
- Ensure all cables and small objects are cleared from the floor before operation to prevent entanglement.
- The robot is equipped with anti-drop sensors to prevent falls from stairs or ledges. However, always ensure these sensors are clean for optimal performance.
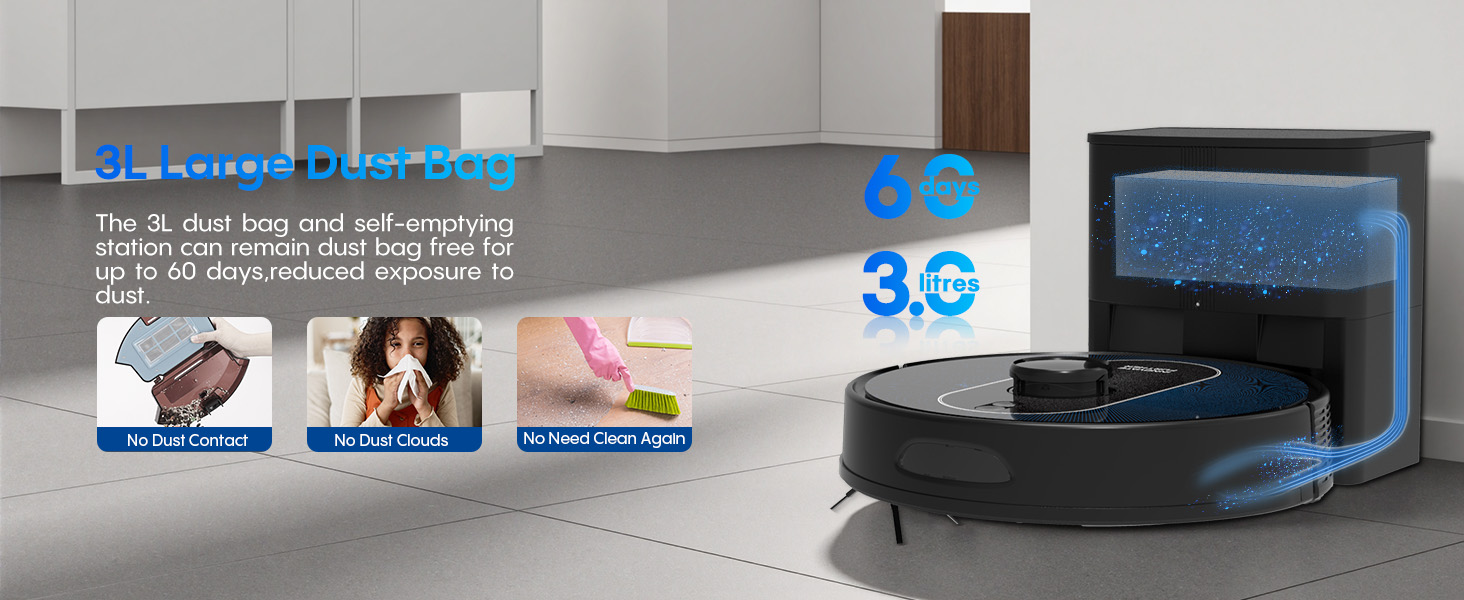
Image 9.1: The robot's anti-drop sensors detect edges and prevent falls, ensuring safe operation near stairs.
10. Warranty and Support
Your AZQQ S6 Pro Robot Vacuum and Mop comes with a manufacturer's warranty. Please refer to the warranty card included in your packaging for details on coverage and terms. For technical support, troubleshooting assistance, or to inquire about replacement parts, please contact AZQQ customer service through the contact information provided in the warranty documentation or on the official AZQQ website.


