monTEK TM1004W-LT
monTEK Heavy Duty Tilt TV Wall Mount (TM1004W-LT) Instruction Manual
Model: TM1004W-LT
1. Introduction
This manual provides comprehensive instructions for the safe and efficient installation and use of your monTEK Heavy Duty Tilt TV Wall Mount. Please read all instructions carefully before installation to ensure proper setup and to prevent damage or injury. Keep this manual for future reference.
Safety Warnings
- Do not attempt installation if you are unsure about the process or your wall type. Consult a qualified professional.
- Ensure the mounting surface can safely support the combined weight of the mount and your TV.
- Do not mount on drywall alone. Concrete anchors are included for brick and concrete walls.
- Verify your TV's VESA pattern, size, and weight are within the mount's specifications before installation.
- Always use the provided hardware. If any parts are missing or damaged, contact customer support.
2. Product Overview
The monTEK Heavy Duty Tilt TV Wall Mount (TM1004W-LT) is designed for large flat and curved TVs ranging from 43 to 100 inches, supporting up to 200 lbs. It features an ultra-slim low profile, tool-free tilt adjustment, and flexible mounting options for various wall types.
Key Features:
- Universal Compatibility: Fits 43"-100" TVs with VESA patterns from 200x200mm to 800x600mm.
- Heavy-Duty Strength: Supports up to 200 lbs, 4x load tested for reliability.
- Tool-Free Tilt: Easily adjust tilt from 0-8° down to reduce glare.
- Ultra-Slim Profile: Positions TV just 1.7" from the wall.
- Flexible Mounting: Compatible with 16"/18"/24"/32" wood studs, concrete, and brick walls.
- Smart Design: Open wall plate for outlets, stable double hooks, quick-release spring lock, and cable management.
Package Contents:
Before installation, ensure all parts are present and undamaged. Refer to the included parts list in your package for a complete inventory.
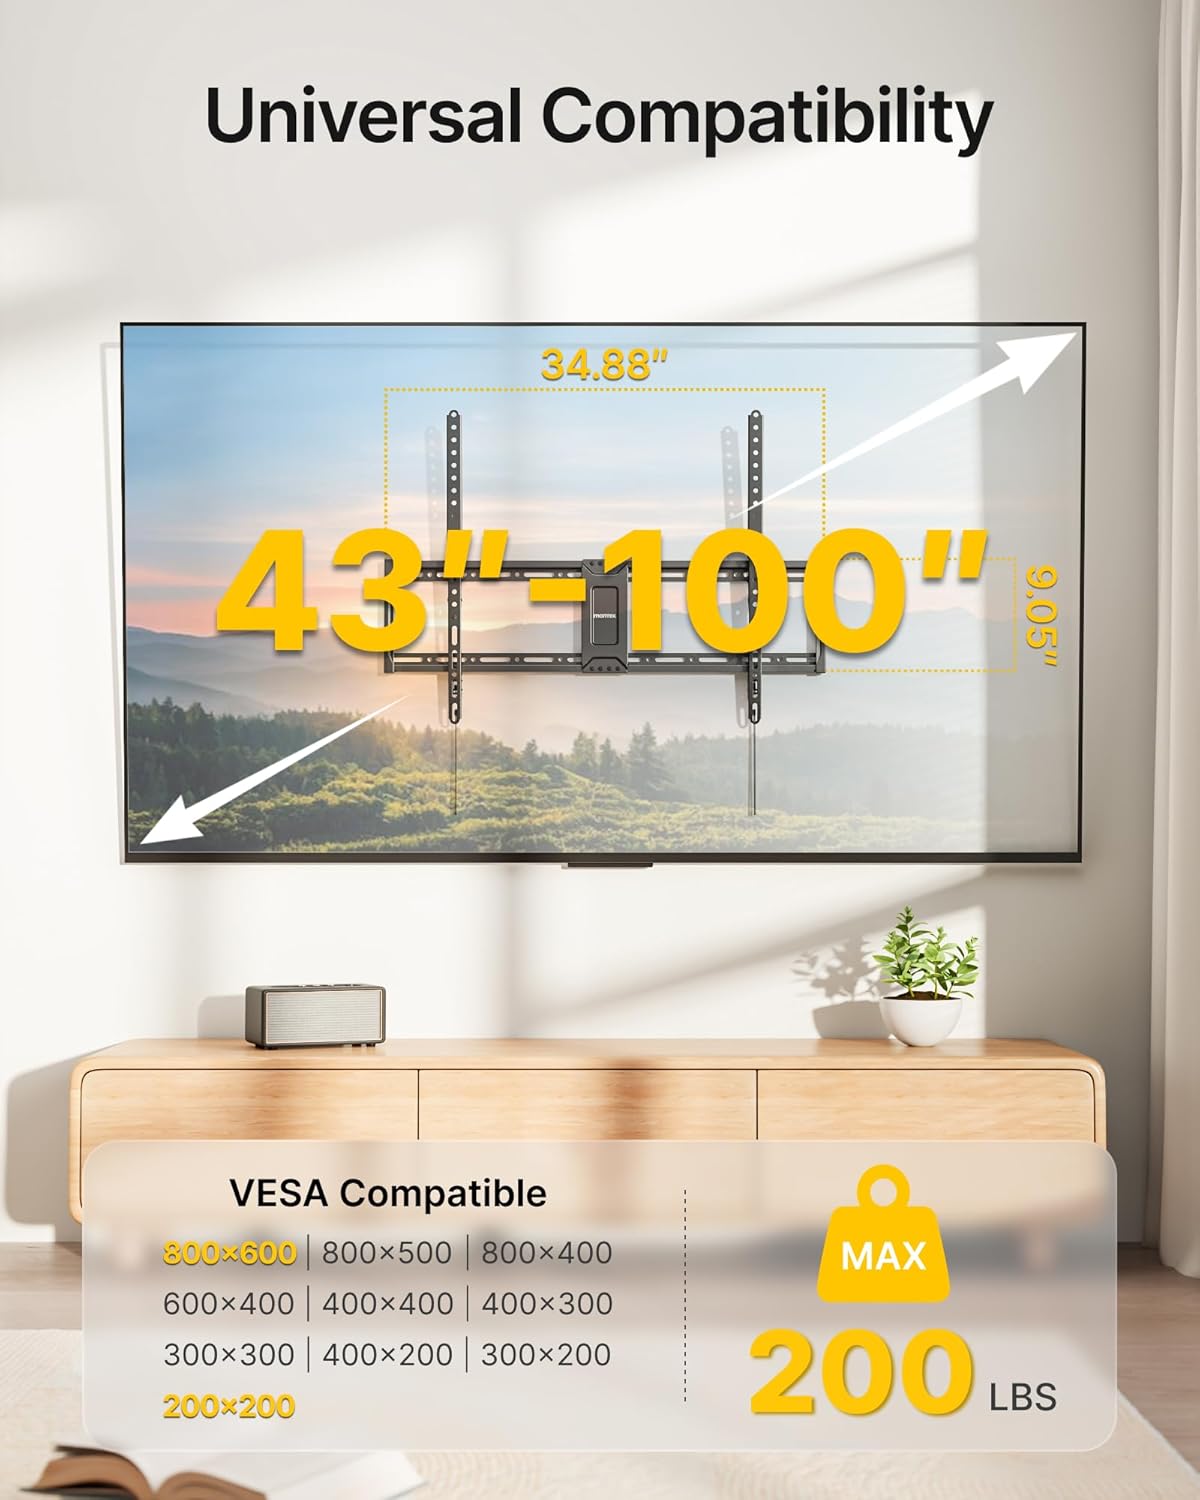
Image: All components of the monTEK Heavy Duty Tilt TV Wall Mount laid out, including the wall plate, TV brackets, and various hardware bags.

Image: A visual representation of the easy 3-step installation process for the monTEK TV mount.
3. Setup and Installation
Follow these steps carefully to install your monTEK TV wall mount. It is recommended to have two people for safe installation, especially for larger TVs.
3.1 Pre-Installation Checklist
- TV Compatibility: Confirm your TV's size (43"-100"), weight (max 200 lbs), and VESA pattern (200x200mm to 800x600mm).
- Wall Type: Identify your wall type (wood stud, concrete, or brick). Do not mount on drywall alone.
- Cable Outlet Location: Check the location of your TV's cable outlets to ensure they won't be blocked by the mount.
- Tools Needed (Not Included): Phillips screwdriver, electric drill, socket wrench, pencil, stud finder.

Image: A visual guide to checking TV size, VESA pattern, wall type, and cable outlet location for compatibility.
3.2 Attaching TV Brackets to the TV
- Select the appropriate screw length (M4, M6, or M8) for your TV. Test different screws by hand to find the correct fit.
- Attach the TV brackets to the back of your TV using the selected screws and washers. Ensure the brackets are centered over the VESA hole pattern and do not block any input ports. The arrow on the front of the TV brackets should point upward.
- For flat-back TVs, use the standard screws and washers. For curved-back TVs or TVs with a bump, use the longer screws, spacers, and washers as needed to create a flat mounting surface.
- Tighten all screws securely, but do not overtighten.

Image: Close-up of the TV brackets showing the open wall plate for outlets, stable double hook, and quick-release spring lock mechanism.
3.3 Installing the Wall Plate
The installation method varies based on your wall type.
For Wood Stud Walls (16"/18"/24" spacing):
- Use a stud finder to locate the edges of your wood studs. Mark the center of the studs at the desired height for your TV.
- Place the drilling template (if provided) or the wall plate against the wall, aligning it with your marks. Use a level to ensure it is perfectly horizontal. Mark the drilling points.
- Drill pilot holes into the center of the studs at the marked locations. The recommended drill bit size is Ø4.5mm (3/16") and drilling depth is 55mm (2.2").
- Attach the wall plate to the wall using the lag bolts (W-A) and washers (W-C). Tighten them securely with a socket wrench.
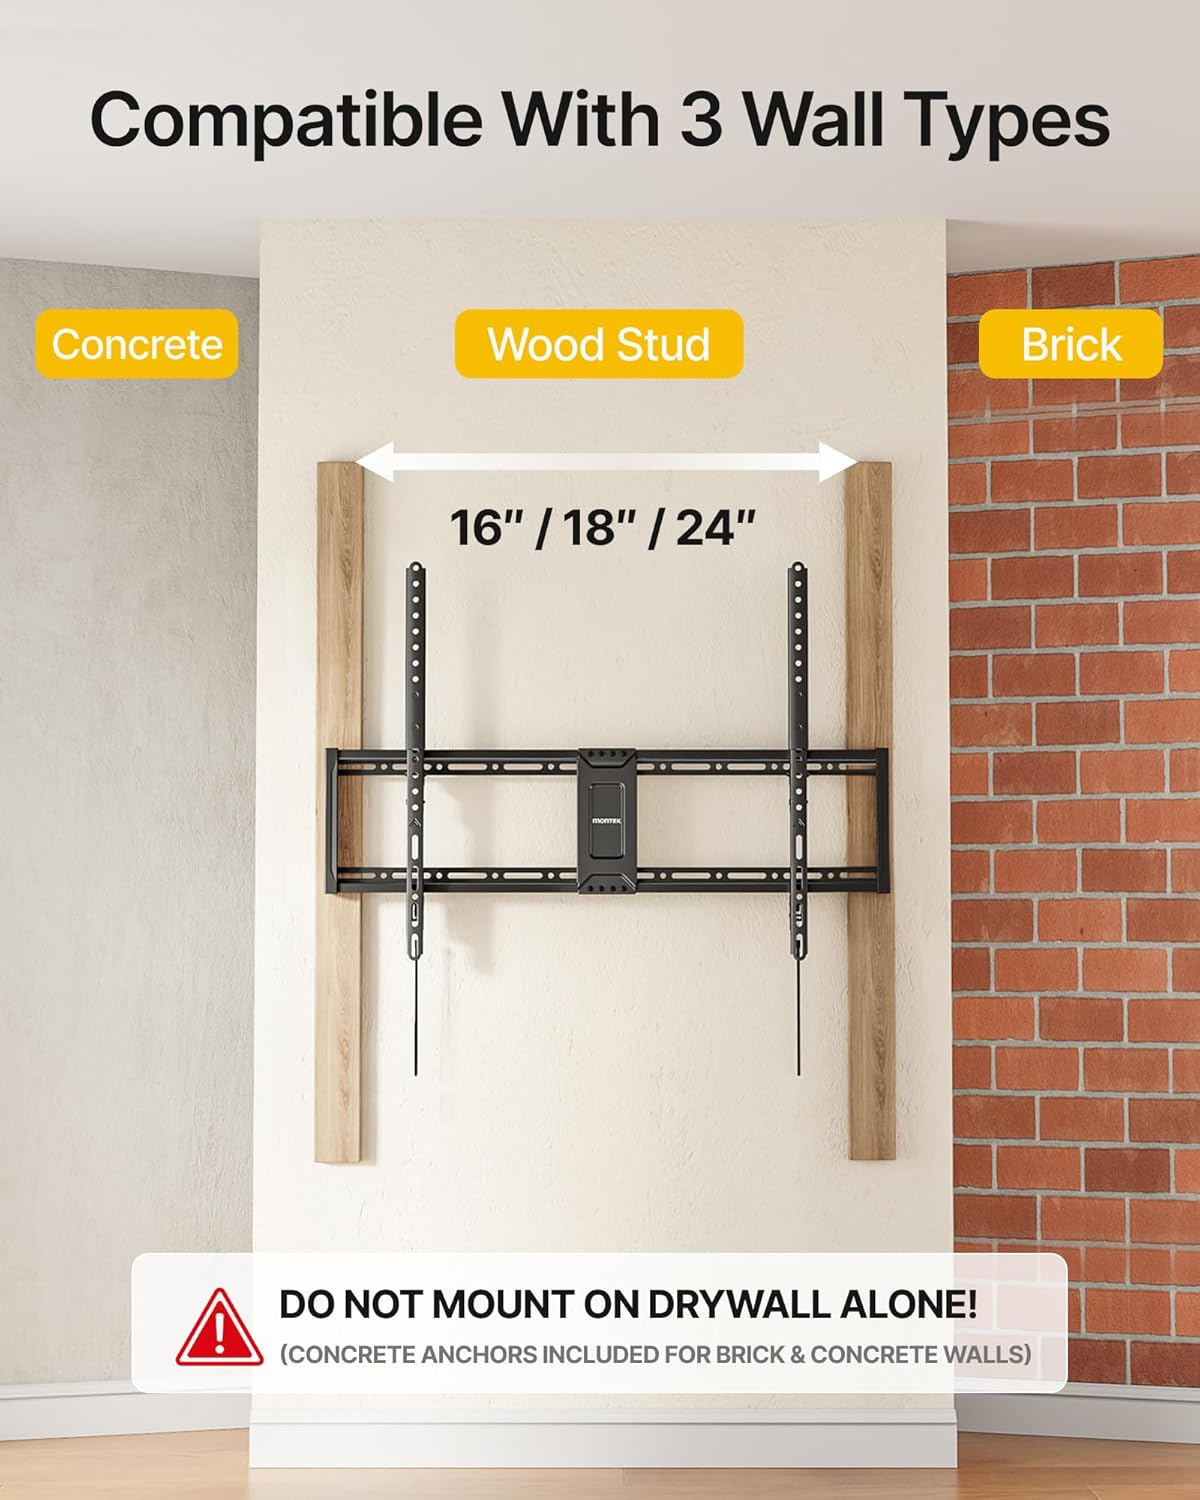
Image: Illustration showing the TV mount installed on wood studs, concrete, and brick walls, highlighting stud spacing.
For Concrete or Brick Walls:
- Place the drilling template or the wall plate against the wall at the desired height. Use a level to ensure it is perfectly horizontal. Mark the drilling points.
- Drill pilot holes into the solid concrete or brick at the marked locations. The recommended drill bit size is Ø10mm (3/8") and drilling depth is 60mm (2.4").
- Insert the concrete anchors (W-B) into the drilled holes. Tap them gently with a hammer until they are flush with the wall surface.
- Attach the wall plate to the wall using the lag bolts (W-A) and washers (W-C). Tighten them securely with a socket wrench.
Important: After securing the wall plate, gently pull on it to ensure it is firmly attached to the wall before proceeding.
3.4 Mounting the TV
- With assistance, carefully lift the TV with the attached brackets.
- Hook the top of the TV brackets onto the top edge of the wall plate.
- Gently push the bottom of the TV towards the wall until the quick-release spring lock engages, securing the TV to the wall plate. You should hear a click.
- Verify that the TV is securely locked in place by gently pulling the bottom of the TV away from the wall. It should not move.
Video: monTEK Tilting TV Mount Installation Video. This video demonstrates the step-by-step process of installing the TV wall mount, from attaching brackets to the TV to securing the TV on the wall plate.
4. Operating Instructions
4.1 Tilt Adjustment
This mount allows for a tool-free tilt adjustment from 0° to -8° to optimize your viewing angle and reduce glare.
- Gently push the bottom of the TV forward or backward to achieve the desired tilt angle.
- Ensure both TV brackets are tilted to the same angle for a balanced appearance.
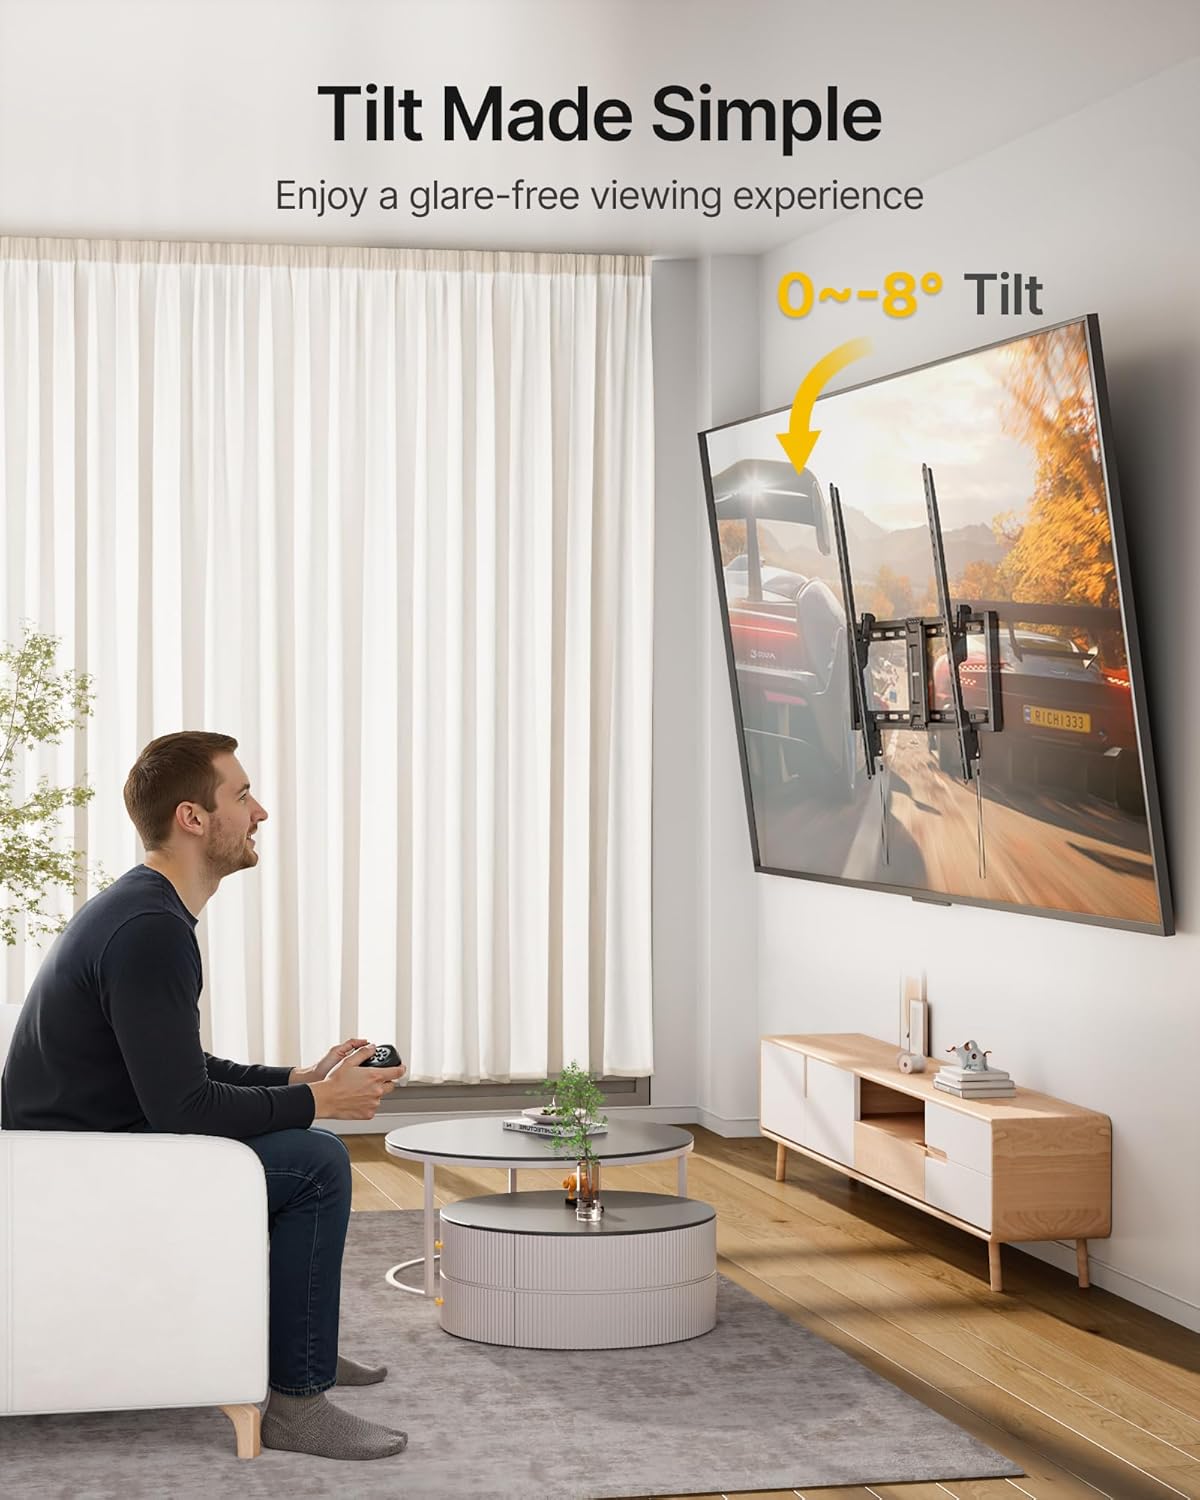
Image: A person adjusting the tilt of a mounted TV, illustrating the 0-8 degree tilt range for glare-free viewing.
4.2 Cable Management
The open structure design of the wall plate provides ample space for cable routing and ventilation. Use cable ties (not included) to organize your cables for a neat and clutter-free setup.
Video: monTEK Tilting TV Wall Mount for Most 43-100 in TVs. This video highlights the features and benefits of the mount, including its compatibility, strength, and ease of installation.
5. Maintenance
- Cleaning: Wipe the mount with a soft, dry cloth to remove dust. Do not use abrasive cleaners or solvents.
- Periodic Checks: Periodically check all screws and bolts to ensure they remain tight and secure. Re-tighten if necessary.
- Damage Inspection: Inspect the mount for any signs of wear, corrosion, or damage. If any issues are found, contact customer support and do not use the mount until it is repaired or replaced.
6. Troubleshooting
| Problem | Possible Cause | Solution |
|---|---|---|
| TV is not level after installation. | Wall plate or TV brackets were not level during installation. | Remove the TV, loosen the wall plate or TV bracket screws, adjust for levelness using a spirit level, and re-tighten. |
| TV does not securely lock onto the wall plate. | TV not properly seated on the hooks; quick-release lock not engaged. | Ensure the TV brackets are fully hooked onto the wall plate and push the bottom of the TV firmly until the lock clicks into place. |
| Difficulty adjusting tilt. | Tilt mechanism might be stiff or obstructed. | Ensure no cables are interfering with the tilt mechanism. Apply gentle, even pressure to adjust. |
| Mount feels unstable. | Loose screws or incorrect wall anchors used. | Immediately remove the TV. Re-check all wall plate and TV bracket screws for tightness. Verify correct anchors were used for your wall type. If unsure, consult a professional. |
7. Specifications
- Model Number: TM1004W-LT
- TV Size Compatibility: 43" - 100"
- Weight Capacity: Up to 200 lbs (90 kg)
- VESA Compatibility: 200x200mm to 800x600mm
- Tilt Angle: 0° to -8°
- Wall Clearance: 1.7 inches
- Material: Alloy Steel
- Color: Black
- Product Dimensions: 1.7 x 34.9 x 24.6 inches
- Item Weight: 7.15 pounds
8. Warranty
monTEK products are designed and manufactured to the highest quality standards. For specific warranty information regarding your product, please refer to the warranty card included in your package or visit the official monTEK website. Keep your purchase receipt as proof of purchase.
9. Customer Support
If you have any questions, require assistance with installation, or encounter any issues with your monTEK TV wall mount, please do not hesitate to contact our customer support team. We are dedicated to ensuring your satisfaction.
- Online Support: Visit the monTEK store on Amazon for FAQs and additional resources.
- Email: Refer to your product packaging or the monTEK store page for direct contact information.