Important Safeguards
Please read all instructions carefully before using your CHULUX Mini Espresso Pod Machine. Keep this manual for future reference.
- Ensure the appliance is connected to a grounded power outlet.
- Do not immerse the machine, cord, or plug in water or other liquids.
- Close supervision is necessary when the appliance is used by or near children.
- Unplug from the outlet when not in use and before cleaning. Allow to cool before handling parts.
- Do not operate any appliance with a damaged cord or plug, or after the appliance malfunctions or has been damaged in any manner.
- Use only Nespresso Original compatible capsules.
- Avoid contact with moving parts.
- Do not place on or near a hot gas or electric burner, or in a heated oven.
- Do not use the appliance for other than its intended use.
Product Overview
Components
Familiarize yourself with the parts of your espresso machine:
- Water Tank: Removable, 24oz capacity, with MIN/MAX indicators.
- Capsule Slot: For inserting Nespresso Original compatible capsules.
- Brew Buttons: Two buttons for Espresso and Lungo brew sizes.
- Drip Tray: Removable and foldable for different cup heights.
- Used Capsule Container: Collects used capsules automatically.
- Power Cord: For connecting to an electrical outlet.
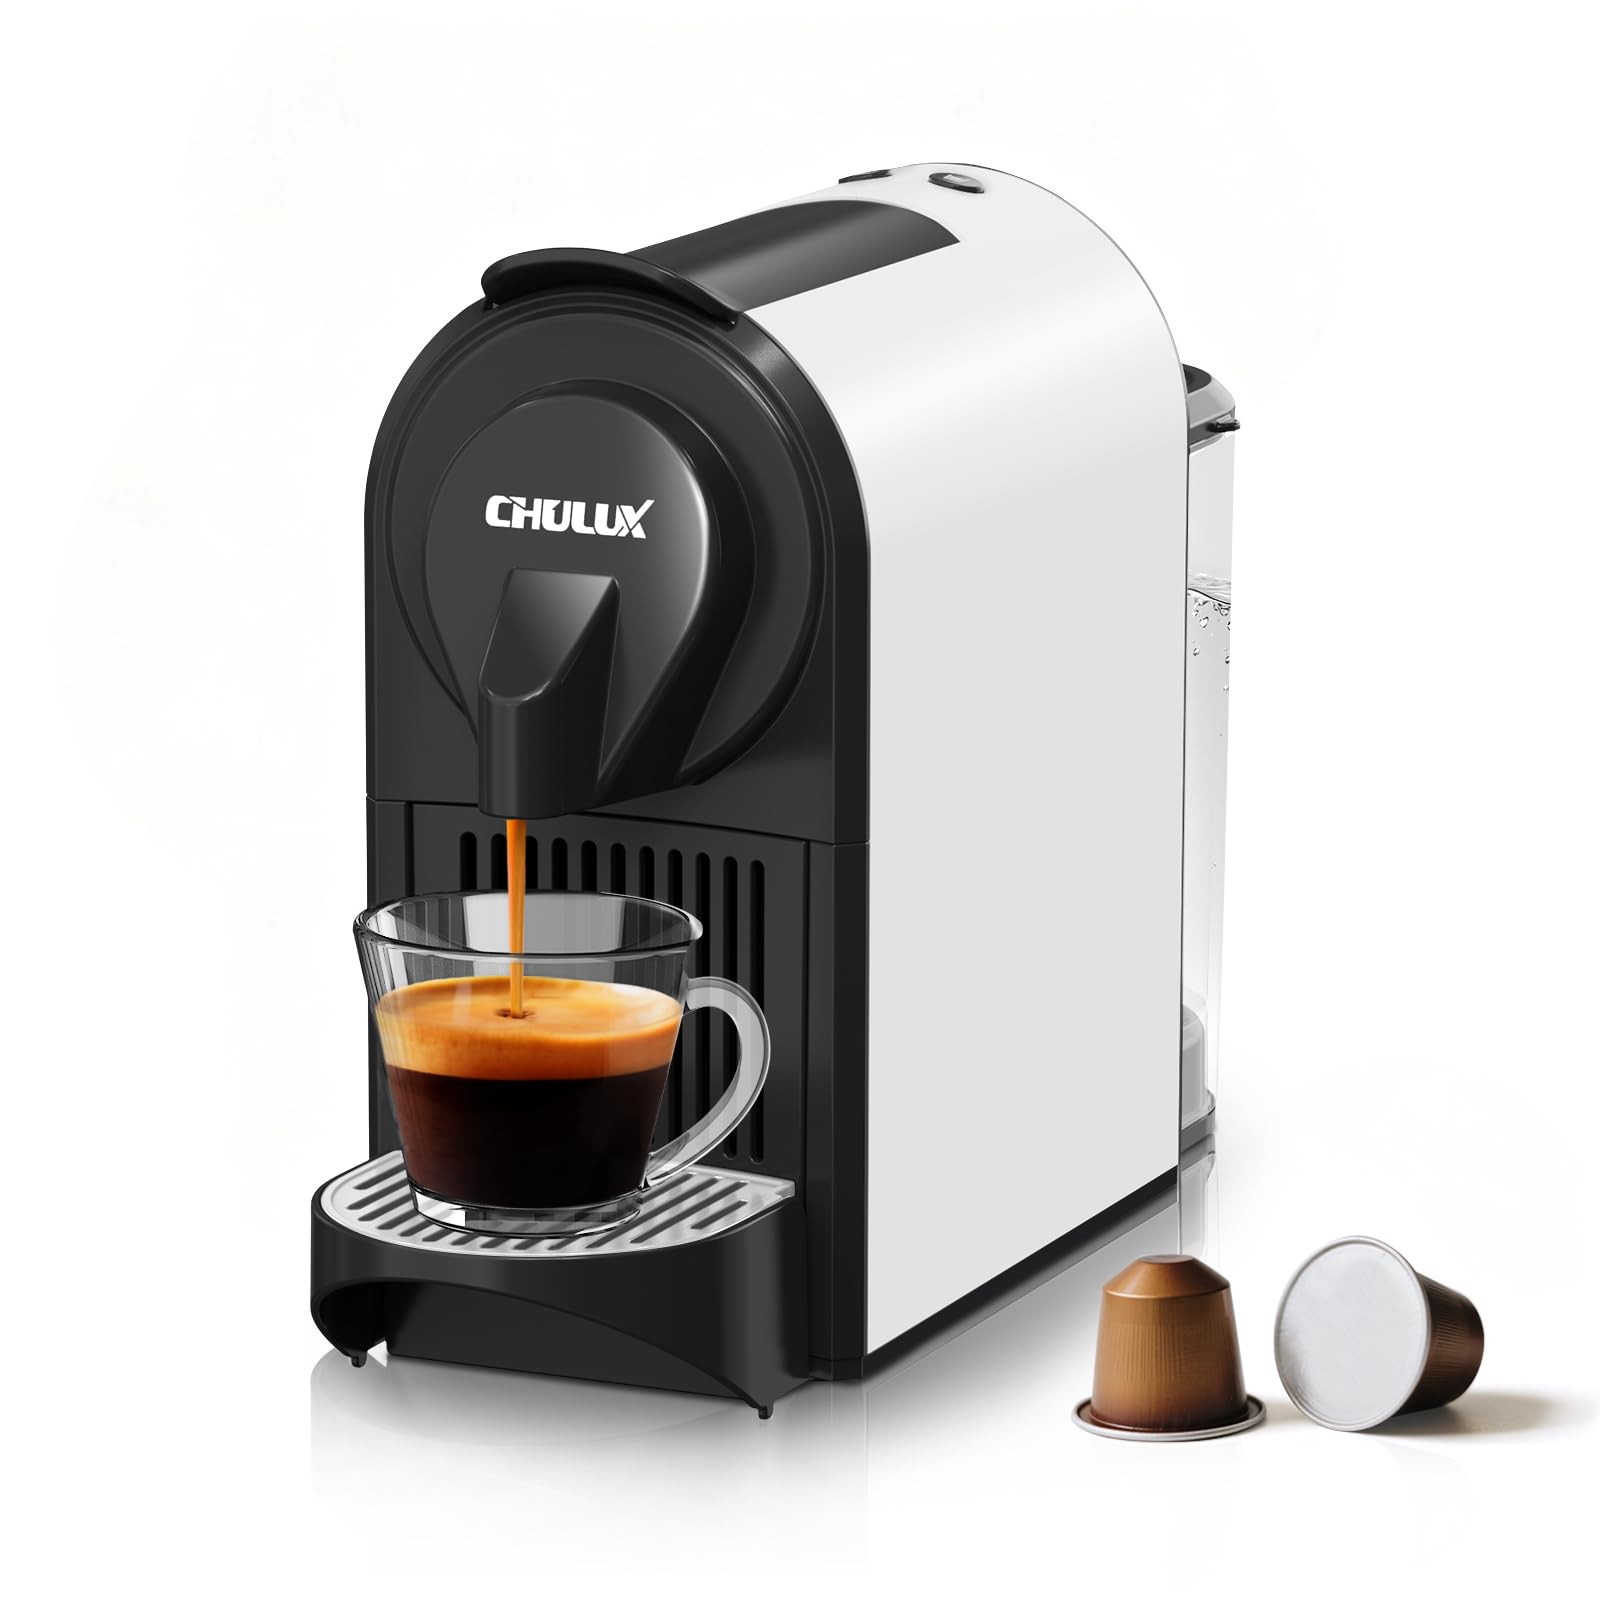
Figure 1: Front view of the CHULUX Mini Espresso Pod Machine.

Figure 2: Internal components diagram illustrating water flow and heating system.
Key Features
- High-Pressure Pump: 20-bar pump for optimal flavor extraction.
- Rapid Heating System: 1400W system ensures fast preheating in 15-20 seconds.
- Dual Brew Modes: Offers programmable Espresso and Lungo options.
- Compact Design: With a 4.5-inch width, it fits easily in small spaces.
- Energy-Saving Mode: Automatically turns off after 5 minutes of inactivity.
- Easy Cleaning: Removable water tank, drip tray, and used capsule container for hassle-free maintenance.
Setup
1. Unpacking
- Remove all packaging materials and stickers from the machine.
- Ensure all components are present: main unit, water tank, water tank lid, drip tray, and used capsule container.
2. Initial Rinse
- Wash the water tank, water tank lid, drip tray, and used capsule container with warm, soapy water. Rinse thoroughly and dry.
- Fill the water tank with fresh, clean water up to the 'MAX' line.
- Place a cup on the drip tray.
- Plug the machine into a grounded electrical outlet. The brew buttons will flash, indicating preheating.
- Once the lights stop flashing and remain steady, press either brew button (without a capsule) to run hot water through the system. This cleans the internal components.
- Repeat the rinse cycle 2-3 times. Discard the water.

Figure 3: Filling the removable water tank with fresh water.
Operating Instructions
1. Powering On and Preheating
- Ensure the water tank is filled with fresh water.
- Plug the machine into a grounded outlet. The brew buttons will flash, indicating the machine is preheating.
- Wait for the lights on the brew buttons to stop flashing and remain steady. This indicates the machine is ready for brewing (approximately 15-20 seconds).
2. Inserting a Capsule
- Lift the lever on top of the machine to open the capsule slot.
- Insert a Nespresso Original compatible capsule into the slot.
- Close the lever firmly until it clicks into place.
3. Selecting Brew Size
Place your desired cup on the drip tray. You can adjust the drip tray height by folding it up or down to accommodate different cup sizes.
- For Espresso (approx. 1.35 oz): Press the left brew button (smaller cup icon).
- For Lungo (approx. 2.7 oz): Press the right brew button (larger cup icon).
- The machine will begin brewing immediately.
- To stop the brewing process manually at any time, press the active brew button again.

Figure 4: Enjoying a freshly brewed espresso from the machine.
Customizing Coffee Amount
You can program your preferred coffee volume for both Espresso and Lungo buttons:
- Ensure the machine is preheated and ready (steady lights).
- Insert a capsule and place a cup.
- Press and hold the desired brew button (Espresso or Lungo).
- Release the button once your cup contains the desired amount of coffee.
- The machine will remember this setting for future brews using that specific button.
Cleaning and Maintenance
1. Daily Cleaning
- Empty Used Capsule Container: After each use, or when full (holds up to 15 capsules), remove and empty the used capsule container.
- Clean Drip Tray: Remove the drip tray and empty any collected liquid. Wash with warm, soapy water and rinse.
- Clean Water Tank: Remove the water tank, wash with warm, soapy water, rinse, and refill with fresh water.
- Wipe Exterior: Wipe the exterior of the machine with a soft, damp cloth. Do not use abrasive cleaners or solvents.
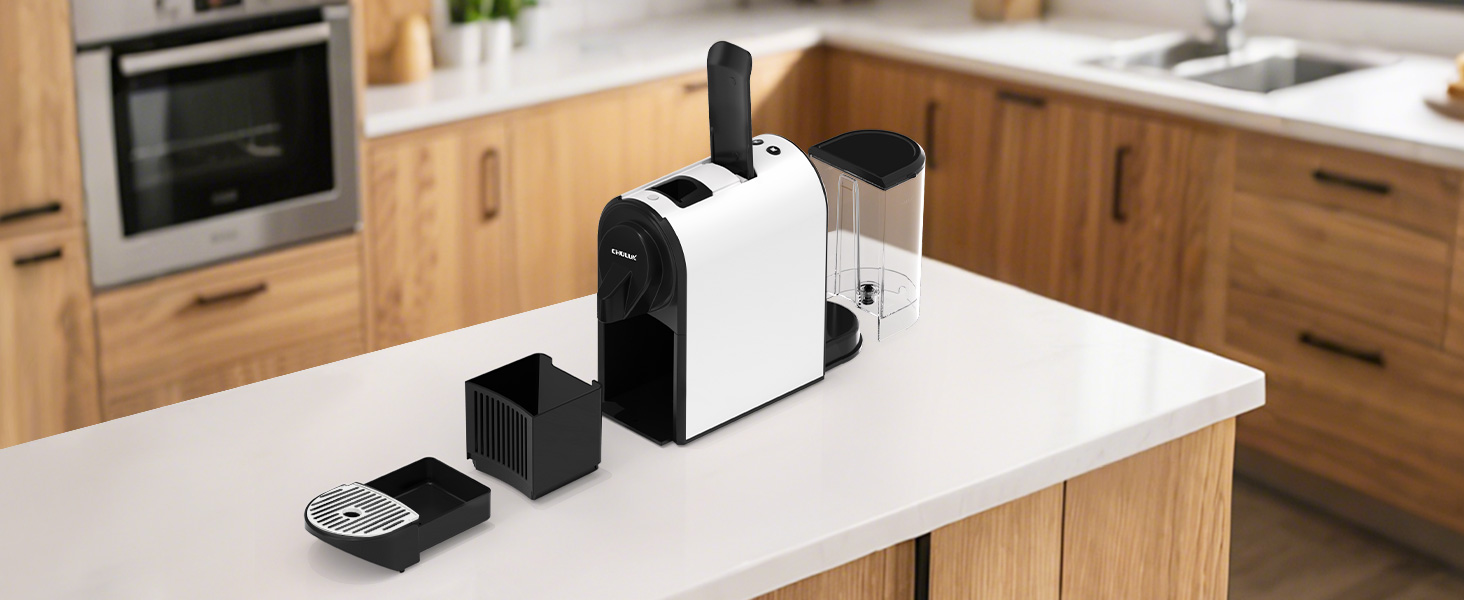
Figure 5: Disassembled components for easy cleaning.
2. Descaling
Regular descaling is essential to maintain machine performance and coffee quality. The frequency depends on water hardness and usage. Follow the instructions of your descaling solution, typically:
- Empty the water tank and fill it with descaling solution and water as per the descaler's instructions.
- Place a large container under the coffee outlet.
- Run the descaling solution through the machine by repeatedly pressing the Lungo button until the tank is empty.
- Rinse the water tank thoroughly and fill it with fresh water.
- Run fresh water through the machine (without a capsule) by repeatedly pressing the Lungo button until the tank is empty, to rinse out any remaining descaling solution.
Troubleshooting
| Problem | Possible Cause | Solution |
|---|---|---|
| Machine does not turn on | No power supply | Check if the power cord is securely plugged into a working outlet. |
| No coffee flows | Water tank empty; Capsule not inserted correctly; Machine needs descaling | Fill water tank; Reinsert capsule correctly; Perform descaling procedure. |
| Coffee is too cold | Machine not preheated; Cold cup | Wait for preheating lights to stabilize; Preheat cup with hot water. |
| Water leaks from machine | Water tank not positioned correctly; Drip tray full | Ensure water tank is seated firmly; Empty and reinsert drip tray. |
| Coffee tastes weak | Incorrect brew size selected; Machine needs descaling | Use Espresso button for stronger coffee; Perform descaling procedure. |
Specifications
| Feature | Detail |
|---|---|
| Brand | CHULUX |
| Model Name | Espresso Maker |
| Model Number | CL-N831V-SV |
| Capacity | 24 Fluid Ounces (Water Tank) |
| Color | White with Silver Tray |
| Product Dimensions | 13.94"D x 4.57"W x 9.53"H |
| Wattage | 1400 watts |
| Voltage | 120 Volts |
| Pressure | 20 Bar |
| Compatible Coffee Pods | Nespresso Original |
| Special Features | Auto Shut-Off, Dual Cup Size Choice, Programmable, Removable Tank, Single Cup Brew |
Warranty and Support
Your CHULUX Mini Espresso Pod Machine is covered by the manufacturer's warranty. For specific warranty details, please refer to the warranty card included with your product or contact customer support.
For any questions, technical support, or warranty claims, please contact CHULUX customer service:
- Email: css@chulux.com


