IRONCK YD-PE-03
IRONCK Shoe Storage Cabinet with 4 Flip Drawers
Model: YD-PE-03
Introduction
Thank you for choosing the IRONCK Shoe Storage Cabinet. This manual provides detailed instructions for the assembly, operation, and maintenance of your new shoe cabinet. Please read this manual thoroughly before beginning assembly or use to ensure proper installation and safe operation. Keep this manual for future reference.
Product Features
- Large Capacity Storage: Equipped with four flip-up drawers, each featuring two levels of storage space. Internal dividers are adjustable and removable to accommodate various shoe types.
- Space-Saving Design: The flip-up drawer mechanism allows for efficient storage in narrow spaces, keeping your entryway or hallway tidy and organized.
- Durable Construction: Crafted from high-quality MDF, ensuring excellent durability and load-bearing capacity for long-lasting use.
- Enhanced Safety: Includes an anti-tipping device for secure installation, preventing accidental tipping.
- Ventilation: Features two ventilation holes on the back to help keep shoes dry and clean.
- Farmhouse Aesthetic: Designed with a diagonal pattern on the drawer fronts, offering a clean, sophisticated, and rustic look that complements various home decor styles.
- Easy Maintenance: The smooth surface is easy to clean with a damp cloth.

Detailed view of key features: top fence, side hook, anti-tipping mechanism, and metal handle.
Specifications
| Attribute | Detail |
|---|---|
| Brand | IRONCK |
| Model Name | Farmhouse Shoe Cabinet |
| Model Number | YD-PE-03 |
| Color | White |
| Product Dimensions | 41.7"D x 9.4"W x 36.4"H |
| Item Weight | 52 Pounds |
| Material | High-quality MDF |
| Mounting Type | Floor Mount |
| Special Features | Adjustable Shelf, Anti-Tipping Device, Ventilation Holes |
| Assembly Required | Yes |
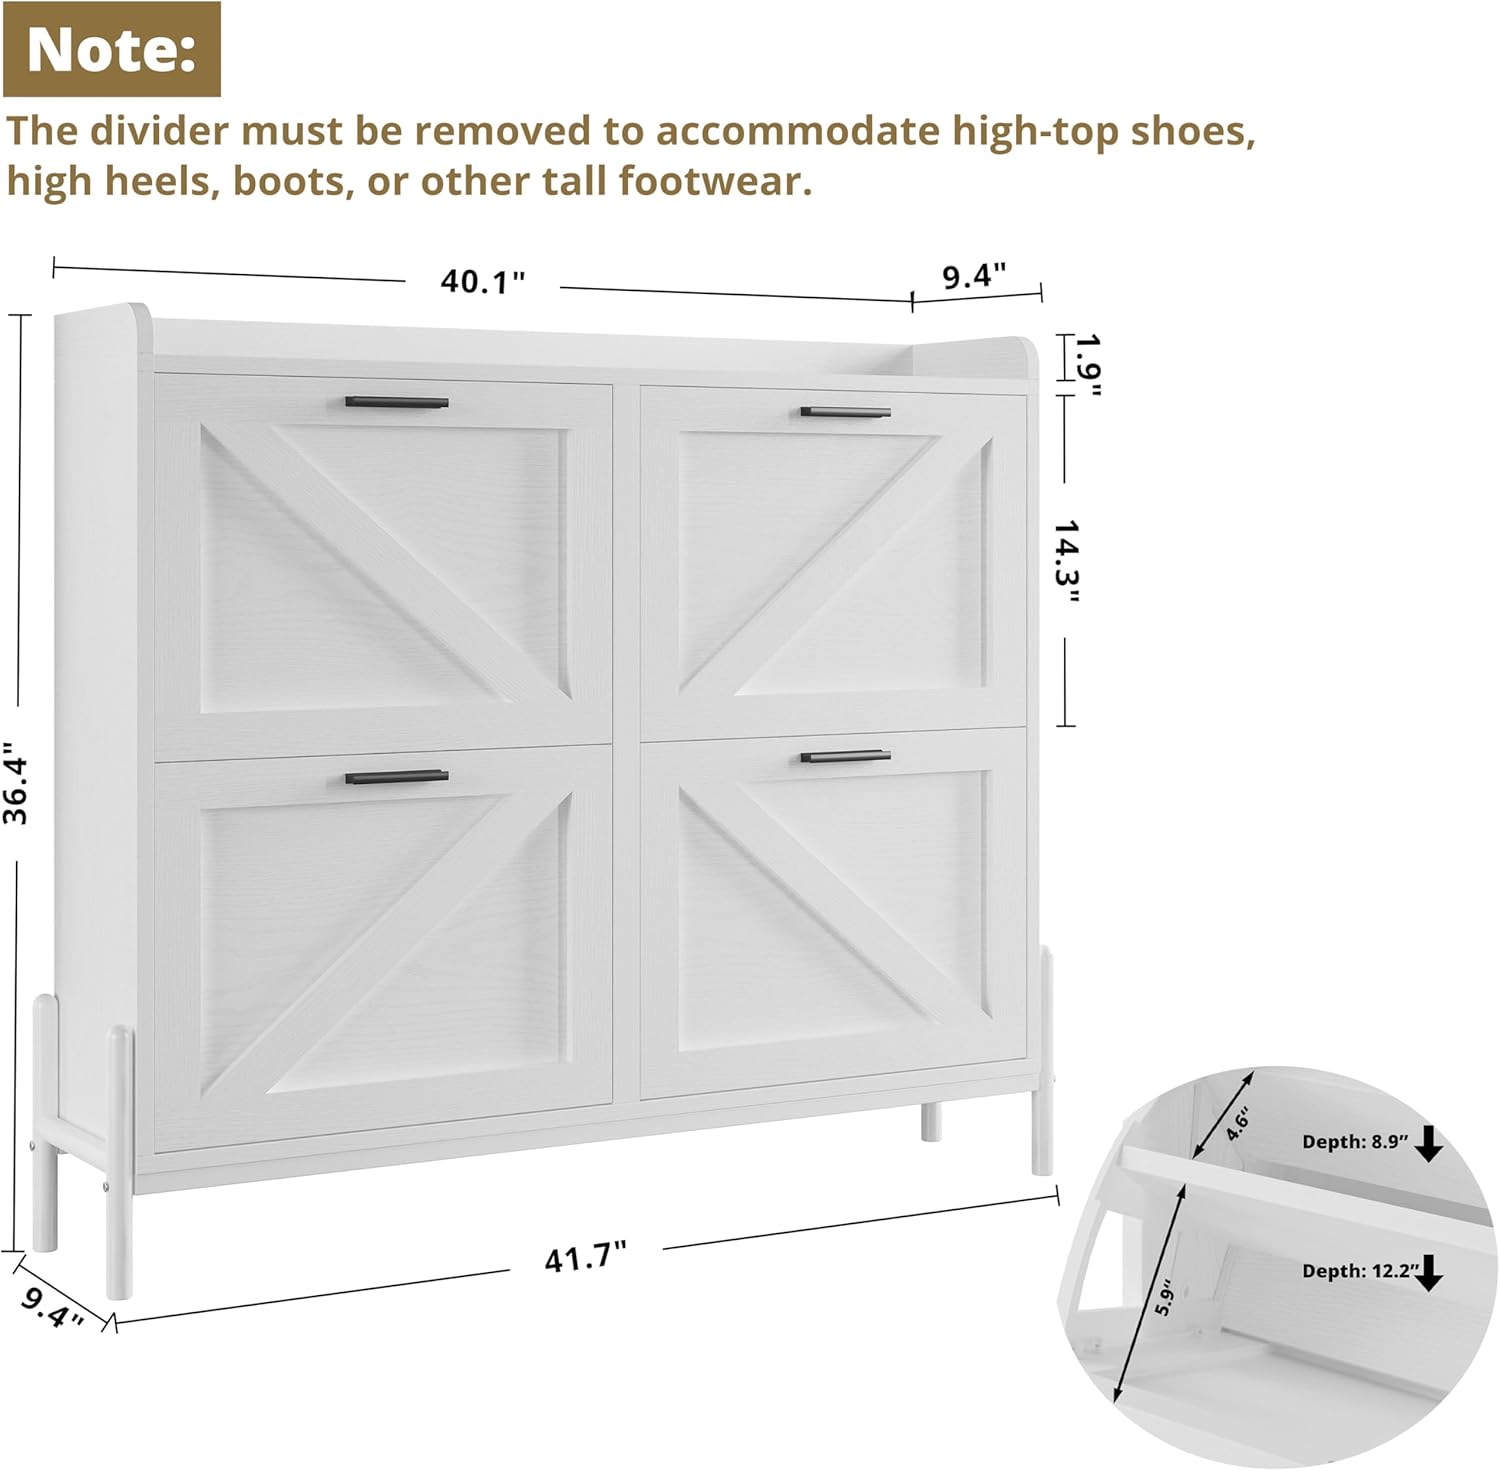
Product dimensions and internal drawer measurements.
Assembly Instructions
This shoe cabinet requires assembly. Please follow the steps below carefully. It is recommended to have a second person assist with assembly for easier handling and safety.
- Unpack and Verify: Carefully unpack all components and hardware. Refer to the included parts list to ensure all pieces are present and undamaged. If any parts are missing or damaged, contact customer support immediately.
- Prepare Workspace: Choose a clean, flat, and spacious area for assembly. Lay down a blanket or cardboard to protect both the cabinet parts and your floor.
- Assemble Frame: Follow the step-by-step diagrams in the separate assembly manual provided with your product to connect the side panels, top, and bottom panels. Ensure all connections are secure.
- Install Drawers: Assemble each flip-up drawer according to the instructions. Pay attention to the orientation of the drawer slides and hinges.
- Insert Dividers: Place the internal dividers into the drawers. These are adjustable and can be removed if you need to store taller footwear like high-top shoes or boots.
- Attach Back Panel: Secure the back panel to the assembled frame. Ensure the ventilation holes are not obstructed.
- Install Anti-Tipping Device: This is a critical safety step. Securely attach the anti-tipping device to the back of the cabinet and to a wall stud using the provided hardware. This prevents the cabinet from tipping over, especially important in households with children or pets.
- Final Check: Once assembled, gently test the stability of the cabinet and the smooth operation of all drawers.

The assembled IRONCK Shoe Cabinet in an entryway setting.
Operating Instructions
Using your IRONCK Shoe Storage Cabinet is straightforward. Follow these guidelines for optimal storage and organization.
- Opening Drawers: Gently pull the metal handle on each drawer to flip it open. The drawers are designed to tilt forward, providing easy access to your shoes.
- Storing Shoes: Place shoes into the compartments within each drawer. Each drawer has two levels. For standard shoes like flats, sandals, slippers, and canvas shoes, the internal dividers can remain in place.
- Adjusting Dividers: If you need to store high-top shoes, boots, or high heels, the internal dividers can be easily removed to create a single, larger compartment within the drawer. Simply slide them out of their slots.
- Closing Drawers: Push the drawer back into the cabinet until it clicks securely into place. Ensure it is fully closed to maintain a tidy appearance and keep dust out.
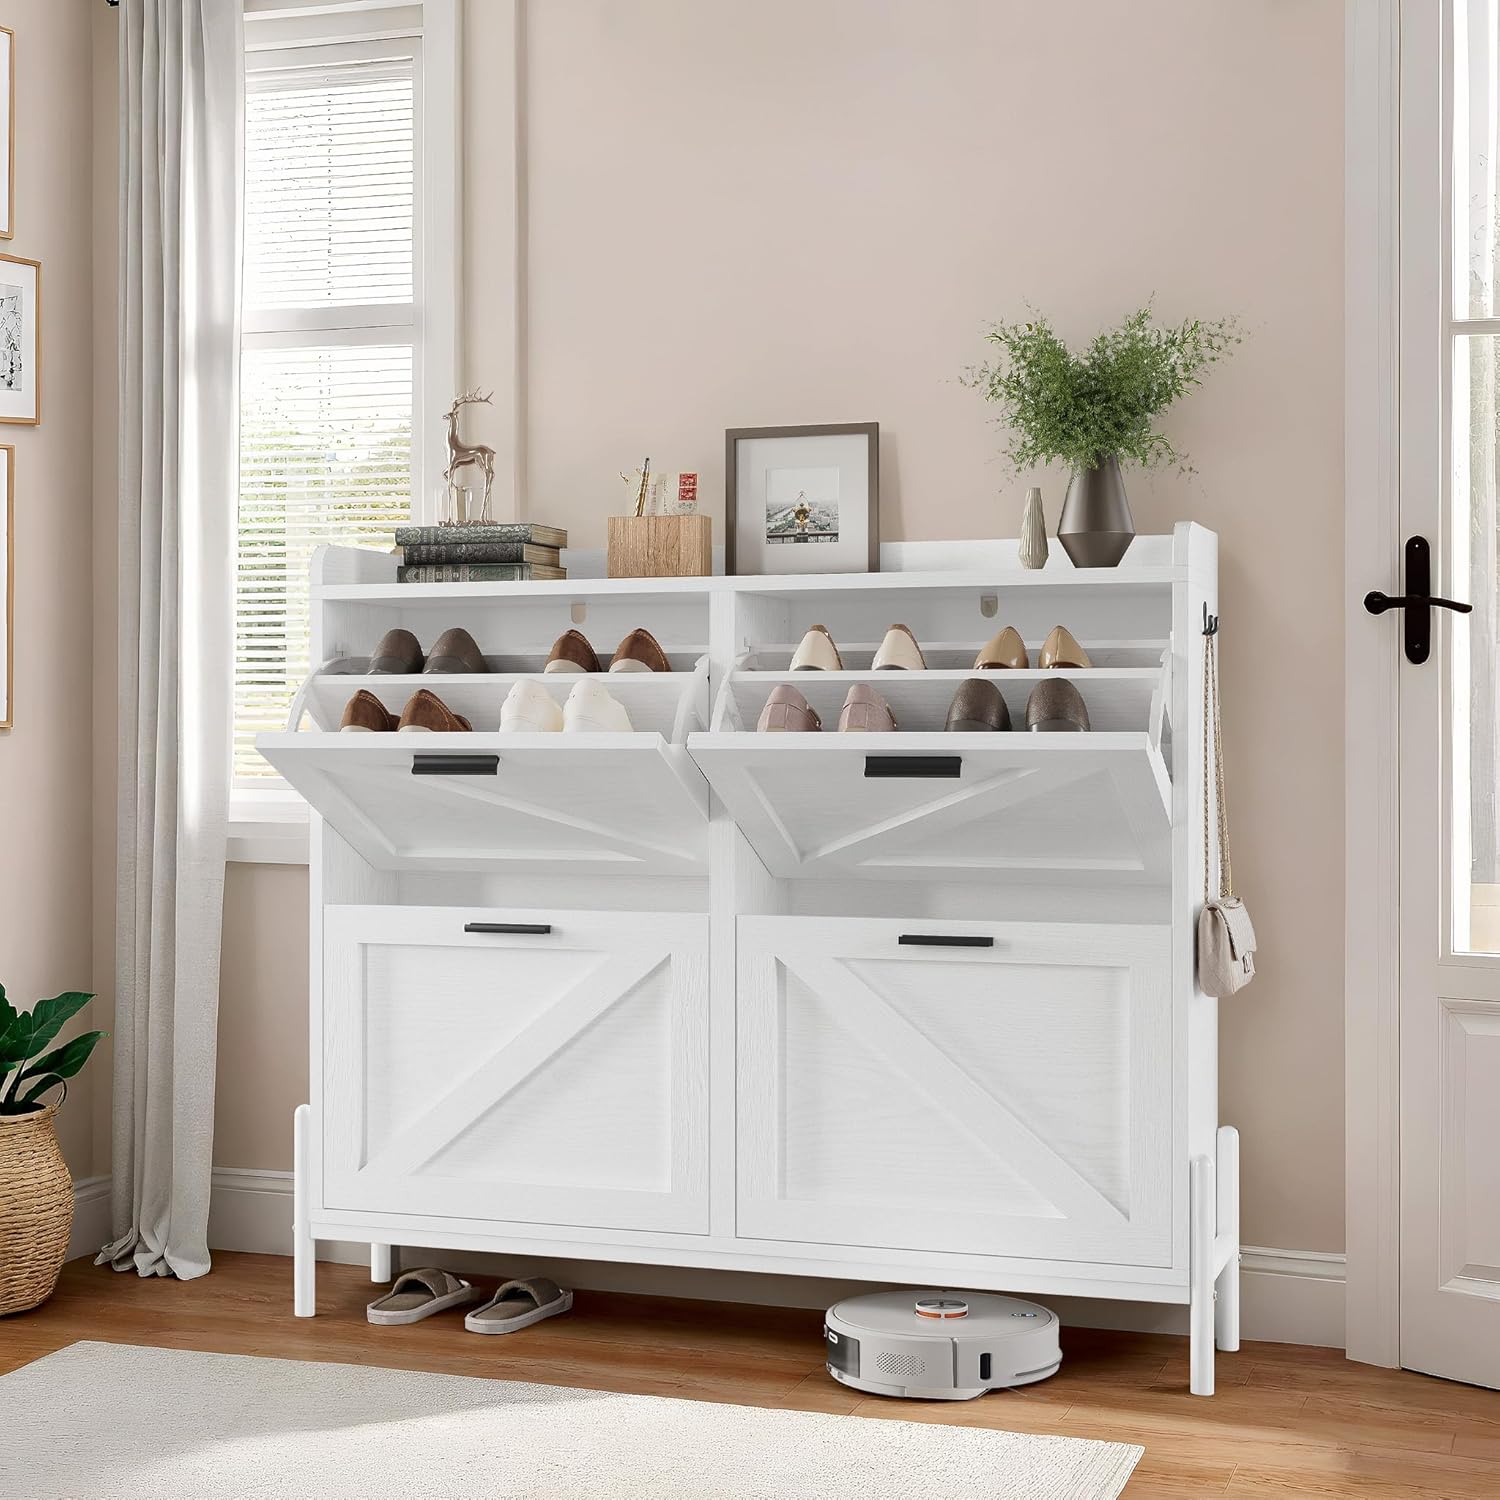
View of the cabinet with drawers open, demonstrating shoe storage.

Examples of shoe types suitable for storage in the cabinet.
Maintenance and Care
Proper care will ensure the longevity and appearance of your IRONCK Shoe Storage Cabinet.
- Cleaning: Wipe the surface regularly with a soft, damp cloth. Avoid using harsh chemicals, abrasive cleaners, or polishes that may damage the finish.
- Dusting: Dust the cabinet frequently with a dry, soft cloth to prevent dust buildup.
- Spills: In case of spills, wipe them immediately with a clean, dry cloth to prevent staining or moisture damage.
- Ventilation: Ensure the ventilation holes on the back of the cabinet remain unobstructed to allow for proper air circulation and prevent odor buildup.
- Avoid Overloading: Do not overload the drawers beyond their capacity, as this can strain the hinges and affect the smooth operation of the flip mechanism.
- Sunlight Exposure: Avoid prolonged exposure to direct sunlight, which can cause fading or discoloration of the finish.
Troubleshooting
If you encounter any issues with your shoe cabinet, refer to the following common problems and solutions:
| Problem | Possible Cause | Solution |
|---|---|---|
| Drawers do not open/close smoothly. | Misaligned hinges or overloaded drawer. | Check hinge alignment and adjust if necessary. Reduce the number of shoes in the drawer. |
| Cabinet feels wobbly or unstable. | Loose assembly screws or anti-tipping device not installed/secured. | Tighten all assembly screws. Ensure the anti-tipping device is properly installed and anchored to a wall stud. |
| Unpleasant odor inside drawers. | Lack of ventilation or damp shoes. | Ensure ventilation holes are clear. Allow shoes to air out before storing. You may place a deodorizer sachet inside. |
| Scratches or marks on the surface. | Abrasion from objects or improper cleaning. | Use soft cloths for cleaning. Avoid placing sharp or rough objects directly on the surface. Minor scratches may be touched up with furniture repair pens. |
Safety Information
Please observe the following safety precautions to prevent injury or damage to the product:
- Anti-Tipping Device: Always install and properly secure the anti-tipping device to a wall stud. This is crucial to prevent the cabinet from falling over, especially if children or pets are present.
- Weight Limit: Do not exceed the recommended weight capacity for each drawer or the top surface. Overloading can compromise stability and structural integrity.
- Children and Pets: Keep children and pets away from the cabinet during assembly. Do not allow children to climb on or play with the cabinet.
- Stable Surface: Place the cabinet on a flat, level, and stable surface to prevent wobbling or tipping.
- Proper Use: Use the cabinet only for its intended purpose of shoe storage.
Warranty and Customer Support
IRONCK stands behind the quality of its products. For any questions, concerns, or assistance with assembly, parts, or troubleshooting, please contact our customer support team.
Our customer service representatives are available to answer your questions within 24 hours.
For more information or to contact support, please visit the official IRONCK store or refer to the contact details provided with your purchase documentation.
Online Store: Visit the IRONCK Store on Amazon
Ask a question about this manual
Ask about setup, troubleshooting, compatibility, parts, safety, or missing instructions. Manuals+ will review the question and use this page’s manual context to help answer it.