1. Introduction
This manual provides detailed instructions for the installation, operation, and maintenance of your Vipbear Smart Toilet with Built-in Bidet (Model Smart Toilet-OPT02). Please read this manual thoroughly before use to ensure proper function and safety. Retain this manual for future reference.

Image 1.1: Vipbear Smart Toilet with Bidet. This image shows the sleek design of the smart toilet, highlighting its modern aesthetic and integrated features.
2. Safety Information
Important: Always follow basic safety precautions when using electrical appliances to reduce the risk of fire, electric shock, and injury.
- Electrical Outlet Required: This product requires a dedicated electrical outlet for operation. Ensure your bathroom has an accessible, properly grounded electrical outlet before installation.
- Do not immerse the product in water or other liquids.
- Do not attempt to repair or modify the product yourself. Contact qualified service personnel for any repairs.
- Keep the remote control away from water.
- Ensure all connections are secure and leak-free during installation.
3. Package Contents
Verify that all components are present and undamaged upon unpacking:
- Smart Toilet X 1
- Remote Control X 1
- Water Valve X 1
- Flange Ring X 1
- Fixed Disk X 1
- Aroma Tablet X 1
4. Product Overview
The Vipbear Smart Toilet (Model Smart Toilet-OPT02) integrates advanced features for enhanced hygiene and comfort. Key features include:
- Hands-Free Operation: Automatic lid opening/closing and flushing via foot sensor or proximity.
- Integrated Bidet System: Dual nozzles for posterior and feminine wash with adjustable position, water pressure, and temperature. Features self-cleaning nozzles.
- Heated Seat: Adjustable warmth levels for comfort.
- Warm Air Dryer: Reduces toilet paper usage.
- Automatic Deodorization: Internal circulation system to maintain fresh air.
- Night Light: Soft built-in illumination for nighttime use.
- Powerful Flush: 360° vortex siphon flush for efficient cleaning.
- Children's Cleaning Mode: Gentle wash setting for young users.
- Colorful Lights: Immersive art lighting options.

Image 4.1: Overview of the Vipbear Smart Toilet. This image illustrates the automatic lid movement and the integrated night light feature.

Image 4.2: Digital Display. This image highlights the digital display showing water temperature, seat temperature, and energy-saving mode indicators.
5. Installation Guide
Installation typically takes approximately 10 minutes with the included tools. It is recommended to measure your toilet area on-site before installation to ensure proper fit. Professional installation is recommended if you are unfamiliar with plumbing or electrical work.
5.1 Pre-Installation Checklist
- Confirm availability of a grounded electrical outlet (120V AC, 60Hz) within reach of the toilet.
- Ensure water supply line is accessible and can be shut off.
- Verify all package contents are present.
5.2 Basic Installation Steps (Summary)
- Shut off the main water supply to your bathroom.
- Remove your existing toilet (if applicable).
- Install the flange ring and fixed disk according to the detailed instructions provided in the separate installation manual.
- Position the Smart Toilet onto the installed flange and secure it.
- Connect the water supply line to the toilet's water valve.
- Connect the power cord to the grounded electrical outlet.
- Turn on the water supply and check for leaks.
- Perform initial function tests.

Image 5.1: Product Dimensions. This diagram provides critical measurements for installation, including depth, width, and height, and the 12-inch rough-in dimension.
6. Operating Instructions
6.1 Automatic Lid & Flush Functions
- Auto Open/Close: The lid automatically opens as you approach and closes when you leave.
- Foot Sensor: A foot sensor allows for hands-free opening of the seat and flushing.
- Auto Flush: The toilet will automatically flush after use when you leave the vicinity.

Image 6.1: Automatic Lid and Foot Sensor Operation. This image demonstrates how the lid automatically opens and closes, and how the foot sensor can be used to open the seat and flush, illustrating the hands-free operation for both standing and sitting users.

Image 6.2: Standing and Sitting Use Flow. This graphic details the sequence of automatic actions for both standing and sitting users, from auto-opening the lid to auto-flushing and closing.
6.2 Bidet Functions
The integrated bidet offers personalized cleaning with dual nozzles.
- Front Wash: For feminine hygiene.
- Rear Wash: For posterior cleaning.
- Movement Wash: Nozzle moves back and forth for a wider cleaning area.
- Water Temperature Adjustment: Select from multiple warmth levels (e.g., Room temperature, 93.2°F, 98.6°F, 104°F).
- Water Pressure Adjustment: Adjust water intensity from weak to strongest.
- Self-Cleaning Nozzles: Nozzles clean themselves before and after each use.
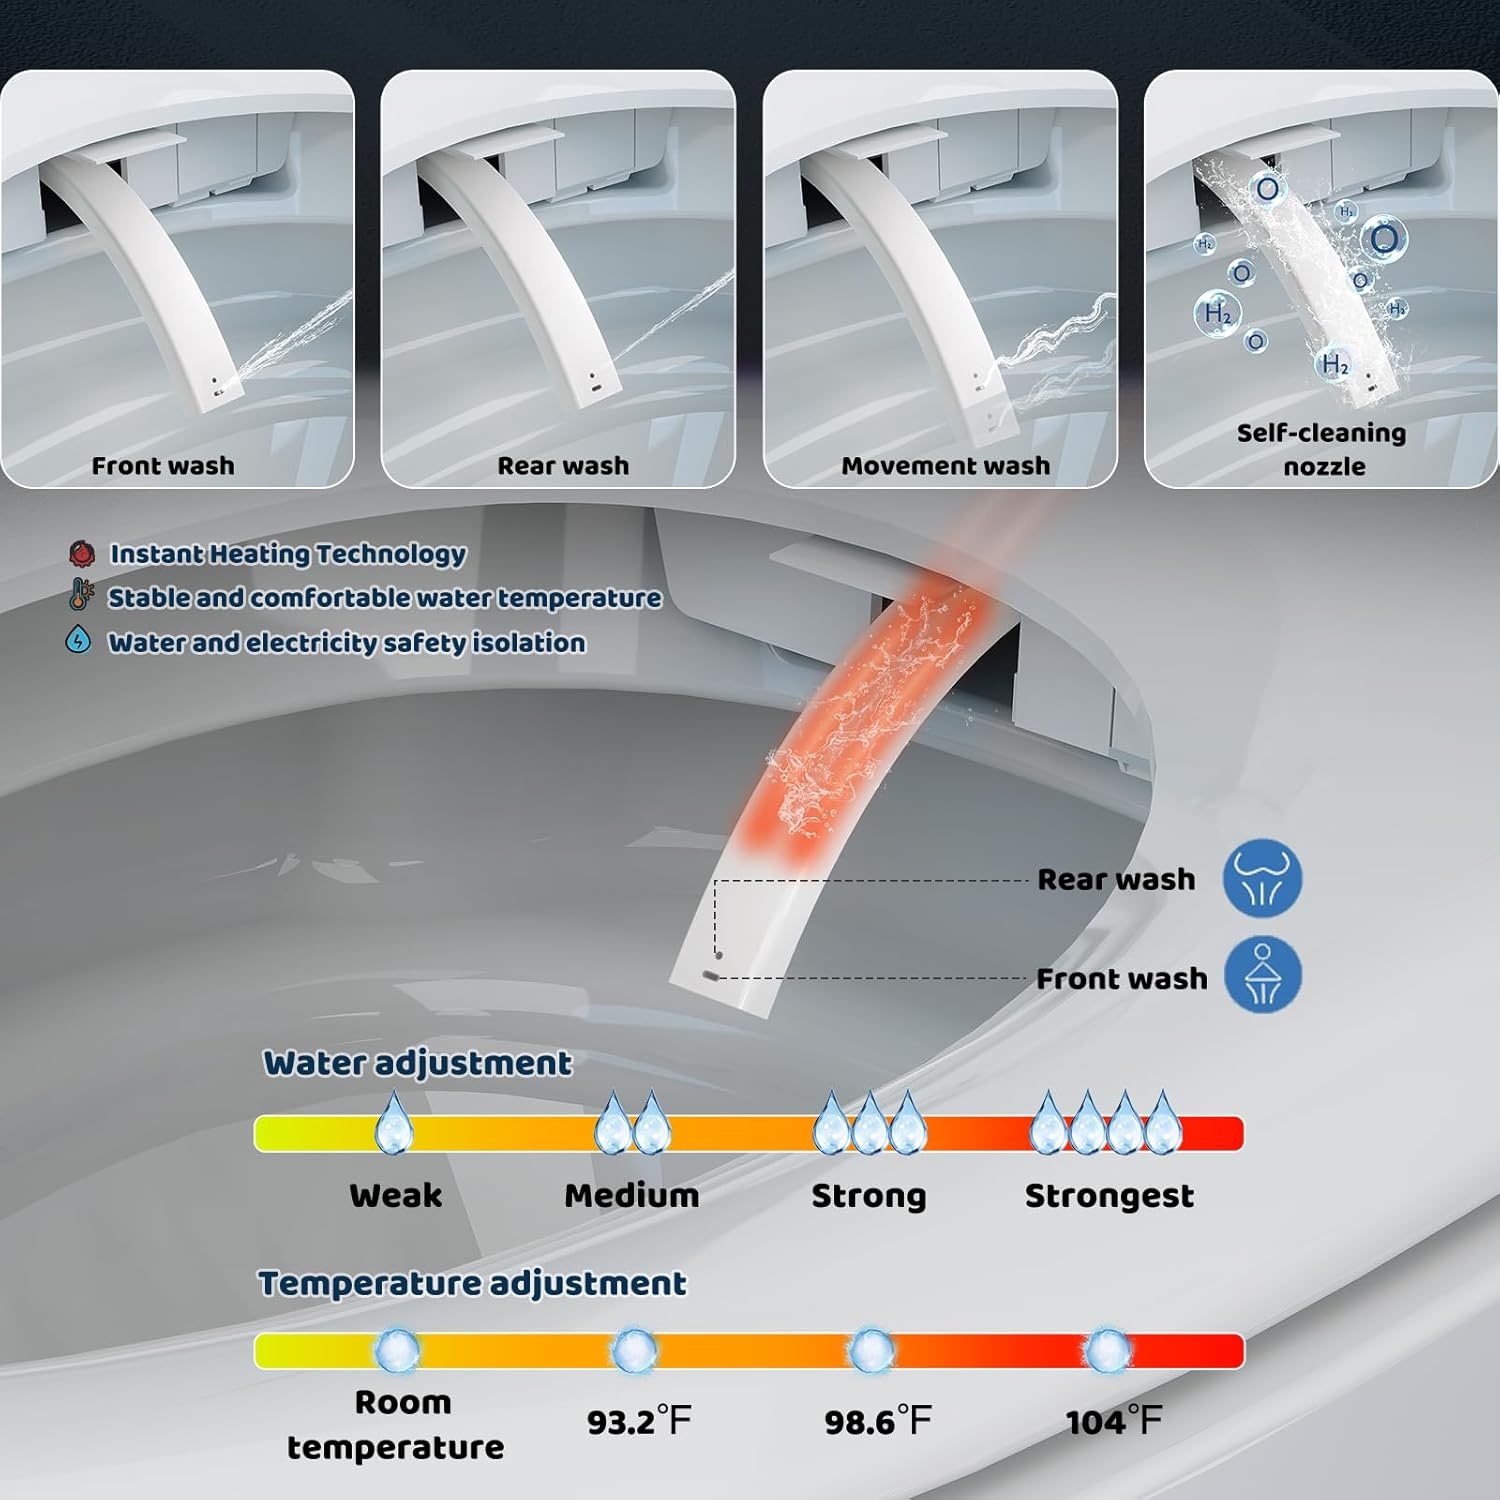
Image 6.3: Bidet Wash Modes and Adjustments. This image illustrates the different wash modes (front, rear, movement, self-cleaning) and the adjustable water temperature and pressure settings.

Image 6.4: Multiple Cleaning Modes. This graphic further details the front, rear, and movement wash functions, along with the self-cleaning nozzle feature.

Image 6.5: Instant Heating Technology. This diagram shows how cold water is instantly heated to a stable and comfortable temperature, ensuring water and electricity safety isolation.
6.3 Heated Seat
The seat provides instant warmth with 4 adjustable temperature levels for comfort in all seasons.

Image 6.6: Heated Seat Function. This image illustrates the heated seat feature, showing the warmth distribution and adjustable temperature settings from room temperature to 99°F.

Image 6.7: 4-Gear Precise Temperature Control. This graphic details the four adjustable temperature levels for the heated seat and illustrates the ECO energy-saving thermostatic seat function, which reduces temperature after 10 minutes of non-use.
6.4 Warm Air Dryer
After washing, the warm air dryer provides a comfortable drying experience, reducing the need for toilet paper.

Image 6.8: Efficient Warm Air Dryer. This image shows the warm air stream from the dryer, indicating its function to reduce toilet paper use.

Image 6.9: 4-Speed Adjustable Wind Temperature. This graphic illustrates the four adjustable wind temperature settings for the dryer, emphasizing fast and efficient drying and reduced toilet paper usage.
6.5 Night Light & Colorful Lights
A soft night light guides you in the dark without disturbing others. The toilet also features immersive art lighting with various color options.

Image 6.10: Immersive Art Light. This image displays the various colorful light options available, such as Spring Verdant Green, Summer Sky Blue, Apricot Leaf Yellow, Flame Red, Sea Water Blue, Stellalou Purple, and Winter Snow White.
6.6 Automatic Deodorization
The toilet features a highly effective internal circulation system that quickly removes odors, keeping the bathroom air fresh. An aroma tablet is included for enhanced air purification.

Image 6.11: Aromatherapy Air Purification. This image visually represents the deodorization system, showing air being circulated and purified, with leaves symbolizing fresh air.

Image 6.12: Automatic Deodorization System. This graphic illustrates the internal circulation system that removes odors and keeps the bathroom air fresh.
6.7 Remote Control & One-Touch Knob
All functions can be controlled via the wireless remote control. A convenient one-touch knob also provides easy access to common functions, suitable for seniors and children.

Image 6.13: Wireless Remote Control. This image displays the remote control with its various buttons for different functions and highlights its rapid response time.

Image 6.14: One-Touch Knob Operation. This graphic explains how to use the one-touch knob for functions like rear wash, front wash, flush, and dryer by rotating and pressing.
6.8 Children's Cleaning Mode
A gentle water spray mode is available to assist children aged 3+ in learning bathroom independence while ensuring effective cleaning.

Image 6.15: Children's Cleaning Mode. This image shows the smart toilet in a bathroom setting, emphasizing the gentle care provided by the children's cleaning mode.
6.9 Powerful Flush
The toilet features a powerful 360° siphon flush with water efficiency, ensuring thorough cleaning with each use. The water pressure can be adjusted via an angle valve.

Image 6.16: Powerful Flush and Water-Saving. This cutaway diagram illustrates the 360° siphon flush mechanism, including the blackout flush and jet flow push, and provides a MAP scoring guide for waste removal efficiency.
7. Maintenance
7.1 Nozzle Cleaning
- The bidet nozzles are self-cleaning and will rinse themselves before and after each use.
- For manual cleaning, refer to the remote control or one-touch knob instructions to extend the nozzles, then gently wipe with a soft cloth and mild cleaner.
7.2 General Cleaning
- Wipe the exterior surfaces of the toilet with a soft, damp cloth and a mild, non-abrasive cleaner.
- Do not use harsh chemicals, abrasive cleaners, or scouring pads, as these can damage the finish.
- Regularly clean the seat and lid with appropriate bathroom cleaners.
- Ensure no water enters the electrical components during cleaning.
8. Troubleshooting
If you encounter issues with your Vipbear Smart Toilet, refer to the following common troubleshooting steps. For problems not listed here, contact customer support.
| Problem | Possible Cause | Solution |
|---|---|---|
| Toilet does not power on. | No power supply; circuit breaker tripped. | Check if the power cord is securely plugged in. Reset the circuit breaker if necessary. Ensure the outlet is functional. |
| Lid/Seat does not open automatically. | Sensor obstructed or disabled; user not detected. | Ensure the sensor area is clear. Check remote settings for auto-open feature. Approach the toilet within the detection range. |
| Bidet water pressure is weak. | Water supply valve partially closed; nozzle clogged. | Ensure the water supply valve is fully open. Clean the bidet nozzles. Adjust water pressure settings via remote. |
| Heated seat is not warm. | Heated seat function off; temperature setting too low. | Activate the heated seat function via remote. Increase the temperature setting. |
| Toilet is leaking. | Loose connections; damaged seal. | Immediately shut off water supply. Check all water connections for tightness. If leak persists, contact customer support. |
9. Specifications
| Feature | Detail |
|---|---|
| Brand | Vipbear |
| Model Number | Smart Toilet-OPT02 |
| Product Dimensions | 26.78"D x 15.79"W x 18.35"H |
| Material | Ceramic |
| Item Weight | 65 Pounds |
| Installation Type | Floor Mounted |
| Shape | Oval |
| UPC | 199581010574 |
| Power Source | Requires Electrical Outlet (Batteries required for remote control) |
| Included Components | Smart Toilet, Remote Control, Water Valve, Flange Ring, Fixed Disk, Aroma Tablet |

Image 9.1: Comfort Height. This image compares the 17.3/8" seat height of the Vipbear toilet to a standard 15" toilet, illustrating the ergonomic benefits for natural leg bending.
10. Warranty and Support
Your Vipbear Smart Toilet is backed by a 1-year warranty from the date of purchase. This warranty covers manufacturing defects and malfunctions under normal use.
For warranty claims, technical assistance, or any questions regarding your product, please contact our dedicated support team. You may also be eligible for 30-day easy returns as per retailer policy.
Contact Information: Refer to your purchase documentation or the Vipbear official website for the most current customer support contact details.


