1. Introduction
This manual provides detailed instructions for the safe and efficient operation, maintenance, and troubleshooting of your VEVOR 1500W Airless Paint Sprayer, Model 450. This high-efficiency airless sprayer is designed to apply a smooth finish without brush marks, making it suitable for various painting projects, including house exteriors, fences, decks, garages, furniture, and trim. Please read this manual thoroughly before initial use and retain it for future reference.
2. Safety Instructions
WARNING: Failure to follow these safety instructions may result in serious injury or property damage.
- Always wear appropriate safety gear, including eye protection, gloves, and skin protection.
- Use the sprayer in a well-ventilated area to prevent inhalation of paint fumes.
- Keep the sprayer and paint materials away from heat sources, sparks, and open flames.
- Ensure the work area is free from obstructions and trip hazards.
- Never point the spray gun at people or animals. High-pressure spray can cause severe injury.
- Always disconnect the power supply before cleaning, servicing, or changing accessories.
- Dispose of paint residues and cleaning solvents responsibly, following all local regulations.
- Do not modify the sprayer or use it for purposes other than its intended use.
- Keep children and pets away from the work area.
3. Product Overview
The VEVOR 1500W Airless Paint Sprayer is engineered for efficiency and ease of use. Key features include:
- 1500W Powerful Motor: Provides high performance for various painting tasks.
- High-Efficiency Airless Technology: Designed to prevent bubbles and cracks in coatings, ensuring a smooth finish.
- Fan-Shaped Spray Pattern: Achieves better atomization for even and efficient paint application.
- Long-Distance Capability: Equipped with a 9-meter high-pressure hose and a 0.5-meter extension rod for reaching distant areas.
- Wear-Resistant Pump: Ensures durability and extends the lifespan of the sprayer.
- Automatic Start & Stop Function: Enhances convenience during operation.
- Dust-Proof Switch: Protects internal components from paint and dust.
- Adjustable Pressure: Allows precise control over paint flow and pressure.
- Compact and Lightweight Design: Features an easy-carry handle for portability.

Figure 3.1: VEVOR Airless Paint Sprayer in action, demonstrating its versatility for various surfaces like decks, fences, and interior walls.

Figure 3.2: Illustration of the powerful 1500W motor and the paint flow control knob, indicating a maximum flow rate of 1.8 liters per minute.

Figure 3.3: Detailed view of the sprayer's functional components, including the dust-proof switch, pressure adjustment knob, exhaust pressure valve, and fluid filter.
4. Setup
- Unpacking: Carefully remove all components from the packaging. Check for any damage during transit.
- Assembly:
- Attach the high-pressure hose to the sprayer outlet and the spray gun. Ensure all connections are tight.
- Connect the suction tube and return tube to the sprayer.
- Insert the spray tip into the spray gun.
- Prepare Paint: Ensure your paint is properly mixed and, if necessary, thinned according to the paint manufacturer's recommendations. Strain the paint to remove any lumps or debris that could clog the sprayer.
- Priming the Sprayer:
- Place the suction tube into the paint container and the return tube into a waste bucket.
- Set the pressure control to the lowest setting.
- Turn on the sprayer. Allow the pump to draw paint through the system until a steady stream flows from the return tube.
- Once primed, turn off the sprayer and move the return tube into the paint container.
- Test Spray: Before painting your project, perform a test spray on a piece of cardboard or scrap material to adjust pressure and ensure a consistent spray pattern.
5. Operating Instructions
- Work Area Preparation: Mask off areas not to be painted and cover floors or furniture to protect them from overspray.
- Adjust Pressure: Turn the pressure adjustment knob to the desired setting. Higher viscosity paints typically require higher pressure.
- Spraying Technique:
- Hold the spray gun perpendicular to the surface, maintaining a consistent distance (typically 25-30 cm or 10-12 inches).
- Move the gun in smooth, even strokes, overlapping each pass by about 50%.
- Release the trigger at the end of each stroke to avoid paint buildup.
- For optimal results, apply multiple thin coats rather than one thick coat.
- Automatic Stop Function: The sprayer features an automatic stop function that pauses the pump when the trigger is released, conserving energy and reducing wear.
- Using the Extension Rod: For high ceilings or hard-to-reach areas, attach the 0.5-meter extension rod to the spray gun.

Figure 5.1: The fan-shaped spray pattern ensures even coverage, and the 9-meter hose allows for extended reach, enabling direct spraying from paint containers.

Figure 5.2: Demonstrating the use of the extension rod for painting high or difficult-to-reach surfaces like ceilings.
6. Maintenance
Proper cleaning and maintenance are crucial for the longevity and optimal performance of your airless paint sprayer.
- Immediate Cleaning After Use:
- Disconnect power.
- Remove the suction tube from the paint and place it into a bucket of appropriate cleaning solution (water for latex, mineral spirits for oil-based paints).
- Turn on the sprayer and flush the system until the cleaning solution runs clear from the spray gun.
- Remove the spray tip and guard, clean them separately.
- Clean the exterior of the sprayer and hose.
- Pump Protector/Storage Fluid: After cleaning, run pump protector fluid through the system before storing to prevent corrosion and freezing.
- Filter Cleaning: Regularly check and clean the fluid filter to ensure proper paint flow and prevent clogs.
- Nozzle Maintenance: If the spray tip becomes clogged during operation, reverse the tip and spray briefly to clear the obstruction.
- Storage: Store the sprayer in a clean, dry, and frost-free environment.

Figure 6.1: The sprayer's design allows for easy disassembly and cleaning of components, ensuring long-term performance.
7. Troubleshooting
Refer to the table below for common issues and their solutions.
| Problem | Possible Cause | Solution |
|---|---|---|
| No spray or weak spray | Clogged tip, clogged filter, insufficient paint, air in system, low pressure setting. | Clean or replace tip/filter, refill paint, prime the sprayer, increase pressure. |
| Inconsistent spray pattern | Worn tip, incorrect pressure, paint too thick, clogged tip. | Replace tip, adjust pressure, thin paint, clean tip. |
| Sprayer not priming | Air leaks in suction system, clogged suction filter, dry pump. | Check connections, clean filter, add pump protector fluid and re-prime. |
| Motor runs but no pressure | Inlet valve stuck open, worn pump packing, air in system. | Clean inlet valve, replace pump packing (professional service recommended), re-prime. |
8. Specifications
| Feature | Detail |
|---|---|
| Brand | VEVOR |
| Model Number | 450 |
| Power | 1500W |
| Max Flow Rate | 1.8 L/Min |
| Hose Length | 9 meters |
| Extension Rod Length | 0.5 meters |
| Product Dimensions (L x W x H) | 44 x 32.5 x 41.5 cm (17.3 x 12.8 x 16.3 inches) |
| Item Weight | 15.5 kg (34.2 lbs) |
| Power Source Type | Corded Electric |
| Color | Red |
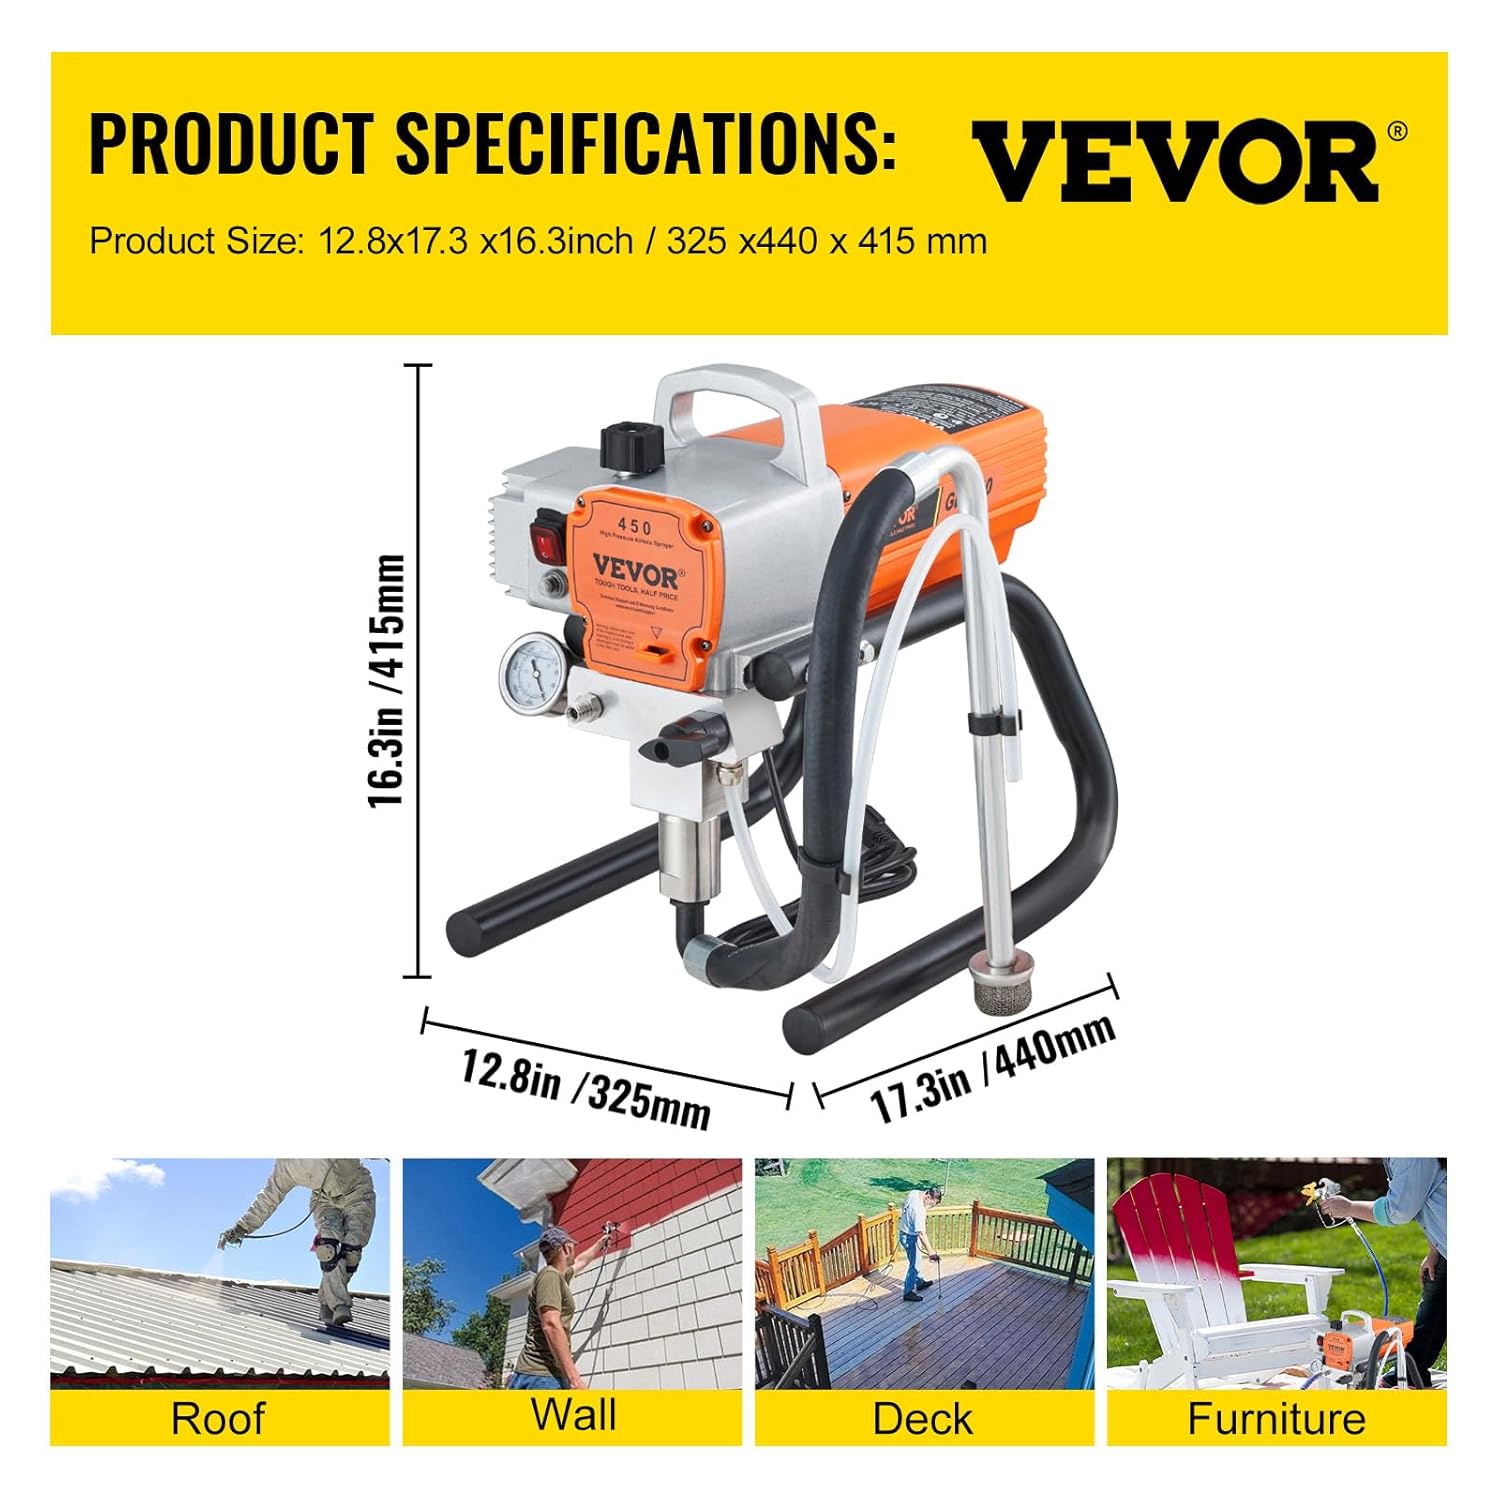
Figure 8.1: Detailed product dimensions of the VEVOR Airless Paint Sprayer.
9. Warranty and Support
For warranty information or technical support, please refer to the warranty card included with your product or visit the official VEVOR website. Keep your purchase receipt as proof of purchase.