1. Introduction
This manual provides detailed instructions for the setup, operation, maintenance, and troubleshooting of your ATTACK SHARK G3PRO Wireless Gaming Mouse. Please read this manual thoroughly to ensure proper use and to maximize your gaming experience.

Image: An overview of the ATTACK SHARK G3PRO mouse and its features, including magnetic fast charging, PAW3311 sensor, web cloud drive, RGB rapid charging dock, and lightweight design.
2. Package Contents
Verify that all items are present in your package:
- ATTACK SHARK G3PRO Wireless Gaming Mouse
- RGB Magnetic Charging Dock
- 2.4G USB Receiver
- USB-C to USB-A Charging/Data Cable
- User Manual
3. Setup
3.1 Initial Charging
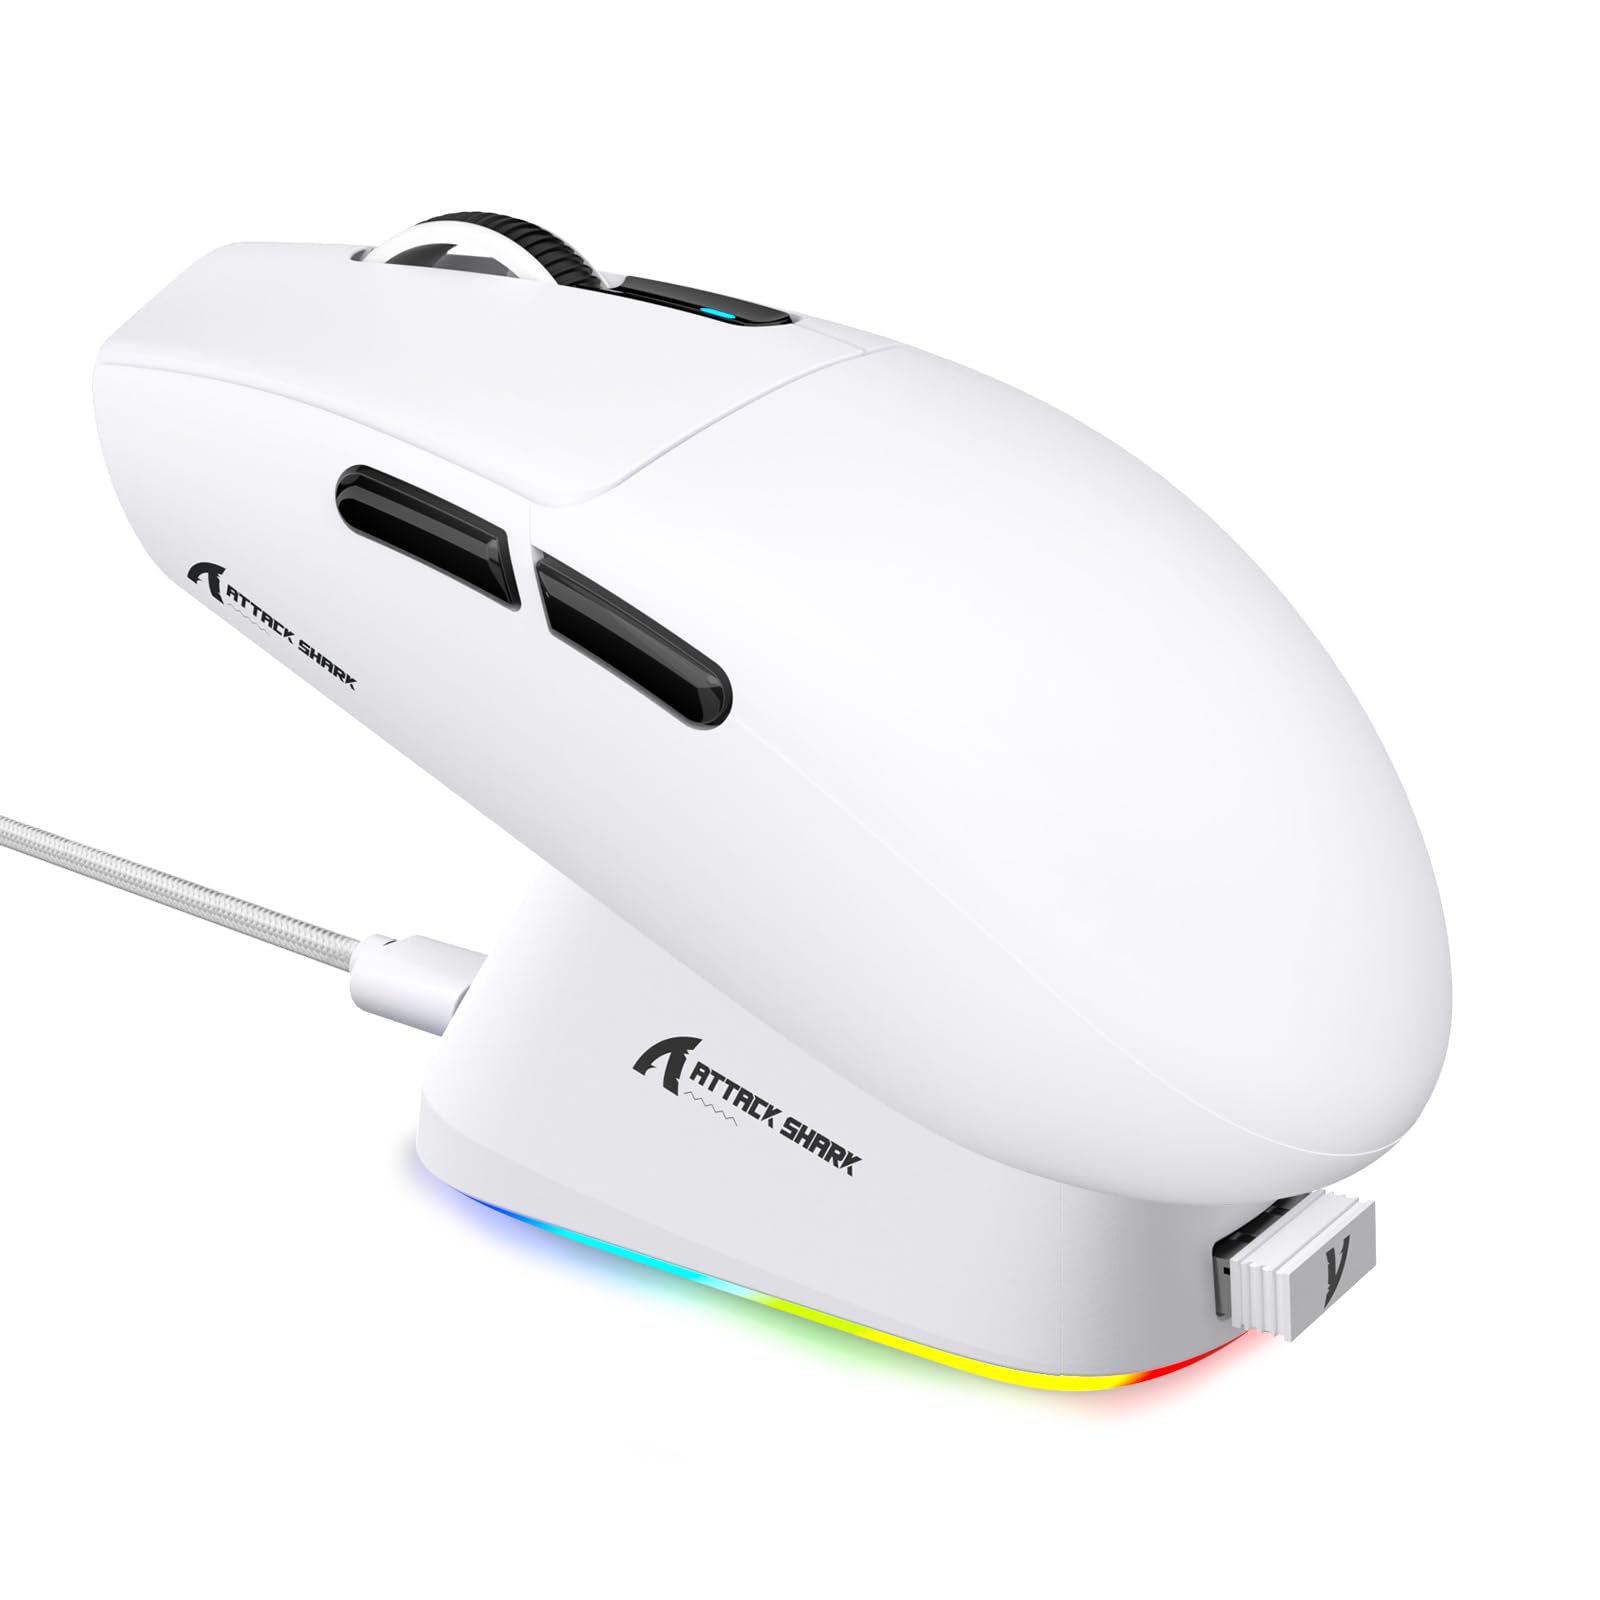
Before first use, it is recommended to fully charge the mouse. Connect the USB-C cable to the charging dock and a power source. Place the mouse onto the magnetic charging dock. The RGB lighting on the dock will indicate charging status.
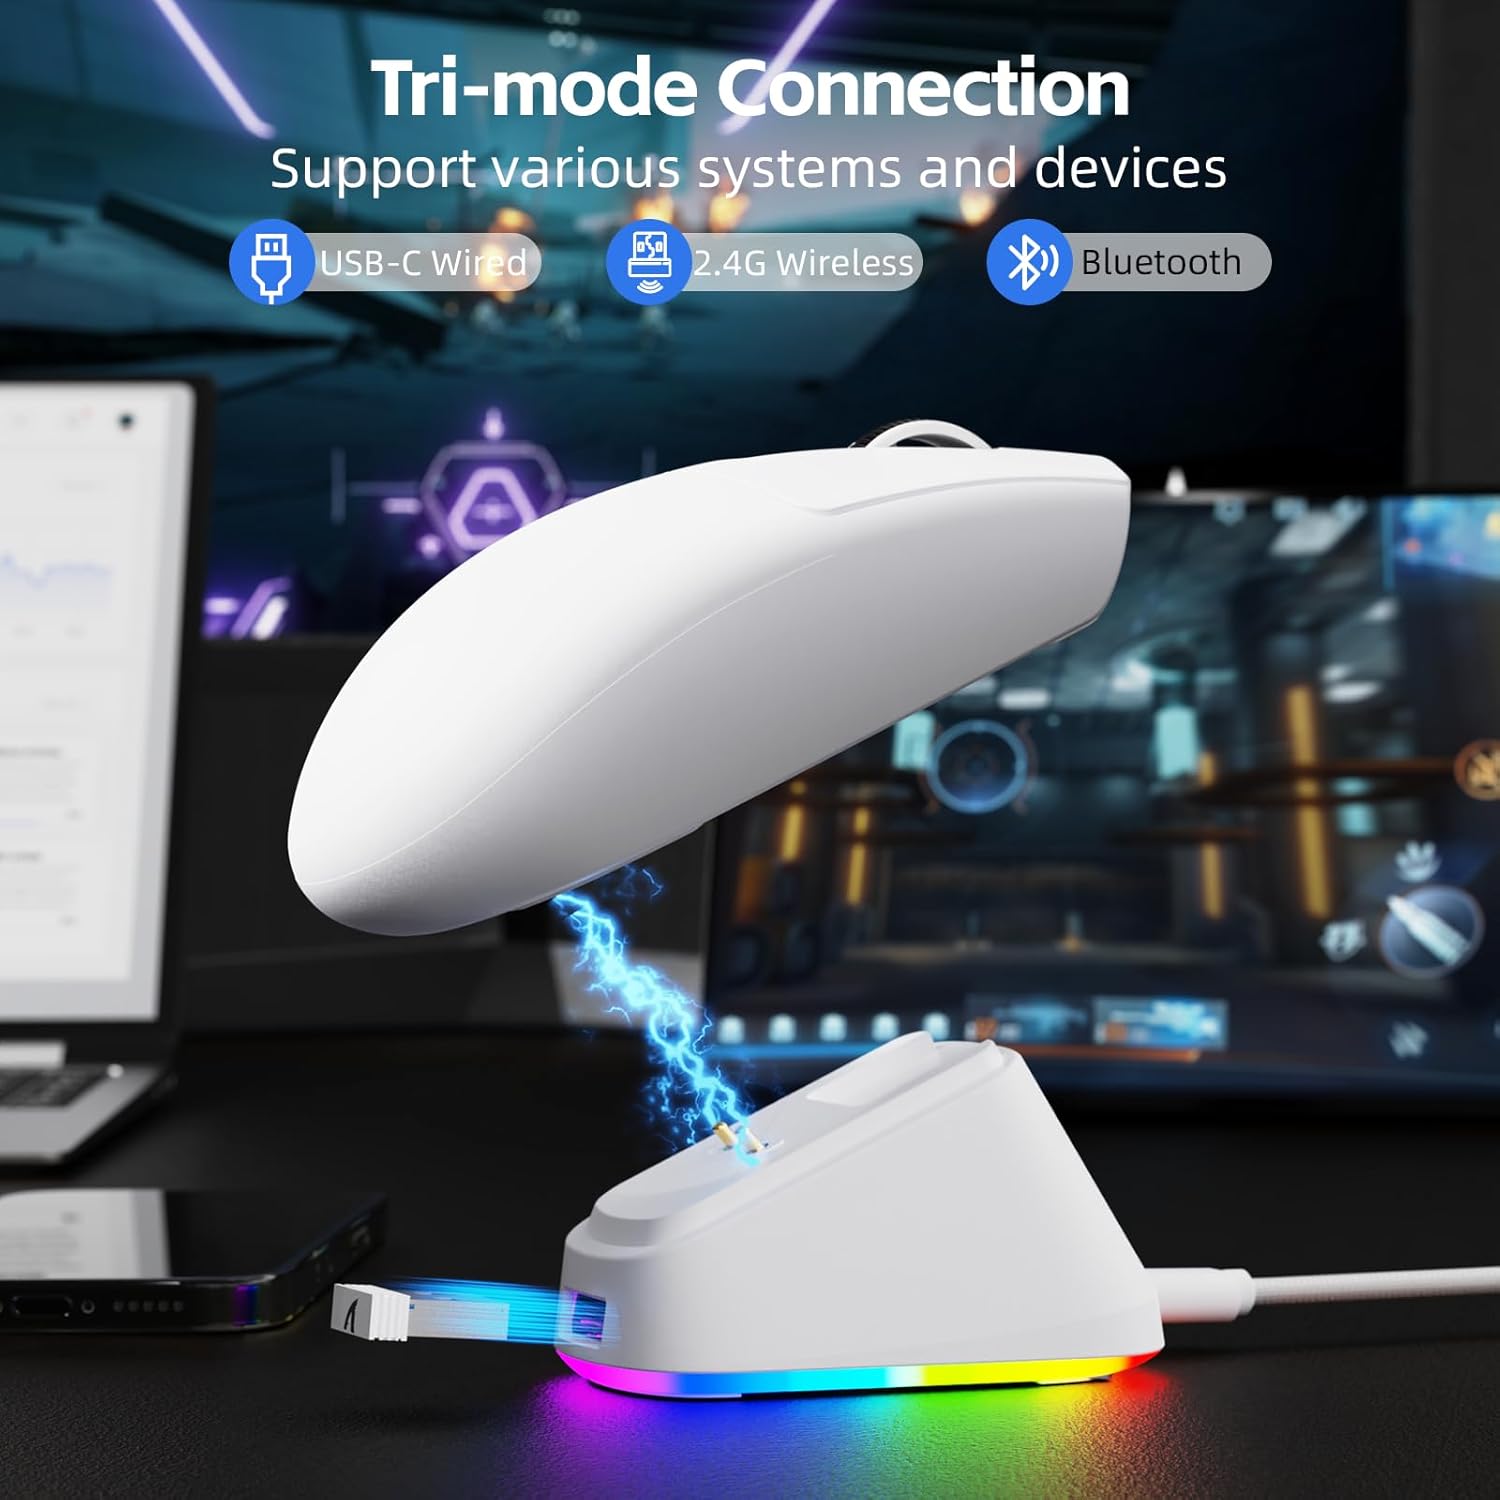
Image: The ATTACK SHARK G3PRO mouse magnetically attached to its RGB charging dock, showing the charging thimbles and USB-C port.
For a visual guide on charging, please watch the following video:
Video: This video demonstrates the magnetic charging dock and its features for the ATTACK SHARK G3PRO Wireless Gaming Mouse.
3.2 Connecting the Mouse
The G3PRO supports three connection modes: 2.4GHz Wireless, Bluetooth, and USB-C Wired. A switch on the bottom of the mouse allows you to select the desired mode.

Image: The ATTACK SHARK G3PRO mouse with visual indicators for Wired, 2.4G, and Bluetooth connectivity modes.
2.4GHz Wireless Mode:
- Locate the 2.4G USB receiver, typically stored within the charging dock or the mouse itself.
- Plug the USB receiver into an available USB port on your computer.
- Set the switch on the bottom of the mouse to "2.4G".
- The mouse should connect automatically.
Bluetooth Mode:
- Set the switch on the bottom of the mouse to "BT".
- On your computer or device, navigate to Bluetooth settings and enable Bluetooth.
- Search for new devices and select "ATTACK SHARK G3PRO" to pair.
USB-C Wired Mode:
- Connect the USB-C cable directly from the mouse to your computer.
- The mouse will function as a wired mouse and charge simultaneously.
For a visual guide on product features and connectivity, please watch the following video:
Video: This video demonstrates the various color options and the magnetic charging feature of the ATTACK SHARK G3PRO Wireless Gaming Mouse, showcasing its design and functionality.
4. Operating the Mouse
4.1 Button Functions
The ATTACK SHARK G3PRO features 5 programmable buttons:
- Left Click: Primary action.
- Right Click: Secondary action/context menu.
- Middle Click/Scroll Wheel: Scroll up/down, middle click for universal scroll or other functions.
- Forward Button: Default for navigating forward in web browsers/folders.
- Backward Button: Default for navigating backward in web browsers/folders.
- DPI Switch: Cycles through preset DPI levels.

Image: A detailed diagram illustrating the location and default functions of the multi-functional buttons on the ATTACK SHARK G3PRO mouse.

Image: An exploded view and labeled diagram of the G3PRO mouse components, including buttons, switches, charging points, and the 2.4G/OFF/BT mode switch.
4.2 DPI Adjustment
The mouse features a dedicated DPI switch to cycle through various sensitivity levels, ranging from 800 to 25,000 DPI. The current DPI setting is indicated by an LED light.

Image: A visual representation of the 25,000 DPI optical sensor's precision and how mouse movement trajectory sensitivity scales with DPI settings.
4.3 Polling Rate
The G3PRO supports a 1000Hz polling rate in both wired and 2.4GHz wireless modes, ensuring rapid response times for competitive gaming.

Image: A diagram illustrating the 1000Hz polling rate capability in both wired and wireless modes, highlighting millisecond response times.
5. Software and Customization
Customize your G3PRO mouse settings using the intuitive web driver or downloadable software from ATTACK SHARK. This allows for personalization of DPI, polling rate, macros, and more.
- Web Driver: Access the web-based configuration tool for quick adjustments without installation.
- Downloadable Software: For advanced customization and profile management, download the dedicated software.

Image: A screenshot of the ATTACK SHARK Hub software interface, showing options for mouse settings, DPI settings, parameter settings, macro editing, and personal center.

Image: The cloud-driven programming interface for the G3PRO mouse, displaying options for button settings, DPI adjustments, polling rate settings, and power management.
6. Maintenance
6.1 Cleaning
To maintain optimal performance, regularly clean your mouse. Use a soft, dry cloth to wipe the surface. For stubborn dirt, a slightly damp cloth can be used, ensuring no moisture enters the internal components. Avoid harsh chemicals or abrasive materials.
6.2 Storage
When not in use for extended periods, store the mouse and charging dock in a cool, dry place. Ensure the USB receiver is securely stored, ideally within the charging dock's designated slot, to prevent loss.
7. Troubleshooting
| Problem | Possible Cause | Solution |
|---|---|---|
| Mouse not responding (2.4G) | Low battery; Receiver not plugged in; Incorrect mode selected; Driver issue. | Charge the mouse; Ensure receiver is firmly plugged in; Set mouse to "2.4G" mode; Reinstall mouse drivers. |
| Mouse not responding (Bluetooth) | Low battery; Bluetooth not enabled on device; Not paired; Incorrect mode selected. | Charge the mouse; Enable Bluetooth on your device; Re-pair the mouse in Bluetooth settings; Set mouse to "BT" mode. |
| Charging dock RGB not lighting up | Cable not connected; Power source issue. | Ensure USB-C cable is securely connected to dock and power source; Try a different USB port or power adapter. |
| Inconsistent tracking | Dirty sensor; Uneven surface; Interference (wireless). | Clean the optical sensor; Use a clean, even mouse pad; Reduce wireless interference by moving other devices or using wired mode. |
| Buttons not responding | Software conflict; Physical damage. | Check software settings for button remapping; Test on another computer; Contact support if physical damage is suspected. |
8. Specifications
| Feature | Detail |
|---|---|
| Brand | ATTACK SHARK |
| Model | G3PRO |
| Color | White |
| Connectivity Technology | 2.4Ghz Wireless, Bluetooth, USB-C Wired |
| Movement Detection Technology | Optical (PAW3311 Sensor) |
| Max DPI | 25,000 DPI |
| Polling Rate | 1000Hz |
| Acceleration | 40G |
| Tracking Speed | 400 IPS |
| Switches | Mechanical (100 Million Clicks) |
| Battery Capacity | 500mAh |
| Battery Life | Up to 200 hours |
| Weight | 59g ± 3g |
| Buttons | 5 |
| Hand Orientation | Ambidextrous |
| Compatible Devices | Laptop, Personal Computer, Smartphone, Tablet |
| Operating System | Windows, macOS |
For a comparison of G3 and G3PRO models, refer to the image below:

Image: A table comparing the specifications of the ATTACK SHARK G3 and G3PRO models, highlighting differences in components and features.
9. Safety Information
- Do not expose the device to extreme temperatures or humidity.
- Avoid dropping or subjecting the device to strong impacts.
- Keep out of reach of children.
- Do not attempt to disassemble or modify the device, as this will void the warranty and may cause damage.
- Use only the provided charging cable and dock.
10. Warranty and Support
The ATTACK SHARK G3PRO Wireless Gaming Mouse comes with a standard manufacturer's warranty. For detailed warranty information, please refer to the warranty card included in your package or visit the official ATTACK SHARK website.
For technical support, troubleshooting assistance, or to inquire about replacement parts, please contact ATTACK SHARK customer service through their official website or the contact information provided in your product packaging.
Official Website: ATTACK SHARK Store on Amazon