
1. Introduction
This manual provides detailed instructions for the proper setup, operation, and maintenance of your Doslnlya S-300 4-Channel Karaoke Wireless Microphone System. Please read this manual thoroughly before using the product to ensure optimal performance and longevity.
2. Product Features
- 4 Independent Channels: Supports simultaneous use of four wireless microphones, ideal for group performances and family gatherings.
- Extended Transmission Range: Achieves an ultra-long barrier-free transmission distance of 80-150 meters. Maintains a stable connection up to 30 meters in environments with obstacles.
- Professional Noise Reduction: Features a dual composite structure with a hard metal mesh cover and high-density sponge to effectively suppress environmental noise and prevent microphone howling, ensuring clear and full vocal reproduction.
- Convenient Battery Operation: Each microphone operates on 2 AA batteries, allowing for quick replacement and continuous use without charging downtime.
- Versatile Design: The system features a modern mirror design, suitable for various applications including home karaoke, professional performances, and conference speeches.
3. What's in the Box
- 1 x Receiver Unit
- 4 x Wireless Microphones
- 1 x Power Adapter/Charger
4. Setup Instructions
- Install Batteries in Microphones: Each wireless microphone requires two (2) AA batteries. Unscrew the bottom part of each microphone, insert the batteries according to the polarity markings, and then re-secure the bottom.

Image: A diagram illustrating the insertion of two AA batteries into a wireless microphone, highlighting the battery compartment.
- Connect Receiver to Power: Connect the provided power adapter to the DC 12V input on the back of the receiver unit, then plug the adapter into a standard electrical outlet.
- Connect Receiver to Audio System: Use a 6.35mm audio cable (not included) to connect the 'MIC OUT' or 'BALANCED' output ports on the receiver to the audio input of your karaoke machine, mixer, or amplifier. For optimal sound quality, use the balanced XLR outputs if your audio system supports them.

Image: The rear panel of the receiver, displaying connection ports including DC12V power, balanced XLR outputs, and a 6.35mm microphone output jack.
- Position Antennas: Extend the antennas on the receiver unit vertically for best signal reception.
- Power On System: Press the power button on the receiver unit. Then, press the power button on each microphone you intend to use. The display on both the receiver and microphones should illuminate, indicating they are powered on and attempting to connect.
- Channel Synchronization: The system is designed for automatic synchronization. Ensure each microphone is assigned to a unique channel (CHA, CHB, CHC, CHD) as displayed on the receiver and microphone screens.

Image: The complete wireless microphone system, featuring the receiver and four microphones, with visual indicators for channels and transmission capabilities.
5. Operating Instructions
- Power On/Off: Press and hold the power button on the receiver and each microphone to turn them on or off.
- Adjust Volume: Use the individual volume knobs (VOL A, VOL B, VOL C, VOL D) on the receiver to adjust the output level for each microphone. Start with a low volume and gradually increase it to avoid sudden loud sounds.
- Microphone Usage: Hold the microphone approximately 2-6 inches (5-15 cm) from your mouth for optimal sound capture. Avoid covering the microphone grille with your hand, as this can affect sound quality and signal.
- Signal Range: The system offers a stable connection up to 30 meters in typical indoor environments with obstacles. For maximum range (80-150 meters), ensure a clear line of sight between the microphones and the receiver.

Image: A visual representation of the wireless microphone system demonstrating a stable signal reception within 30 meters in an unobstructed environment.
- Application Scenarios: This system is suitable for various uses including home entertainment, professional performances, conferences, and public speaking.

Image: A collage showing the versatility of the microphone system across different scenarios such as conferences, live music performances, karaoke, and general vocal use.
6. Maintenance
- Battery Replacement: Replace AA batteries in microphones when the battery indicator shows low power or when performance degrades. Always use fresh batteries.
- Cleaning: Wipe the receiver and microphones with a soft, dry cloth. Do not use liquid cleaners or abrasive materials. Ensure the microphone grille is free of debris.

Image: A detailed view of the microphone's head, highlighting its construction with a hard metal mesh shell and internal high-density foam, designed for noise reduction and anti-howling.
- Storage: Store the system in a cool, dry place away from direct sunlight and extreme temperatures. Remove batteries from microphones if storing for extended periods to prevent leakage.
7. Troubleshooting
- No Sound Output:
- Ensure the receiver is powered on and connected correctly to your audio system.
- Check if microphones are powered on and have fresh batteries.
- Verify that the volume knobs on the receiver and your audio system are turned up.
- Confirm that the microphone channels are synchronized with the receiver.
- Interference or Poor Signal:
- Ensure the receiver antennas are fully extended and positioned correctly.
- Reduce the distance between the microphones and the receiver.
- Remove any large metallic objects or other wireless devices that may be causing interference.
- Avoid placing the receiver in enclosed spaces.
- Microphone Howling/Feedback:
- Move the microphone further away from speakers.
- Reduce the volume level on the receiver or your audio system.
- Avoid pointing the microphone directly at speakers.
8. Specifications
| Feature | Detail |
|---|---|
| Brand | Doslnlya |
| Model Number | S-300 |
| Connectivity Technology | UHF |
| Connector Type | 6.35 mm Jack |
| Number of Channels | 4 |
| Power Source | Corded Electric (Receiver) |
| Microphone Power | 2 AA batteries per microphone |
| Recommended Uses | Singing, Karaoke, Performances, Conferences |
| Included Components | Receiver, Four Wireless Microphones, Charger |
| UPC | 762949779217 |
| ASIN | B0FG25XX21 |
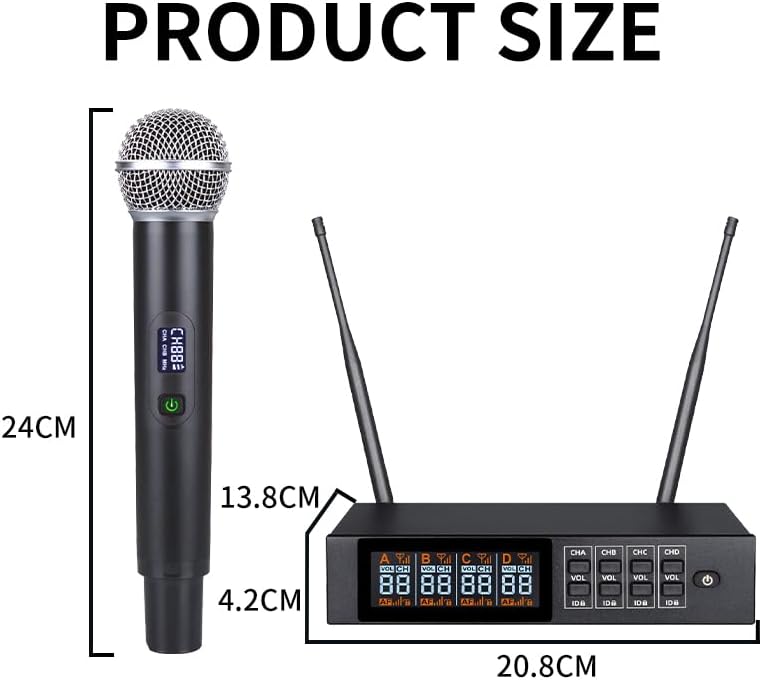
Image: Product dimensions for the receiver (20.8cm x 13.8cm x 4.2cm) and microphone (24cm length).
9. Warranty Information
The Doslnlya S-300 4-Channel Karaoke Wireless Microphone System comes with a 1-Year Warranty from the date of purchase. This warranty covers manufacturing defects and malfunctions under normal use. Please retain your proof of purchase for warranty claims. For detailed warranty terms and conditions, please refer to the official Doslnlya website or contact customer support.
10. Customer Support
If you encounter any issues or have questions regarding your Doslnlya S-300 system that are not addressed in this manual, please contact Doslnlya customer support. Refer to the product packaging or the official Doslnlya website for contact information.