Introduction
This manual provides detailed instructions for the assembly, operation, and maintenance of your AOGLLATI Black 5-Drawer Dresser with LED Lightbox. Please read all instructions carefully before beginning assembly and retain this manual for future reference. This dresser features five spacious drawers and an integrated LED lightbox with adjustable settings to enhance your living space.
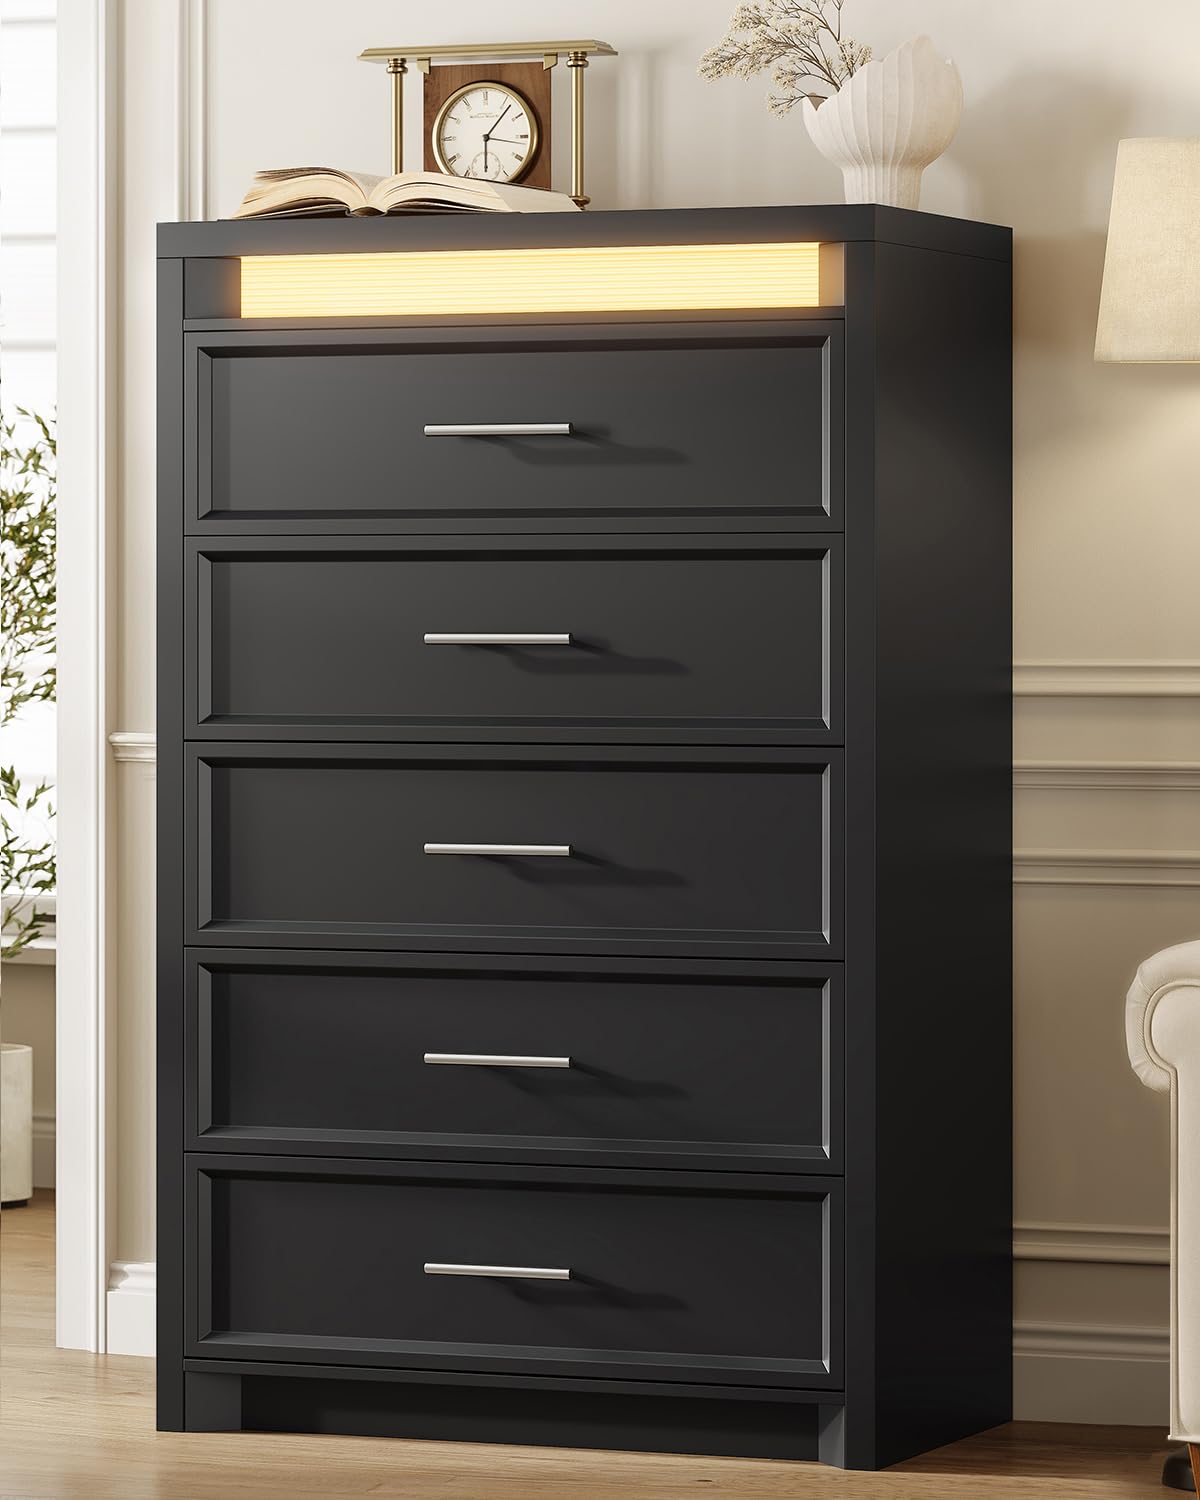
Image: Front view of the AOGLLATI Black 5-Drawer Dresser with the LED lightbox illuminated.
Safety Information
To prevent serious or fatal injuries from furniture tip-over, this product must be permanently attached to the wall with the included anti-tip device. Always use the anti-tip kit provided. Never allow children to climb on drawers or the dresser itself. Keep small parts away from children during assembly.

Image: Close-up of the anti-tipping device attached to the dresser, illustrating its function for enhanced stability.
Package Contents
Before assembly, verify that all components listed below are present and undamaged. If any parts are missing or damaged, please contact customer support.
- Dresser Panels (Top, Bottom, Sides, Back)
- 5 Drawer Boxes
- Drawer Fronts with Metal Handles
- Drawer Glide Rails (Pre-installed or separate)
- Hardware Pack (Screws, dowels, cam locks, etc.)
- LED Light Strip with Controller
- Anti-tip Kit
- Instruction Manual
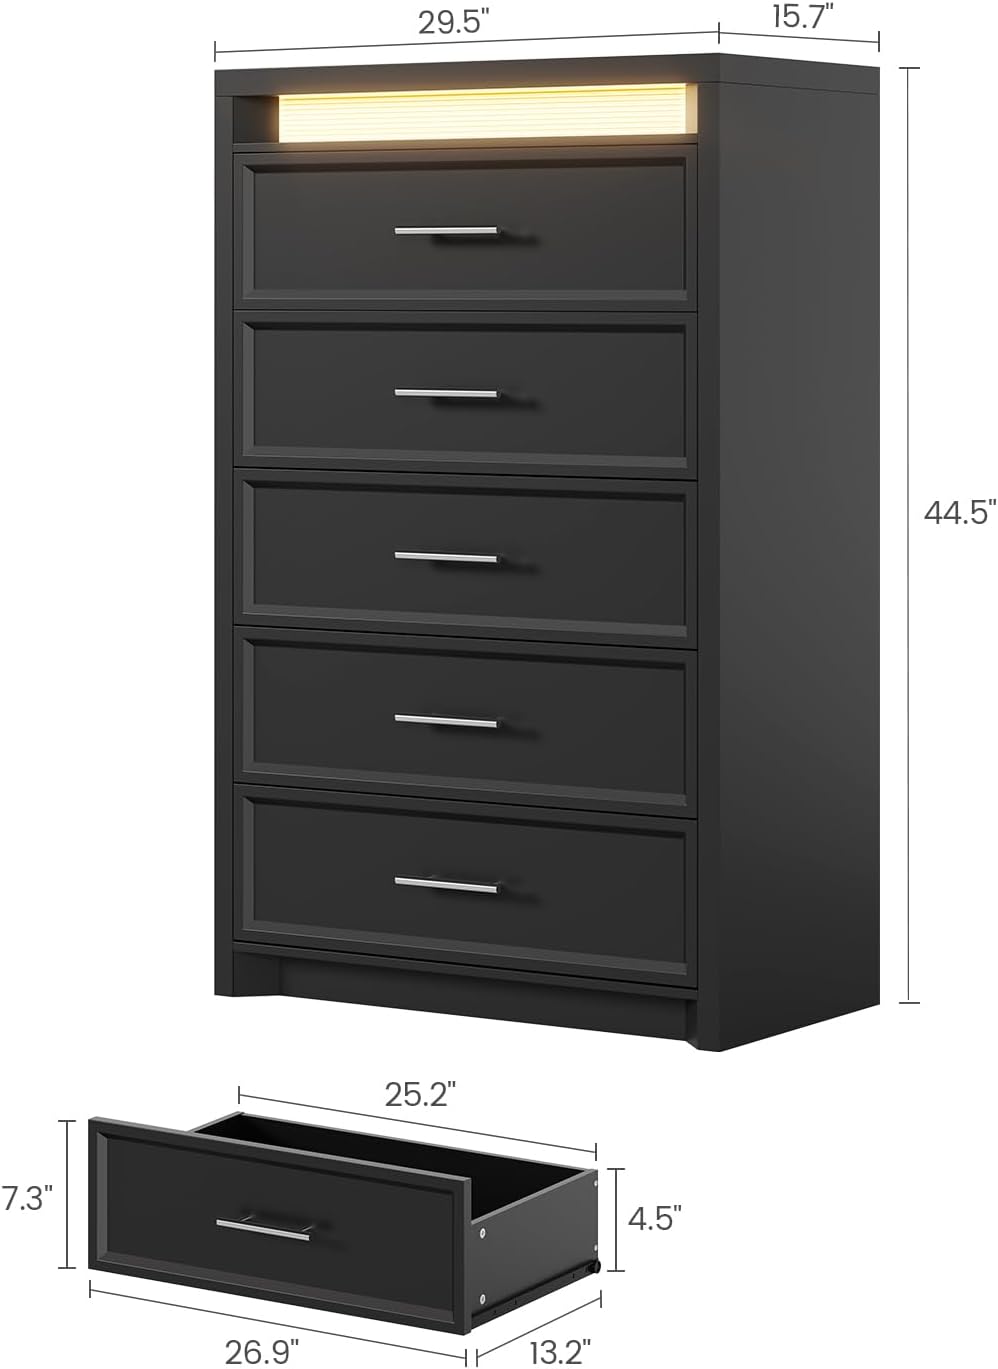
Image: Diagram showing the overall dimensions of the dresser and individual drawer components, indicating various parts.
Assembly Instructions
Assembly of this dresser requires two adults. Please follow the step-by-step instructions provided in the included assembly guide. Ensure you have a clear, spacious area for assembly and the necessary tools (typically a Phillips head screwdriver and a hammer).
- Prepare Components: Unpack all parts and lay them out on a soft, clean surface to prevent scratches. Identify each part using the labels and diagrams in the assembly guide.
- Assemble Frame: Begin by connecting the side panels to the top and bottom panels using the provided hardware. Ensure all connections are secure.
- Install Drawer Glides: Attach the drawer glide rails to the dresser frame and the drawer boxes as per the instructions. Ensure they are aligned correctly for smooth operation.
- Assemble Drawers: Construct the five drawer boxes and attach the metal handles to the drawer fronts.
- Insert Drawers: Carefully slide the assembled drawers into their respective slots in the dresser frame.
- Install LED Lightbox: Secure the LED light strip into the designated slot at the top of the dresser. Connect the power cable and controller.
- Attach Anti-tip Device: Securely fasten the anti-tip device to the back of the dresser and to a wall stud using the provided hardware. This step is crucial for safety.
For detailed visual steps, refer to the separate assembly manual included in your package.
Operating Instructions (LED Lightbox)
The integrated LED lightbox offers three color modes and adjustable brightness. Use the inline controller to manage these settings.
- Power On/Off: Press the power button on the controller to turn the LED lights on or off.
- Switch Modes: Press the 'M' (Mode) button to cycle through the three available light colors: Warm White, Yellow White, and Cool White.
- Adjust Brightness: Use the '+' button to increase brightness and the '-' button to decrease brightness.
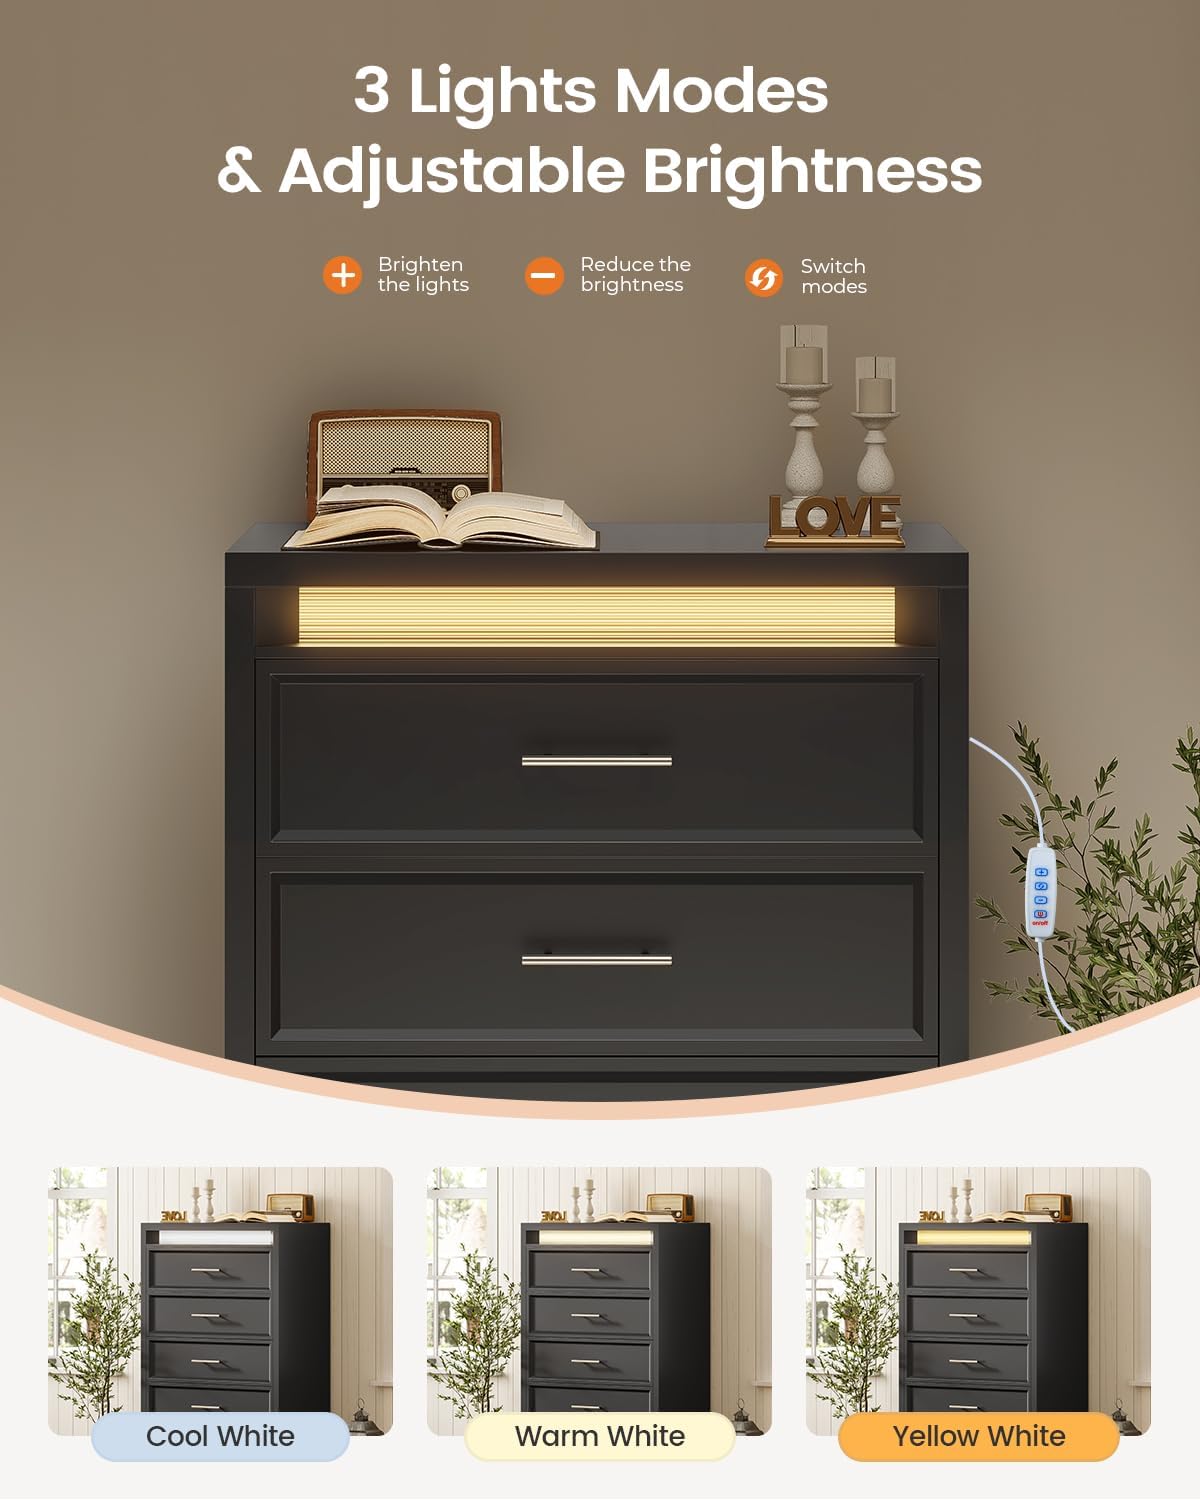
Image: The LED lightbox illuminated in different color modes (Cool White, Warm White, Yellow White) with the inline controller visible.
Maintenance
To maintain the appearance and longevity of your dresser, follow these simple care instructions:
- Cleaning: Wipe the dresser surfaces with a soft, damp cloth. Avoid using harsh chemicals or abrasive cleaners, which can damage the finish.
- Spills: Promptly clean up any spills to prevent staining or damage to the wood.
- Drawer Rails: Periodically check drawer glide rails for smooth operation. If a drawer becomes stiff, ensure no debris is obstructing the rails.

Image: Close-up of the dresser surface showing water resistance, highlighting ease of cleaning.
Troubleshooting
Refer to the following table for common issues and their solutions:
| Problem | Possible Cause | Solution |
|---|---|---|
| LED Lightbox not turning on | Power cable not connected; Controller malfunction; Power outlet issue | Ensure power cable is securely plugged into the dresser and a working outlet. Check the controller for damage. Try a different outlet. |
| Drawers are stiff or do not slide smoothly | Drawer rails misaligned; Obstruction in rails; Loose hardware | Remove the drawer and inspect the rails for any obstructions. Ensure all screws on the rails are tightened. Realign the drawer if necessary. |
| Dresser feels unstable | Anti-tip device not installed; Uneven floor; Loose connections | Install the anti-tip device as per instructions. Place the dresser on a level surface. Check and tighten all assembly hardware. |
Specifications
| Feature | Detail |
|---|---|
| Brand | AOGLLATI |
| Model Number | AG-RD-Dresser-5-B |
| Product Dimensions (D x W x H) | 15.7" x 29.5" x 44.5" |
| Number of Drawers | 5 |
| Material | Engineered Wood, Metal |
| Finish Type | Black |
| Item Weight | 92.5 Pounds |
| Additional Features | 3 Color Lightbox, Anti-Tipping, Metal Handle, Modern, Smooth Sliding Rail |
| Required Assembly | Yes |
Warranty Information
This AOGLLATI dresser comes with a limited warranty. Please refer to the warranty card included in your package for specific terms, conditions, and duration of coverage. The warranty typically covers manufacturing defects and material flaws under normal use.
Customer Support
If you have any questions regarding the assembly, operation, or maintenance of your AOGLLATI dresser, or if you require assistance with missing or damaged parts, please do not hesitate to contact our customer support team. Our team is ready to help you.
Contact information can typically be found on the packaging, the included warranty card, or on the official AOGLLATI website.