REDCAMP Inner Tent for 10'x10' or 10'x20' Canopies
REDCAMP Canopy Camping Tent Instruction Manual
Model: Inner Tent for 10'x10' or 10'x20' Straight Leg Canopies
Introduction
This manual provides detailed instructions for the setup, operation, and maintenance of your REDCAMP Canopy Camping Tent. This product is designed to convert a standard 10'x10' or 10'x20' straight leg pop-up canopy (frame and shelter not included) into a private and sheltered camping space. Please read these instructions carefully before use to ensure proper assembly and safe operation.

Image: The REDCAMP Canopy Camping Tent attached to a pop-up canopy frame, providing a sheltered space for users. Note: Canopy frame and top shelter are not included with this product.
Safety Information
- Do not use in heavy winds or storms. Severe weather conditions can damage the tent and pose a safety risk.
- Keep away from open flames and heat sources. The tent material is not fireproof and can ignite.
- Ensure the canopy frame (not included) is securely anchored before attaching the inner tent.
- Always check for overhead hazards such as dead branches before setting up.
Package Contents
Please verify that all items listed below are present in your package:
- Canopy Side Tent (Main fabric body)
- Fiberglass Tent Pole (1 unit)
- Iron Tent Poles (2 units)
- Rope (for guylines)
- Stakes (for securing the tent)
- Storage Bag

Image: All components included in the package, neatly laid out for identification.
Setup Instructions
This tent is designed for quick and easy setup. A pop-up canopy frame (10'x10' or 10'x20' straight leg) is required and not included.
- Prepare the Canopy Frame: Set up your existing 10'x10' or 10'x20' straight leg pop-up canopy frame according to its own instructions. Ensure it is fully extended and stable.
- Unfold the Tent: Lay the REDCAMP Canopy Camping Tent flat on the ground next to your canopy frame. Identify the tent's entrance and attachment points.
- Insert Poles: Assemble the fiberglass and iron tent poles. Insert the fiberglass pole into the designated sleeve at the top of the tent's dome section. Insert the two iron poles into the sleeves at the base of the tent's side walls to create structure.
- Attach to Canopy Frame: Lift the tent and align it with one side of your canopy frame. Use the built-in fasteners, adjustable straps, and hooks to securely attach the tent to the legs and frame of your pop-up canopy. Ensure the tent is taut and evenly distributed.
- Secure with Stakes and Ropes: Once attached to the canopy frame, use the provided stakes to secure the base of the tent to the ground. Utilize the ropes (guylines) and additional stakes to further stabilize the tent, especially in windy conditions.
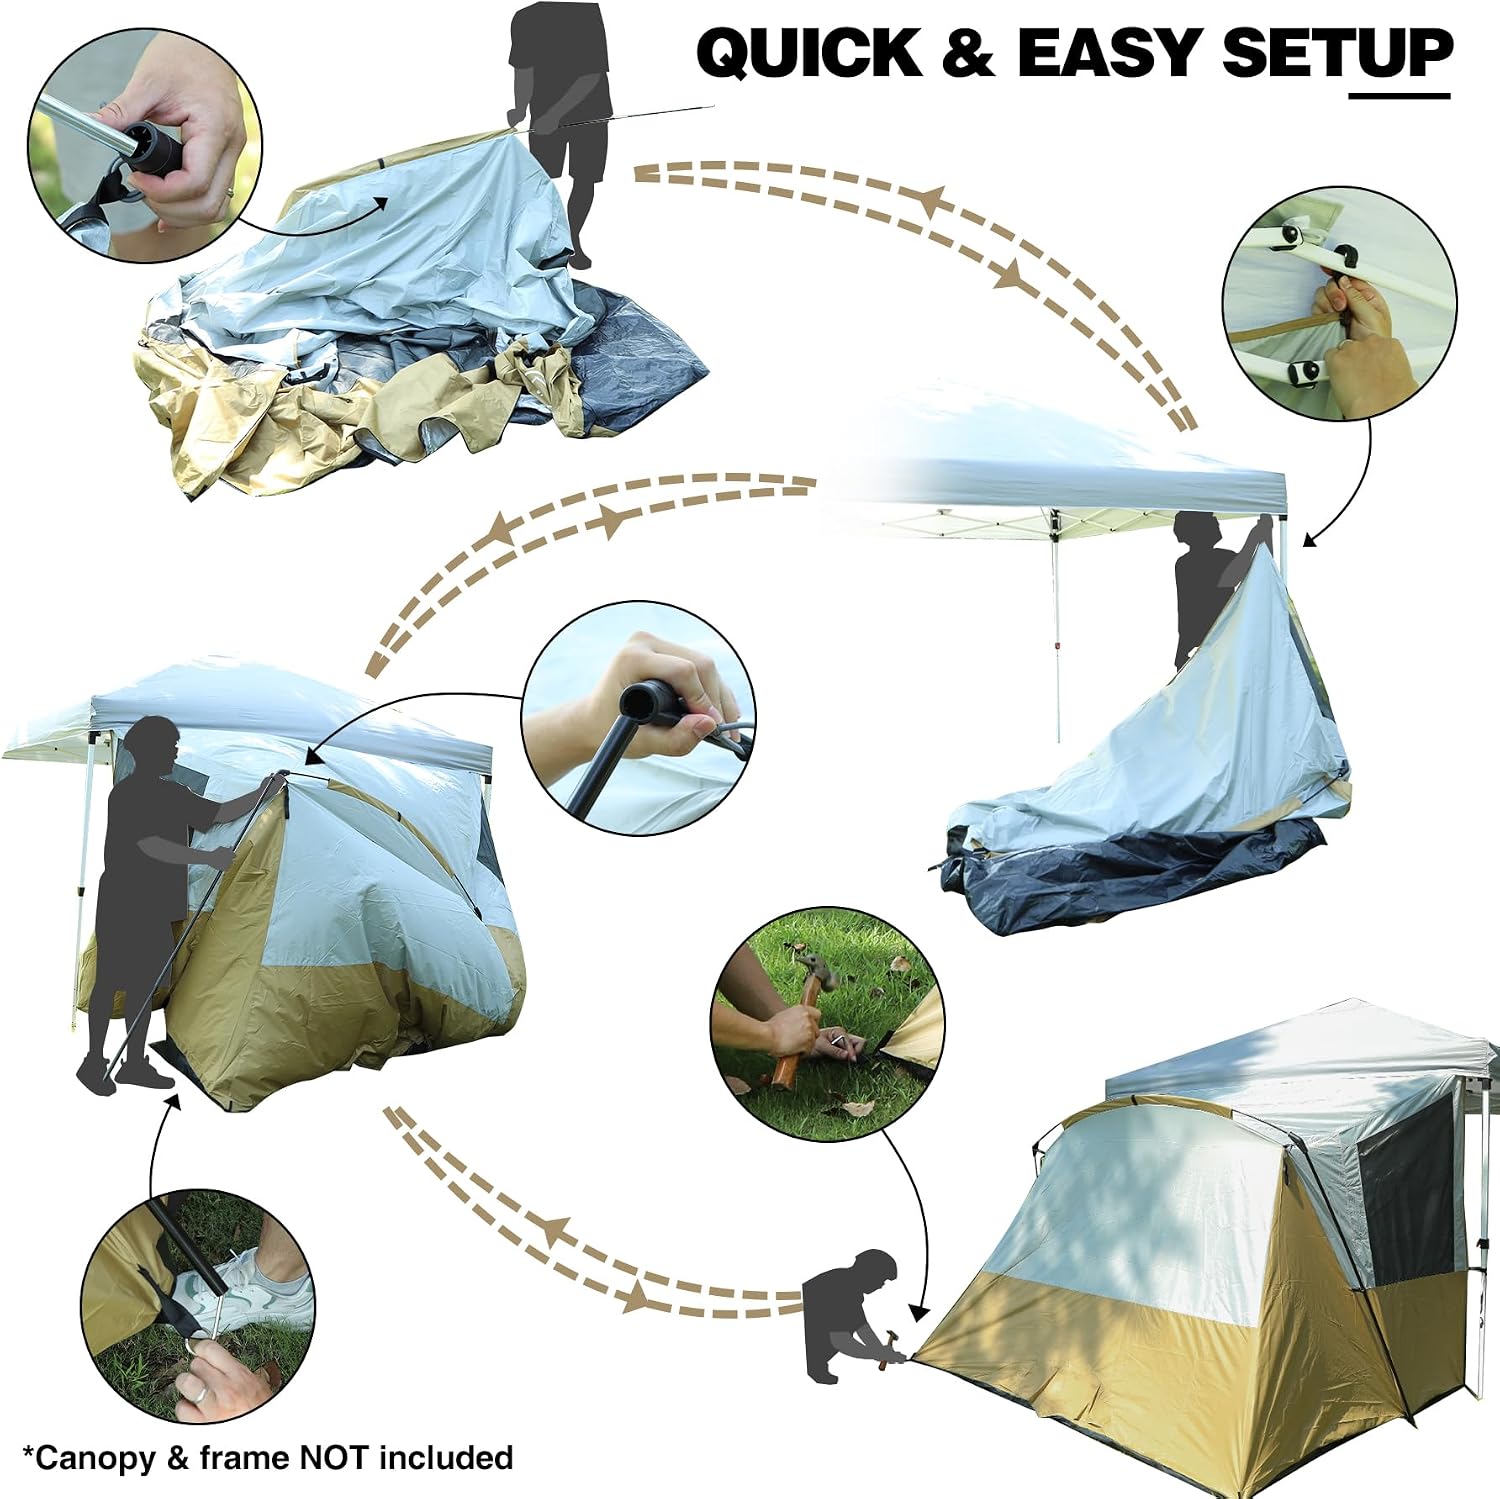
Image: Visual guide for the quick and easy setup process of the canopy camping tent.
Operating Features
Your REDCAMP Canopy Camping Tent includes several features designed for comfort and convenience:
- Ventilation: Equipped with mesh doors and windows, the tent promotes smooth air circulation, keeping the interior cool. The mesh also acts as a barrier against insects.
- Water Resistance: Constructed from 150D Oxford fabric with a PU 1500mm coating, the tent effectively repels rainwater, keeping the interior dry during light to moderate showers.
- Internal Features:
- Hanging Hook: Located inside for lanterns or other lightweight items.
- Mesh Storage Pockets: Conveniently store small personal items.
- Two-way Zippers: For easy access from both inside and outside.
- Power Port: A designated opening for electrical cords.
- Adjustable Straps: For secure attachment to the canopy frame.

Image: Arrows indicate airflow through the mesh panels, highlighting the tent's ventilation system.

Image: Water droplets on the tent fabric, showcasing its water-resistant coating.

Image: Detailed view of the tent's internal and external convenience features.

Image: Interior perspective of the tent, demonstrating its spaciousness and functional design.
Maintenance
- Cleaning: Clean the tent with a soft brush or sponge and mild soap. Rinse thoroughly with water. Do not use harsh detergents or bleach.
- Drying: Ensure the tent is completely dry before packing it away to prevent mildew and odors. Air dry in a shaded area.
- Storage: Store the tent in its carrying bag in a cool, dry place, away from direct sunlight and extreme temperatures.
- Inspection: Periodically inspect poles, zippers, seams, and fabric for any damage. Repair small tears promptly to prevent them from enlarging.
Troubleshooting
| Problem | Possible Cause | Solution |
|---|---|---|
| Tent is not stable or sways in light wind. | Insufficient staking or loose attachment to canopy frame. | Ensure all stakes are firmly driven into the ground. Tighten all adjustable straps and fasteners connecting the tent to the canopy frame. Use all provided guylines. |
| Water leakage during rain. | Tent not properly pitched, fabric damage, or extreme weather. | Verify the tent is taut and pitched correctly to allow water runoff. Inspect fabric for tears and repair if necessary. Avoid using in heavy rain or storms. |
| Zippers are sticking. | Dirt or debris in zipper teeth, or fabric caught. | Clean zipper teeth with a brush. Carefully pull fabric away from the zipper path. Apply a zipper lubricant if needed. |
| Difficulty fitting tent to canopy frame. | Incorrect canopy frame size or improper alignment. | Ensure your canopy frame is a 10'x10' or 10'x20' straight leg model. Re-align the tent carefully, starting from one corner and working your way around. |
Specifications
| Feature | Detail |
|---|---|
| Brand | REDCAMP |
| Model | Canopy Camping Tent (Inner Tent) |
| Compatibility | 10'x10' or 10'x20' Straight Leg Pop-Up Canopies (Frame/Shelter NOT Included) |
| Material | 150D Oxford Fabric with PU 1500mm coating |
| Color | Khaki |
| Item Weight | 10.5 Pounds (4.8 kg) |
| Dimensions (L x W x H) | 110"L x 95"W x 78"H (approx. 9.2ft x 7.9ft x 6.5ft) |
| Occupancy | 2 Person (comfortably, can fit 4-6 depending on setup) |
| Coverage | 100 square feet (side coverage) |
| Pole Material | Aluminum, Fiberglass |
| Water Resistance Level | Water Resistant (PU 1500mm) |
| Closure Type | Zipper |
| Recommended Uses | Beach, Camping & Hiking, Party, Tailgate |

Image: Key dimensions of the tent for compatibility and space planning.
Warranty and Support
Specific warranty information for the REDCAMP Canopy Camping Tent is not provided in the product details. For any support inquiries, warranty claims, or further assistance, please refer to the contact information provided by the retailer or the manufacturer, REDCAMP.
You may also visit the REDCAMP Store on Amazon for additional product information or to contact the brand directly.
Related Documents - Inner Tent for 10'x10' or 10'x20' Canopies
 |
GAOMON Heavy Duty Carport Assembly Guide & Product Reviews Comprehensive guide to assembling GAOMON heavy-duty carports, featuring detailed instructions, product specifications, user testimonials, and maintenance tips for various models including 20'x13'x10' and 20'x10'x11'. |
 |
Owner's Manual & Assembly Guide for 20'x20'x10' Carport This document provides a comprehensive owner's manual and assembly guide for the 20'x20'x10' carport. It includes essential safety precautions, assembly tips, a list of required tools and materials, detailed parts identification, and step-by-step instructions for building the structure. Learn how to properly install and maintain your carport for long-lasting use. |
 |
Chery Industrial 20'x20'x10' Carport Assembly Manual and Owner's Guide Comprehensive assembly instructions and owner's manual for the Chery Industrial 20'x20'x10' Galvanized Steel Carport. Includes safety precautions, tools required, site preparation, and step-by-step assembly guidance. |
 |
WINDNINJA B101CN Robot Vacuum Mop Cloth Part Installation and Safety Guide Installation and safety instructions for the WINDNINJA B101CN robot vacuum mop cloth part, compatible with Xiaomi Mijia Omni 1S and other models. |
 |
MEDION PC User Manual: Setup, Operation, and Troubleshooting for Multimedia, High Performance, and Mini PCs Comprehensive user manual for MEDION Multimedia, High Performance, and mini PCs, including models like Erazer Engineer X10, E10, X20, P10, and Hunter X30. Covers setup, safety, connections, operation, system recovery, and troubleshooting. |
 |
12'W x 10'H RoundTop Frame Assembly Instructions Step-by-step guide for assembling the ShelterLogic 12'W x 10'H RoundTop frame, including parts list, installation procedures, and important safety and care information. |
Ask a question about this manual
Ask about setup, troubleshooting, compatibility, parts, safety, or missing instructions. Manuals+ will review the question and use this page’s manual context to help answer it.