Gevanti SA8
Gevanti SA8 Professional Wireless Home Weather Station User Manual
Model: SA8
Introduction
This manual provides detailed instructions for the setup, operation, and maintenance of your Gevanti SA8 Professional Wireless Home Weather Station. This device is designed to provide accurate, real-time weather data, including indoor and outdoor temperature, humidity, barometric pressure, wind speed and direction, rainfall, dew point, feels-like temperature, moon phases, and calendar information.

Image: The Gevanti SA8 Professional Wireless Home Weather Station, showing the main display console and the integrated outdoor sensor unit.
What's in the Box
Please check the package contents carefully. If any items are missing or damaged, contact customer support.
- Display Console (1x)
- Integrated Outdoor Transmitter (1x)
- Power Adapter (1x)
- Foot Mounting (with pole insert) (1x)
- Mounting Bracket Back Plate (polemount) (1x)
- Mounting Pole (2x)
- Pole mounting nuts (M3) / bolts (O3) (2x)
- Pole mounting nuts (M5) / bolts (O5) (4x)
- Tapping screws (4x)
- User Manual (1x)

Image: Visual representation of the Gevanti SA8 package contents, including the display console, outdoor sensor, mounting hardware, and power adapter.
Setup
1. Outdoor Sensor Installation
The outdoor sensor unit measures wind speed, wind direction, rainfall, temperature, and humidity. Proper placement is crucial for accurate readings.
- Powering the Sensor: The outdoor sensor requires 3 AA batteries (not included). Ensure fresh batteries are installed before mounting. The sensor also features a solar panel to extend battery life, but it does not charge the batteries.
- Mounting Location: Choose an open area free from obstructions (trees, buildings) that could interfere with wind or rain measurements. Ensure the sensor is level using the integrated bubble level.
- Mounting Options: The sensor can be mounted on a pole or flat surface using the provided bracket and screws.

Image: Diagram illustrating different ways to mount the outdoor sensor, including on top of a pole, on the side of a pole, or on a flat surface.

Image: Close-up view of the outdoor sensor, highlighting the battery compartment, reset button, thermo-hygrometer sensor, and various mounting parts.
2. Display Console Setup
- Powering the Console: The display console can be powered by the included 6V power adapter or by 3 AAA batteries (not included) for backup. For continuous operation and optimal display brightness, use the power adapter.
- Initial Sync: Once both the outdoor sensor and display console are powered on, they should automatically synchronize. Allow a few minutes for all data to appear on the display.
- Placement: Place the console in a convenient indoor location where it can be easily viewed. It has a built-in stand for tabletop use or can be wall-mounted.

Image: Illustration demonstrating the wireless connectivity between the outdoor sensor and the indoor display console, effective even through walls and trees.
Operating Instructions
1. Display Overview
The 7.5-inch high-contrast color screen provides a clear overview of all weather data. Key information is organized into distinct sections:
- Top Left: Date and Time.
- Middle Left: Wind speed (current, gust, average) and wind direction compass.
- Top Right: Outdoor temperature and humidity.
- Middle Right: Indoor temperature and humidity.
- Center: Weather forecast icons (sunny, cloudy, rainy, snowy).
- Bottom Center: Barometric pressure and rainfall data (hourly, daily, weekly, monthly, cumulative).
- Bottom Right: Moon phase.
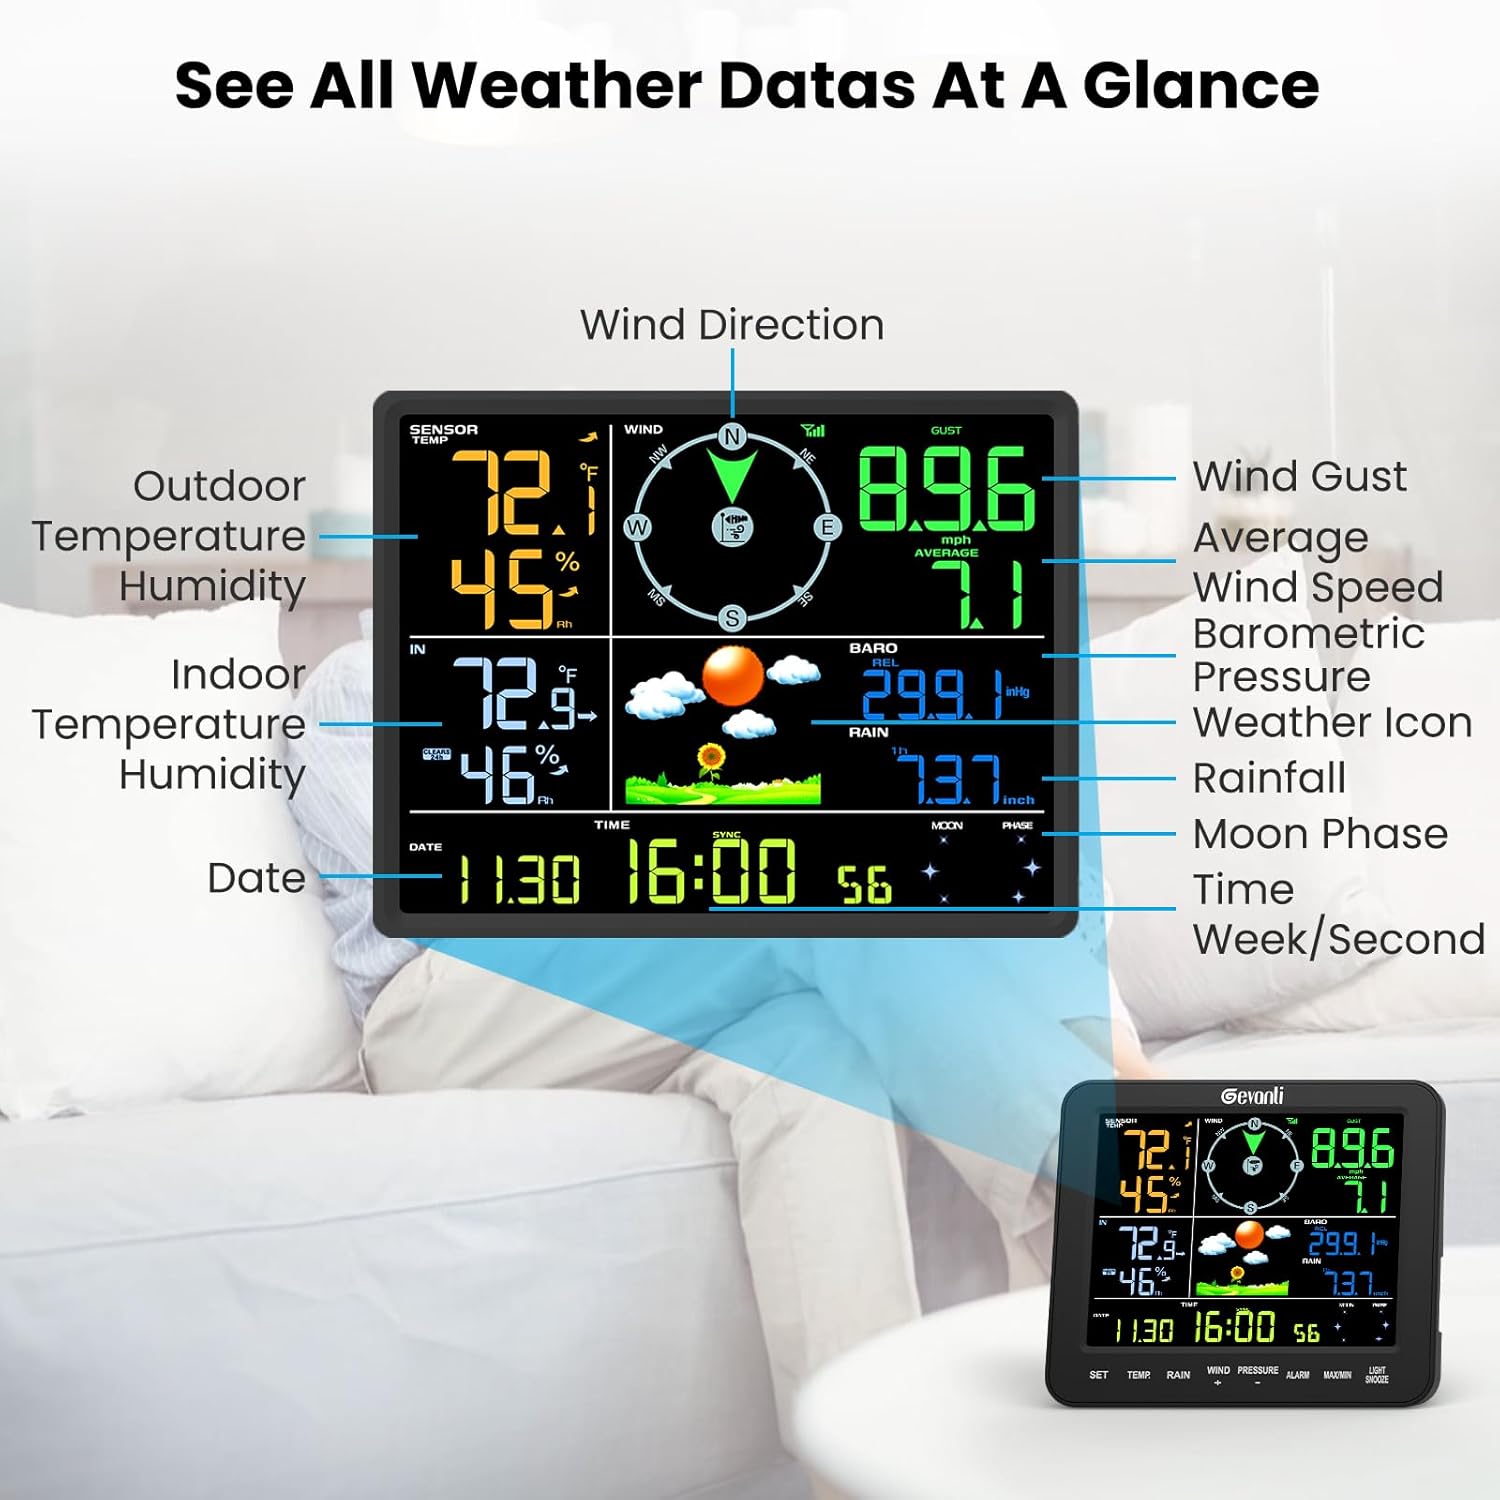
Image: The display console with labels pointing to various data points such as outdoor/indoor temperature and humidity, wind direction, wind speed, barometric pressure, rainfall, moon phase, date, and time.

Image: A closer look at the display console, indicating the location of control buttons (SET, TEMP, RAIN, WIND, PRESSURE, ALARM, MAX/MIN, LIGHT/SNOOZE) and the corresponding display sections.
2. Adjusting Display Brightness
The display console features a 3-stage manual backlight adjustment. Press the LIGHT/SNOOZE button to cycle through different brightness levels to suit your environment and reduce eyestrain.
3. Viewing Minimum and Maximum Records
Press the MAX/MIN button to view the recorded maximum and minimum values for temperature, humidity, wind speed, and other parameters since the last reset. Pressing it again will cycle through maximum, minimum, and current readings.
4. Rainfall Monitoring
The integrated rain gauge provides precise rainfall measurements. It achieves ±1mm accuracy for rainfall under 15mm and ±7% accuracy for measurements between 15-9999mm. The display shows hourly, daily, weekly, monthly, and cumulative rainfall data.

Image: A detailed view of the rain gauge mechanism, illustrating its precision in measuring rainfall amounts.

Image: The display section dedicated to rainfall, showing current and historical data (hourly, daily, weekly, monthly, yearly) and the accuracy range.
5. Customizable Weather Data Alerts
Set high and low alerts for various weather parameters such as temperature, humidity, and wind speed. When a set threshold is crossed, the console will provide an alert, allowing you to stay informed about significant weather changes.
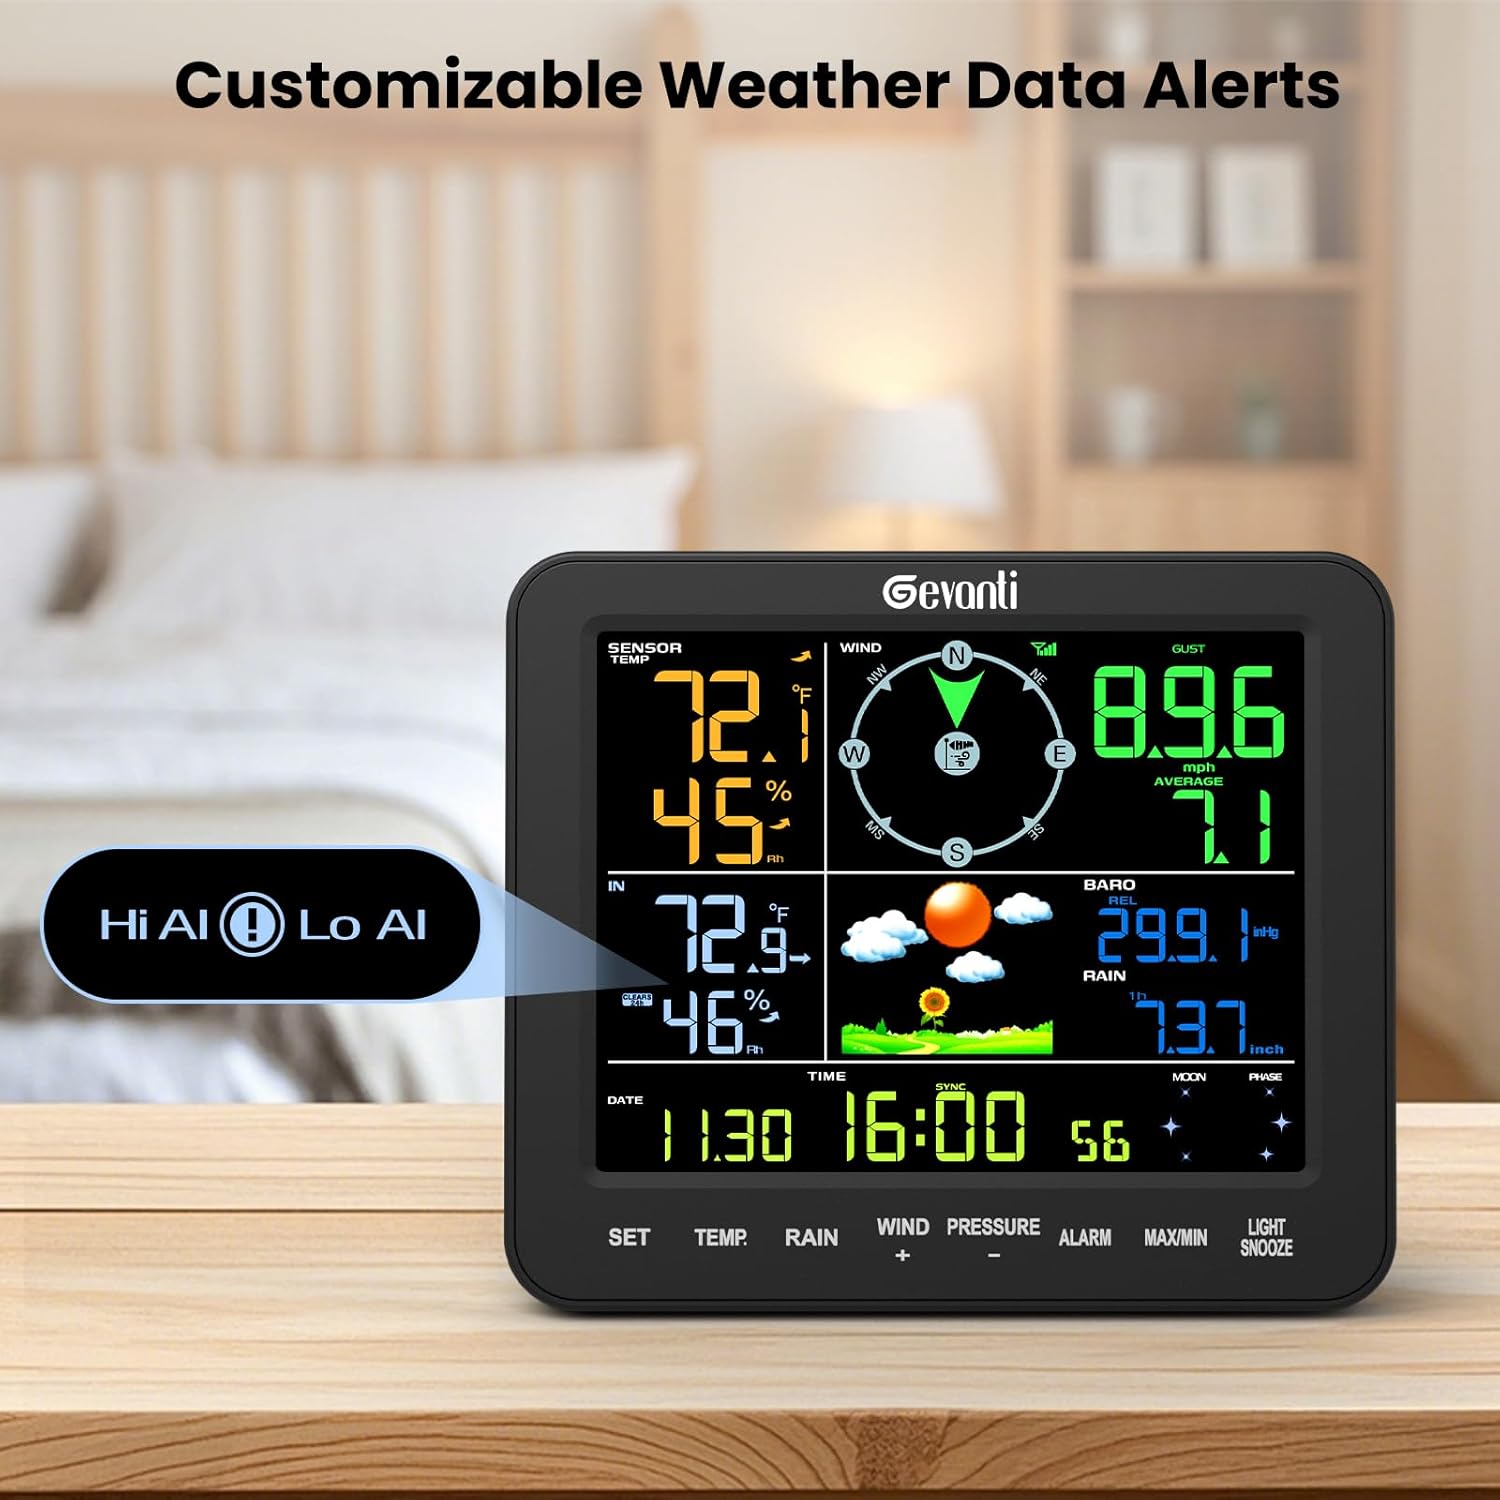
Image: The display console highlighting the "Hi Al" (High Alert) and "Lo Al" (Low Alert) indicators, signifying customizable weather thresholds.
Maintenance
- Battery Replacement: Replace batteries in the outdoor sensor (3 AA) and display console (3 AAA, if used for backup) annually or when the low battery indicator appears.
- Cleaning: Periodically clean the outdoor sensor, especially the rain gauge funnel and wind cups, to ensure accurate readings. Use a soft, damp cloth. Avoid abrasive cleaners.
- Calibration: The console allows for calibration adjustments for certain parameters. Refer to the detailed user manual booklet for specific instructions on how to perform these adjustments if necessary.
Troubleshooting
- No Outdoor Sensor Signal:
- Ensure the outdoor sensor batteries are fresh and correctly installed.
- Verify the outdoor sensor is within the wireless transmission range of the display console.
- Avoid placing the sensor near large metal objects or strong electromagnetic interference sources.
- Note: Using NiMH batteries in the sensor array may result in insufficient power for transmission; alkaline or lithium batteries are recommended.
- Inaccurate Readings:
- Ensure the outdoor sensor is mounted level and free from obstructions.
- Clean the rain gauge and wind sensors regularly.
- If barometric pressure readings are consistently off, consider using the console's calibration feature as described in the full user manual.
- Display Not Lighting Up (on battery power): The display will time out to conserve battery life. Press any button to reactivate the backlight. For continuous illumination, use the power adapter.
Specifications
| Feature | Detail |
|---|---|
| Product Dimensions | 1 x 7.5 x 6.3 inches; 2.3 Pounds |
| Item Model Number | SA8 |
| Batteries Required | Outdoor Sensor: 3 AA batteries; Display Console: 3 AAA batteries (for backup) |
| Manufacturer | Gevanti |
| Recommended Uses | Garden, Home |
| Specific Uses | Average Wind Speed, Feels Like, Wind Arrow, Wind Direction, Date, Dew Point, Humidity, Moon Phase, Rainfall, Wind Gust, Pressure, Temperature, Time |
| Power Source | Battery Powered (with AC adapter option for console) |
| Special Features | Adjustable Brightness, Alarm, Clock, Portable, Wireless |
| Material | Acrylonitrile Butadiene Styrene (ABS) |
| Connectivity Technology | Wireless |
| Rainfall Accuracy | ±1mm (under 15mm), ±7% (15-9999mm) |
| Temperature Range | Indoor: 0°C-60°C; Outdoor: -40°C-60°C |
| Humidity Range | 10%-99% |
| Pressure Range | 300-1100hPa |
Warranty and Support
Gevanti is committed to providing excellent customer service. For any inquiries or assistance, please use the following contact channels:
- U.S. Local Phone Support: Available Monday through Friday, 10:00 AM to 6:00 PM (Eastern Time).
- Email Support: Guaranteed reply within 24 hours on weekdays and within 48 hours on weekends.
- Online Support: Additional support resources are available through the Sainlogic official website.
Please refer to your purchase documentation for specific warranty details.