1. Introduction
The Gochanmi UR100X is a professional 2-channel UHF wireless microphone system designed for various applications including conferences, schools, churches, musical performances, weddings, parties, public speaking, and karaoke. This system features two handheld dynamic microphones with adjustable frequencies and a robust metal receiver, ensuring stable performance and clear audio transmission over distances up to 80 meters.
This manual provides essential information for the correct installation, operation, and maintenance of your UR100X system. Please read it thoroughly before use to ensure optimal performance and longevity of the product.
2. Package Contents
Before proceeding with the setup, please verify that all components are present in the package:
- 1 x UHF Wireless Receiver
- 2 x Handheld Dynamic Microphones
- 1 x Power Adapter for Receiver
- 1 x 6.35mm Audio Cable
- User Manual (this document)
3. System Overview
3.1 Receiver Panel Functions
Familiarize yourself with the receiver's front and rear panels to understand its controls and connections.

Image: Receiver Panel Functions. This image illustrates the various controls and ports on the Gochanmi UR100X receiver. Key elements include the power button, volume controls for each channel, frequency setting buttons, IR sensor, antenna interfaces, DC input, balanced XLR outputs, and a mixed 6.35mm output.
Front Panel:
- Power Button: Turns the receiver on or off.
- Volume Control (VOL A / VOL B): Adjusts the output volume for Microphone A and Microphone B independently. Rotate clockwise to increase volume, counter-clockwise to decrease.
- SET Button: Used for frequency selection and pairing. Press to select frequency, press and hold to initiate pairing.
- IR Sensor: Infrared sensor for automatic frequency matching with microphones.
- Display Screen: Shows current frequency, channel number, and other operational status.
Rear Panel:
- Antenna Interface (ANTENNA A / ANTENNA B): Connect the included antennas here for optimal signal reception.
- DC INPUT (12-18V): Connect the provided power adapter to power the receiver.
- BALANCED OUTPUT (XLR A / XLR B): Individual balanced XLR outputs for Microphone A and Microphone B.
- MIXED OUTPUT (6.35mm): A single unbalanced 6.35mm (1/4 inch) jack output for both microphones combined.
3.2 Microphone Features
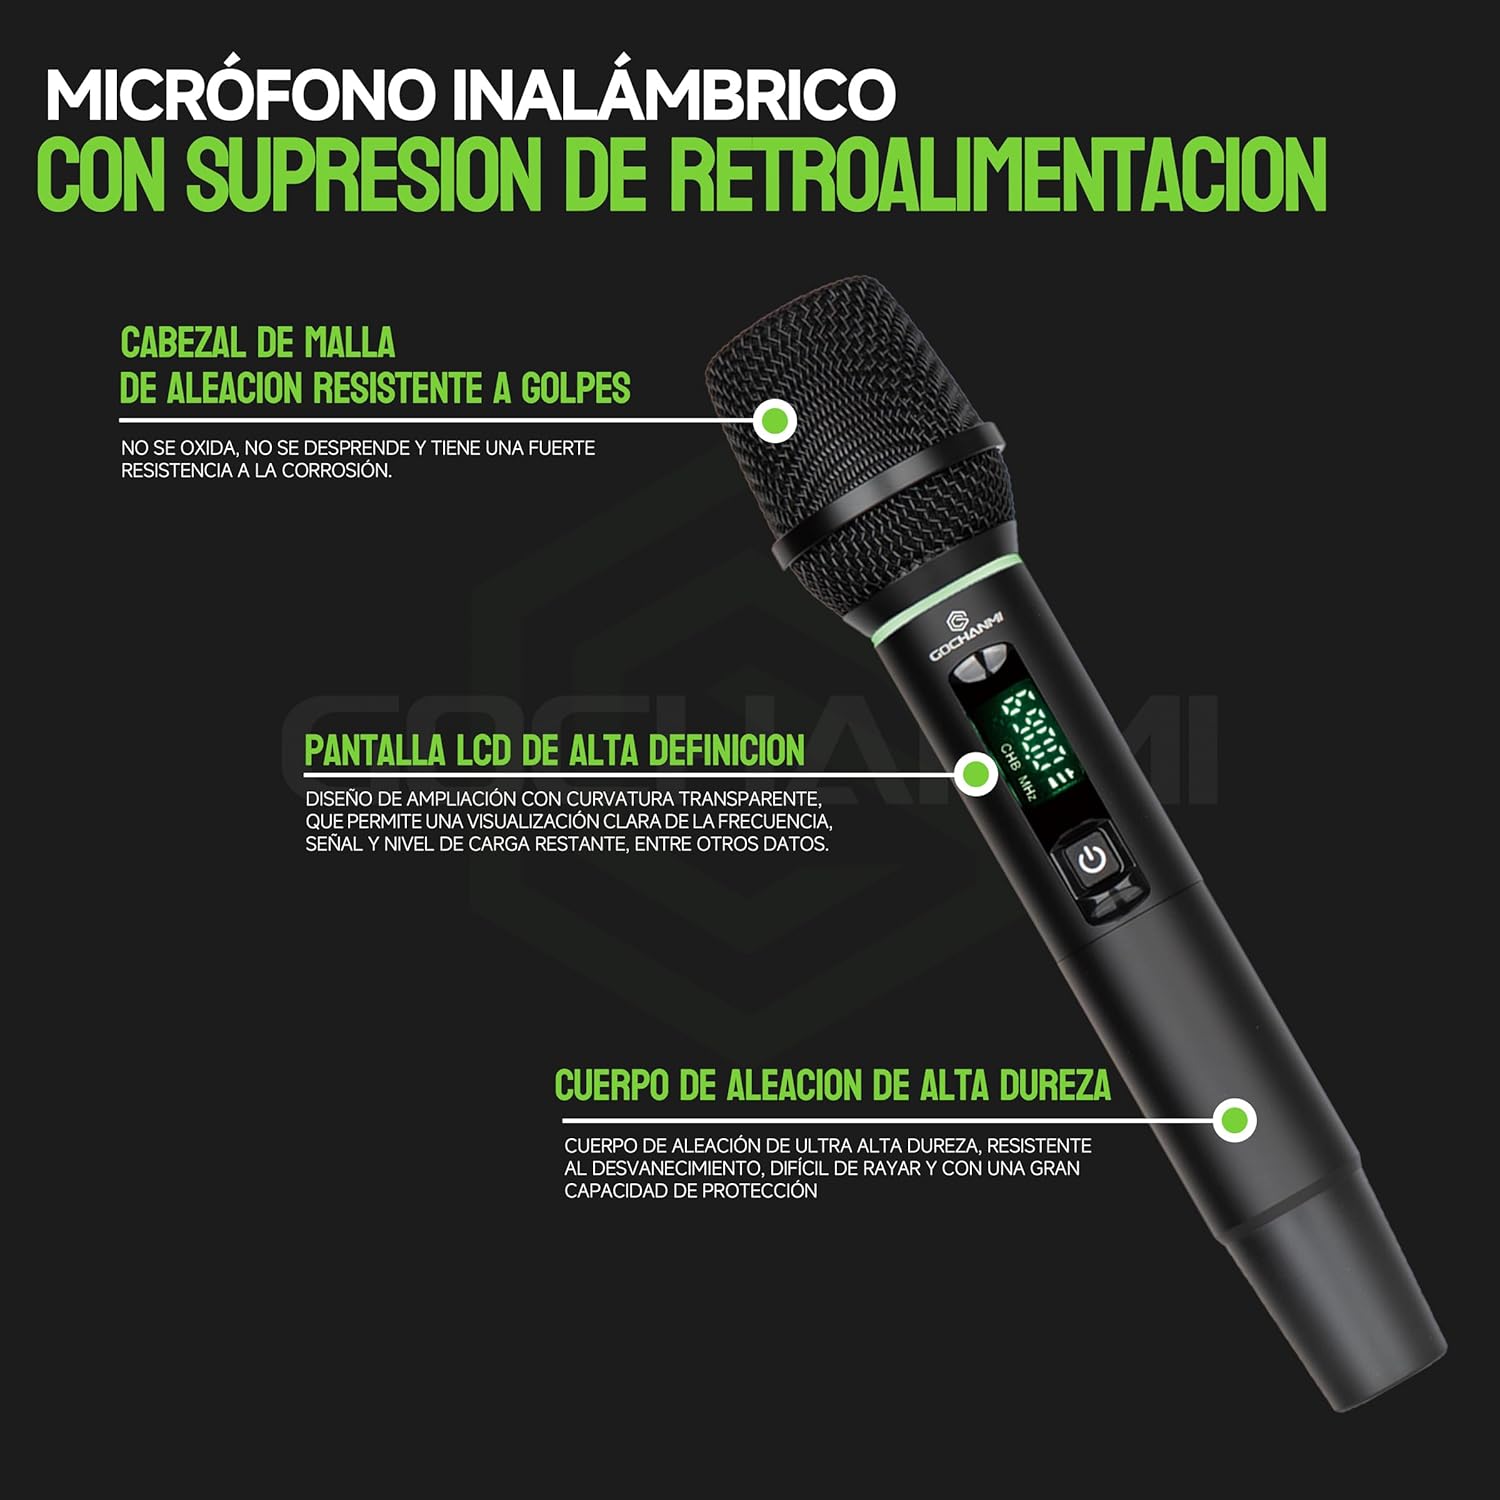
Image: Handheld Microphone Features. This image highlights the key features of the Gochanmi UR100X handheld microphone, including its durable metal mesh head, high-definition LCD screen, and high-strength alloy body.
- Metal Mesh Head: Made of corrosion-resistant alloy, providing durability and impact resistance.
- High-Definition LCD Screen: Displays current frequency, battery level, and signal strength.
- High-Strength Alloy Body: Durable and resistant to fading, scratches, and provides excellent protection.
- Power Source: Each microphone operates on AA batteries.

Image: Microphone Capsule High Fidelity Moving Coil. This image shows the microphone's high-fidelity moving coil capsule, emphasizing its low distortion, high noise resistance, and wide frequency range for clear audio capture.
4. Setup Instructions
4.1 Receiver Setup
- Connect Antennas: Screw the two antennas securely into the ANTENNA A and ANTENNA B interfaces on the rear panel of the receiver. Position them vertically for best reception.
- Power Connection: Connect the provided power adapter to the DC INPUT (12-18V) port on the receiver's rear panel, then plug the adapter into a suitable power outlet.
- Audio Output Connection:
- For individual microphone outputs, connect XLR cables from the BALANCED OUTPUT (XLR A and XLR B) ports to your audio mixer or amplifier.
- For a combined output, connect a 6.35mm (1/4 inch) audio cable from the MIXED OUTPUT port to your audio mixer, amplifier, or powered speaker.
- Power On: Press the POWER button on the front panel of the receiver. The display screen should illuminate.
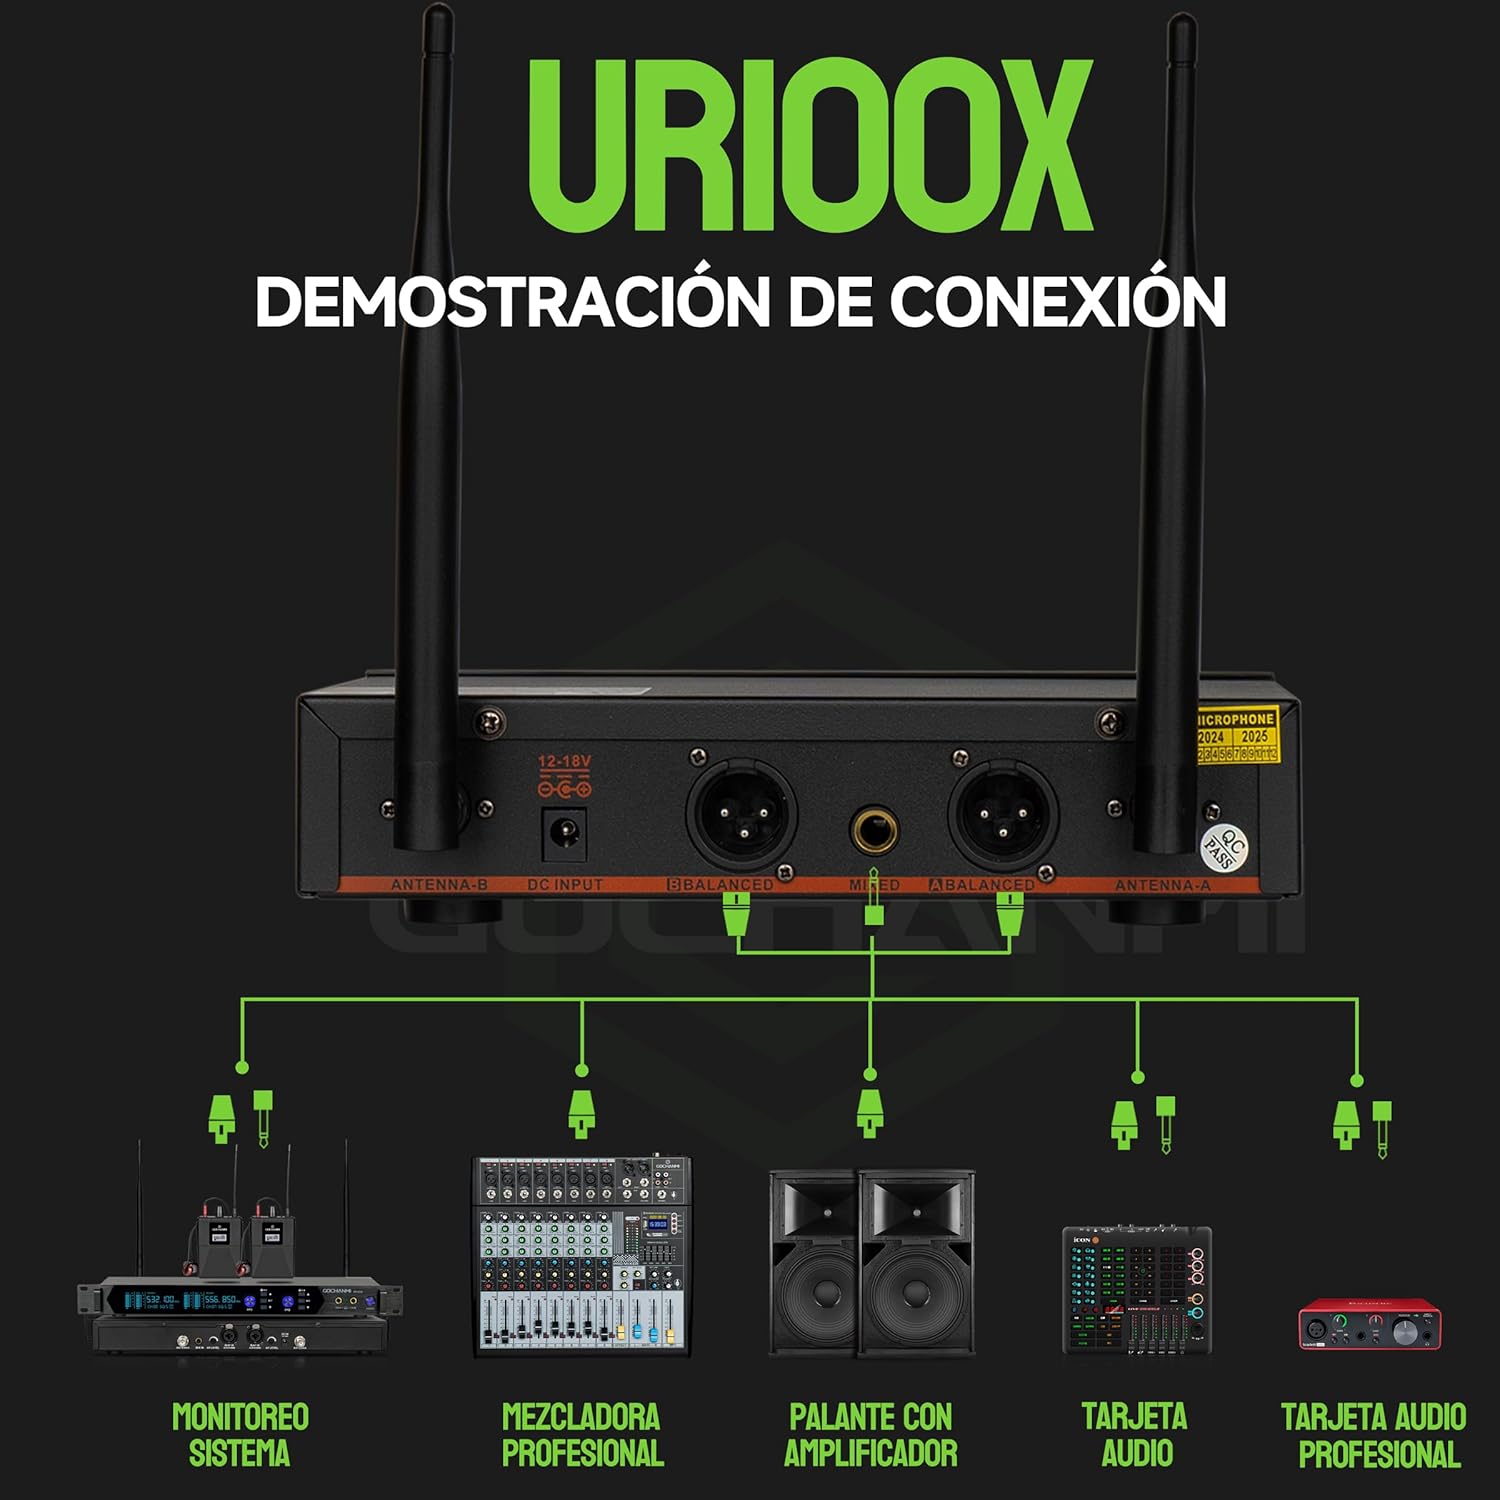
Image: Connection Demonstration. This diagram illustrates various connection possibilities for the Gochanmi UR100X receiver, including connections to a professional mixer, powered speaker, audio interface, and professional audio card.
4.2 Microphone Setup
- Insert Batteries: Unscrew the bottom part of each handheld microphone. Insert two fresh AA alkaline batteries into each microphone, ensuring correct polarity (+/-).
- Power On: Press and hold the power button on the microphone until the LCD screen illuminates.
5. Operating Instructions
5.1 Automatic Frequency Pairing
The UR100X system features an infrared (IR) pairing function for easy synchronization of frequencies between the receiver and microphones.
- Ensure both the receiver and the microphone are powered on.
- On the receiver, press the SET button for the desired channel (A or B). The display will show "IR---".
- Hold the microphone with its IR sensor (usually near the display) facing the receiver's IR sensor, typically within a few centimeters.
- The receiver and microphone will automatically synchronize their frequencies. Once paired, the microphone's display will show the same frequency as the receiver, and the receiver's RF indicator will light up.
Image: Receiver Panel Functions. This image highlights the SET button and IR sensor on the receiver, crucial for automatic frequency pairing with the microphones.
5.2 Manual Frequency Adjustment (Microphone)
If automatic pairing is not desired or if you need to manually select a specific frequency, you can adjust it directly on the microphone.

Image: Microphone Multifunction SET Button. This image demonstrates the use of the SET button on the microphone for frequency selection and channel adjustment.
- Single Click SET: Press the SET button on the microphone to cycle through available frequencies.
- Automatic Clean Channel Selection: Press and hold the SET button on the microphone to automatically scan and select a clean, interference-free channel.
- Manual Channel Adjustment: Use the ▲ and ▼ buttons (if present, or cycle with SET) to manually adjust the frequency.
5.3 Volume Control
Adjust the output volume for each microphone using the VOL A and VOL B knobs on the receiver's front panel. Turn clockwise to increase volume and counter-clockwise to decrease.
5.4 Optimal Performance and Range
The UR100X system utilizes UHF (Ultra High Frequency) technology, which offers excellent anti-interference capabilities, communication range, and data quality. The system is designed for a reception range of up to 80 meters, with a maximum transmission distance potentially reaching 100 meters under ideal conditions.

Image: UHF Anti-interference Technology. This chart compares UHF, 2.4G, and VHF technologies, illustrating UHF's superior communication distance, audio quality, penetration capability, and anti-interference capacity.
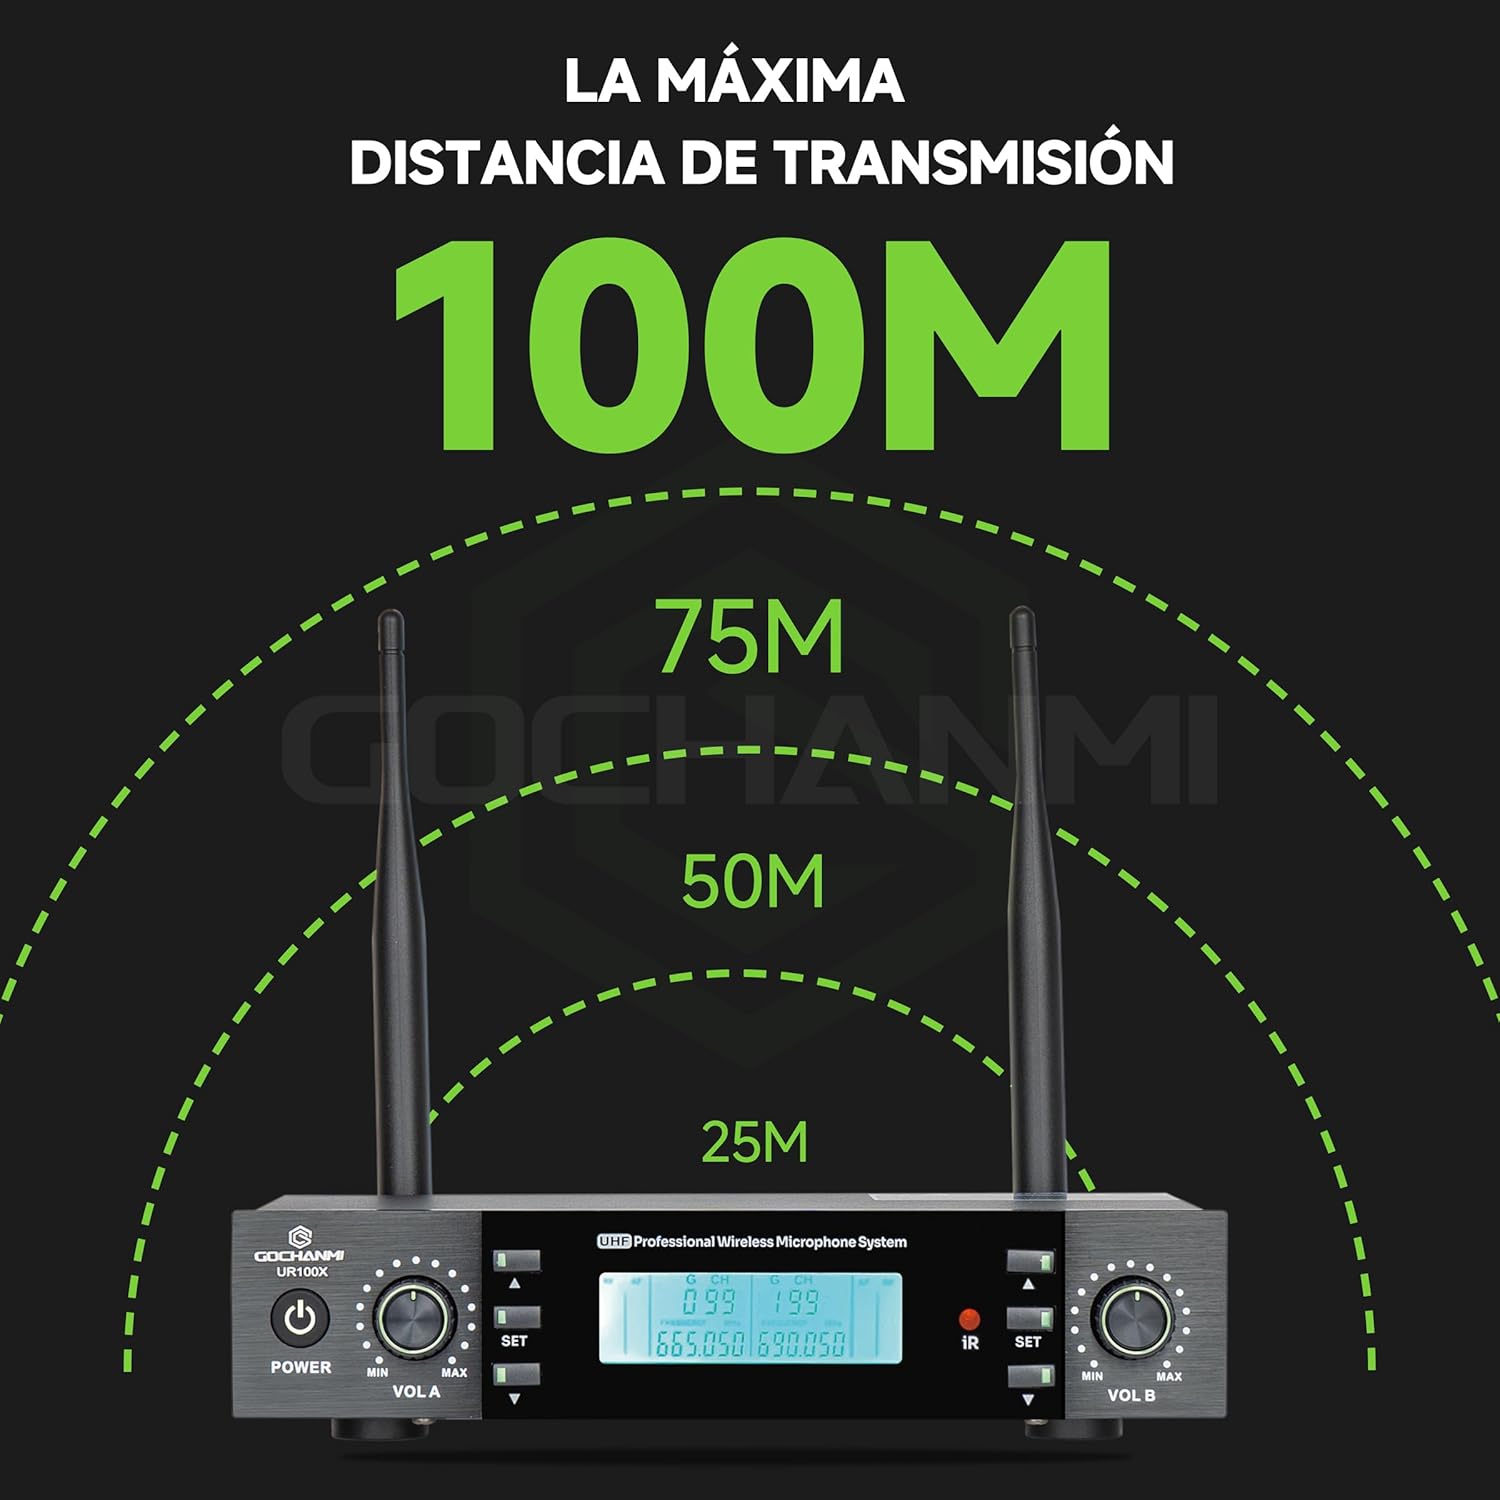
Image: Maximum Transmission Distance 100M. This image visually represents the potential maximum transmission distance of the UR100X system, indicating a range up to 100 meters.
For best results, ensure a clear line of sight between the microphones and the receiver. Avoid placing the receiver near large metal objects, walls, or other electronic devices that may cause interference.
6. Maintenance
6.1 Battery Replacement
The handheld microphones use two AA batteries each. The microphone's LCD screen displays the remaining battery level. Replace batteries when the indicator shows low power to avoid interruptions during use. Always use authentic alkaline or rechargeable batteries for optimal performance and battery life (approximately 7-8 hours under normal volume conditions).
To replace batteries:
- Unscrew the bottom cap of the microphone.
- Remove the old batteries.
- Insert new AA batteries, ensuring correct polarity.
- Screw the bottom cap back on securely.
6.2 Cleaning and Storage
- Wipe the receiver and microphones with a soft, dry cloth. Do not use liquid cleaners or abrasive materials.
- Avoid exposing the system to extreme temperatures, humidity, or direct sunlight.
- When not in use for extended periods, remove batteries from the microphones and store the system in a cool, dry place.
7. Troubleshooting
If you encounter issues with your Gochanmi UR100X system, refer to the following common problems and solutions:
| Problem | Possible Cause | Solution |
|---|---|---|
| No sound from microphone |
|
|
| Interference or static noise |
|
|
| Short operating range |
|
|
8. Specifications
| Brand | Gochanmi |
| Model Name | UR100X |
| Connectivity Technology | UHF Wireless |
| Number of Channels | 2 |
| Microphone Type | Dynamic, Handheld |
| Polar Pattern | Unidirectional |
| Frequency Range | 610 MHz - 670 MHz |
| Operating Range | Up to 80 meters (optimal conditions up to 100 meters) |
| Receiver Outputs | 2 x XLR Balanced, 1 x 6.35mm Mixed Unbalanced |
| Microphone Power Source | 2 x AA Batteries (per microphone) |
| Receiver Power Source | DC 12-18V (Power Adapter) |
| Compatible Devices | Karaoke machine, Audio mixer, Speaker |
| Package Dimensions | 40.29 x 34.79 x 8.8 cm |
| Package Weight | 2.5 kg |
9. Warranty and Support
For warranty information and technical support, please refer to the documentation provided at the time of purchase or contact your retailer. You may also visit the official Gochanmi website for further assistance.