Hlivelood QLQ-001
Hlivelood Queen Size Murphy Bed with LED Lights (Model QLQ-001) Instruction Manual
Brand: Hlivelood | Model: QLQ-001
1. Introduction
This manual provides comprehensive instructions for the assembly, operation, and maintenance of your Hlivelood Queen Size Murphy Bed with LED Lights. Designed for space-saving and functionality, this bed frame integrates into various room settings, including bedrooms, home offices, and guest rooms. Please read all instructions carefully before beginning assembly and retain this manual for future reference.

Image 1: Hlivelood Queen Size Murphy Bed in a room setting.
2. Important Safety Information
- Wall Mounting is Mandatory: This Murphy bed must be securely fixed to a structural or load-bearing wall using appropriate screws and anchors. Failure to do so can result in serious injury or property damage.
- Weight Capacity: Do not exceed the maximum weight capacity of 1000 pounds (including mattress).
- Proper Assembly: Ensure all parts are assembled correctly and all fasteners are tightened as instructed to prevent instability.
- Gas Struts: Handle gas struts carefully during assembly and operation. They are under pressure.
- Mattress Requirements: Use a mattress with a thickness of 8-12 inches and a weight between 59-110 lbs for Queen size. The mattress is NOT included.
- Two-Person Assembly: Assembly requires at least two adults for safety and ease of installation.
3. Product Specifications
| Brand | Hlivelood |
| Model Number | QLQ-001 |
| Size | Queen |
| Color | Brown |
| Product Dimensions (L x W x H) | 85.8" x 63.6" x 86" |
| Item Weight | 257 Pounds |
| Special Feature | Foldable, LED Lights |
| Form Factor | Murphy Bed |
| Box Spring Required | No |

Image 2: Product dimensions and weight capacity (1000 lbs).
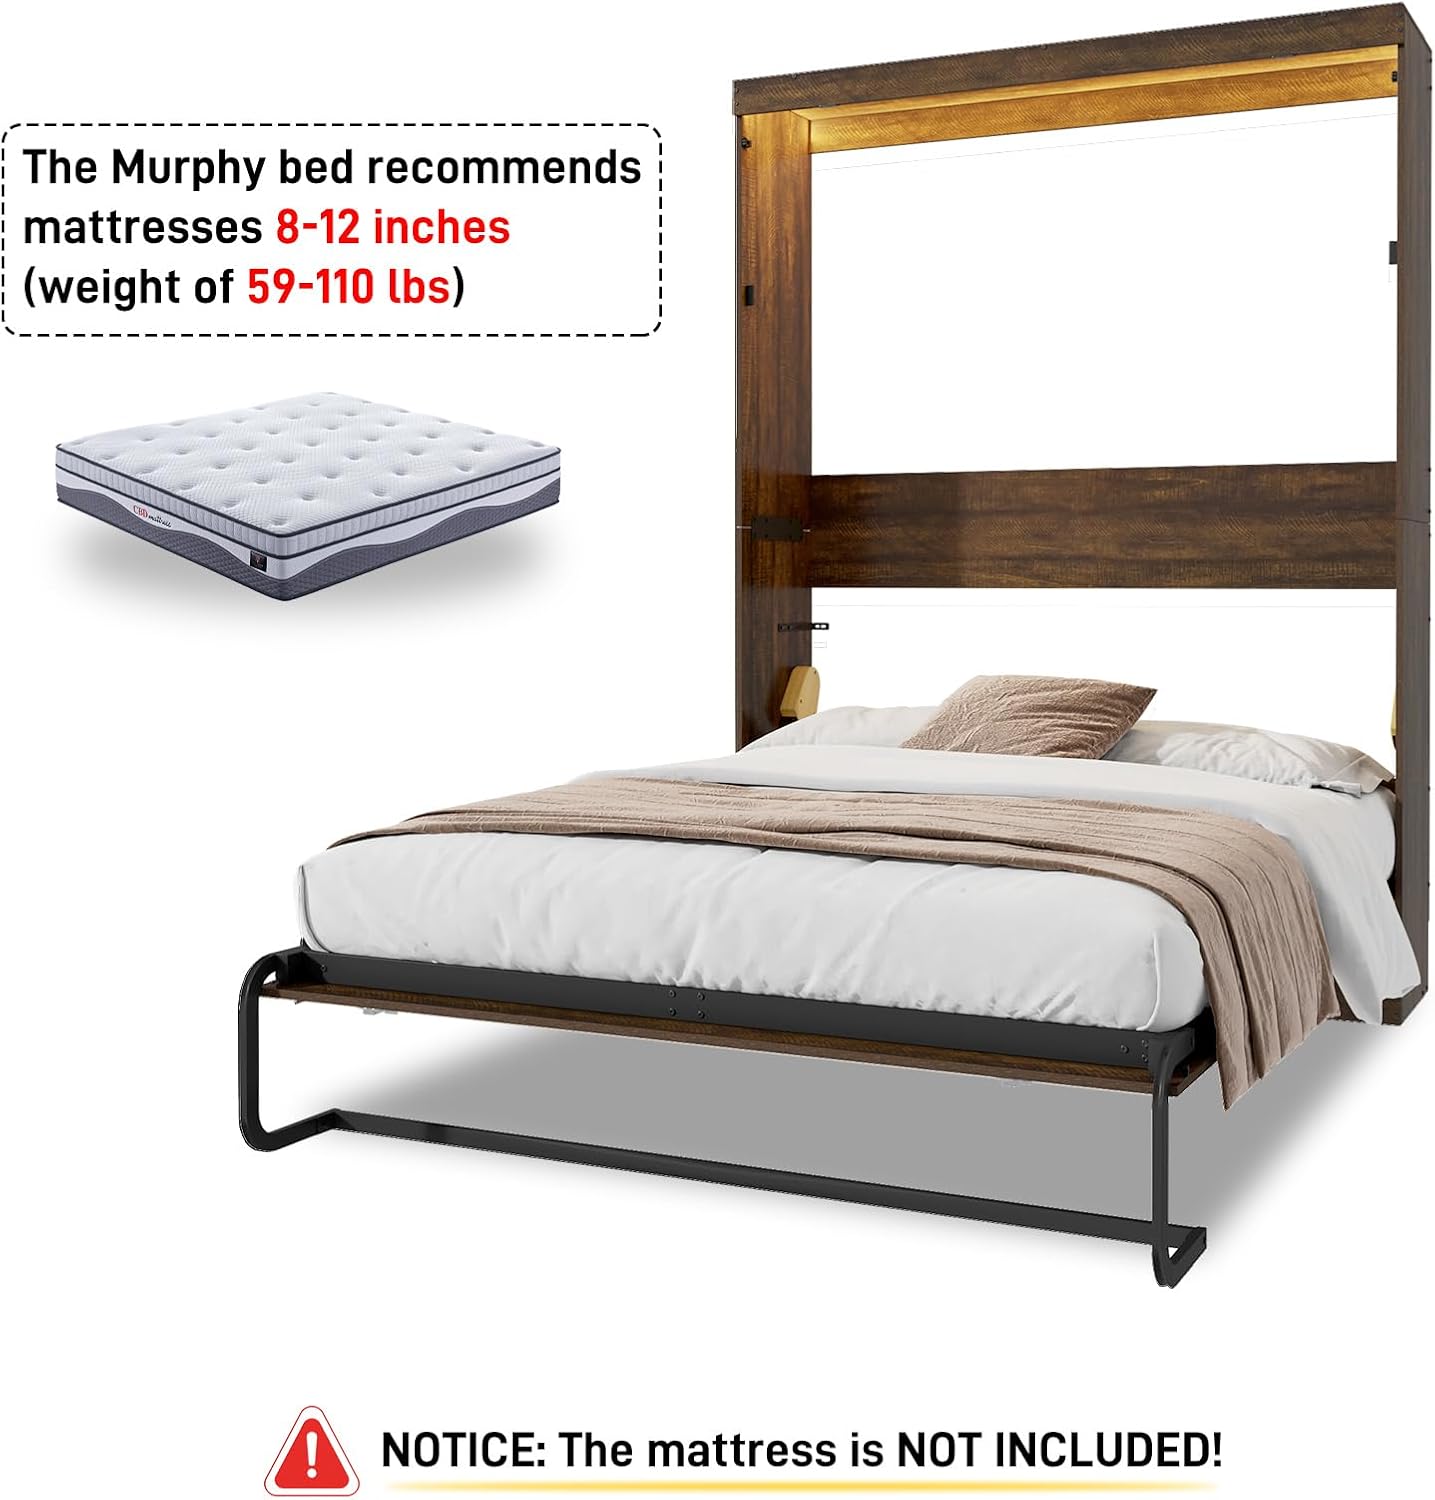
Image 3: Recommended mattress specifications.
4. Package Contents
Your Hlivelood Murphy Bed is shipped in multiple packages. Please ensure all parts are present and undamaged before beginning assembly. Refer to the included parts list in your physical manual for detailed identification.
- Wooden panels for cabinet structure
- Metal bed frame components
- Gas struts (2 units)
- LED light strips
- Hardware kit (screws, bolts, nuts, wooden plugs, brackets)
- Mattress straps
- Assembly tools (Allen wrench, utility knife) - Note: Power drill not included but recommended.
5. Tools Required for Assembly
- Phillips Head Screwdriver
- Hammer
- Measuring Tape
- Pencil
- Level
- Stud Finder (Essential for wall mounting)
- Power Drill (recommended for efficiency)
- Utility Knife (for opening packages)
- Allen Wrench (usually included in hardware kit)
6. Assembly Instructions
Follow these steps carefully. It is highly recommended to watch the official installation video for visual guidance. Ensure you have a clear, spacious area for assembly.
6.1. Preparation
- Unpack and Sort: Carefully open all packages. Use a utility knife to lightly cut tape to avoid scratching components. Sort all wooden panels and hardware according to their labels. It is recommended to place small parts in separate containers.
- Identify Components: Familiarize yourself with all numbered plates and hardware parts by referring to the included parts list.
- Work Surface: Assemble on a soft, clean surface (e.g., a carpet or blanket) to prevent scratches.
6.2. Official Installation Video
For a detailed visual guide, please refer to the official installation video provided by the manufacturer:
Video 1: Murphy Wall Bed Installation Guide. This video provides step-by-step instructions for assembling the Murphy bed frame and cabinet.
6.3. Key Assembly Steps (Summary from Video)
- Assemble Cabinet Base: Connect the base panels (e.g., plates 23, 24, 31, 32, 33, 27, 34, 25, 26, 30, 29) using the specified screws and wooden plugs. Ensure all connections are secure.
- Install LED Lights: Attach the LED light strips (part K) to the designated panels (e.g., plates 28 and 31) as shown in the video.
- Wall Mounting: This is a critical step.
- Identify a structural or load-bearing wall. Use a stud finder to locate wall studs.
- Position the assembled cabinet frame against the wall.
- Measure and mark the drilling points for the wall mounting brackets (U1).
- Drill pilot holes and securely attach the U1 brackets to the wall studs.
- Attach the cabinet frame to the wall brackets. Verify the frame is level and square by measuring diagonals (AB=CD).
- Assemble Bed Frame: Connect the metal bed frame components (e.g., plates 1, 2, 3, 4, 5, 6, 7, 8, 9, 10, 11, 12, 13) using the provided hardware.
- Attach Gas Struts: Securely attach the gas struts (part S) to the bed frame and cabinet frame as instructed. These assist in the bed's folding mechanism.
- Install Decorative Panels: Attach the decorative wooden panels (e.g., plates 18, 19, 20, 21, 22) to the bed frame using wooden plugs (part L) and screws.
- Final Tightening: After all components are assembled, go back and tighten all bolts and screws using the Allen wrench to ensure maximum stability.

Image 4: Visual guide for opening the Murphy bed.
7. Operating Instructions
7.1. Opening the Bed
- Release Latches: Locate and release the top latches that secure the bed in the upright position.
- Grasp Handle: Firmly grasp the handle located on the front panel of the bed.
- Lower Bed: Gently pull the bed downwards. The gas struts will assist in a smooth, controlled descent. Continue lowering until the bed frame is fully extended and the support legs are deployed.
- Adjust Legs: Ensure the support legs are fully extended and stable on the floor.
7.2. Closing the Bed
- Clear Bedding: Remove all bedding, pillows, and any other items from the mattress.
- Fold Legs: Fold the support legs back into their stored position.
- Lift Bed: Grasp the handle and gently lift the bed upwards. The gas struts will assist in lifting the bed back into the cabinet.
- Secure Latches: Once the bed is fully upright, engage the top latches to securely hold the bed in the closed position.

Image 5: Murphy bed in closed cabinet position.
8. LED Lights Operation
Your Murphy bed is equipped with integrated LED lights. These lights can be controlled via a remote control or a smartphone application (if applicable). Refer to the separate LED light instruction sheet for specific pairing and operation details.
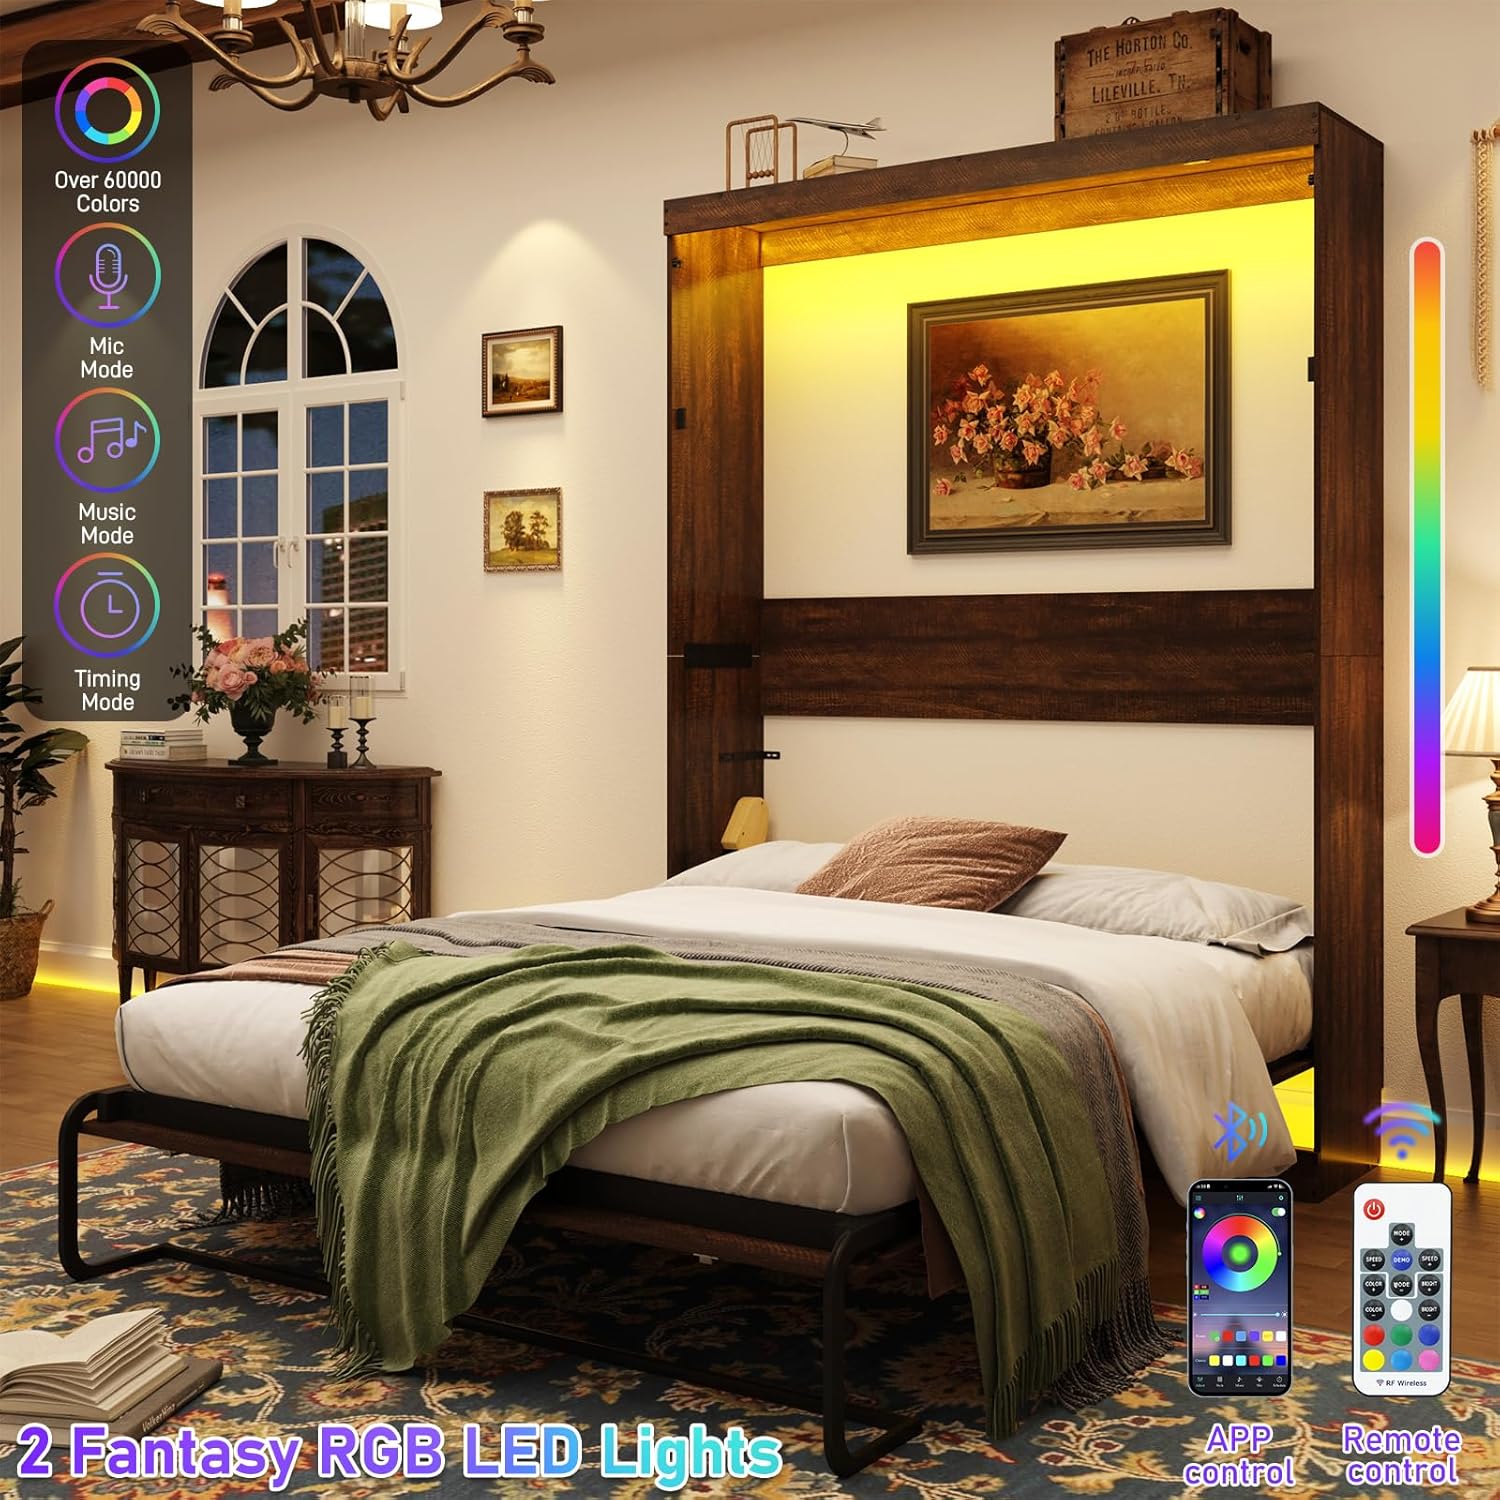
Image 6: Murphy bed with LED lights and control options.
9. Maintenance
- Cleaning: Wipe down wooden surfaces with a soft, damp cloth. Avoid harsh chemicals or abrasive cleaners.
- Hardware Check: Periodically check all screws, bolts, and connections to ensure they remain tight. Retighten as necessary.
- Gas Struts: Inspect gas struts for any signs of damage or leakage. If issues are found, contact customer support for replacement. Do not attempt to repair damaged struts.
- Mattress Straps: Ensure mattress straps are in good condition and securely fastened to prevent the mattress from shifting when the bed is closed.
10. Troubleshooting
| Problem | Possible Cause | Solution |
|---|---|---|
| Bed does not close or open smoothly. | Misaligned frame, loose hardware, faulty gas struts, incorrect mattress weight. |
|
| Bed feels unstable. | Improper wall mounting, loose hardware. |
|
| Mattress slips when closing. | Straps not tightened, incorrect mattress size/weight. |
|
11. Warranty and Support
For warranty information or technical support, please refer to the documentation included with your purchase or contact Hlivelood customer service directly. Keep your purchase receipt and model number (QLQ-001) handy for faster service.
Related Documents - QLQ-001
 |
Murphy Bed Assembly Instructions: Safety and Installation Guide Detailed assembly instructions and critical safety guidelines for installing a Queen Size Murphy Wall Bed. This guide covers essential steps for wall mounting, mattress requirements, and safe operation, emphasizing professional installation and adherence to warnings to ensure user safety and product longevity. |
 |
Create-A-Bed Queen Vertical Murphy Bed Plywood Construction & Assembly Guide Comprehensive assembly instructions and specifications for the Create-A-Bed Queen Vertical Plywood Murphy Bed. Includes parts list, cutting guide, dimensions, and step-by-step installation. |
 |
Easy-to-Build Queen-size Deluxe Murphy Bed Plan | Rockler Woodworking Detailed plan for building a DIY Queen-size Deluxe Murphy Bed with side cabinets. Includes elevation drawings, materials list, and step-by-step instructions from Rockler Woodworking and Hardware. |
 |
Murphy Bed Assembly Instructions: N708P310080-N708P310082 Comprehensive assembly instructions for the Murphy Bed (SKUs N708P310080, N708P310081, N708P310082). Learn how to safely install your space-saving wall bed with detailed steps and safety precautions. |
 |
Wall Bed Factory Assembly Instructions for Murphy Beds Comprehensive assembly and wall mounting instructions for Wall Bed Factory's Murphy bed models, including Mission, Camden, Hudson, and Farmhouse styles. Covers tools, hardware, step-by-step assembly, light kit installation, and mounting on wood, metal, and masonry walls. |
 |
Furnulem TYBF-001-Queen Bed Frame with LED Lights - User Manual and Assembly Guide Comprehensive user manual and assembly guide for the Furnulem TYBF-001-Queen bed frame, featuring LED lights and a charging station. Includes parts list, step-by-step assembly instructions, remote control functions, troubleshooting, and warranty information. |
Ask a question about this manual
Ask about setup, troubleshooting, compatibility, parts, safety, or missing instructions. Manuals+ will review the question and use this page’s manual context to help answer it.