AZZUNO MIG-145L
AZZUNO MIG Welder 145A User Manual
Model: MIG-145L
1. Introduction
Thank you for choosing the AZZUNO MIG Welder 145A, Model MIG-145L. This versatile 4-in-1 welding machine is designed for various welding applications, supporting Gas MIG, Gasless Flux Core MIG, Lift TIG, and Stick welding. It operates on both 110V and 220V input power, offering flexibility and performance for both beginners and experienced users. This manual provides essential information for safe operation, setup, maintenance, and troubleshooting.

Image 1.1: AZZUNO MIG Welder 145A and included flux core wire spools.
2. Safety Instructions
Always prioritize safety when operating welding equipment. Failure to follow safety guidelines can result in serious injury or property damage.
- Eye and Face Protection: Always wear a welding helmet with appropriate shade lenses to protect against arc flash and sparks.
- Body Protection: Wear flame-resistant clothing, welding gloves, and safety shoes to protect against burns and electric shock.
- Ventilation: Ensure adequate ventilation to remove welding fumes, which can be hazardous to your health. Work in a well-ventilated area or use fume extractors.
- Electrical Safety: Ensure the welder is properly grounded. Do not operate in wet conditions. Inspect cables and connections for damage before each use.
- Fire Prevention: Keep flammable materials away from the welding area. Have a fire extinguisher readily available. Sparks and hot metal can cause fires.
- Work Area: Keep the work area clean and free of clutter. Ensure stable footing.
- Read Manual: Read and understand this entire manual before operating the welder.
3. Package Contents
Verify that all items listed below are included in your package. If any items are missing or damaged, please contact AZZUNO customer support.
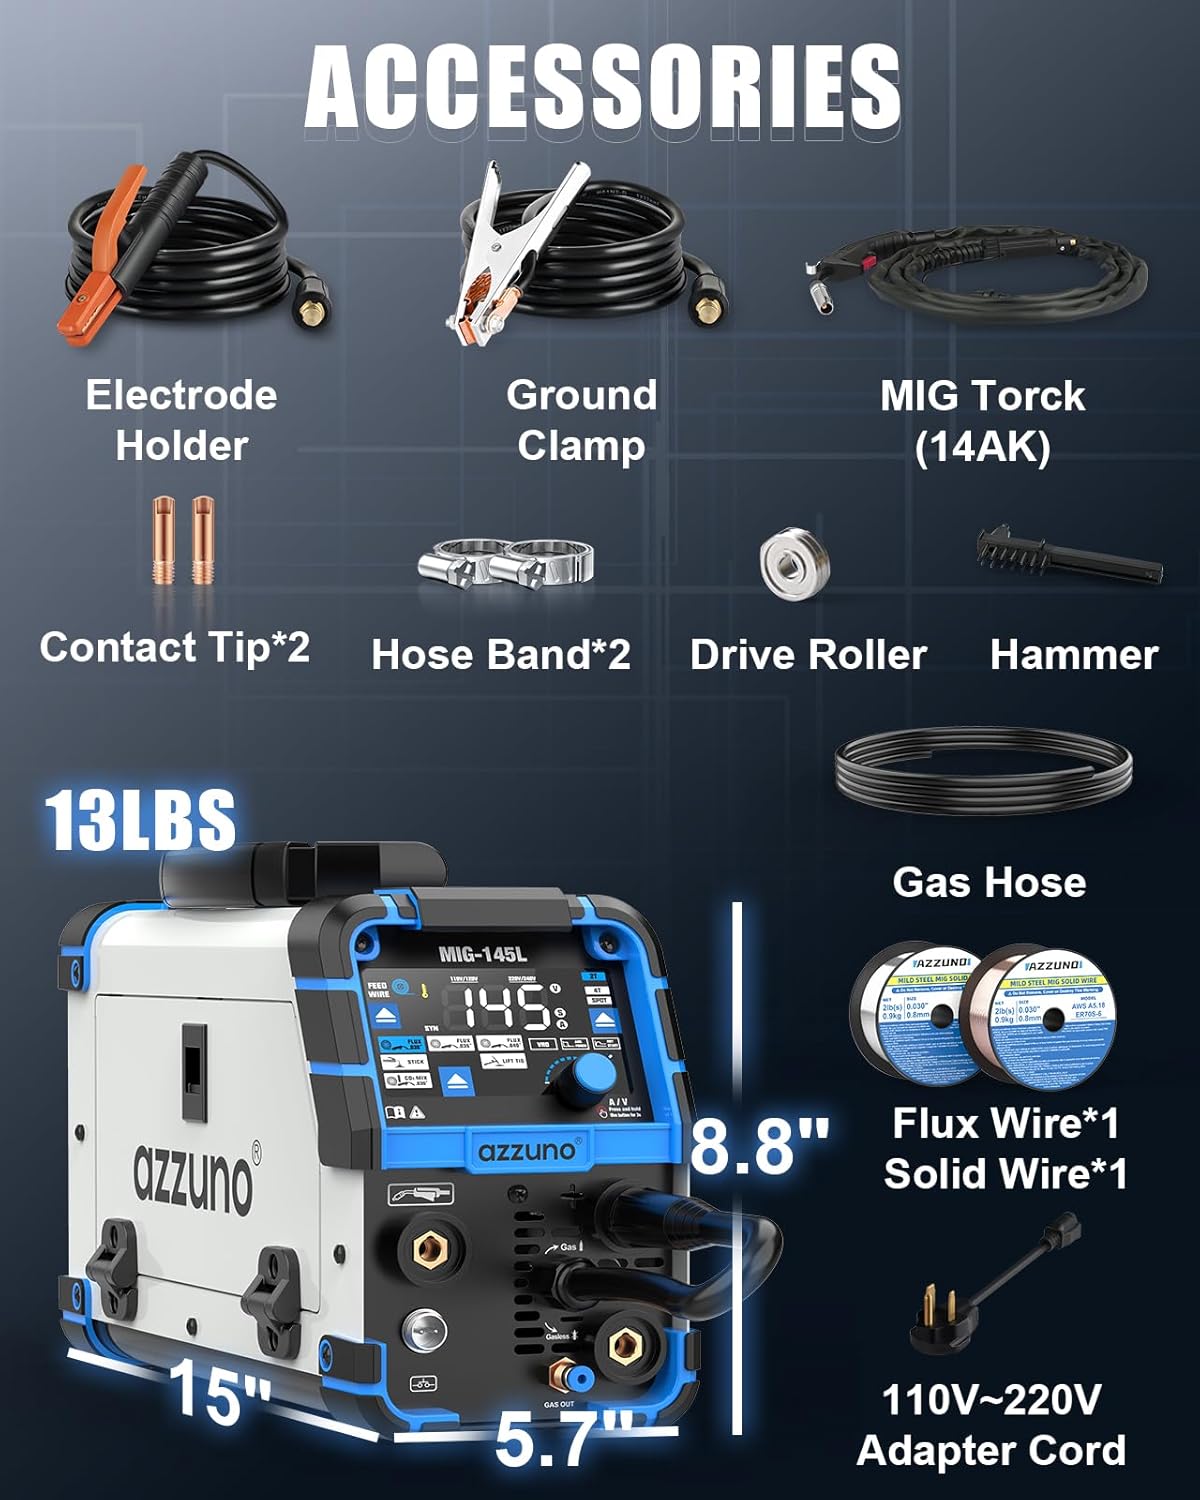
Image 3.1: All accessories and components included in the AZZUNO MIG Welder package.
- AZZUNO MIG-145L Welder Unit
- 0.030" x 3 Flux Cored Wire (2LBS 2-Pack + 1 extra)
- 0.030" x 1 Solid Wire
- 14AK MIG Torch x 1
- Electrode Holder x 1
- Ground Clamp x 1
- Gas Hose x 1
- Hose Band x 2
- Contact Tips x 2
- V-groove Drive Roller x 1
- Brush & Hammer x 1
- 110V~220V Adapter x 1
- User Manual x 1 (this document)
4. Product Features
The AZZUNO MIG-145L welder is equipped with advanced features for superior welding performance and user convenience:

Image 4.1: The four primary welding functions of the AZZUNO MIG-145L.
- 4-IN-1 Welding Machine: Supports Gas MIG, Gasless Flux Core MIG, Lift TIG, and Stick welding modes.
- Dual Voltage Compatibility: Operates on both 110V and 220V input power, adapting to various power sources.
- Wide Wire Compatibility: Works with .030"/.035"/.040" flux core wire and .030" solid wire. Compatible with E6013 electrodes for Stick welding.
- Large Clear LED Display: Features an oversized LED screen for crystal-clear visibility and intuitive operation, simplifying setting adjustments.
- Smart & Flexible MIG Welding: Includes SYNERGIC mode for automatic optimal setting adjustments. Offers 2T, 4T, and SPOT modes for manual, continuous, or timed welds.
- Manual Wire Feed Button: Allows for quick and easy wire feeding by pressing and holding the button.
- Portable Design: Compact size (5.7" x 15" x 8.8") and lightweight (13 LBS) for easy transport and storage.
5. Setup
5.1 Power Connection
- Ensure the welder is turned off before connecting to power.
- The welder supports both 110V and 220V input. Use the appropriate adapter cable provided for your power outlet.
- Plug the power cord securely into a grounded electrical outlet.
5.2 Wire Installation (MIG/Flux Core)
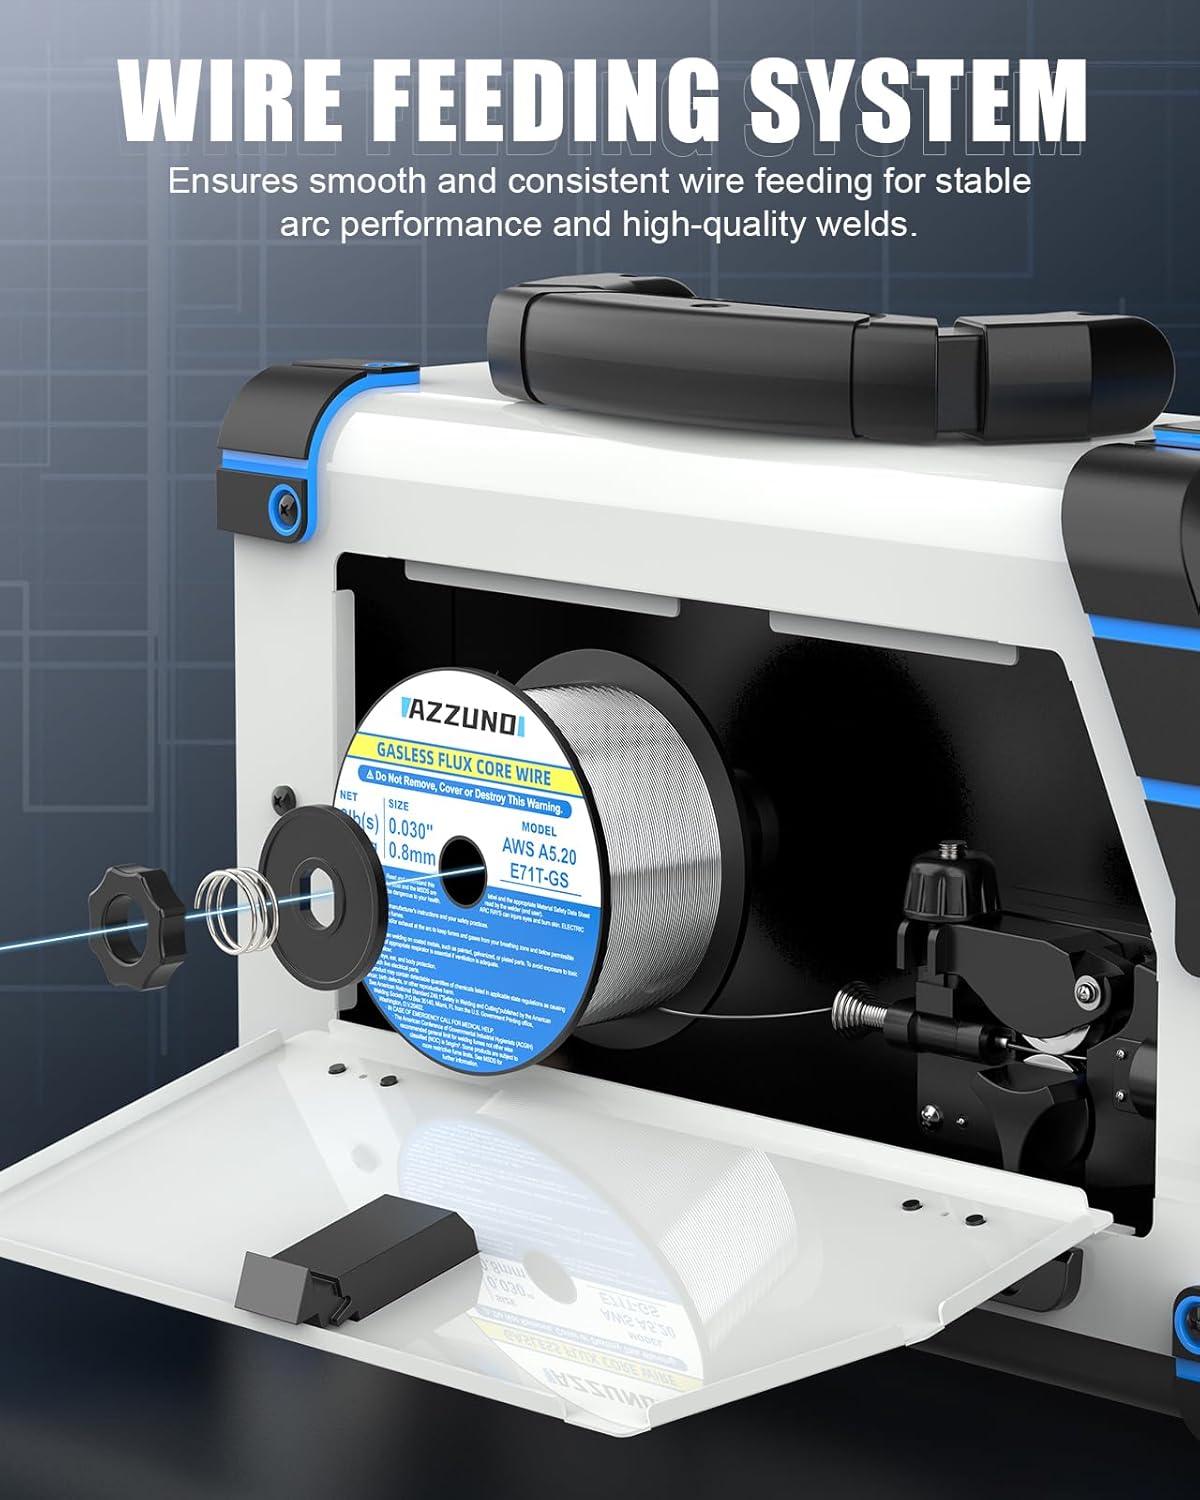
Image 5.1: Internal view of the wire feeding system with a wire spool.
- Open the side panel of the welder to access the wire spool compartment.
- Place the wire spool onto the spindle, ensuring it rotates freely.
- Thread the wire through the guide tube and into the drive roller mechanism.
- Close the drive roller tension arm and adjust the tension knob. The tension should be firm enough to feed the wire without slipping, but not so tight as to deform the wire.
- Press and hold the WIRE FEED BUTTON on the control panel to feed the wire through the MIG torch liner until it exits the contact tip.
- Cut off any excess wire, leaving about 1/2 inch protruding from the tip.
5.3 Gas Connection (for Gas MIG)
- For Gas MIG welding, connect the gas hose (provided) to the gas inlet on the back of the welder and to your shielding gas cylinder regulator.
- Ensure all connections are tight to prevent gas leaks.
- Open the gas cylinder valve slowly.
6. Operating Modes
The AZZUNO MIG-145L offers four distinct welding modes:
6.1 Gasless Flux Core MIG Welding
- Ideal for outdoor use or when shielding gas is not available.
- Uses flux-cored wire which produces its own shielding gas as it burns.
- Ensure correct polarity (DCEN - Direct Current Electrode Negative) for flux core.
6.2 Gas MIG Welding
- Requires an external shielding gas (e.g., Argon/CO2 mix for steel, Argon for aluminum).
- Provides cleaner welds with less spatter compared to flux core.
- Ensure correct polarity (DCEP - Direct Current Electrode Positive) for solid wire MIG.
6.3 Lift TIG Welding
- Provides precise control and high-quality welds, especially on thinner materials.
- Requires a TIG torch (not included in standard package), tungsten electrode, and shielding gas (Argon).
- To initiate arc, touch the tungsten to the workpiece and then lift slightly.
6.4 Stick Welding (MMA)
- Uses coated electrodes (stick electrodes) for welding.
- Suitable for thicker materials and outdoor conditions.
- Connect the electrode holder to the positive (+) terminal and the ground clamp to the negative (-) terminal for most common electrodes (DCEP).
7. Display and Controls
The AZZUNO MIG-145L features an intuitive control panel with a large LED display for easy adjustments.

Image 7.1: Detailed view of the welder's large LED display and control interface.
- Mode Selection: Use the dedicated buttons to select between Flux MIG, Gas MIG, Stick, and Lift TIG modes.
- Large LED Display: Shows current welding parameters (Amperage, Voltage, Wire Feed Speed).
- Control Knob: Adjusts welding current (Amperage) or voltage. Press and hold for 3 seconds to switch between Amp and Voltage adjustment.
- Synergic Control (SYN): Press button "A" for 3 seconds to activate. This mode automatically adjusts wire feed speed and voltage based on the selected amperage, simplifying setup for optimal performance.
- 2T/4T/SPOT Settings:

Image 7.2: Explanation of 2T, 4T, and SPOT welding modes.
- 2T (Two-Touch): Press and hold the trigger to weld, release to stop. Ideal for short welds.
- 4T (Four-Touch): Press and release trigger to start welding, press and release again to stop. Useful for long welds, reducing hand fatigue.
- SPOT: Allows for timed spot welds. Adjust the spot time as needed.
- VRD/Arc Force/Hot Start: Selectable functions for Stick welding to improve arc stability and starting.
8. Maintenance
Regular maintenance ensures the longevity and optimal performance of your welder.
- Cleaning: Regularly clean the internal components with compressed air to remove dust and metal particles. Ensure the machine is unplugged before cleaning.
- Torch and Cable Inspection: Inspect the MIG torch, electrode holder, ground clamp, and all cables for cuts, cracks, or loose connections before each use. Replace damaged parts immediately.
- Contact Tip and Nozzle: Replace worn contact tips and clean the welding nozzle regularly to prevent spatter buildup.
- Drive Rollers: Keep the drive rollers clean and free of debris to ensure smooth wire feeding. Check for wear and replace if necessary.
- Storage: Store the welder in a clean, dry environment, away from excessive dust and moisture.
9. Troubleshooting
Refer to the table below for common issues and their solutions. If the problem persists, contact AZZUNO customer support.
| Problem | Possible Cause | Solution |
|---|---|---|
| Welder does not power on | No power from outlet; Loose power connection; Internal fuse blown | Check power outlet and circuit breaker; Ensure power cord is securely plugged in; Contact service for fuse replacement. |
| No arc/Poor arc stability | Loose ground clamp; Incorrect settings (Amps/Volts); Worn contact tip; Incorrect polarity; Insufficient gas flow (MIG) | Ensure ground clamp has good contact; Adjust settings according to material/wire; Replace contact tip; Verify correct polarity for mode; Check gas cylinder and flow rate. |
| Wire feeding issues (slipping/jamming) | Incorrect drive roller tension; Dirty/worn drive rollers; Kinked/clogged liner; Wrong size contact tip | Adjust drive roller tension; Clean/replace drive rollers; Inspect and clear/replace liner; Ensure contact tip matches wire diameter. |
| Excessive spatter | Voltage too high/Amperage too low; Incorrect stickout; Dirty workpiece; Insufficient gas shielding (MIG) | Adjust voltage/amperage; Maintain proper stickout; Clean workpiece thoroughly; Check gas flow and connections. |
10. Specifications
| Feature | Specification |
|---|---|
| Model | MIG-145L |
| Welding Processes | Gas MIG, Gasless Flux Core MIG, Lift TIG, Stick (MMA) |
| Input Voltage | 110V/220V Dual Voltage |
| Max Amperage | 145A (approx.) |
| Flux Core Wire Diameter | 0.030" / 0.035" / 0.040" |
| Solid Wire Diameter | 0.030" |
| Electrode Compatibility | E6013 (and similar) |
| Dimensions (L x W x H) | 15" x 5.7" x 8.8" |
| Weight | 13 LBS |
| Included Flux Core Wire | AWS E71T-GS, 0.030" (0.8mm), 2LBS x 2-Pack |
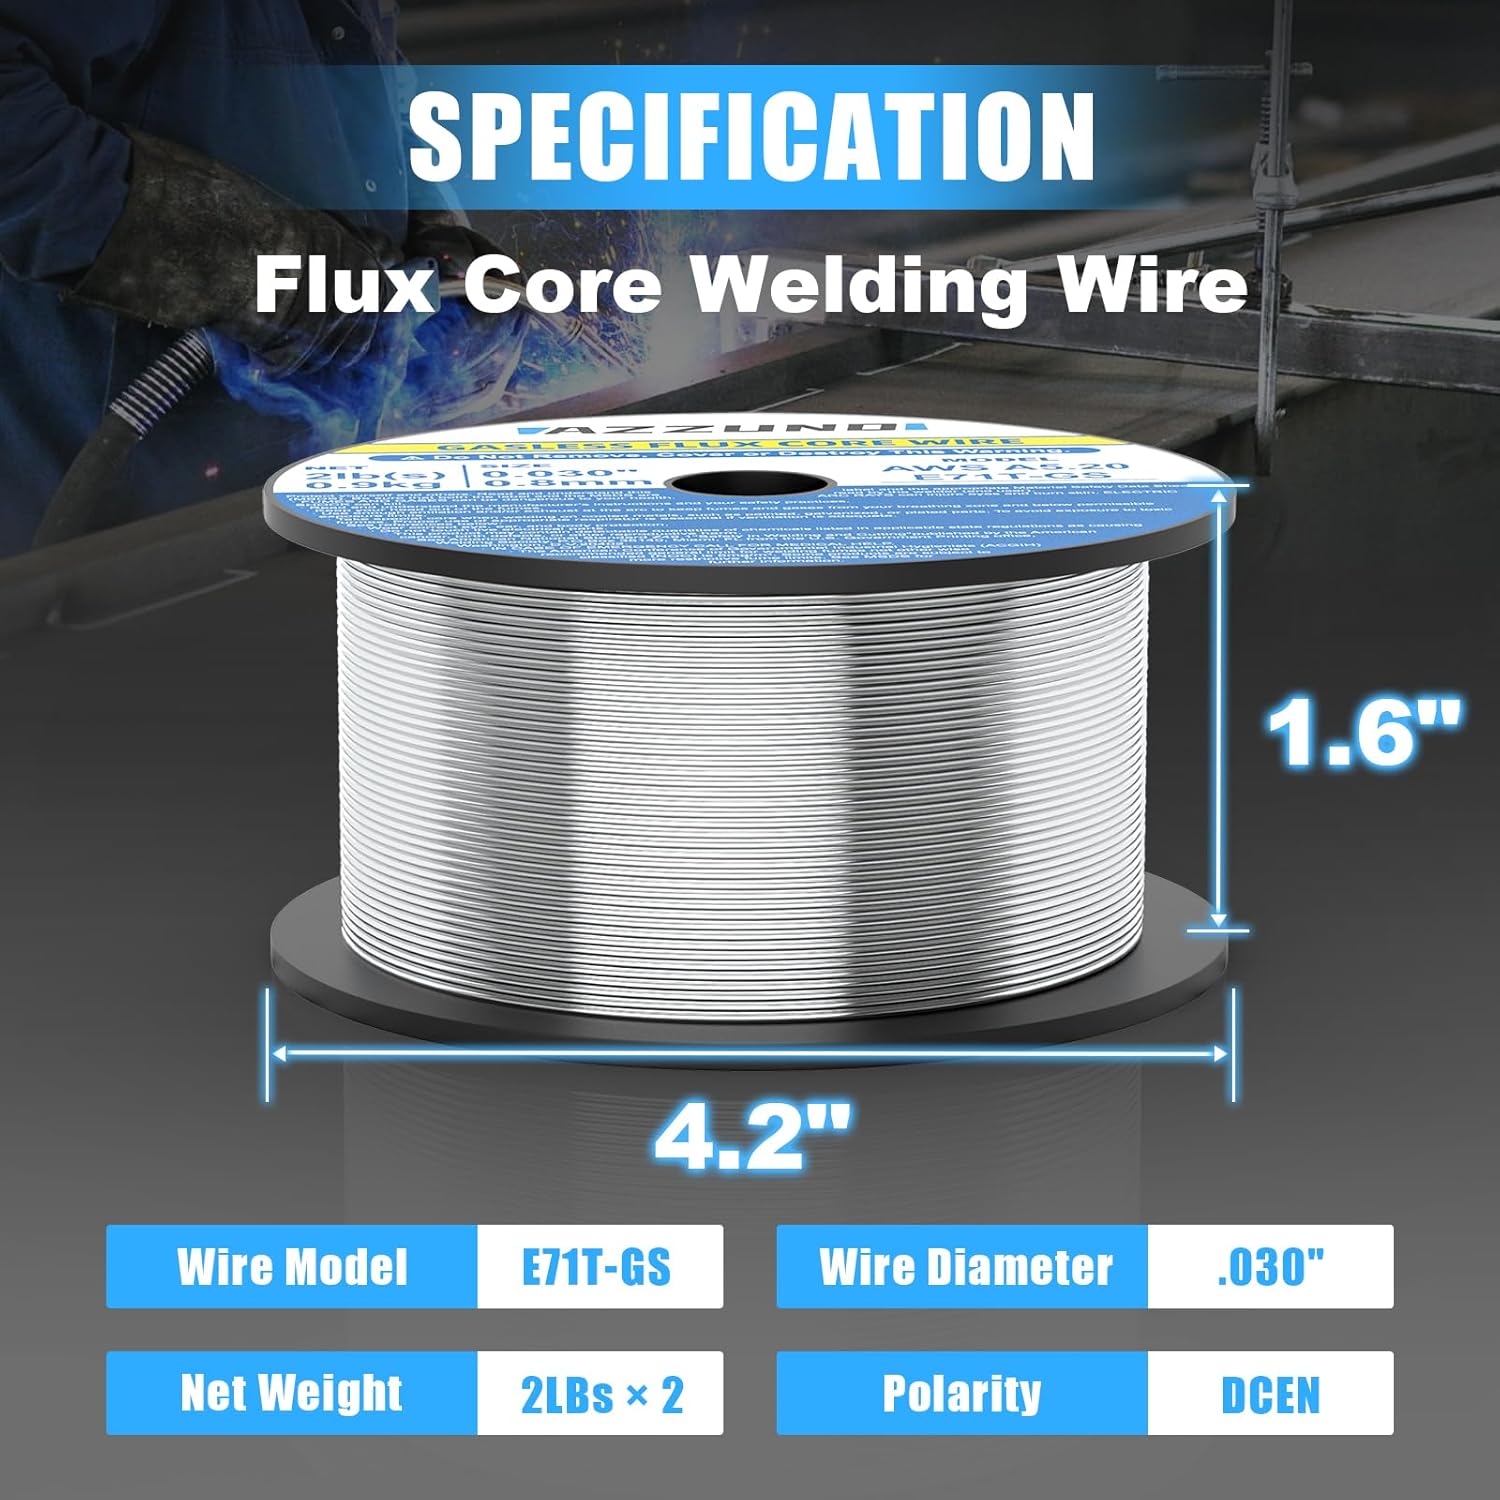
Image 10.1: Specifications for the included AZZUNO Flux Core Welding Wire.
11. Warranty and Support
AZZUNO products are manufactured to high-quality standards. For warranty information, technical support, or service inquiries, please refer to the contact information provided with your purchase or visit the official AZZUNO website. Please retain your proof of purchase for warranty claims.
Ask a question about this manual
Ask about setup, troubleshooting, compatibility, parts, safety, or missing instructions. Manuals+ will review the question and use this page’s manual context to help answer it.