1. Product Overview
The morlyrctooy M17 Mini Drone is a versatile quadcopter designed for beginners, featuring both land and air flight capabilities. Its protective cover ensures durability during learning, while intelligent flight modes simplify operation.

Figure 1: M17 Mini Drone with its remote controller, showcasing its compact design and protective frame.
2. Setup
2.1 Package Contents

Figure 2: All components included in the M17 Mini Drone package, laid out for inspection.
Verify that all items are present in the package:
- M17 Mini Drone
- Remote Controller
- Rechargeable Drone Battery
- Spare Propellers (2x A, 2x B)
- USB Charging Cable
- Propeller Guards (4 pieces)
- Screwdriver
- Spanner Tool
- User Manual
2.2 Controller Battery Installation
The remote controller requires 4 AAA batteries (not included). Use a screwdriver to open the battery compartment on the back of the controller. Insert the batteries, ensuring correct polarity (negative and positive ends). Close the compartment and secure with the screw.
2.3 Charging the Drone Battery
Connect the drone's rechargeable battery to the provided USB charging cable. Plug the USB end into a 5V USB power source (e.g., computer USB port, USB wall adapter). The charging indicator on the USB cable will turn red during charging and turn off when fully charged. Charging typically takes 30-40 minutes.
2.4 Propeller Guards Installation/Removal
The drone comes with propeller guards for enhanced protection, especially for beginners. These guards can be easily slid onto and off the drone's arms. Ensure they are securely attached before flight.
2.5 Propeller Replacement
In case of damaged propellers, use the provided spanner tool to gently remove the old propeller. Match the new propeller to the correct arm (A or B, indicated on the propeller and drone arm) and slide it onto the motor shaft. Ensure the flat end of the propeller faces the motor.
3. Operating Instructions
3.1 Pre-Flight Preparation

Figure 3: Pre-take-off preparation, ensuring the drone is secured and ready for flight.
Always perform a pre-flight check to ensure the drone and controller are in good condition and fully charged. Place the drone on a flat, level surface.
3.2 Power On/Off and Pairing
1. Turn on the drone by pressing the power button located near the red propellers. The drone's lights will illuminate.
2. Turn on the remote controller. The indicator light on the controller will flash.
3. To pair, push the left joystick (throttle) all the way up, then all the way down. The controller will beep, and the drone's lights will become solid, indicating successful pairing.
3.3 Calibration
After pairing, calibrate the drone for stable flight. Push both joysticks down and inwards simultaneously. The drone's lights will flash and then become solid again, confirming calibration.
3.4 Take-off and Landing

Figure 4: The M17 Mini Drone demonstrating its one-key take-off/landing function, simplifying flight initiation and conclusion.
The M17 Mini Drone features a convenient one-key take-off/landing function.
- One-Key Take-off: After pairing and calibration, press the one-key take-off button on the controller. The drone will automatically ascend and hover at a stable altitude.
- One-Key Landing: During flight, press the one-key landing button. The drone will slowly descend and land automatically.
3.5 Speed Modes

Figure 5: The M17 Mini Drone showcasing its three adjustable speed modes, suitable for various skill levels.
The drone offers three adjustable speed modes (low, medium, high) to suit different skill levels and environments. Press the speed switch button on the controller to cycle through the modes.
3.6 Headless Mode
In headless mode, the drone's orientation is relative to the pilot, making it easier to control without worrying about the drone's front or back. Activate headless mode by pressing the dedicated button on the controller.
3.7 3D Flip
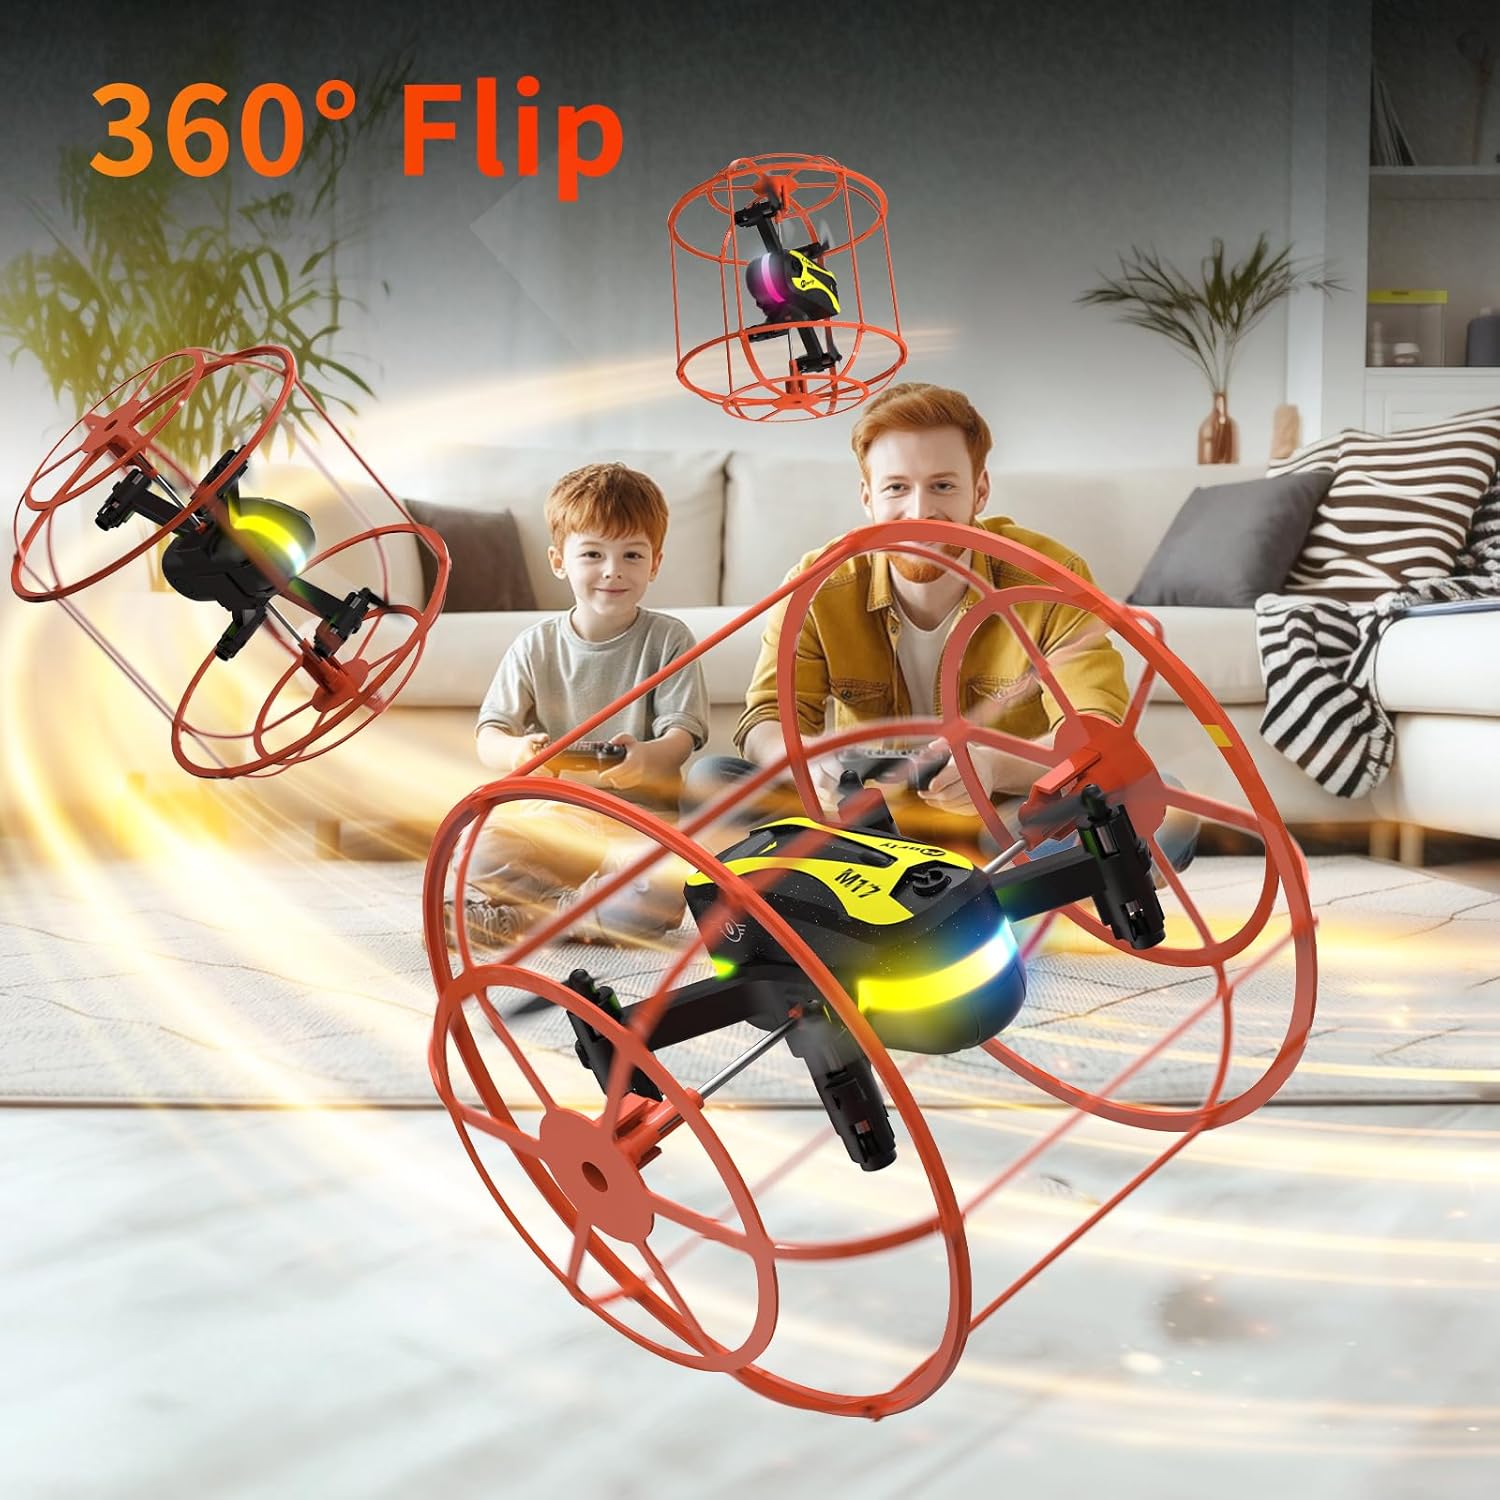
Figure 6: The M17 Mini Drone executing a dynamic 360-degree flip, a fun feature for experienced pilots.
To perform a 3D flip, press the 3D flip button on the controller, then quickly move the right joystick in the desired flip direction (forward, backward, left, or right).
3.8 Land-Air Dual Mode & Collision Protection

Figure 7: The M17 Mini Drone showcasing its wall-climbing capability and robust collision protection, allowing for versatile play.
The M17 Mini Drone features a unique land-air dual mode, allowing it to roll on the ground or fly in the air. Its full protective cage provides 360° collision protection, making it safe for indoor use and resistant to bumps against walls or obstacles.
4. Maintenance
4.1 Battery Care
To prolong battery life, allow the drone to rest for a few minutes between flights and charging cycles. Avoid overcharging the battery.
4.2 Storage
When not in use, store the drone and its components in a safe, dry place, preferably in its original packaging or a protective case, to prevent damage.
4.3 Cleaning
Gently wipe the drone with a soft, dry cloth to remove dust or debris. Avoid using liquids or harsh chemicals.
5. Troubleshooting
5.1 Drone Not Responding/Losing Pairing
If the drone stops responding or loses pairing during flight, it may be due to accidentally pressing the controller's power off button. This will cause the drone to shut down and lose its pairing code. Always ensure proper handling of the controller during flight.
5.2 Drone Drifts After Calibration
If the drone exhibits drift even after calibration, re-calibrate on a perfectly flat surface. If the issue persists, it may indicate a need for fine-tuning the trim settings on the remote controller or contacting support for further assistance.
6. Specifications
- Brand: morlyrctooy
- Model: M17
- Item Weight: 15 Grams (0.529 ounces)
- Battery Capacity: 500 Milliamp Hours
- Material: Plastic Or Nylon
- Battery Cell Composition: Lithium Polymer
- Product Dimensions: 5.2"L x 4.6"W x 4.6"H
7. Warranty and Support
For any questions regarding your morlyrctooy M17 Mini Drone, including setup, advanced maneuvers, troubleshooting, or warranty information, please contact morlyrctooy's support team. Our specialists are available to provide friendly guidance and ensure smooth flights.
Contact information can typically be found on the product packaging or the official morlyrctooy website.