1. Introduction
Thank you for choosing the Zericuf 9505T Mini Table Saw. This versatile tool is designed for precision cutting, sanding, and engraving tasks in various craft and DIY projects. Please read this manual thoroughly before operation to ensure safe and efficient use of the product. Keep this manual for future reference.

Figure 1: User consulting the detailed instruction manual.
2. Safety Instructions
Always prioritize safety when operating any power tool. Failure to follow these instructions may result in serious injury or property damage.
- Read the Entire Manual: Understand all operating procedures and safety warnings before use.
- Wear Personal Protective Equipment (PPE): Always wear safety glasses, hearing protection, and a dust mask. Gloves are recommended for handling materials but avoid loose-fitting gloves near rotating parts.
- Work Area: Ensure your work area is clean, well-lit, and free from clutter. Keep children and bystanders away.
- Power Connection: Use only the provided power adapter. Ensure the power supply matches the tool's requirements.
- Dual Switch Operation: The Zericuf 9505T features a dual-switch, dual-motor system. Important Note: Never activate both switches simultaneously during operation to prevent power adapter overload and potential accidents.
- Secure Workpiece: Always secure your workpiece firmly before cutting or sanding to prevent kickback or loss of control.
- Blade Guard: Always use the acrylic safety baffle when operating the saw blade to protect against debris.
- Unplug When Changing Accessories: Always unplug the tool from the power source before changing blades, sanding discs, or any other accessories.
- Inspect Before Use: Check the tool for any damage, loose parts, or worn accessories before each use. Do not operate if damaged.
- Avoid Overreaching: Maintain proper footing and balance at all times.
- Dust Collection: Connect an external vacuum cleaner to the dust extraction tube to minimize dust exposure.

Figure 2: Enhanced safety features including dual switches and dust collection.

Figure 3: Acrylic safety baffle and precision cutting system.
3. Package Contents
Verify that all items listed below are included in your package:
- Zericuf 9505T Mini Table Saw Unit
- 7-Level Adjustable Power Adapter
- Flexible Rotary Tool
- Saw Blades (4 types: High-speed Steel, Alloy, Grinding Wheel, Diamond)
- Sanding Discs (various grits)
- Polishing Wheels (wool, foam)
- Rotary Tool Attachments (various grinding/sanding heads)
- Acrylic Safety Baffle
- Adjustable Guide Fence (with 12cm scale ruler)
- Allen Keys / Wrenches
- Dust Extraction Tube
- 16-Page Detailed Instruction Manual

Figure 4: All components included in the Zericuf 9505T Mini Table Saw package.

Figure 5: Different blade types for various materials.
4. Product Overview
The Zericuf 9505T Mini Table Saw is a multi-functional tool featuring:
- Dual 795 Motors: Provides powerful and stable operation.
- Dual Switches: Separate control for cutting and polishing functions, enhancing safety.
- Adjustable Height Saw Blade: Cutting depth adjustable from 0-26mm for various material thicknesses.
- 3.15-inch Sanding Disc: Efficient for large-area sanding tasks.
- Widened Worktable: Extended to 12cm for customized cutting of longer materials.
- Shock-Absorbing Rubber Feet: Improves stability and reduces vibration during operation.
- Precision Cutting System: Includes a 12cm scale ruler and 180° adjustable guide fence.

Figure 6: Powerful dual 795 motors with 7-level speed adjustment.
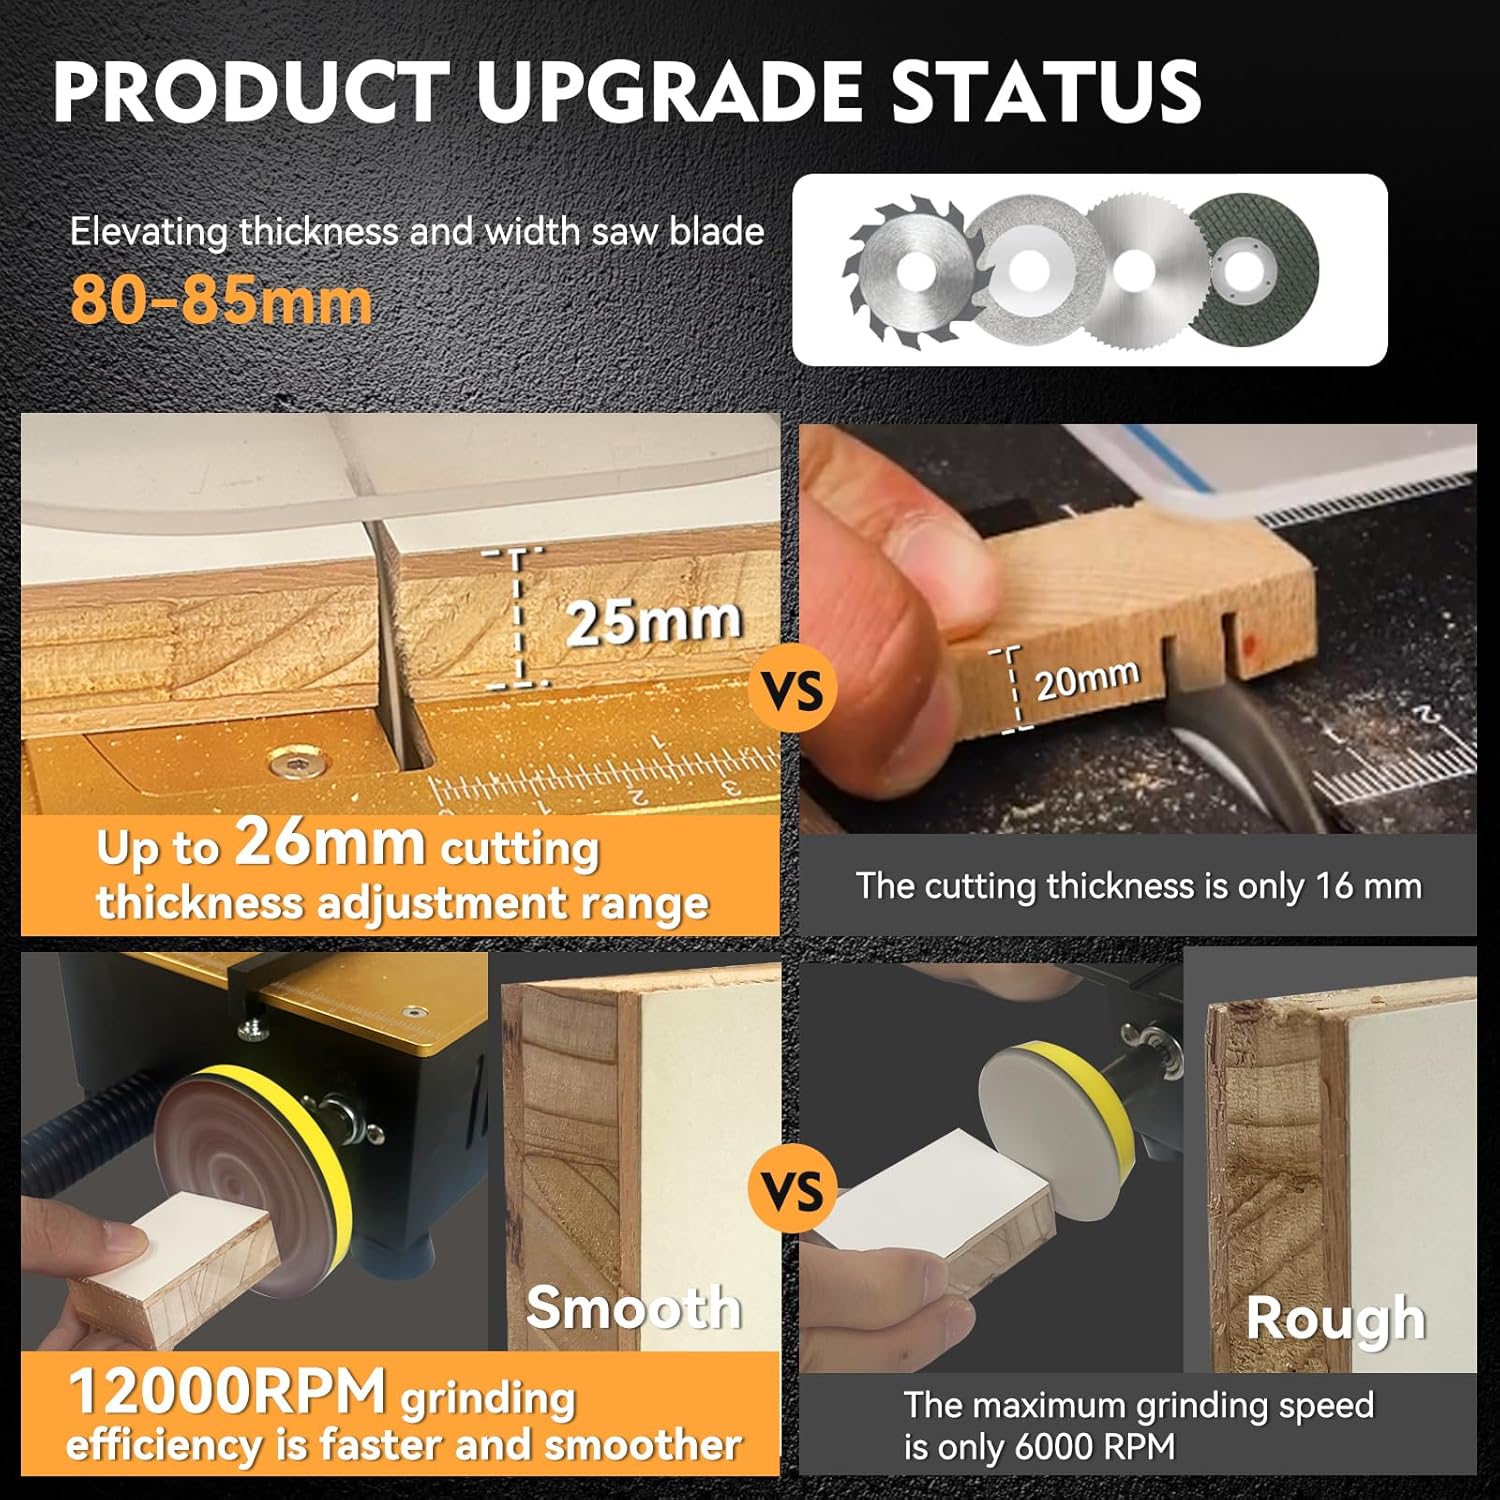
Figure 7: Product upgrades including increased cutting thickness and grinding efficiency.
5. Setup
Follow these steps to set up your Zericuf 9505T Mini Table Saw:
- Unpacking: Carefully remove all components from the packaging and verify against the package contents list.
- Install Backing and Baffle: Attach the metal backer and transparent protective board to the main unit using the provided screws and butterfly nuts.
- Install Adjustable Guide Fence: Secure the adjustable guide fence to the worktable. Adjust its position as needed for your cutting tasks.
- Saw Blade Installation:
- Unscrew the two cover screws on the desktop to access the blade compartment.
- Remove the outer saw blade clamp.
- Carefully place the desired saw blade onto the motor shaft, ensuring the teeth direction is correct for cutting.
- Reinstall the outer saw blade clamp and tighten the fixing screw with the provided Allen key.
- Replace the desktop cover and secure with the two screws.
- Adjust Saw Blade Height: Use the small Allen key to adjust the saw blade height by inserting it into the top hole and twisting left or right.
- Install Drill Chuck (for Sanding/Polishing):
- Install the drill chuck onto the left-side motor shaft.
- Tighten the small screw on the connecting rod first, then tighten the small screws on both sides to securely fix it.
- Attach the desired sandpaper disc or polishing wheel onto the drill chuck and tighten it with the drill chuck wrench.
- Install Flexible Rotary Tool:
- First, install the three top screws on the connecting rod of the flexible shaft.
- Install the flexible shaft onto the connecting rod and tighten the top screw to fix the flexible shaft.
- Install the other side of the flexible shaft onto the motor shaft on the right side of the main unit.
- Tighten the two screws on the connecting rod from the bottom hole to secure it.
- When installing a grinding head onto the flexible tool, use a wrench to lock it securely.
- Power Connection: Connect the power adapter to the main unit and then plug it into a suitable power outlet.
Video 1: This video demonstrates the installation method for the Zericuf Mini Table Saw, including attaching components and setting up accessories.

Figure 8: Simplified saw blade replacement process.
6. Operating Instructions
Familiarize yourself with the controls and functions before beginning any work.
- Power On/Off: Use the red power switch on the front of the unit to turn the table saw ON or OFF.
- Speed Adjustment: The power adapter features a 7-level adjustable switch. Slide this switch to increase or decrease the speed of both the main unit and the flexible rotary tool.
- Cutting Operation:
- Select the appropriate saw blade for your material (refer to Figure 5).
- Adjust the saw blade height using the Allen key to match the desired cutting depth (0-26mm).
- Position the adjustable guide fence for precise cuts, using the 12cm scale ruler.
- Place the workpiece firmly against the guide fence and slowly feed it into the rotating saw blade. Always use the acrylic safety baffle.
- Sanding/Polishing Operation:
- Ensure the sanding disc or polishing wheel is securely attached to the drill chuck.
- Turn on the unit and adjust the speed as needed.
- Gently apply the workpiece to the rotating disc for sanding or polishing.
- Flexible Rotary Tool Use:
- Attach the desired grinding or sanding head to the flexible rotary tool.
- Turn on the unit and adjust the speed.
- Use the flexible tool for detailed work such as engraving, fine sanding, or drilling small holes.
Video 2: This video provides a comprehensive demonstration of the Zericuf Mini Table Saw's capabilities, including cutting, sanding, and flexible rotary tool use.
Video 3: This video showcases various functional demonstrations of the Zericuf Mini Table Saw, cutting different materials.
Video 4: A demonstration of the Mini Table Saw in action, cutting various materials.
Video 5: This video demonstrates the Mini Liftable Table Saw's cutting capabilities on wood dowels.
7. Maintenance
Regular maintenance ensures the longevity and optimal performance of your Zericuf 9505T Mini Table Saw.
- Cleaning: After each use, unplug the tool and clean off any dust or debris. Use the dust extraction tube to connect to an external vacuum cleaner for efficient dust removal. The internal dedicated blade compartment helps prevent dust from affecting motor operation.
- Blade Care: Inspect saw blades and other cutting/sanding accessories for wear or damage. Replace dull or damaged blades immediately to maintain cutting efficiency and safety.
- Storage: Store the tool and its accessories in a clean, dry place, out of reach of children.
8. Troubleshooting
If you encounter any issues, refer to the following common problems and solutions:
- Tool Not Turning On:
- Check if the power adapter is securely plugged into both the tool and the wall outlet.
- Ensure the power switch on the unit is in the 'ON' position.
- Verify the power outlet is functional.
- Reduced Performance/Slow Speed:
- Adjust the speed setting on the power adapter to a higher level.
- Check if the blade or accessory is dull or damaged and replace if necessary.
- Ensure the workpiece is not being forced too hard against the blade/disc.
- Excessive Vibration/Noise:
- Ensure all accessories (blades, discs, chucks) are properly installed and tightened.
- Check for any loose components on the main unit.
- Verify the tool is placed on a stable, flat surface.
- Blade Getting Stuck:
- Ensure the correct blade type is used for the material being cut.
- Do not force the workpiece; feed it slowly and steadily.
- Check for proper blade height adjustment.
9. Specifications
| Feature | Specification |
|---|---|
| Brand | Zericuf |
| Model Number | 9505T |
| Product Dimensions | 20.29 x 16.51 x 10.16 cm |
| Item Weight | 3.9 kg |
| Power Source | Corded Electric |
| Wattage | 200 watts |
| Speed | Max 12,000 RPM (single motor) |
| Max Cutting Thickness | 26mm |
| Blade Length | 85 Millimeters |
| Material | Alloy Steel, Aluminum, High Speed Steel |
| Special Features | Depth Adjustment, Keyed Blade Change, Lightweight |
| Certification | CE |
10. Warranty and Support
The Zericuf 9505T Mini Table Saw comes with a 3-Year Warranty. This warranty covers defects in materials and workmanship under normal use. If you encounter any issues after receiving the product, please contact Zericuf customer support promptly via Amazon for assistance.