Surakey JIAQI-QJ1234X-HWC-06
Surakey Android 13 Car Stereo Radio Instruction Manual
Model: JIAQI-QJ1234X-HWC-06
For Peugeot 208 & 2008 (2012-2018)
1. Introduction
This manual provides detailed instructions for the installation, operation, and maintenance of your Surakey Android Car Stereo Radio. Please read this manual thoroughly before using the product to ensure proper function and safety. Keep this manual for future reference.
2. Product Overview
2.1 Key Features
- Android 13 Operating System with 4GB RAM + 64GB ROM
- 10-inch HD IPS Capacitive Touchscreen (1024x600 resolution)
- Wireless CarPlay & Wired/Wireless Android Auto
- Built-in GPS Navigation
- Integrated Wi-Fi and Bluetooth for hands-free calls and music streaming
- FM/RDS Radio
- Split Screen Functionality
- Support for Steering Wheel Controls
- Compatible with AHD Backup Cameras
2.2 Package Contents

Figure 2.2.1: Package Contents. This image displays all items included with your Surakey car stereo: the main head unit, various connection cables (power, RCA, USB, camera input, radio adapter), a GPS antenna, this instruction manual, a USB adapter cable, and a Canbus Box for vehicle integration.
- 1 x Car Stereo Radio Unit
- 1 x Power Cable
- 1 x RCA Input/Output Cable Set
- 2 x USB Cables
- 1 x Camera Input Cable
- 1 x Radio Antenna Adapter
- 1 x GPS Antenna
- 1 x Instruction Manual (this document)
- 1 x USB Adapter Cable
- 1 x Canbus Box (if applicable for your vehicle model)
3. Safety Information
- Ensure the vehicle's ignition is off and the battery is disconnected before installation to prevent electrical shorts or damage.
- Professional installation is recommended. Incorrect wiring can damage the unit or the vehicle's electrical system.
- Do not operate the device in a way that distracts you from driving. Always prioritize road safety.
- Avoid exposing the unit to extreme temperatures, direct sunlight for prolonged periods, or excessive moisture.
- Do not attempt to disassemble or modify the unit. This will void the warranty and may cause damage.
4. Installation
4.1 Vehicle Compatibility
This car stereo is designed for Peugeot 208 and 2008 models manufactured between 2012 and 2018. Verify your vehicle's dashboard configuration matches the "After Installation" image below before proceeding.
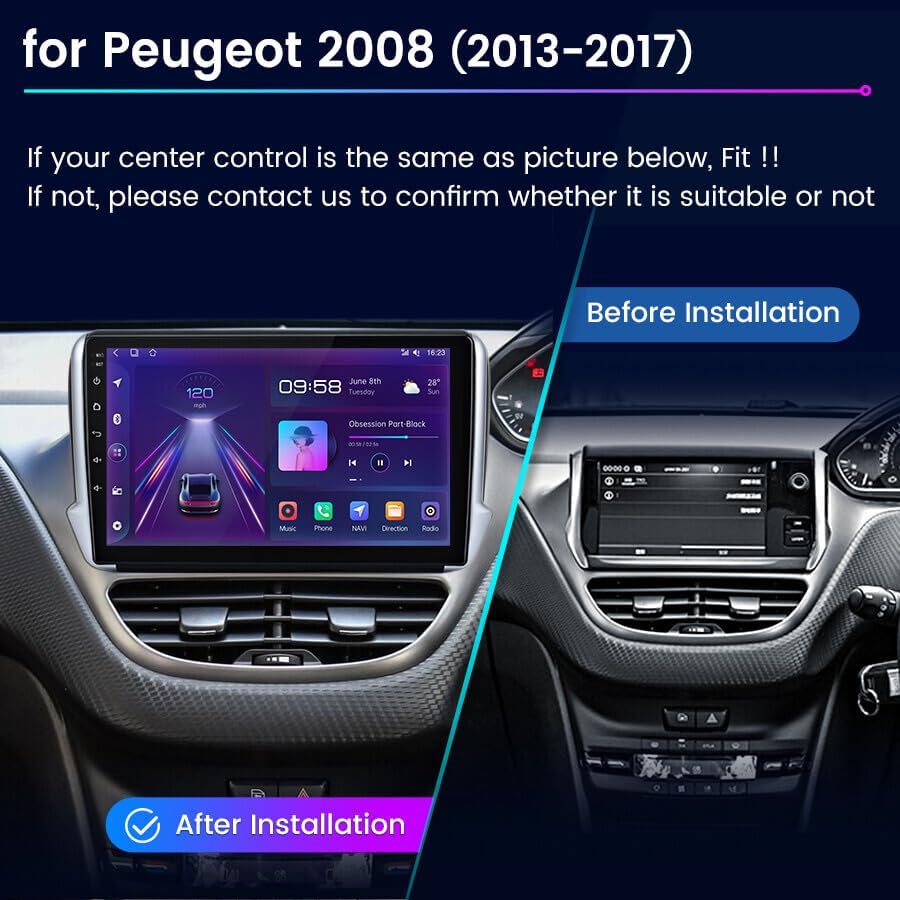
Figure 4.1.1: Before and After Installation. This image illustrates the dashboard of a Peugeot 2008. The left side shows the original factory radio, and the right side displays the Surakey 10-inch car stereo installed, demonstrating its fit and appearance.
4.2 Wiring Diagram Overview
Refer to the detailed wiring diagram provided with your unit for specific connections. The image below provides a general overview of the rear connections.

Figure 4.2.1: Rear Connections. This image displays the back of the car stereo unit, illustrating the various input and output ports and the connected wiring harnesses for power, audio/video (RCA), USB devices, and the radio antenna.
- Disconnect Battery: Before starting, disconnect the negative terminal of your vehicle's battery.
- Remove Old Unit: Carefully remove the existing car stereo and dashboard trim.
- Connect Power Harness: Connect the provided power cable to the vehicle's wiring harness. Ensure all connections are secure. The Canbus box, if included, should be integrated here to manage steering wheel controls and other vehicle data.
- Connect RCA Cables: Connect any external amplifiers, subwoofers, or auxiliary input/output devices using the RCA cables.
- Connect USB Cables: Route the USB cables to a convenient location in your dashboard or glove compartment for connecting USB drives or smartphones.
- Connect GPS Antenna: Mount the GPS antenna in a location with a clear view of the sky, typically on the dashboard or under the windshield.
- Connect Radio Antenna: Connect the vehicle's radio antenna to the stereo using the provided adapter if necessary.
- Connect Backup Camera (Optional): If installing a backup camera, connect its video input to the designated camera input on the stereo. Ensure the camera's power is connected to the reverse light circuit for automatic activation.
- Test Connections: Before fully reassembling the dashboard, reconnect the battery and perform a basic test of the stereo's functions.
- Reassemble: Once all functions are verified, carefully reassemble the dashboard trim and secure the stereo unit.
5. Initial Setup
- First Power On: After installation, turn on your vehicle's ignition. The stereo should power on automatically.
- Language Selection: Follow the on-screen prompts to select your preferred language.
- Date and Time: Set the correct date and time. This can often be synchronized automatically via GPS or network if Wi-Fi is connected.
- Wi-Fi Connection: Navigate to Settings > Network & Internet > Wi-Fi. Select your Wi-Fi network and enter the password to connect. This enables online features like Google Maps and app downloads.
- GPS Calibration: Ensure the GPS antenna is properly connected and positioned. The system will automatically acquire satellite signals for navigation.
6. Operating Instructions

Figure 6.0.1: Main User Interface. This image shows the primary screen of the car stereo, featuring a clean layout of application icons for various functions such as phone calls, music playback, navigation, and messaging.
6.1 Wireless CarPlay & Android Auto
This unit supports both Wireless CarPlay and Wired/Wireless Android Auto, allowing seamless integration with your smartphone.

Figure 6.1.1: CarPlay and Android Auto Connection. This image provides instructions for connecting your smartphone. For Wireless CarPlay, enable Bluetooth on your iPhone, pair it with the car radio, and open the 'Car Link' app. For Wired Android Auto, install the 'Android Auto' app on your Android phone and connect it via a USB cable.
- For Wireless CarPlay (iOS):
- Enable Bluetooth on your iPhone.
- Pair your iPhone with the car stereo via Bluetooth.
- Open the "Car Link" application on the car stereo. CarPlay should activate automatically.
- For Wired/Wireless Android Auto (Android):
- Ensure the "Android Auto" app is installed on your Android phone.
- For wired connection, connect your phone to the stereo using a high-quality USB cable.
- For wireless connection, enable Bluetooth and Wi-Fi on your Android phone and follow the on-screen prompts on the stereo to pair.
6.2 GPS Navigation & Wi-Fi Connection
The unit features built-in GPS for navigation and Wi-Fi for online services.

Figure 6.2.1: GPS Navigation and Wi-Fi. This image shows the car stereo displaying a detailed GPS navigation map. Below, smaller screens illustrate the unit's capability to access online content, such as streaming videos, when connected to Wi-Fi.
- GPS Navigation: Access the pre-installed navigation app or download your preferred navigation app from the Play Store. With Wi-Fi connected, online maps like Google Maps can be used for real-time traffic and updated routes.
- Wi-Fi: Connect to a mobile hotspot or home Wi-Fi network via Settings > Network & Internet > Wi-Fi to access online features, download apps, and update software.
6.3 Bluetooth Hands-free & FM/RDS Radio
Utilize Bluetooth for safe hands-free communication and enjoy local radio stations.

Figure 6.3.1: Bluetooth and FM Radio. This image illustrates the Bluetooth hands-free calling feature, showing a call in progress. Below, the FM/RDS radio interface is displayed, allowing users to tune into various radio frequencies and save presets.
- Bluetooth Pairing: Go to Settings > Connected devices > Bluetooth. Enable Bluetooth on your phone and search for the car stereo. Select the stereo from the list and confirm pairing.
- Hands-free Calls: Once paired, you can make and receive calls directly from the stereo's interface. The phonebook can be synchronized.
- Bluetooth Music: Stream audio from your phone to the stereo via Bluetooth.
- FM/RDS Radio: Access the Radio app to scan for available FM stations. RDS (Radio Data System) provides station information where available.
6.4 Split Screen Function & HiFi Sound Effect
Multitask with the split-screen feature and customize your audio experience.

Figure 6.4.1: Split Screen and Sound Equalizer. This image demonstrates the split-screen capability, showing navigation on one side and music playback on the other. It also highlights the audio equalizer interface, allowing users to fine-tune sound settings for a personalized listening experience.
- Split Screen: To activate, open an application, then long-press the recent apps button or drag an app to one side of the screen (depending on Android version) to open another app alongside it. This allows simultaneous use of navigation and music, for example.
- HiFi Sound Effect (EQ): Access the Equalizer settings from the audio application or system settings. Adjust frequency bands and select from preset sound modes (e.g., Pop, Rock, Jazz) to optimize your audio experience.
6.5 Backup Camera & Steering Wheel Control
Enhance parking safety with a backup camera and control the stereo conveniently from your steering wheel.

Figure 6.5.1: Backup Camera and Steering Wheel Control. This image shows the automatic display of the backup camera feed when the vehicle is in reverse, complete with parking guidelines. It also illustrates the process of configuring steering wheel controls, allowing users to map vehicle buttons to stereo functions.
- Backup Camera: If an AHD backup camera is connected and wired correctly to the reverse light, the stereo will automatically display the camera feed when the vehicle is shifted into reverse gear.
- Steering Wheel Control (SWC): If your vehicle has original steering wheel buttons, the included Canbus box (if applicable) or the system's SWC learning function allows you to map these buttons to control the stereo (e.g., volume, track skip, mode). Access SWC settings in the system menu to configure.
7. Maintenance
- Cleaning: Use a soft, dry cloth to clean the screen and unit. For stubborn smudges, a slightly damp cloth with a mild, non-abrasive cleaner can be used, then wipe dry immediately. Do not use harsh chemicals or abrasive materials.
- Software Updates: Periodically check for system updates via the Wi-Fi connection in the system settings. Updates can improve performance and add new features.
- Data Backup: Regularly back up important data or settings if applicable, especially before major software updates.
8. Troubleshooting
| Problem | Possible Cause | Solution |
|---|---|---|
| Unit does not power on. | Incorrect wiring; Blown fuse; Vehicle battery disconnected. | Check power connections and fuses. Ensure vehicle battery is connected. |
| No sound. | Volume too low; Mute activated; Speaker wires disconnected; Incorrect audio settings. | Increase volume. Check mute status. Verify speaker wiring. Adjust audio output settings. |
| GPS signal not found. | GPS antenna improperly connected or positioned; Obstruction. | Ensure GPS antenna has a clear view of the sky and is securely connected. |
| Bluetooth not connecting. | Bluetooth off on phone/stereo; Device not in pairing mode; Interference. | Ensure Bluetooth is enabled on both devices. Put stereo in pairing mode. Try restarting both devices. |
| CarPlay/Android Auto not starting. | Incorrect app on phone; USB cable issue (for wired); Bluetooth/Wi-Fi issue (for wireless). | Verify correct app is installed. Use a high-quality USB cable. Check Bluetooth/Wi-Fi connection. |
| Steering Wheel Controls not working. | Canbus box not connected; SWC not configured. | Ensure Canbus box is correctly installed. Go to SWC settings and perform the learning function. |
If problems persist after attempting these solutions, please contact customer support.
9. Specifications
| Feature | Detail |
|---|---|
| Model Number | JIAQI-QJ1234X-HWC-06 |
| Operating System | Android 13 |
| RAM | 4GB |
| ROM | 64GB |
| Screen Size | 10 inches |
| Resolution | 1024x600 |
| Material | Plastic, Metal |
| Product Dimensions | 29 x 22 x 13 cm |
| Item Weight | 1.9 kg |
| Vehicle Fitment | Peugeot 208, 2008 (2012-2018) |
10. Warranty and Support
For warranty information, please refer to the terms and conditions provided at the time of purchase or contact your retailer. For technical support, troubleshooting assistance, or inquiries regarding your Surakey Android Car Stereo, please contact the manufacturer or your point of purchase.
Please have your model number (JIAQI-QJ1234X-HWC-06) and purchase details ready when contacting support.
Ask a question about this manual
Ask about setup, troubleshooting, compatibility, parts, safety, or missing instructions. Manuals+ will review the question and use this page’s manual context to help answer it.