1. Introduction
This manual provides essential instructions for the safe operation, assembly, maintenance, and troubleshooting of your Generic Monster Scooter X15. Please read this manual thoroughly before first use to ensure proper function and to prevent injury or damage.

Image 1.1: Overview of the Generic Monster Scooter X15, featuring its robust design, large off-road tires, and adjustable seat.
2. Safety Information
Operating an electric scooter carries inherent risks. Adhere to the following safety guidelines to minimize potential hazards:
- Always wear a helmet and appropriate protective gear, including knee and elbow pads, and sturdy footwear.
- Observe local laws and regulations regarding electric scooter use, including age restrictions and traffic rules.
- Perform a pre-ride inspection: Check brakes, tire pressure, and ensure all fasteners are secure.
- Do not ride in adverse weather conditions such as heavy rain, snow, or ice.
- Avoid riding under the influence of alcohol or drugs.
- Maintain a safe speed and distance from other vehicles and pedestrians.
- Maximum weight capacity is 150 kg. Do not exceed this limit.
- Be aware of your surroundings and potential obstacles.
3. Package Contents
Verify that all items are present in the package:
- Monster Scooter X15 (Main Unit)
- Charger
- User Manual
- NFC Key Cards (Quantity: 2)
- Assembly Tools (if applicable, not specified but common)

Image 3.1: Included NFC key cards for scooter activation.
4. Setup and Initial Assembly
Follow these steps for initial setup:
- Unpack the Scooter: Carefully remove all components from the packaging.
- Handlebar Installation: Attach the handlebars to the steering column. Ensure all bolts are securely tightened.
- Seat Installation (if applicable): If your model includes a seat, attach it to the designated post and secure it. Adjust the height for comfortable riding.
- Initial Charge: Before first use, fully charge the scooter's battery. Connect the charger to the scooter's charging port and then to a power outlet. The charging indicator will change when fully charged (approximately 6-8 hours).
- Tire Pressure Check: Verify that the tires are inflated to the recommended pressure (refer to tire sidewall for details).
5. Operating Instructions
5.1 Powering On/Off
- To Power On: Tap an NFC key card against the designated NFC reader on the scooter. The display will illuminate.
- To Power Off: Tap the NFC key card again, or hold the power button (if present) for a few seconds. The scooter may also power off automatically after a period of inactivity.
5.2 Riding the Scooter
- Stand on the Deck: Place both feet firmly on the scooter deck.
- Initiate Movement: Push off with one foot to gain initial momentum.
- Accelerate: Gently press the throttle lever or button to engage the motor. Increase pressure for more speed.
- Braking: Use the brake levers on the handlebars to slow down or stop. The scooter is equipped with front and rear brakes for effective stopping.
- Steering: Lean gently in the direction you wish to turn and use the handlebars for guidance.

Image 5.1: Front section of the scooter, highlighting the dual headlights and robust front suspension.
5.3 Lighting System
- Headlights: Activate the high-light LED headlights for improved visibility during low-light conditions or at night.
- Brake Rear Lights: These lights illuminate automatically when the brakes are applied, signaling to others.
- LED Side Lights: Enhance the scooter's visibility from the sides, particularly useful for night riding.
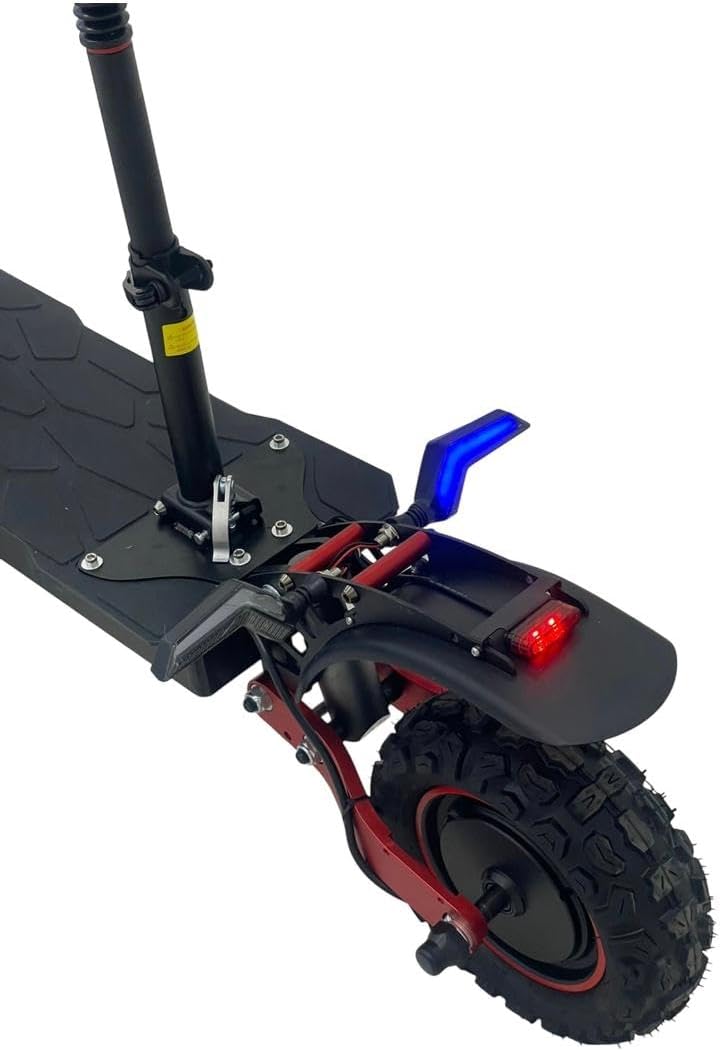
Image 5.2: Rear section of the scooter, showing the brake light, fender, and robust rear wheel.
6. Maintenance
Regular maintenance ensures the longevity and safe operation of your scooter.
- Battery Care:
- Charge the battery fully after each use.
- Avoid completely draining the battery.
- Store the scooter in a cool, dry place when not in use, and ensure the battery is partially charged (50-70%) if storing for extended periods.
- Tire Maintenance:
- Check tire pressure weekly and inflate to the recommended PSI.
- Inspect tires for wear, punctures, or damage.
- Brake System:
- Regularly check brake levers and cables for proper tension and function.
- Ensure brake pads are not excessively worn.
- General Cleaning:
- Clean the scooter with a damp cloth. Avoid using high-pressure water jets directly on electrical components.
- Keep the scooter free of dirt and debris.
- Fastener Checks: Periodically check all bolts and screws to ensure they are tight and secure.
7. Troubleshooting
| Problem | Possible Cause | Solution |
|---|---|---|
| Scooter does not power on. | Battery is depleted or NFC card not detected. | Charge the battery. Ensure NFC card is correctly tapped. |
| Reduced range or power. | Low battery charge, incorrect tire pressure, or heavy load. | Fully charge battery. Check and adjust tire pressure. Reduce load. |
| Brakes feel loose or ineffective. | Brake cables need adjustment or pads are worn. | Adjust brake cable tension. Inspect and replace worn brake pads. |
| Unusual noises during operation. | Loose components or debris in moving parts. | Inspect for loose fasteners. Clean any debris from wheels or motor area. If noise persists, contact support. |
8. Specifications
| Model Name | Monster Scooter X15 (Note: Some documentation may refer to X5) |
| Brand | Generic |
| Motor Capacity | 1800W High Torque Electric Motor (Built-in Rear Wheel) |
| Maximum Speed | 45-60 km/h (varies by load and road conditions) |
| Battery Type | 48V 18Ah Rechargeable Lithium Battery |
| Range per Charge | Up to 50-60 km (varies by speed, passenger weight, and road type) |
| Charging Time | Approximately 6-8 hours |
| Wheel Size | 11 inches (Note: Source data listed 11 Centimeters, which is likely a typo) |
| Tire Type | Pneumatic (Tubeless) Heavy Duty Non-Slip Rubber |
| Brake Type | Front & Rear Brake |
| Frame Material | Aluminum |
| Material Type | Metal |
| Maximum Weight Capacity | 150 Kilograms |
| Product Dimensions | 80L x 90W x 180H cm (80 x 90 x 180 cm) |
| Weight | 90 kg |
| Color | Black |
9. Warranty and Support
For warranty information, technical support, or service inquiries, please refer to the documentation provided at the time of purchase or contact the retailer/manufacturer directly. Keep your proof of purchase for warranty claims.


