NUZEZCJG TY310MCT
NUZEZCJG TY310MCT Rail Integrated Three-Phase Multifunctional Power Instrument Electricity Meter User Manual
Model: TY310MCT | Brand: NUZEZCJG
1. Introduction
This manual provides detailed instructions for the installation, operation, and maintenance of the NUZEZCJG TY310MCT Rail Integrated Three-Phase Multifunctional Power Instrument Electricity Meter. This device is designed for accurate measurement of electrical parameters in three-phase systems.
1.1 Package Contents
- 1 × NUZEZCJG TY310MCT Integrated Three-Phase Multifunctional Power Instrument Electricity Meter (100A variant)
2. Safety Information
Please read all safety instructions carefully before installation and operation. Failure to follow these instructions may result in electric shock, fire, or damage to the device.
- Installation and maintenance should only be performed by qualified personnel.
- Ensure power is disconnected before performing any wiring or maintenance.
- Do not operate the device in environments exceeding its specified operating temperature or humidity ranges.
- Verify all connections are secure and correct before applying power.
- Do not open the device casing unless specifically instructed by the manufacturer.
3. Key Features
- Integrated three-phase power measurement.
- Multifunctional display for various electrical parameters.
- LCD display for clear data readability.
- RS485 communication interface for remote monitoring.
- Rail-mounted design for easy installation.
- High accuracy class (0.5).
4. Technical Specifications
| Parameter | Value |
|---|---|
| Model Number | TY310MCT |
| Rated Voltage | 3*220/380V AC |
| Operating Frequency | 50Hz |
| Max Operating Current | 80A - 99A (for 100A variant) |
| Accuracy Class | 0.5 |
| Phase | Three Phase |
| Display Type | LCD Display |
| Communication Interface | RS485 (MODBUS-RTU) |
| Normal Operating Temperature | -10°C to +45°C |
| Dimensions (L*W*H) | 106mm * 56mm * 89mm |
| Item Weight | 50 Grams |
5. Installation and Wiring
The TY310MCT meter is designed for standard DIN rail mounting. Ensure the mounting location is free from excessive vibration, moisture, and direct sunlight.
5.1 Mounting
- Securely attach a standard 35mm DIN rail in the desired location.
- Align the meter's mounting clips with the DIN rail and press firmly until it clicks into place.
5.2 Wiring Diagram
Refer to the diagram below for correct wiring connections. Ensure all power sources are disconnected before proceeding with wiring.

Figure 1: Rear view of the meter showing terminal blocks for power and communication wiring. Terminals are clearly labeled for L1, L2, L3, N, and RS485 A/B connections.
- Connect the three-phase voltage inputs (L1, L2, L3) and Neutral (N) to the corresponding terminals.
- Connect the current transformers (CTs) for each phase to the designated current input terminals.
- For RS485 communication, connect the A and B lines to the RS485 terminals on the meter.
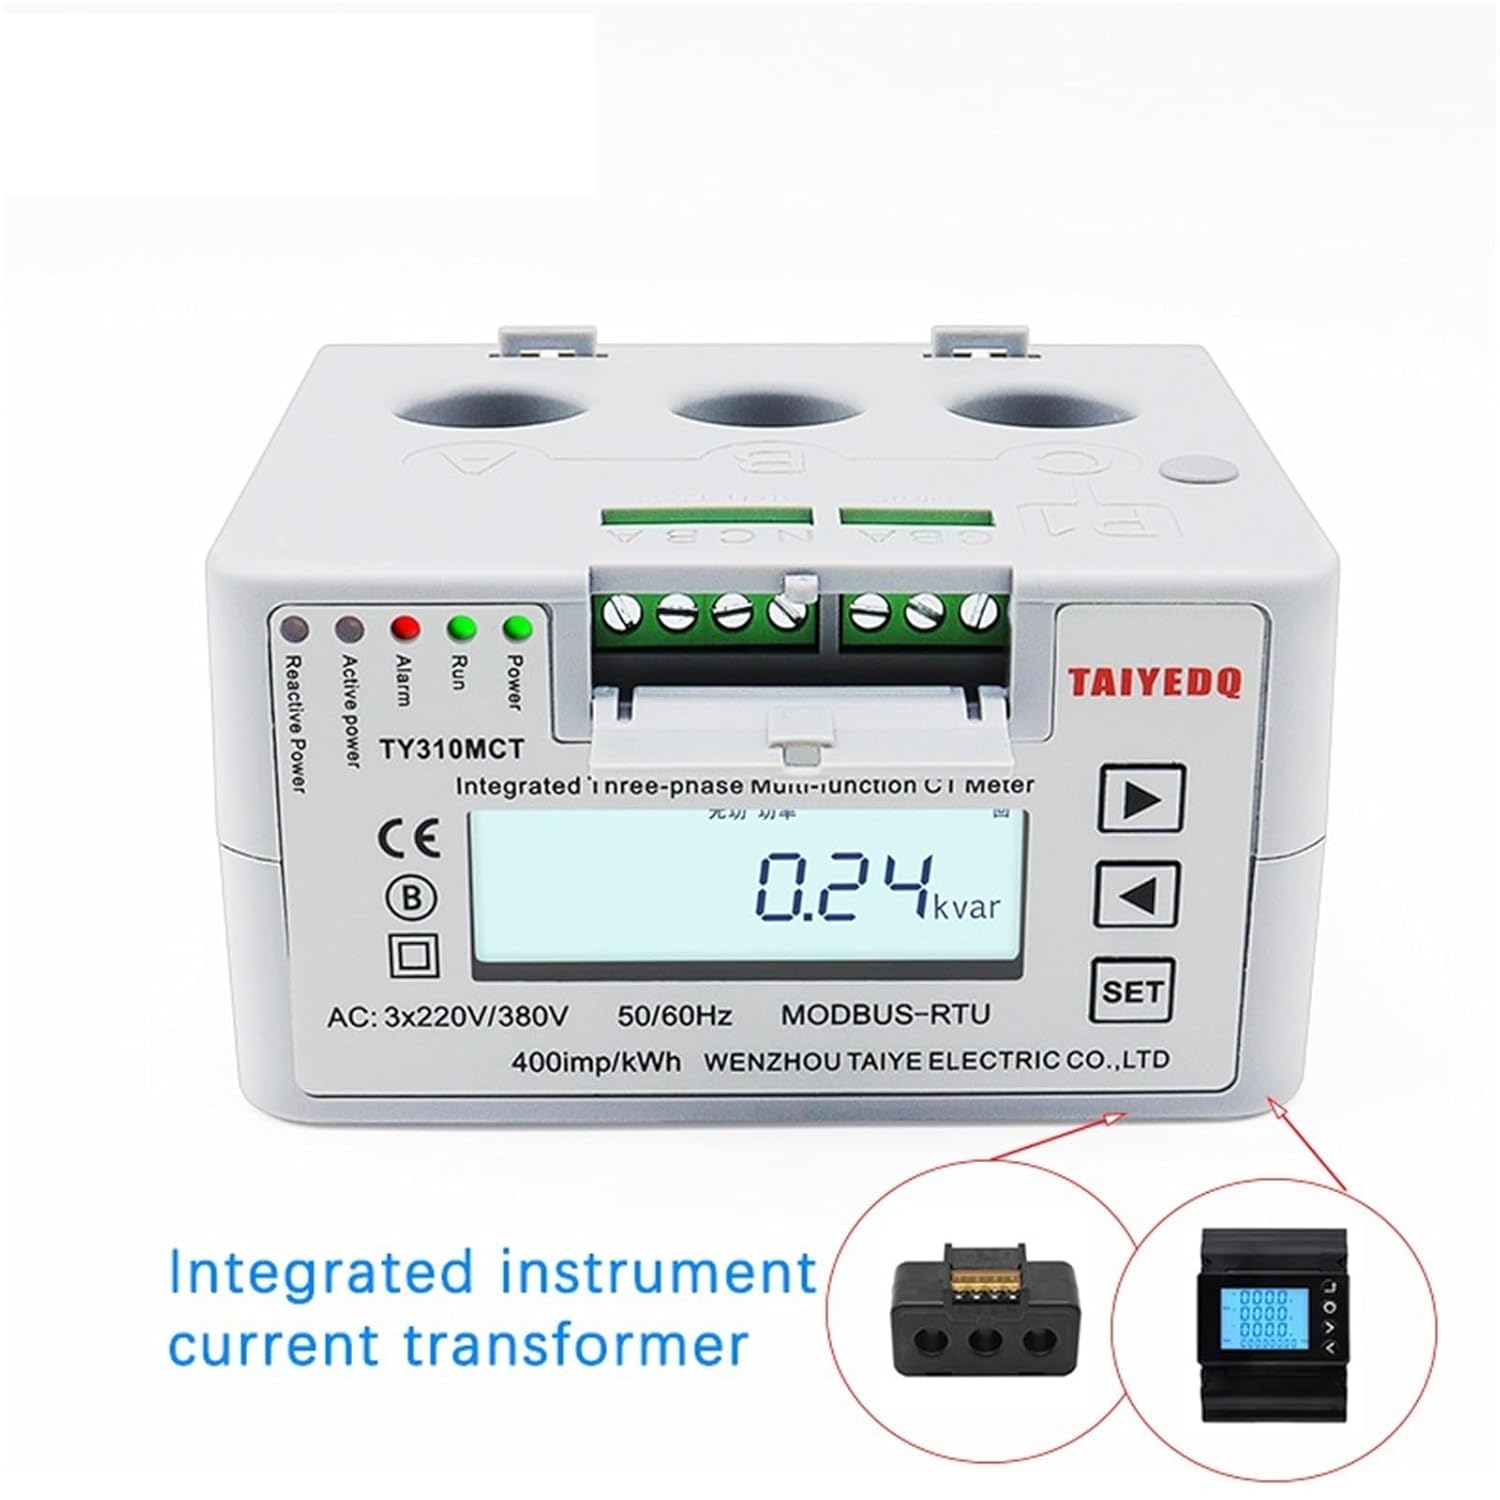
Figure 2: Front panel of the meter, highlighting the integrated current transformer design and the LCD screen displaying measurement data.
6. Operating Instructions
Once installed and powered, the meter will automatically begin displaying electrical parameters on its LCD screen.
6.1 Display Overview

Figure 3: The meter's front panel, illustrating the LCD screen which cycles through various electrical measurements, and the 'SET' and navigation buttons.
The LCD display cycles through various parameters such as voltage, current, active power, reactive power, power factor, frequency, and energy consumption (kWh).
- Power LED: Indicates the device is powered on.
- Run LED: Indicates normal operation.
- Alarm LED: Illuminates in case of an alarm condition.
- Reactive Power LED: Indicates reactive power flow.
- Active Power LED: Indicates active power flow.
6.2 Button Functions
- SET Button: Used to enter settings menus or confirm selections.
- Up/Down Arrows: Used to navigate through display parameters or adjust settings within menus.
Press the Up/Down arrow buttons to manually cycle through the displayed parameters. Press the SET button to access configuration menus (refer to advanced settings for detailed configuration).

Figure 4: An angled view of the meter, providing a clear perspective of the LCD screen and the 'SET' and navigation buttons for user interaction.
7. Maintenance
The NUZEZCJG TY310MCT meter is designed for minimal maintenance. However, periodic checks can ensure optimal performance and longevity.
- Cleaning: Use a soft, dry cloth to clean the exterior of the device. Do not use abrasive cleaners or solvents.
- Connection Checks: Periodically inspect wiring connections to ensure they remain tight and free from corrosion. Ensure power is off before checking connections.
- Environmental Conditions: Ensure the operating environment remains within the specified temperature and humidity ranges.
8. Troubleshooting
| Problem | Possible Cause | Solution |
|---|---|---|
| No display/No power | No power supply; Incorrect wiring; Blown fuse (external) | Check power connections; Verify wiring against diagram; Check external fuses. |
| Incorrect readings | Incorrect CT wiring; Incorrect CT ratio setting; Sensor malfunction | Verify CT wiring and polarity; Check CT ratio settings in the menu; Contact support if issue persists. |
| RS485 communication error | Incorrect wiring (A/B reversed); Incorrect communication settings (baud rate, parity); Device address conflict | Check RS485 wiring; Verify communication parameters; Ensure unique device addresses. |
| Alarm LED illuminated | Over-current; Over-voltage; Under-voltage; Other system fault | Check system parameters for abnormal conditions; Refer to advanced manual for specific alarm codes. |
9. Warranty Information
NUZEZCJG products are manufactured to high-quality standards. This product comes with a standard manufacturer's warranty against defects in materials and workmanship. Please retain your proof of purchase for warranty claims. Specific warranty terms and duration may vary by region. For detailed warranty information, please contact NUZEZCJG customer support.
10. Customer Support
If you encounter any issues or have questions regarding your NUZEZCJG TY310MCT meter that are not covered in this manual, please contact our customer support team.
For assistance, please visit the official NUZEZCJG website or refer to your purchase documentation for contact details.
Online Resources: NUZEZCJG Support Page
Ask a question about this manual
Ask about setup, troubleshooting, compatibility, parts, safety, or missing instructions. Manuals+ will review the question and use this page’s manual context to help answer it.