1. Introduction
This user manual provides essential information for the safe and efficient operation of the PABVRPYT TY310MCT Multifunctional Three-Phase Integrated Rail Electricity Meter. This device is designed for accurate measurement of electrical parameters in three-phase systems, featuring an integrated design for rail mounting and an LCD display for clear readings.
2. Safety Information
WARNING: Installation and maintenance of this device should only be performed by qualified personnel. Failure to follow these instructions may result in electric shock, fire, or serious injury.
- Always disconnect power before installation, wiring, or maintenance.
- Ensure all connections are secure and correctly wired according to local electrical codes.
- Do not operate the device if it appears damaged.
- Keep the device away from moisture and extreme temperatures.
3. Product Overview
The PABVRPYT TY310MCT is a compact and versatile electricity meter. Below are images illustrating its design and key features.

Figure 3.1: Front view of the TY310MCT meter, displaying the LCD screen, navigation buttons, and status indicators for active and reactive power, alarm, and run status. The model number TY310MCT is visible on the left.
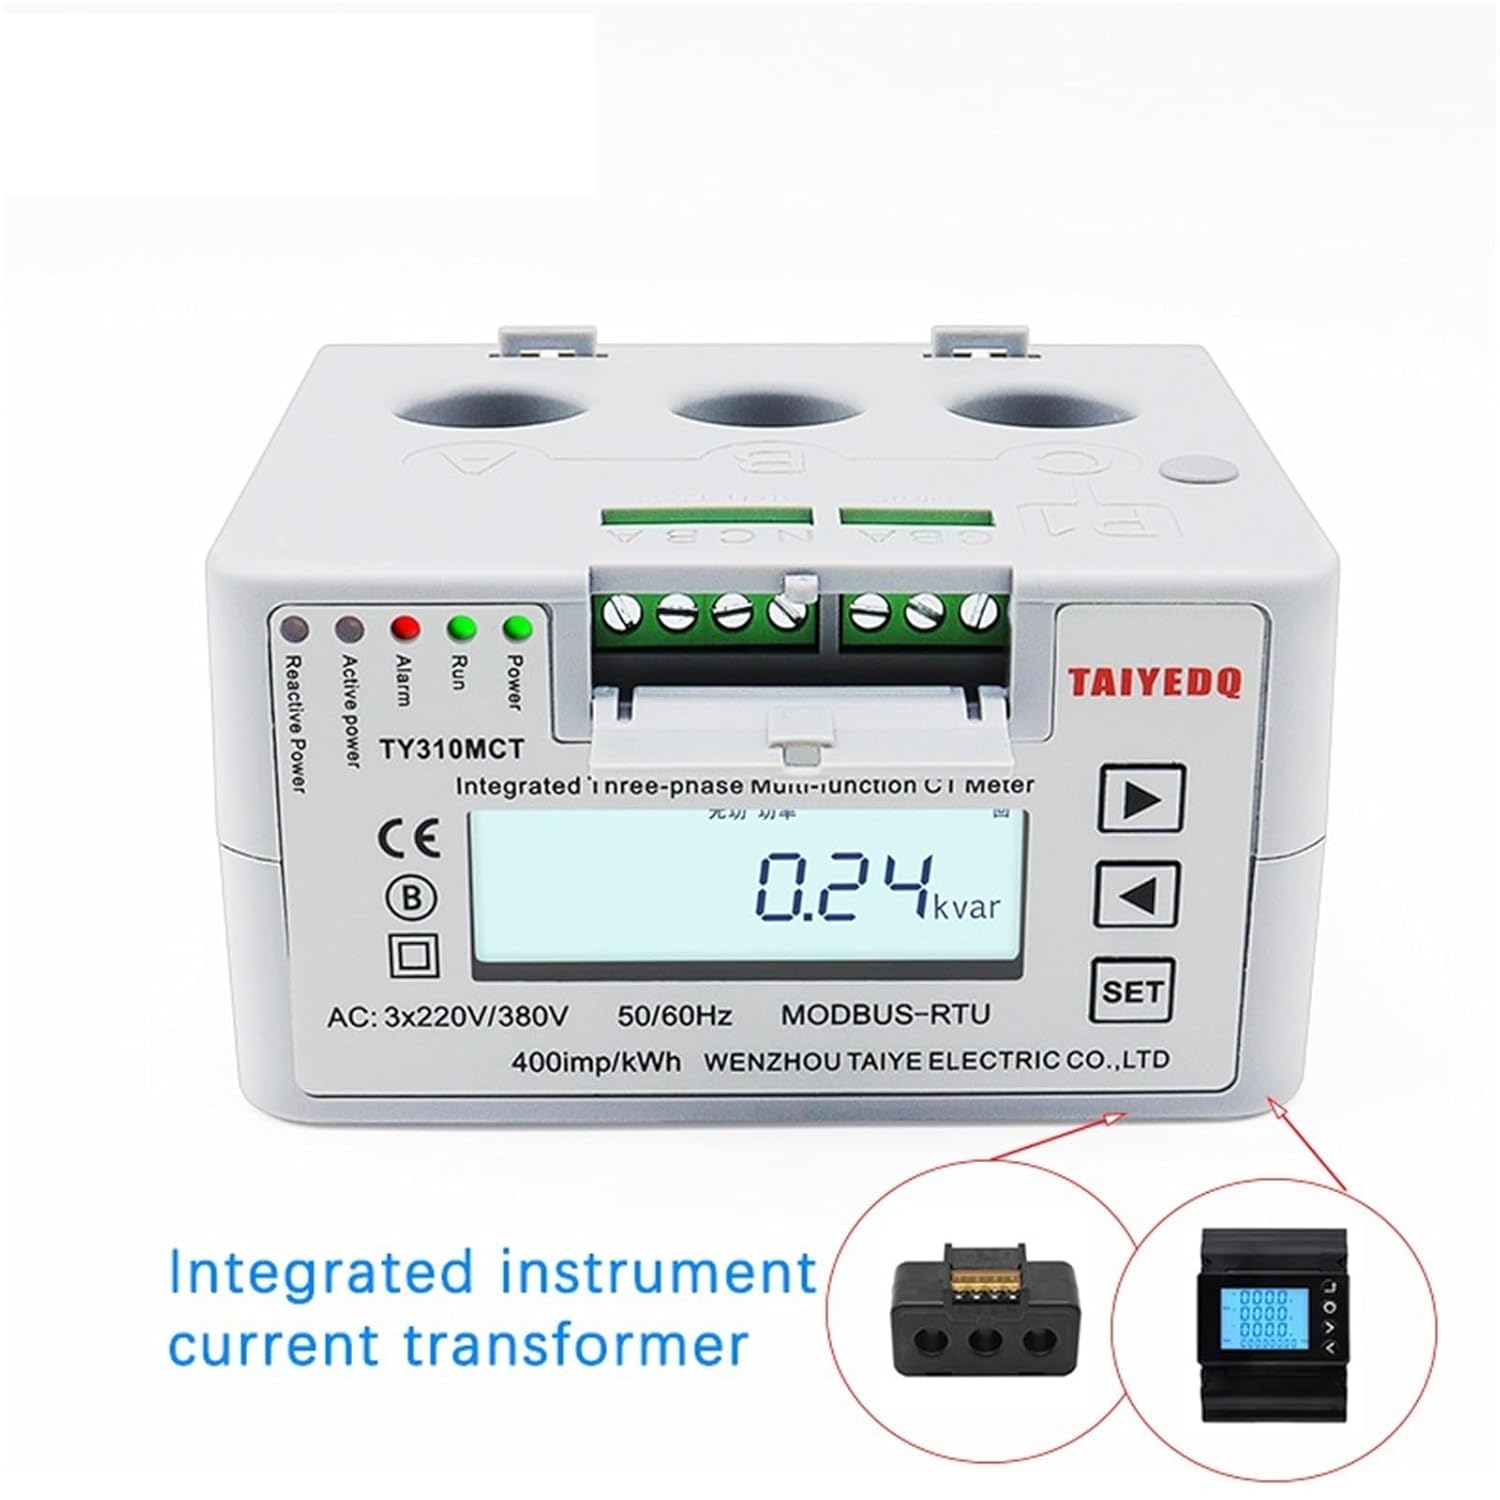
Figure 3.2: The meter with its front cover opened, exposing the integrated current transformer connections and the main display. This view highlights the compact design and the accessibility of the wiring terminals.

Figure 3.3: Side perspective of the meter, clearly showing the three circular openings for current transformer (CT) inputs, labeled P1, P2, and P3 (or A, B, C as per image text), which are essential for three-phase current measurement.

Figure 3.4: An angled view from the top, providing a comprehensive look at the meter's compact dimensions and the integrated rail-mounting mechanism, designed for easy installation in electrical panels.
4. Specifications
| Parameter | Value |
|---|---|
| Model Number | TY310MCT |
| Rated Voltage | 3*220/380V (AC) |
| Operating Frequency | 50 Hz |
| Max Operating Current | 80A - 99A (Note: Product title indicates 60A, refer to device markings for specific rating) |
| Operating Temperature | -10°C to +45°C |
| Communication Interface | RS485 |
| Display Type | LCD |
| Accuracy Class | 0.5 |
| Phase | Three-phase |
| Dimensions | 106 x 56 x 89 mm |
| Imp/kWh | 400imp/kWh |
5. Setup and Installation
This meter is designed for DIN rail mounting. Proper installation is crucial for accurate readings and safe operation. It is highly recommended that installation be performed by a certified electrician.
5.1 Mounting
- Ensure the mounting location is dry, well-ventilated, and free from excessive vibration or direct sunlight.
- Snap the meter onto a standard 35mm DIN rail. Ensure it is securely fastened.
5.2 Wiring
Refer to the wiring diagram provided on the device or in the packaging for precise connection details. General wiring steps include:
- Connect the three-phase voltage inputs (L1, L2, L3) and neutral (N) to the designated terminals.
- Pass the current-carrying conductors through the integrated current transformer (CT) holes (P1, P2, P3 or A, B, C) as indicated. Ensure correct directionality for accurate current measurement.
- If utilizing the RS485 communication interface, connect the A and B terminals to your communication network.
- Verify all connections are tight and insulated.
- Once wiring is complete, close the terminal cover securely.
6. Operation
After successful installation and power-up, the meter's LCD display will illuminate. The display cycles through various parameters or can be manually navigated.
6.1 Display Navigation
- Use the Up and Down arrow buttons (▲ and ▼) to scroll through different measurement parameters such as voltage, current, active power, reactive power, power factor, frequency, and total energy consumption (kWh).
- The SET button may be used to enter configuration menus or confirm selections, depending on the specific firmware version. Refer to the on-screen prompts.
6.2 Status Indicators
- Run: Indicates the meter is operating normally.
- Alarm: Illuminates if an abnormal condition or error is detected. Consult the troubleshooting section.
- Active Power / Reactive Power: These LEDs flash to indicate energy consumption.
7. Maintenance
The PABVRPYT TY310MCT meter requires minimal maintenance. Regular checks can help ensure its longevity and accuracy.
- Cleaning: Gently wipe the display and casing with a soft, dry cloth. Do not use abrasive cleaners or solvents.
- Inspection: Periodically inspect wiring connections for tightness and signs of wear or damage. Ensure the meter is free from dust accumulation.
- Environment: Ensure the operating environment remains within the specified temperature and humidity ranges.
8. Troubleshooting
If you encounter issues with your meter, refer to the following common problems and solutions:
| Problem | Possible Cause | Solution |
|---|---|---|
| No display / Meter off | No power supply; Incorrect wiring; Internal fault. | Check power source and circuit breaker. Verify wiring connections. If problem persists, contact support. |
| Incorrect readings | Incorrect CT wiring direction; Loose connections; Meter calibration issue. | Ensure CTs are installed in the correct direction. Check all wiring for tightness. If readings are consistently off, professional calibration may be required. |
| Alarm LED illuminated | Overload; Wiring error; Internal fault. | Check for overcurrent conditions. Re-verify wiring. If no obvious cause, contact support. |
| RS485 communication failure | Incorrect wiring; Address conflict; Software issue. | Verify RS485 A/B connections. Check device address settings. Ensure communication software is correctly configured. |
For issues not listed above or if solutions do not resolve the problem, please contact PABVRPYT customer support.
9. Warranty and Support
Specific warranty terms and conditions for the PABVRPYT TY310MCT meter are typically provided with the product packaging or available from the point of purchase. Please retain your proof of purchase for warranty claims.
For technical support, troubleshooting assistance, or warranty inquiries, please contact PABVRPYT customer service through their official website or the contact information provided with your product.