1. Product Overview
The Handstar TH810 is an advanced 6-in-1 multifunction wall scanner designed for accurate detection of various materials behind walls. It features an upgraded chip and automatic detection mode, eliminating the need for manual mode switching. This device is capable of locating wooden studs, magnetic metals, non-magnetic metals, and live AC wires, providing essential information for safe drilling and renovation projects.
The scanner incorporates a backlit LCD display and audio alarms to provide clear indications of detected objects, their depth, and signal strength. Its ergonomic design ensures comfortable handling during extended use.

Image 1.1: Front view of the Handstar TH810 Stud Finder Wall Scanner, showcasing its orange and black design with an LCD screen.
2. Setup
2.1 Battery Installation
The Handstar TH810 requires a 9V battery (not included) for operation. To install the battery:
- Locate the battery compartment cover on the back of the device.
- Slide or unclip the cover to open it.
- Insert a new 9V battery, ensuring correct polarity (+/-).
- Close the battery compartment cover securely.
2.2 Initial Calibration
Before each use, the device must be calibrated on the wall surface. This automatic calibration ensures accurate readings.
- Press the Power Button to turn on the device.
- Place the stud finder flat against the wall surface where you intend to scan. Ensure there are no objects or hands between the device and the wall.
- The device will automatically calibrate. The LCD display will show a calibration indicator (CAL) and then indicate readiness for scanning.
- Do not move the device during calibration.

Image 2.1: Visual guide for calibration, scanning, and pinpointing the location of objects behind a wall.
3. Operating Instructions
3.1 General Scanning Procedure
After successful calibration, follow these steps to scan:
- Keep the device flat against the wall.
- Slowly slide the stud finder horizontally across the surface.
- Observe the LCD display and listen for audio alerts.
- When an object is detected, the display will show indicators for stud edges, center, and signal strength. An audio alarm will also sound.
- Mark the detected edges and center for precise location.
3.2 Detection Modes and Depths
The TH810 features an automatic detection mode that seamlessly switches between material types. The device can detect:
- Wood Studs: Up to 1.5 inches (38mm) deep.
- Magnetic Metals: Up to 3.94 inches (100mm) deep.
- Non-magnetic Metals: Up to 3.15 inches (80mm) deep.
- Live AC Wires: Up to 2 inches (51mm) deep.

Image 3.1: Overview of the 6-in-1 detection modes and their maximum detection depths.
3.3 LCD Display Indications
The backlit LCD provides comprehensive visual feedback:
- Central Indication: An arrow or icon pointing to the center of the detected object.
- Stud Edge Indication: Icons indicating the left and right edges of a stud.
- Metal Depth Indication: Displays the approximate depth of detected metal objects.
- Signal Strength Ratio: A percentage or bar graph indicating the strength of the detected signal.
- Magnetic and Non-magnetic Indication: Icons differentiating between magnetic and non-magnetic metals.
- AC Warning Symbol: An icon indicating the presence of live AC wires.
- Low Battery Symbol: Indicates when the battery needs replacement.
- CAL Calibration Indication: Shows when the device is calibrating or calibrated.
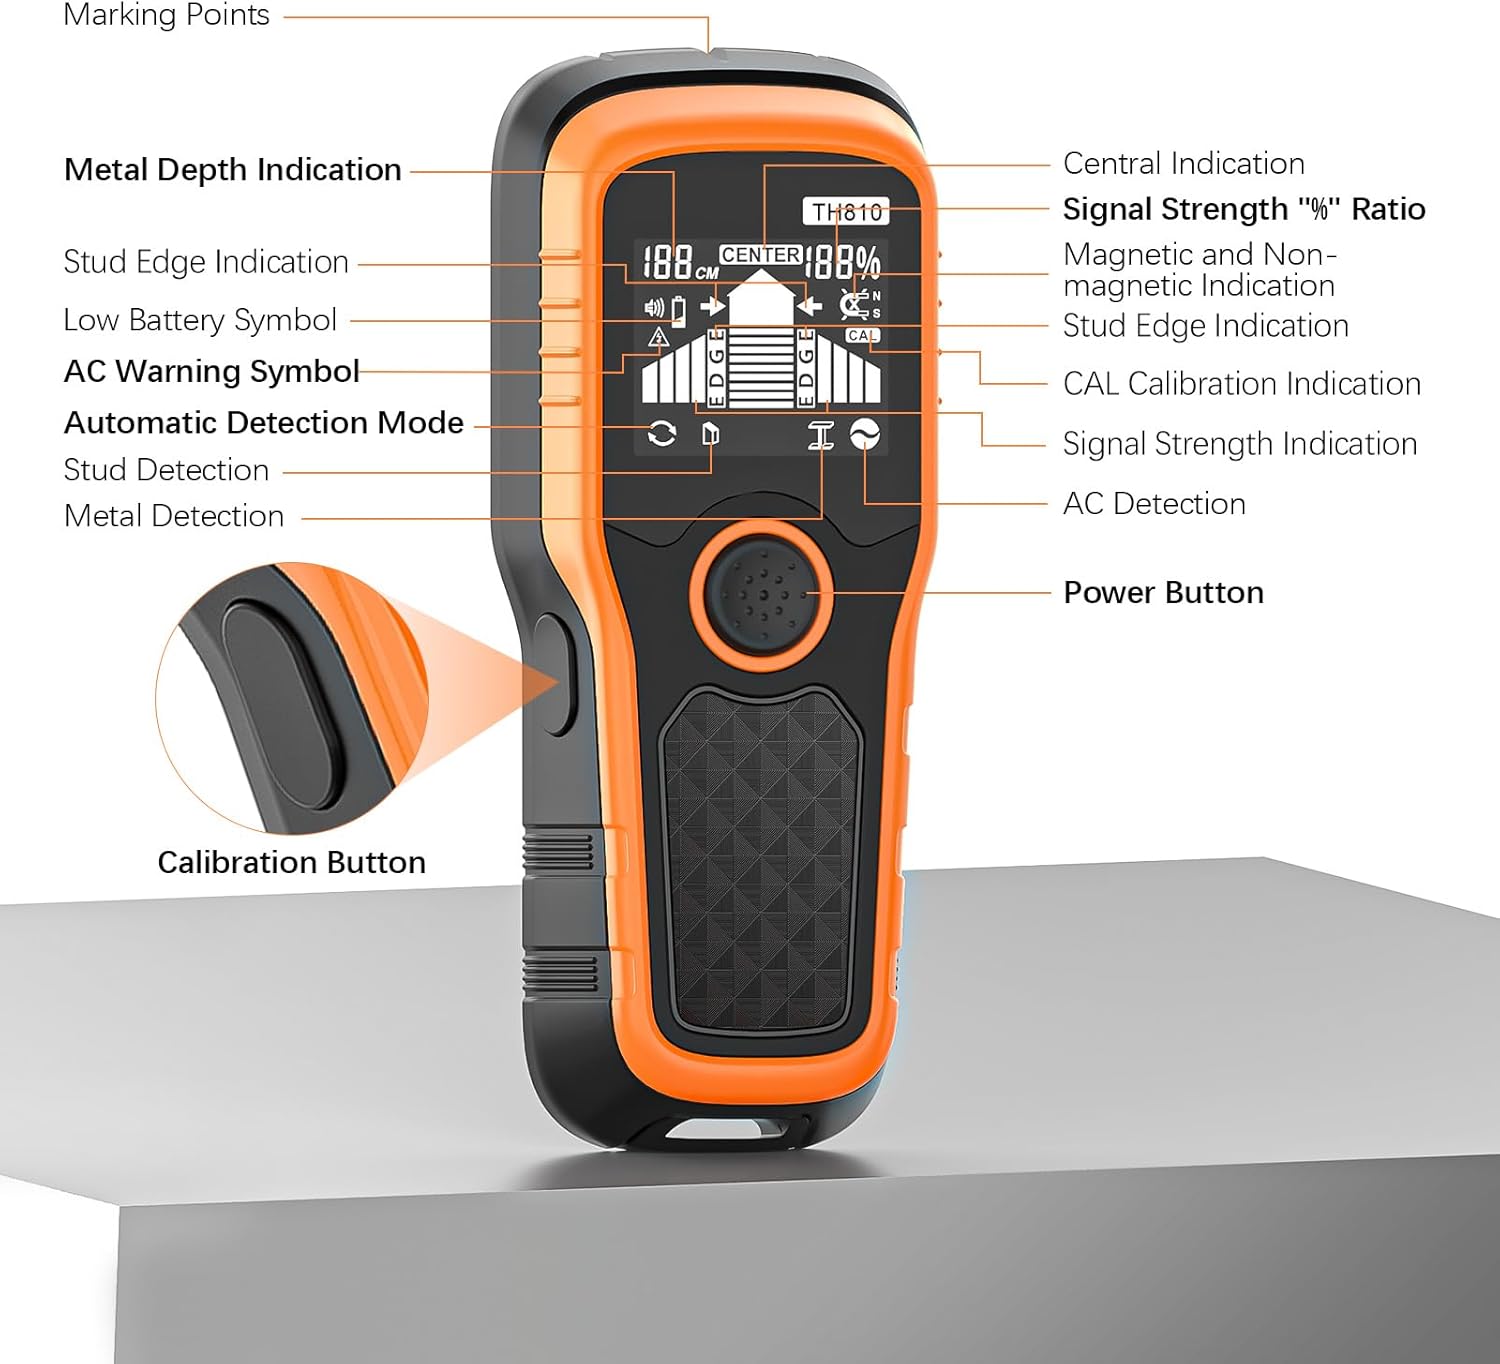
Image 3.2: Labeled diagram of the Handstar TH810's display and controls.
4. Maintenance
4.1 Cleaning
To maintain the device's performance and longevity:
- Wipe the exterior of the device with a soft, dry cloth.
- Do not use abrasive cleaners, solvents, or immerse the device in water.
4.2 Storage
When not in use:
- Store the device in a cool, dry place, away from direct sunlight and extreme temperatures.
- If the device will not be used for an extended period, remove the 9V battery to prevent leakage and damage.
5. Troubleshooting
If you encounter issues with your Handstar TH810, refer to the following common problems and solutions:
- Inaccurate or inconsistent readings:
- Ensure the device is calibrated correctly by placing it flat on the wall before scanning.
- Scan slowly and consistently across the surface. Rapid movement can affect accuracy.
- Check the wall material. Very thick or uneven surfaces may reduce detection depth or accuracy.
- Re-calibrate the device in a different spot on the wall.
- No detection or device not turning on:
- Check the 9V battery. Replace it if the low battery indicator is shown or if the device does not power on.
- Ensure the device is held flat against the wall surface during calibration and scanning.
- False positives or constant alarms:
- Re-calibrate the device in an area of the wall that is known to be clear of objects.
- Move the device slower during scanning.
- Ensure your hand is not covering the sensor area.
6. Specifications
| Feature | Specification |
|---|---|
| Model Number | TH810 |
| Detection Modes | 6-in-1 (Auto, Wood, Metal, Deep Metal, AC, Signal Scan) |
| Max. Wood Stud Detection Depth | 1.5 inches (38mm) |
| Max. Magnetic Metal Detection Depth | 3.94 inches (100mm) |
| Max. Non-magnetic Metal Detection Depth | 3.15 inches (80mm) |
| Max. Live AC Wire Detection Depth | 2 inches (51mm) |
| Power Source | 9V Battery (not included) |
| Display | Backlit LCD |
| Audio Alarm | Yes |
| Item Weight | 8.4 ounces |
| Product Dimensions | 7.09 x 2.76 x 1.18 inches |
| Material | Plastic |
7. Warranty Information
Specific warranty details for the Handstar TH810 Stud Finder Wall Scanner are typically provided with your purchase or can be found on the official Handstar website. Please refer to the documentation included in your product packaging or visit the manufacturer's website for the most current warranty terms and conditions.
8. Support
For technical assistance, product inquiries, or further support regarding your Handstar TH810 Stud Finder Wall Scanner, please contact Handstar customer service. Contact information can usually be found on the product packaging, the official Handstar website, or through your retailer.


