1. Product Overview
The Acegeek Stratus Glass Mid-Tower PC Case (AG-STRATUS-GLASS-BK) is designed for computer enthusiasts and gamers, offering a blend of aesthetics and functionality. It features a tempered glass side panel for showcasing internal components and a mesh front panel for optimal airflow. This manual provides essential information for assembly, operation, and maintenance.
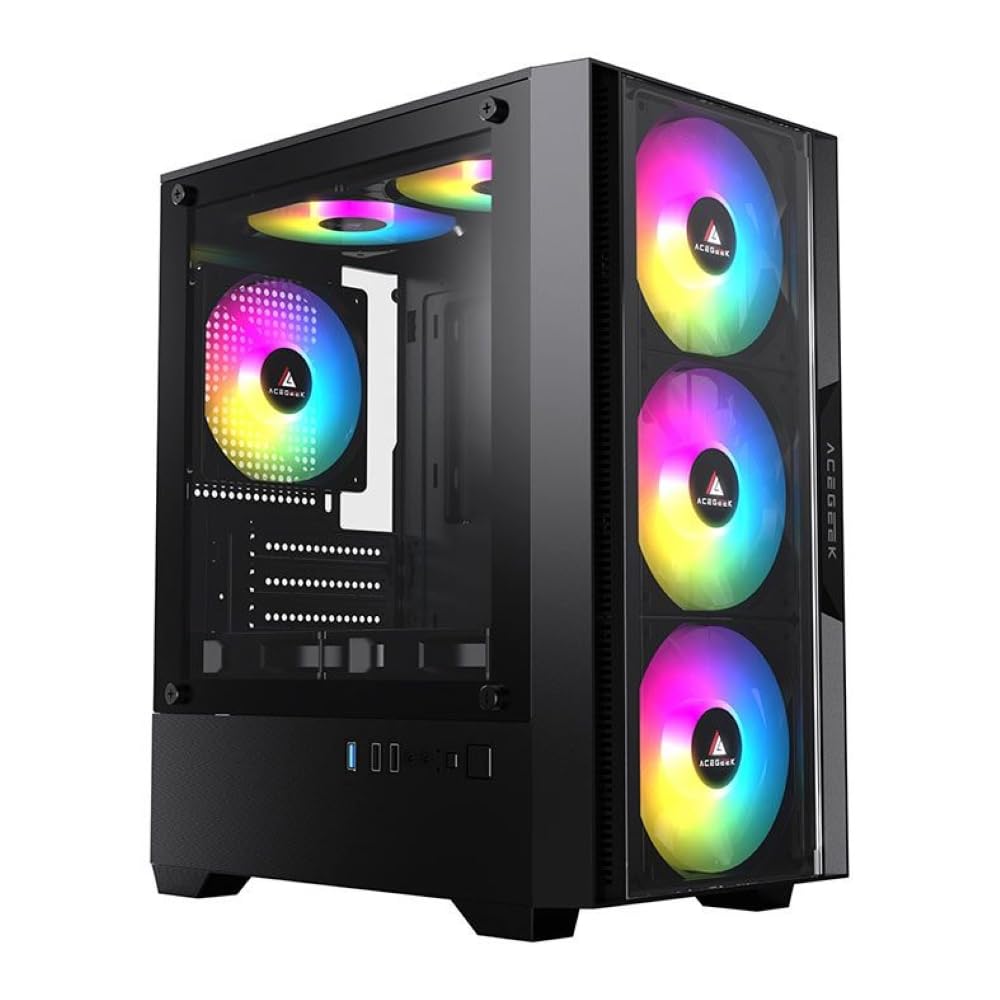
Figure 1: Front view of the Acegeek Stratus Glass PC case, showcasing the tempered glass panel and three RGB fans.
Key Features:
- Material: Durable construction with ABS, Mesh, and Tempered Glass panels. The frame is metal.
- Motherboard Support: Compatible with Micro-ATX, ITX, ATX, and Mini-ITX motherboards.
- Drive Bays: Flexible storage options with 1 x HDD + 1 x SSD or 2 x SSD configurations.
- Expansion Slots: 5 slots available for various expansion cards.
- Cooling System: Extensive fan support with mounts for up to 3x 120mm fans in the front, 2x 120mm on top, 1x 120mm in the rear, and 2x 120mm on the bottom.
- Water Cooling: Supports a 240mm water cooler on the top, provided memory height is within 28mm.
- Component Clearance: Maximum CPU cooler height of 165mm and VGA length of 280mm.
- Cable Management: 20mm space behind the motherboard tray for organized cable routing.
- Power Supply: Supports power supplies up to 190mm in length.
2. Specifications
| Feature | Detail |
|---|---|
| Brand | Acegeek |
| Model Name | AG-STRATUS-GLASS-BK |
| Case Type | Mid Tower |
| Material | Metal (structure) + ABS + Tempered Glass |
| Motherboard Compatibility | ATX, Micro-ATX, Mini-ITX, ITX |
| Drive Bays | 1 x HDD + 1 x SSD or 2 x SSD |
| Expansion Slots | 5 |
| Front Fan Support | 3 x 120 mm |
| Top Fan Support | 2 x 120 mm |
| Rear Fan Support | 1 x 120 mm |
| Bottom Fan Support | 2 x 120 mm |
| Water Cooler Support (Top) | 240 mm (memory height within 28 mm) |
| Max CPU Cooler Height | 165 mm |
| Max VGA Length | 280 mm |
| Cable Management Space | 20 mm |
| Max PSU Length | 190 mm |
| Cooling Method | Air |
| Special Features | Tempered glass side panel, front dust filter |
| Dimensions (D x W x H) | 35.8 cm x 27.5 cm x 36 cm |

Figure 2: Dimensions of the Acegeek Stratus Glass Mid-Tower PC Case.
3. Setup and Installation
Follow these steps to install your components into the Acegeek Stratus Glass PC case. Ensure your system is powered off and unplugged before beginning any installation.
3.1 Preparing the Case
- Remove Side Panels: Carefully unscrew the thumbscrews on the rear of the case and remove the tempered glass side panel and the solid steel side panel. Place them on a soft, flat surface to prevent scratches.
- Accessory Kit: Locate the accessory kit inside the case, which contains screws, standoffs, and cable ties.

Figure 3: Rear-side view showing access to the cable management area.
3.2 Motherboard Installation
- Install Standoffs: Ensure the correct standoffs are installed for your ATX, Micro-ATX, Mini-ITX, or ITX motherboard. The case may have pre-installed standoffs; adjust as necessary.
- Position Motherboard: Carefully place your motherboard onto the standoffs, aligning the screw holes.
- Secure Motherboard: Use the provided screws to secure the motherboard to the motherboard tray. Do not overtighten.

Figure 4: Interior view highlighting the motherboard tray and drive mounting points.
3.3 Power Supply Unit (PSU) Installation
- Mount PSU: Slide the PSU into its designated compartment at the bottom rear of the case.
- Secure PSU: Align the PSU with the screw holes on the rear of the case and secure it with screws.
3.4 Storage Drive Installation
The case supports 1 x HDD + 1 x SSD or 2 x SSD. Locate the drive mounting points behind the motherboard tray or in the PSU shroud area.
- SSD Installation: Secure 2.5-inch SSDs using the provided screws in the designated mounting locations.
- HDD Installation: Secure 3.5-inch HDDs in the drive cage, typically located near the PSU shroud.
3.5 Graphics Card (VGA) and Expansion Card Installation
- Remove Slot Covers: Remove the necessary expansion slot covers from the rear of the case.
- Insert Card: Carefully insert your graphics card or other expansion cards into the appropriate PCIe slots on the motherboard.
- Secure Card: Secure the card with screws to the case.
3.6 Fan and Radiator Installation
The case offers versatile cooling options. Fans are not included and must be purchased separately.
- Front: Up to 3 x 120mm fans.
- Top: Up to 2 x 120mm fans or a 240mm radiator (ensure memory clearance).
- Rear: 1 x 120mm fan.
- Bottom: Up to 2 x 120mm fans.
- Mount Fans/Radiator: Align fans or radiators with the screw holes in the desired locations and secure them.
- Connect Cables: Connect fan power cables to your motherboard or fan controller.

Figure 5: Front panel fan mounting locations (fans not included).

Figure 6: Top panel fan/radiator mounting locations.
3.7 Cable Management
Utilize the 20mm space behind the motherboard tray and the cable routing cutouts to organize cables. This improves airflow and aesthetics.
- Route Cables: Pass power and data cables through the cutouts to the back of the motherboard tray.
- Secure Cables: Use the provided cable ties to bundle and secure cables, keeping them away from moving parts and airflow paths.
3.8 Front Panel Connections
Connect the front panel cables (USB, audio, power switch, reset switch, LED indicators) to the corresponding headers on your motherboard. Refer to your motherboard manual for exact header locations.
4. Operating Instructions
Once all components are installed and connected, replace the side panels and power on your system.
- Power On: Press the power button on the top panel of the case.
- Initial Boot: Monitor your system's boot process. If issues arise, refer to the Troubleshooting section.
- Fan Control: If you have installed RGB fans or a fan controller, configure their settings via your motherboard's BIOS/UEFI or dedicated software.
Figure 7: Front panel with power button and I/O ports.
5. Maintenance
Regular maintenance helps ensure optimal performance and longevity of your PC components.
- Dust Filters: The case features a front dust filter. Regularly remove and clean it to maintain good airflow and prevent dust buildup inside the case.
- Interior Cleaning: Periodically open the side panels and use compressed air to remove dust from fans, heatsinks, and other components.
- Tempered Glass: Clean the tempered glass panel with a soft, lint-free cloth and a non-abrasive glass cleaner. Avoid harsh chemicals.
- Cable Management: Periodically check cable routing to ensure no cables are obstructing airflow or fan operation.
6. Troubleshooting
This section addresses common issues you might encounter during setup or operation.
6.1 System Does Not Power On
- Power Connections: Ensure the PSU is properly connected to the wall outlet and the power switch on the PSU is in the 'ON' position.
- Motherboard Power: Verify that the 24-pin ATX power connector and the CPU power connector (4/8-pin) are securely seated on the motherboard.
- Front Panel Headers: Check that the power switch cable from the front panel is correctly connected to the motherboard's front panel header. Refer to your motherboard manual.
6.2 Fans Not Spinning / RGB Not Lighting Up
- Fan Connections: Ensure all fan power cables are securely connected to the motherboard fan headers or a fan controller.
- RGB Connections: If applicable, verify that RGB cables are correctly connected to the motherboard's RGB headers or a dedicated RGB controller.
- Software/BIOS Settings: Check your motherboard's BIOS/UEFI settings or any installed fan/RGB control software to ensure fans and lighting are enabled and configured correctly.
6.3 Poor Airflow / Overheating
- Dust Filters: Clean all dust filters, especially the front filter, to ensure unrestricted airflow.
- Fan Orientation: Verify that fans are installed with the correct orientation (intake/exhaust) to create effective airflow.
- Cable Management: Improve cable management to reduce obstructions to airflow within the case.
- Component Clearance: Ensure no components are blocking fan intakes or exhausts.
7. Warranty and Support
The Acegeek Stratus Glass Mid-Tower PC Case comes with a 12-month warranty from the date of purchase. This warranty covers manufacturing defects and material flaws under normal use.
The warranty does not cover:
- Damage caused by improper installation, misuse, abuse, or neglect.
- Damage caused by unauthorized modifications or repairs.
- Normal wear and tear.
- Cosmetic damage that does not affect functionality.
For warranty claims or technical support, please contact Acegeek customer service through their official website or the retailer where the product was purchased. Please have your proof of purchase and product model number (AG-STRATUS-GLASS-BK) ready.