Pikabike scooter
Pikabike Electric Scooter User Manual
Model: Scooter
Important Safety Information
Read all instructions carefully before operating the electric scooter. Failure to follow safety guidelines may result in serious injury or property damage.
- Always wear a helmet and appropriate safety gear (knee pads, elbow pads) when riding.
- Do not ride in wet conditions, heavy rain, or through puddles.
- Ensure all bolts and fasteners are tightened before each ride.
- Familiarize yourself with local laws and regulations regarding electric scooter use.
- Avoid riding on uneven terrain, steep slopes, or in heavy traffic.
- Do not exceed the maximum load capacity of 300 pounds.
- Keep hands and feet clear of moving parts.
Product Overview
The Pikabike Electric Scooter is designed for commuting and leisure, featuring a powerful motor, long-range battery, and comfortable riding experience. It includes a rear box for convenient storage.

Figure 1: The Pikabike Electric Scooter, showcasing its design and the versatile rear storage box, suitable for carrying pets or cargo.
Setup and Assembly
Your Pikabike Electric Scooter comes partially assembled. Follow these steps for final assembly:
- Unpack: Carefully remove all components from the packaging.
- Handlebar Installation: Unfold the handlebar stem and secure it in the upright position using the quick-release clamp. Ensure it clicks into place firmly.
- Seat Assembly: Attach the seat post to the scooter frame and adjust the height to your preference. Tighten the clamp securely.
- Rear Box Attachment: Mount the rear storage box onto the designated rack at the back of the scooter. Ensure it is securely fastened.
- Initial Charge: Fully charge the battery before first use. Refer to the "Charging the Battery" section for details.
- Pre-Ride Check: Inspect tire pressure, brake function, and ensure all connections are secure.
Operating Instructions
Powering On/Off
To power on the scooter, press and hold the power button on the display unit until the screen illuminates. To power off, press and hold the power button again until the display turns off.
Charging the Battery
The scooter is equipped with a 48V 15Ah (720WH) lithium battery. A full charge takes approximately 5-6 hours.
- Locate the charging port on the scooter.
- Connect the charger to the charging port, then plug the charger into a standard wall outlet.
- The charger indicator light will show charging status (typically red for charging, green for fully charged).
- Do not overcharge the battery. Disconnect the charger once charging is complete.

Figure 2: Illustration of the 48V 15Ah Lithium Battery, highlighting its 720WH capacity, 5-6 hour fast charging time, and up to 35 miles of range.
Speed Modes and Display
The intuitive LCD display provides real-time data and allows you to switch between three speed modes.
- The display shows battery level, current speed, PAS (Pedal Assist System) level, and cycling distance.
- Use the mode button to cycle through the three speed settings.
- The scooter can reach a maximum speed of 30 mph.

Figure 3: The scooter's intuitive control panel and LCD display, providing essential riding information at a glance.
Braking System
The scooter features a dual braking system for enhanced safety: disc brakes and electric brakes.
- Apply both brake levers simultaneously for optimal stopping power.
- Regularly check brake pads for wear and tear.

Figure 4: Overview of the scooter's dual braking system, combining electronic and mechanical disc brakes for reliable stopping.
Lighting System
For visibility and safety, the scooter is equipped with bright headlights, brake lights, and turn signals.
- Activate the headlight for night riding or low-light conditions.
- Use turn signals to indicate your direction to other road users.
- The brake light automatically illuminates when brakes are applied.
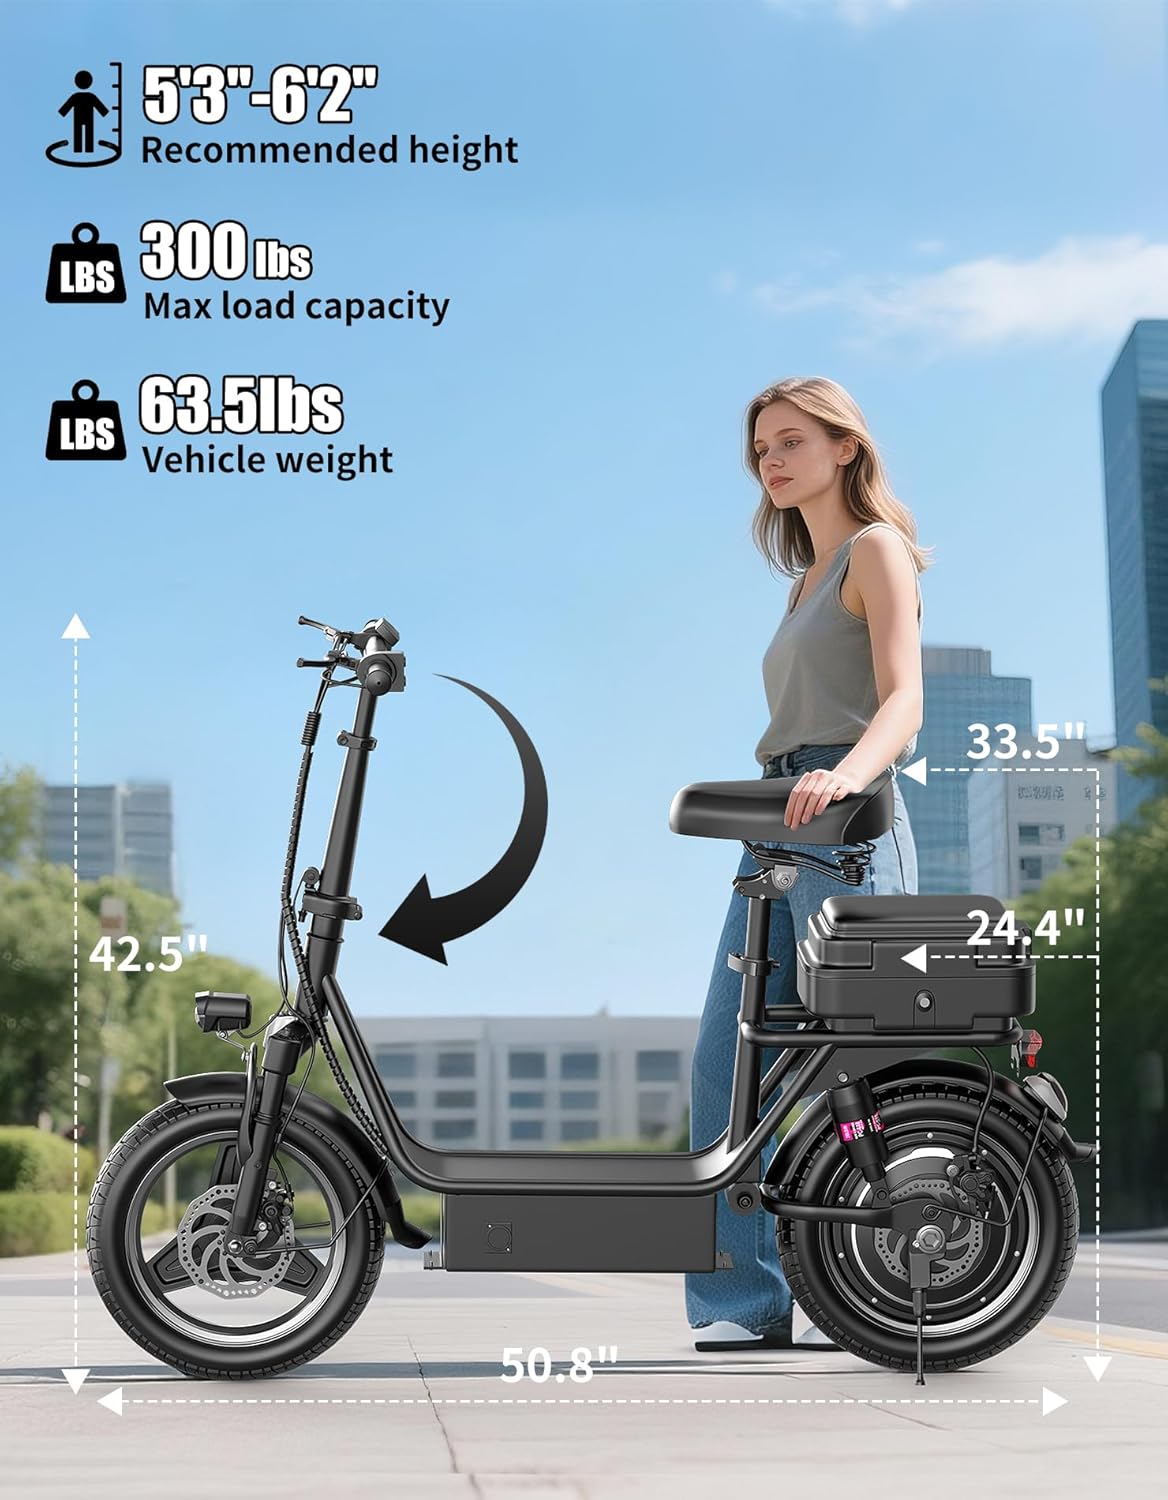
Figure 5: The scooter's comprehensive lighting system, ensuring visibility and safety during night rides.
Folding Mechanism
The scooter features a foldable design for easy storage and transport.
- Locate the folding latch on the handlebar stem.
- Release the latch and carefully fold the handlebars down towards the deck.
- Ensure the folding mechanism is securely locked when unfolded for riding.

Figure 6: The scooter's foldable design, allowing for compact storage and easy portability in car trunks or small spaces.
Using the Rear Box
The included rear box provides additional storage space for items, making it ideal for commuting, shopping, or traveling with small pets.
- Ensure the rear box is securely attached before placing items inside.
- Do not overload the rear box beyond its recommended weight capacity.

Figure 7: The scooter's rear box, designed to accommodate various items, including small pets or groceries, enhancing its utility for daily tasks.
Riding Tips
- Maintain a comfortable posture with both hands on the handlebars.
- Start at a low speed mode until you are comfortable with the scooter's handling.
- Be aware of your surroundings and anticipate potential hazards.
- Utilize the dual suspension and 14-inch pneumatic tires for a smooth ride over varied terrains.
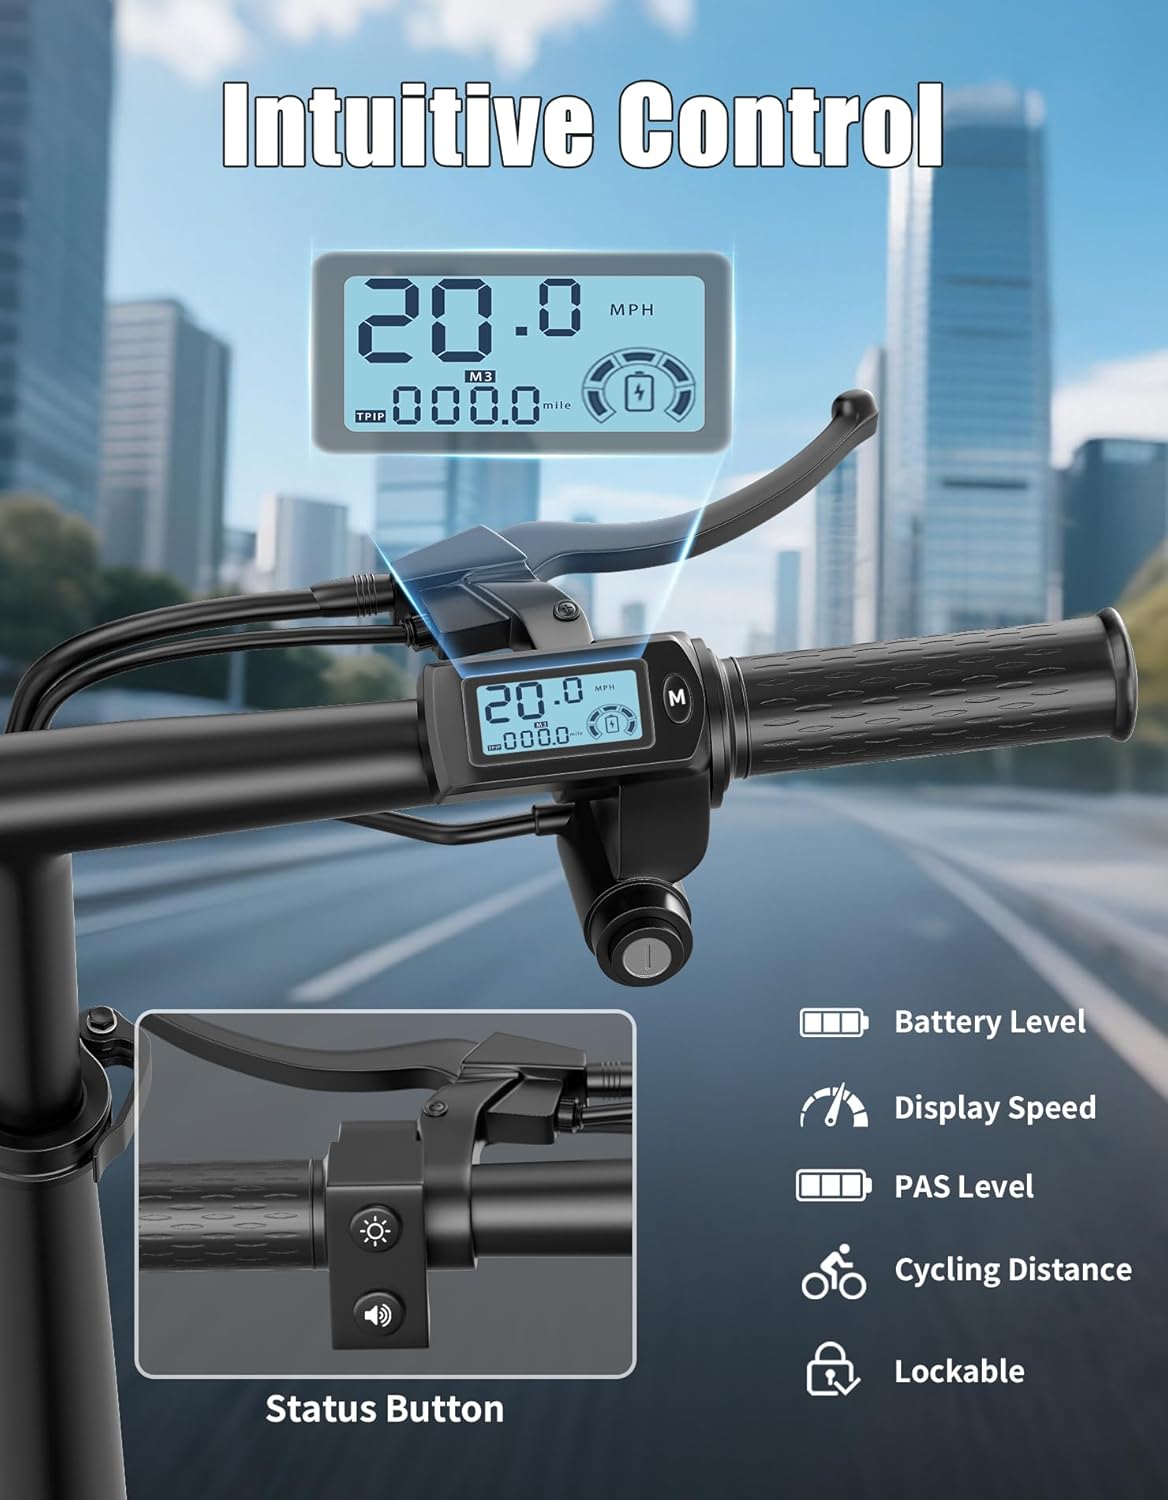
Figure 8: The scooter's full shock absorption system, including front and rear suspension and a comfortable shock-absorbing seat, designed for a smooth ride.
Maintenance
Regular maintenance ensures the longevity and safe operation of your scooter.
- Cleaning: Wipe down the scooter with a damp cloth. Do not use high-pressure water or corrosive cleaners.
- Tires: Check tire pressure regularly (recommended pressure is typically found on the tire sidewall). Inspect for punctures or excessive wear.
- Brakes: Periodically inspect brake pads and discs for wear. Adjust brake tension as needed.
- Battery Care: Store the scooter in a cool, dry place. If storing for extended periods, charge the battery to about 50-70% every 2-3 months to prevent deep discharge.
- Fasteners: Check all screws, bolts, and quick-release mechanisms for tightness before each ride.
Troubleshooting
This section addresses common issues you might encounter.
| Problem | Possible Cause | Solution |
|---|---|---|
| Scooter does not power on | Low battery; Loose battery connection; Faulty power button | Charge the battery; Check battery connections; Contact support if issue persists. |
| Reduced range or speed | Underinflated tires; Overloaded scooter; Battery degradation | Inflate tires to recommended pressure; Reduce load; Battery may need replacement over time. |
| Brakes feel weak | Worn brake pads; Loose brake cable; Air in hydraulic system (if applicable) | Inspect and replace brake pads; Adjust brake cable tension; Seek professional service for hydraulic issues. |
| Unusual noises during operation | Loose components; Debris in wheels/motor; Worn bearings | Check all fasteners; Inspect for foreign objects; Contact support for internal component issues. |
| Display not working correctly | Loose cable connection; Water damage; Software glitch | Check display cable connections; Avoid riding in heavy rain; Try restarting the scooter. |
Specifications
Detailed technical specifications for the Pikabike Electric Scooter.
| Feature | Specification |
|---|---|
| Brand | Pikabike |
| Model Name | scooter |
| Motor | 1000W Peak Motor |
| Battery | 48V 15Ah (720WH) Lithium Battery |
| Max Speed | 30 MPH |
| Max Range | Up to 35 Miles |
| Charging Time | 5-6 Hours |
| Weight Limit | 300 Pounds |
| Vehicle Weight | 63.5 Pounds |
| Wheel Size | 14 Inches |
| Wheel Type | Pneumatic |
| Suspension Type | Dual Suspension |
| Brake Style | Front Braking, Rear Braking (Disc Brakes & Electric Brakes) |
| Deck Width | 8 Inches (Non-Slip Wide Deck) |
| Recommended Height | 5'3" - 6'2" |
| Material | Alloy Steel |

Figure 9: Key dimensions and weight specifications of the scooter, along with recommended rider height range.
Warranty and Support
The Pikabike Electric Scooter comes with a 1-Year Warranty from the date of purchase, covering manufacturing defects.
For warranty claims, technical support, or any inquiries, please contact Pikabike customer service through the retailer's platform or the official Pikabike website. Please have your purchase receipt and product model information ready when contacting support.