MESGS MG NYG
MESGS MG NYG 3/8-Inch Drive Torque Wrench User Manual
Model: MG NYG | Torque Range: 5-45 Ft-Lb (6.8-61 Nm)
Introduction
This manual provides essential instructions for the safe and effective operation, maintenance, and care of your MESGS MG NYG 3/8-Inch Drive Torque Wrench. Please read this manual thoroughly before using the tool to ensure proper function and to prevent damage or injury. Keep this manual for future reference.
Safety Information
- Always wear appropriate personal protective equipment, such as safety glasses, when using this tool.
- Do not exceed the maximum torque capacity of 45 Ft-Lb (61 Nm). Over-torquing can damage fasteners and the wrench.
- Ensure the fastener and socket are clean and free of debris before applying torque.
- Do not use the torque wrench as a breaker bar or for loosening fasteners. It is designed for precise tightening only.
- Avoid dropping the wrench, as this can affect its calibration and accuracy.
- Store the torque wrench in its protective case when not in use, and set it to the lowest torque setting (but not below) to relieve spring tension.
- Keep out of reach of children.
Product Overview
The MESGS MG NYG torque wrench is a precision instrument designed for accurate fastening. It features a 3/8-inch drive, a 72-tooth reversible ratchet head, and a dual-range scale for both Foot-Pounds (Ft-Lb) and Newton-meters (Nm).

Figure 1: MESGS MG NYG 3/8-Inch Drive Torque Wrench and its protective case.

Figure 2: Key features including the 72-tooth ratchet head, laser-etched dual scale, and ergonomic knurled handle.
Specifications
| Feature | Detail |
|---|---|
| Model Number | MG NYG |
| Drive Size | 3/8-Inch |
| Torque Range | 5-45 Ft-Lb (6.8-61 Nm) |
| Accuracy | ±3% |
| Ratchet Teeth | 72-Tooth |
| Direction | Dual-Direction (Clockwise & Counter-clockwise) |
| Material | Chrome Vanadium Steel |
| Item Length | 11.5 Inches |
| Item Weight | 1 Pound |
| Finish | Powder Coated (Black with Orange Electrophoretic Coating) |
| Included Components | Blow molding box |

Figure 3: Dual scale markings for Foot-Pounds (Ft-Lb) and Newton-meters (Nm).

Figure 4: Example of a calibration certificate, indicating ±3% accuracy.
Setup and Torque Setting
Follow these steps to set the desired torque value on your wrench:
- Unlock the Handle: Pull down the knurled locking collar located at the base of the handle. This will allow the handle to rotate.

Figure 5: Visual guide for setting torque: Unlock, Rotate to Set, Rebound Lock.
- Set the Torque Value: Rotate the handle to align the desired torque value on the main scale with the zero mark on the micrometer scale. For example, to set 7.5 Ft-Lb, align '5' on the main scale with the indicator line, then rotate the handle further until '2.5' on the micrometer scale aligns with the main scale line. The sum (5 + 2.5 = 7.5 Ft-Lb) is your set torque.

Figure 6: Detailed view of the dual scale for precise torque setting.
- Lock the Handle: Once the desired torque is set, release the locking collar. It will automatically rebound and lock the handle in place. Ensure it is securely locked before use.
Operating Instructions
- Attach Socket: Press the quick-release button on the ratchet head and firmly attach the appropriate socket to the 3/8-inch drive square. Ensure the socket is fully seated.

Figure 7: Quick-release mechanism for secure socket attachment and removal.
- Select Ratchet Direction: Use the lever on the ratchet head to select the desired direction (clockwise for tightening, counter-clockwise for loosening, though the wrench is primarily for tightening).

Figure 8: Reversible ratchet head for clockwise and counter-clockwise operation.
- Apply Torque: Place the socket onto the fastener. Apply smooth, steady pressure to the handle in the tightening direction. Do not jerk or apply sudden force.
- Listen for the Click: Continue applying pressure until you hear and feel a distinct "click" from the wrench. This indicates that the preset torque value has been reached. Immediately stop applying force.

Figure 9: The audible "click" signals that the target torque has been achieved.
- Release: Remove the wrench from the fastener.
Note: For optimal accuracy, always pull the wrench rather than push it, and ensure your hand is positioned on the handle for consistent leverage.

Figure 10: Using the torque wrench, including the quick-release function and reversible head.
Maintenance
- Cleaning: Wipe the wrench clean with a soft, dry cloth after each use. Do not use solvents or harsh chemicals, as these can damage the finish and markings.
- Storage: Always store the torque wrench in its original protective blow-molded case. Before storing, set the torque value to the lowest setting (5 Ft-Lb or 6.8 Nm) to relieve tension on the internal spring mechanism. Do not set it below the lowest marked value.
- Calibration: Torque wrenches are precision tools and may require periodic recalibration to maintain accuracy. The manufacturer recommends professional recalibration annually or after significant impact.
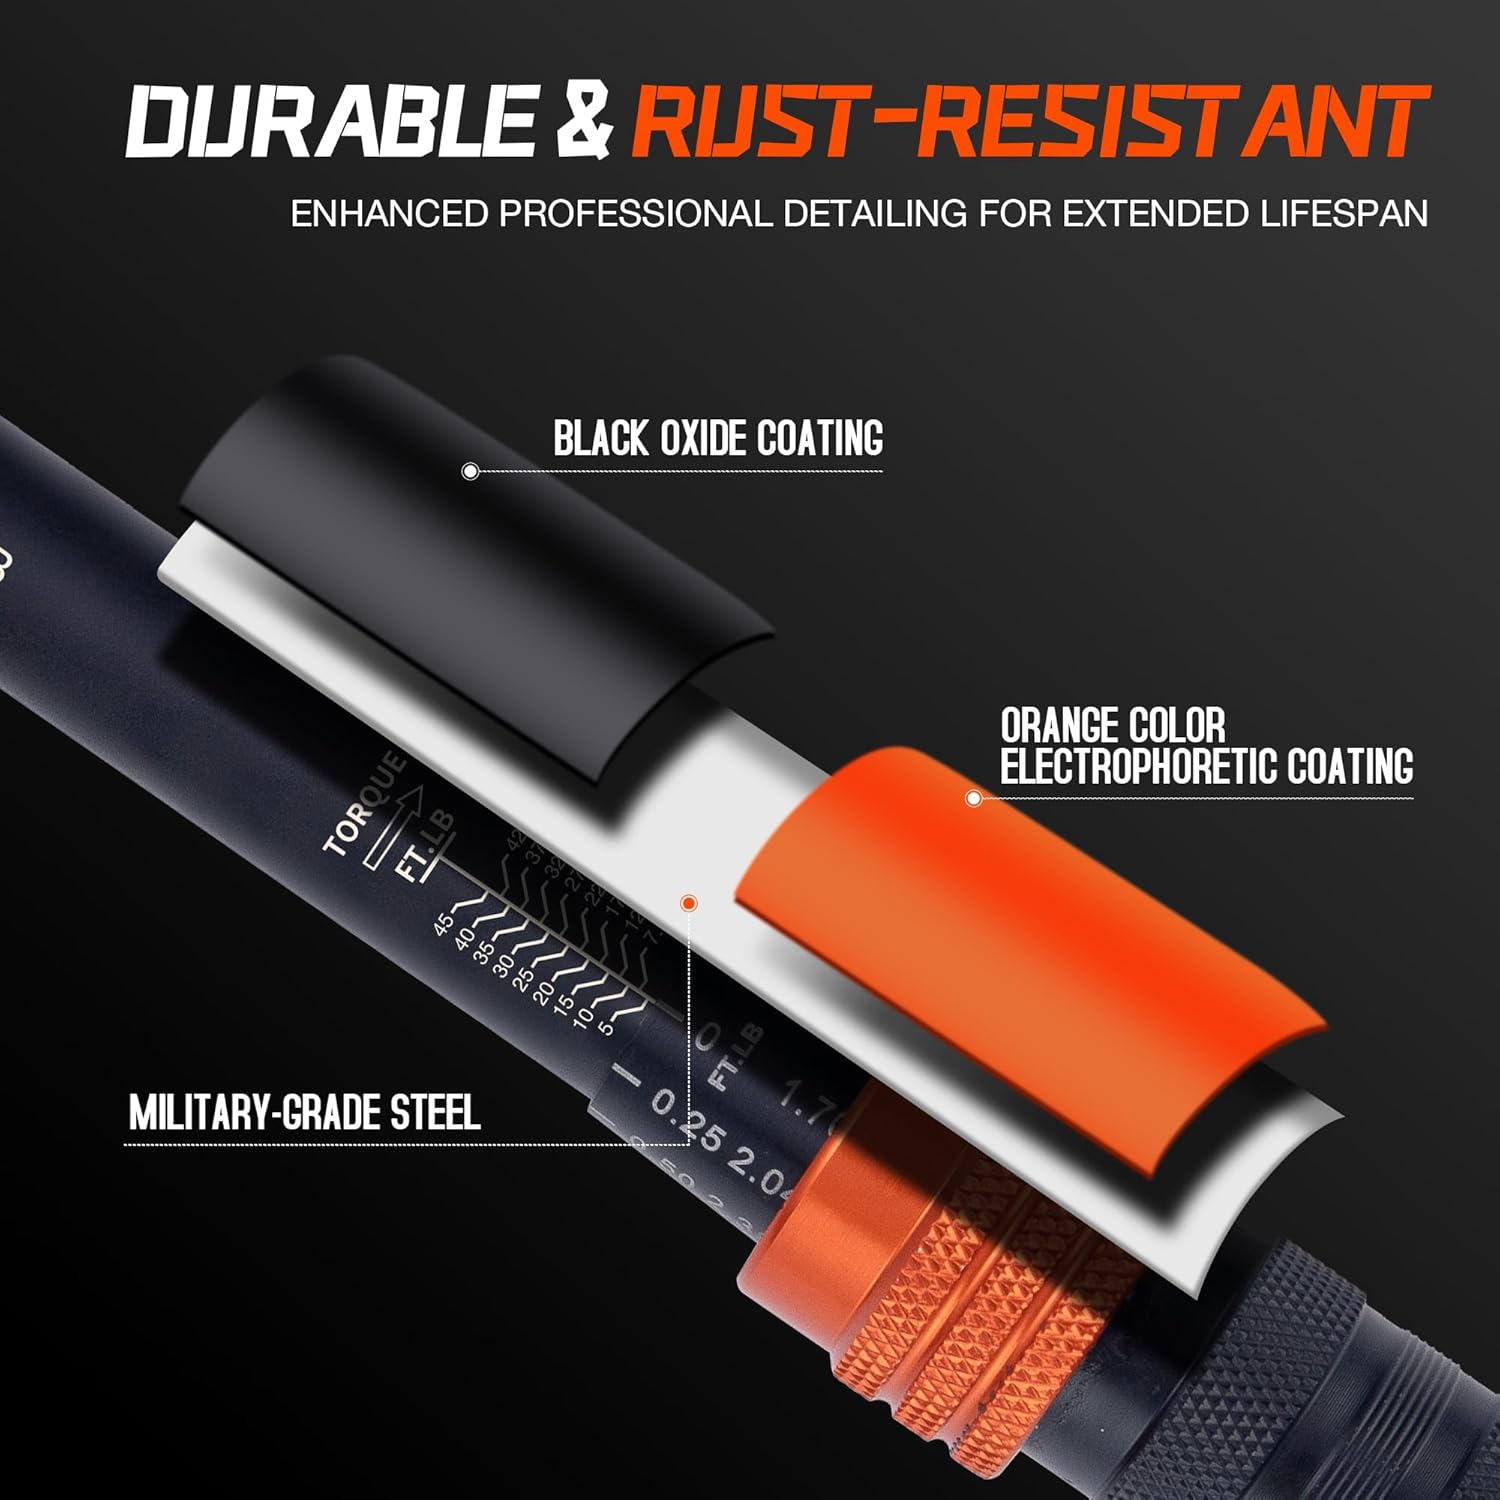
Figure 11: The wrench features a black oxide coating over military-grade steel with an orange electrophoretic coating for durability and rust resistance.
Troubleshooting
| Problem | Possible Cause | Solution |
|---|---|---|
| No audible click | Torque setting too low; Wrench not properly calibrated; Fastener already tight. | Ensure torque is set correctly. If issue persists, consider professional recalibration. Do not over-tighten. |
| Inaccurate torque readings | Wrench dropped; Improper use; Out of calibration. | Avoid dropping the tool. Use smooth, steady pull. Have the wrench professionally recalibrated. |
| Handle difficult to rotate/lock | Debris in mechanism; Locking collar not fully disengaged. | Clean the handle area. Ensure the locking collar is pulled down completely before rotating. Do not force. |
Warranty and Support
MESGS products are manufactured to high-quality standards. For warranty information or technical support, please refer to the contact details provided with your purchase documentation or visit the official MESGS website. Keep your purchase receipt as proof of purchase.
For further assistance, please contact MESGS customer service.
Ask a question about this manual
Ask about setup, troubleshooting, compatibility, parts, safety, or missing instructions. Manuals+ will review the question and use this page’s manual context to help answer it.