1. Introduction
Thank you for choosing the Buyounger A3 Laminator Machine. This manual provides essential information for the safe and efficient operation of your laminator. Please read it thoroughly before use and retain it for future reference.
This versatile laminator is designed for home, school, and office use, capable of laminating documents up to 13 inches (A3 size). It features both thermal and cold lamination modes, a built-in paper cutter, and a corner rounder for professional finishing.

Image 1.1: The Buyounger A3 Laminator Machine, shown with a document being laminated, along with the included corner rounder and laminating pouches.
2. Package Contents
Verify that all items are present in the package:
- 1 x Buyounger A3 Laminator Machine
- 1 x Integrated Paper Cutter (pre-installed or to be installed)
- 1 x Corner Rounder
- 30 x Laminating Pouches (various sizes: A3, A4, A5, A6)
- 1 x User Manual (this document)
3. Setup
- Unpack the Laminator: Carefully remove the laminator and all accessories from the packaging.
- Placement: Place the laminator on a stable, flat, and heat-resistant surface. Ensure there is adequate space around the machine for proper ventilation and for documents to exit smoothly.
- Power Connection: Plug the power cord into a standard electrical outlet.
- Install Paper Cutter (if not pre-installed): The integrated paper cutter typically slides into a designated slot on the top of the laminator. Refer to the visual guide for correct placement.

Image 3.1: The integrated paper cutter positioned on top of the laminator, ready for use.
4. Operating Instructions
4.1 Power On and Mode Selection
- Locate the power switch on the side of the laminator.
- Select your desired lamination mode:
- HOT Mode (Thermal Lamination): For standard documents and photos using thermal laminating pouches (3-5 mil thickness). This mode requires preheating.
- COLD Mode (Cold Lamination): For heat-sensitive documents or materials using self-adhesive cold laminating pouches (not included). This mode does not require preheating.
- The laminator will begin to warm up if HOT mode is selected. The red indicator light will be on.
- Wait for the green "Ready" indicator light to illuminate. This typically takes 1-2 minutes for hot mode. The machine is ready for use when the green light is steady.

Image 4.1: The power switch and indicator lights, showing the selection of hot or cold mode and the green 'Ready' light.
4.2 Lamination Process
- Prepare Your Document: Place your document or photo neatly inside a laminating pouch, ensuring it is centered and there is an even border around the edges. Do not use pouches that are too small or too large for your document, or attempt to laminate multiple documents in one pouch.
- Feed the Pouch: With the sealed edge of the pouch first, carefully insert the pouch straight into the laminator's entry slot. The machine will automatically feed the pouch through.
- Retrieve Laminated Document: Once the pouch exits the rear of the machine, retrieve your laminated document. Be cautious as it may be warm if using hot mode.

Image 4.2: Visual representation of the laminator's fast operating speed (340mm/min) and quick warm-up time (1-2 minutes).
4.3 Finishing Touches
- Using the Paper Cutter: If needed, use the integrated paper cutter to trim excess laminating film from your document. Place the laminated document under the cutter guide and slide the blade for a clean edge.
- Using the Corner Rounder: For a professional finish and to eliminate sharp corners, use the included corner rounder. Insert a corner of the laminated document into the rounder and press down. The corner rounder is conveniently stored at the bottom of the laminator.
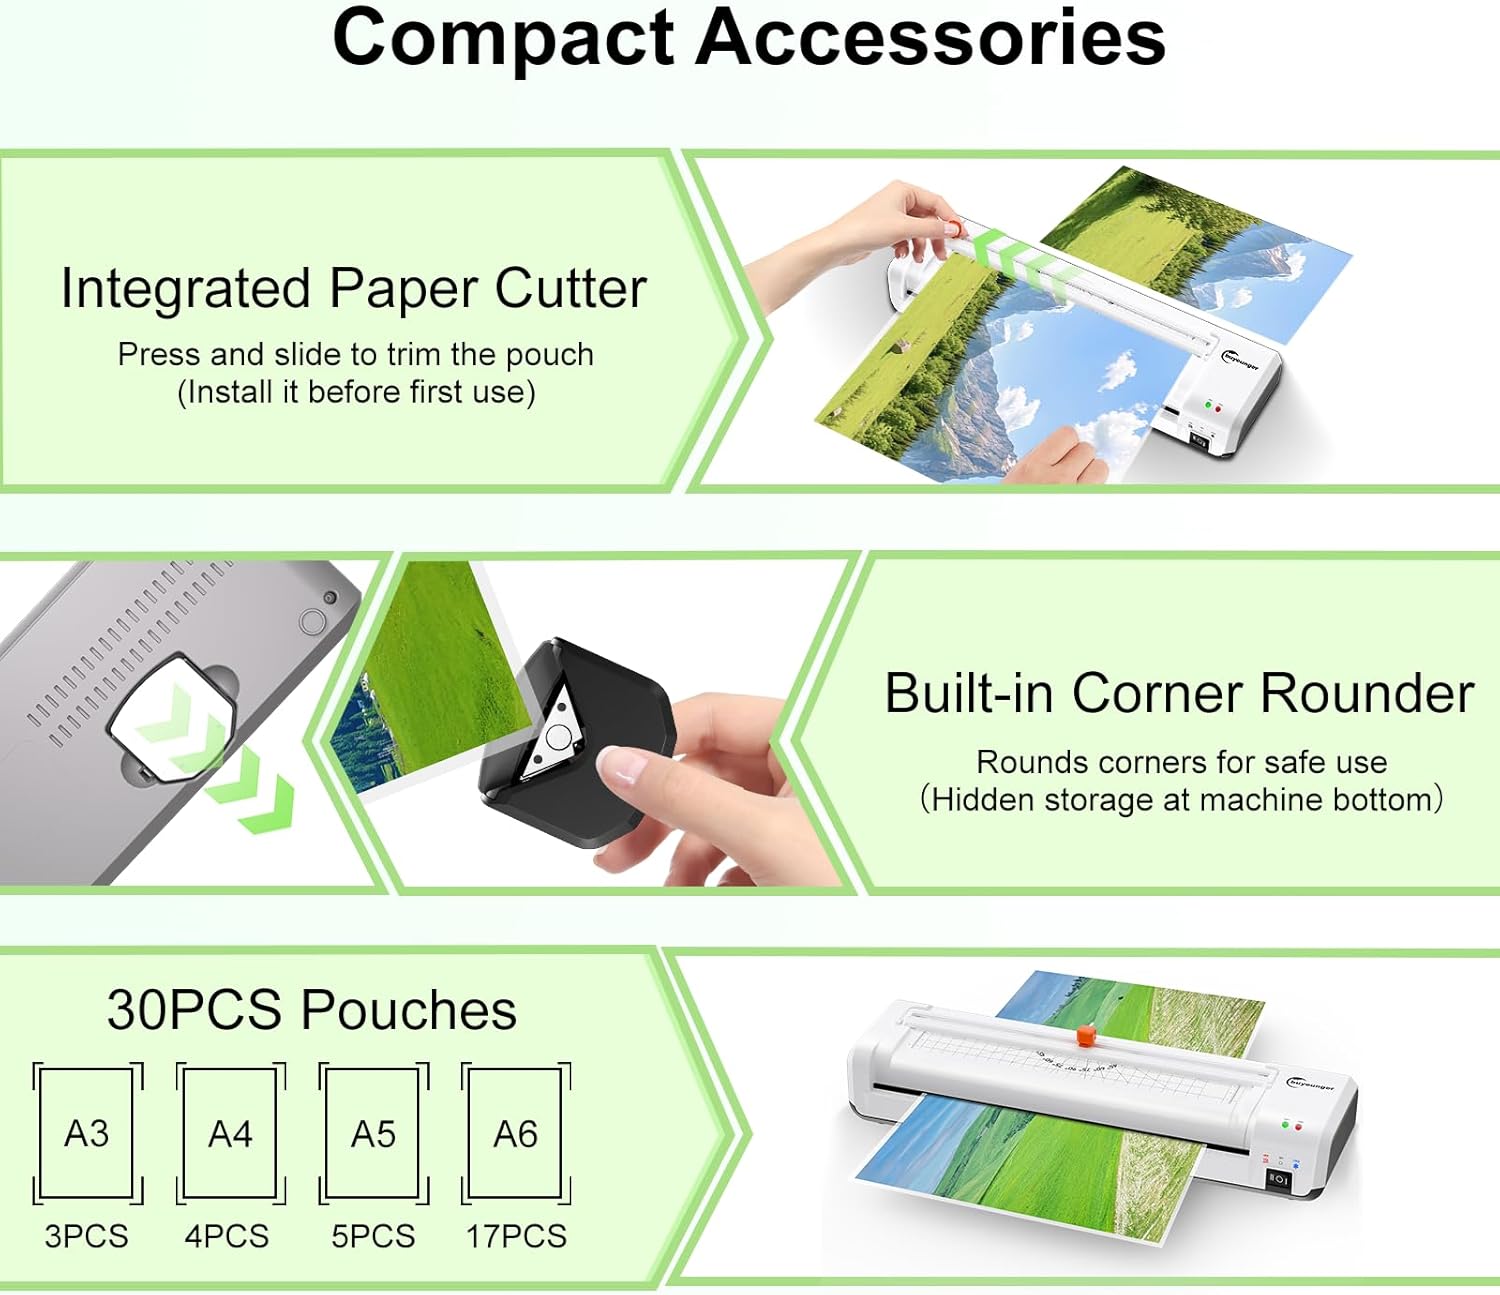
Image 4.3: Demonstration of using the corner rounder to create smooth, rounded edges on a laminated document.
5. Maintenance
Proper maintenance ensures the longevity and optimal performance of your laminator.
- Cleaning: Always unplug the laminator before cleaning. Use a soft, dry cloth to wipe the exterior of the machine. Do not use abrasive cleaners or solvents.
- Roller Cleaning: If you notice residue on the rollers, run a folded piece of paper through the laminator several times to help clean them. For stubborn residue, a specialized laminator cleaning sheet (not included) can be used.
- Storage: When not in use, store the laminator in a clean, dry place. Its compact design allows for easy storage.
6. Troubleshooting
Here are solutions to common issues you might encounter:
- Paper Jam: If a laminating pouch gets stuck, immediately press and hold the ABS (Anti-Jam) button located on the side of the machine. This will release the rollers, allowing you to gently pull the pouch out. Release the button once the pouch is clear.

Image 6.1: Illustration of the ABS button being pressed to release a jammed document from the laminator.
- Bubbles or Wrinkles:
- Ensure the laminator has fully warmed up (green light is steady).
- Make sure the document is centered and flat within the pouch.
- Use appropriate pouch thickness (3-5 mil) for hot lamination.
- Avoid feeding the pouch at an angle.
- Laminator Not Heating:
- Check if the power cord is securely plugged in.
- Ensure the power switch is set to "HOT" mode.
- Allow sufficient time for warm-up (1-2 minutes).
- Laminated Document is Cloudy or Poorly Sealed:
- Ensure the laminator is fully warmed up.
- Verify that you are using thermal pouches for hot lamination.
- The pouch thickness might be too thin for the selected temperature, or the document itself is too thick.
7. Specifications
| Feature | Specification |
|---|---|
| Brand | Buyounger |
| Model Number | SL360 |
| Item Weight | 3.58 pounds |
| Product Dimensions (L x W x H) | 16.81 x 3.35 x 5.16 inches |
| Max. Laminating Width | 13 inches (330mm) |
| Compatible Sheet Sizes | A3, A4, A5, A6 |
| Warm-up Time (Hot Mode) | 1-2 minutes |
| Laminating Speed | 340mm/min |
| Pouch Thickness Compatibility | 3-5 mil (80-125 mic) |
| Lamination Modes | Hot and Cold |
| Special Features | Built-in Paper Cutter, Corner Rounder, ABS Anti-Jam Function |

Image 7.1: Detailed dimensions of the laminator and examples of its wide application in home, school, and office settings.
8. Warranty and Support
Warranty Information: Specific warranty details are not provided in this manual. Please refer to the product packaging, the manufacturer's official website, or your point of purchase for comprehensive warranty terms and conditions.
Customer Support: If you encounter any issues or have questions regarding your Buyounger A3 Laminator Machine, please contact Buyounger customer support through their official website or the contact information provided with your purchase. When contacting support, please have your model number (SL360) and purchase date available.