1. Important Safety Information
Please read all instructions carefully before installation and operation. Failure to follow these instructions may result in property damage, personal injury, or death. Retain this manual for future reference.
- Professional Installation Recommended: To avoid installation errors and ensure safe operation, it is strongly recommended that a qualified professional installs this water heater.
- Electrical Safety: Ensure the power supply matches the unit's requirements (110V, 1500W). Proper grounding is essential. Do not operate with damaged cords or plugs.
- Water Pressure: Ensure water pressure is within safe operating limits (0.8 MPa).
- Water and Electricity Separation: The unit is designed with internal water and electricity separation for enhanced safety.
- Protection Features: This water heater includes Dry Combustion Protection, High Water Pressure Protection, Leakage Protection, and Overheat Protection.
- Waterproof Rating: The unit has an IPX4 waterproof rating, indicating protection against splashing water.
- Temperature Control: The maximum temperature is 176°F (80°C). Exercise caution to prevent scalding.
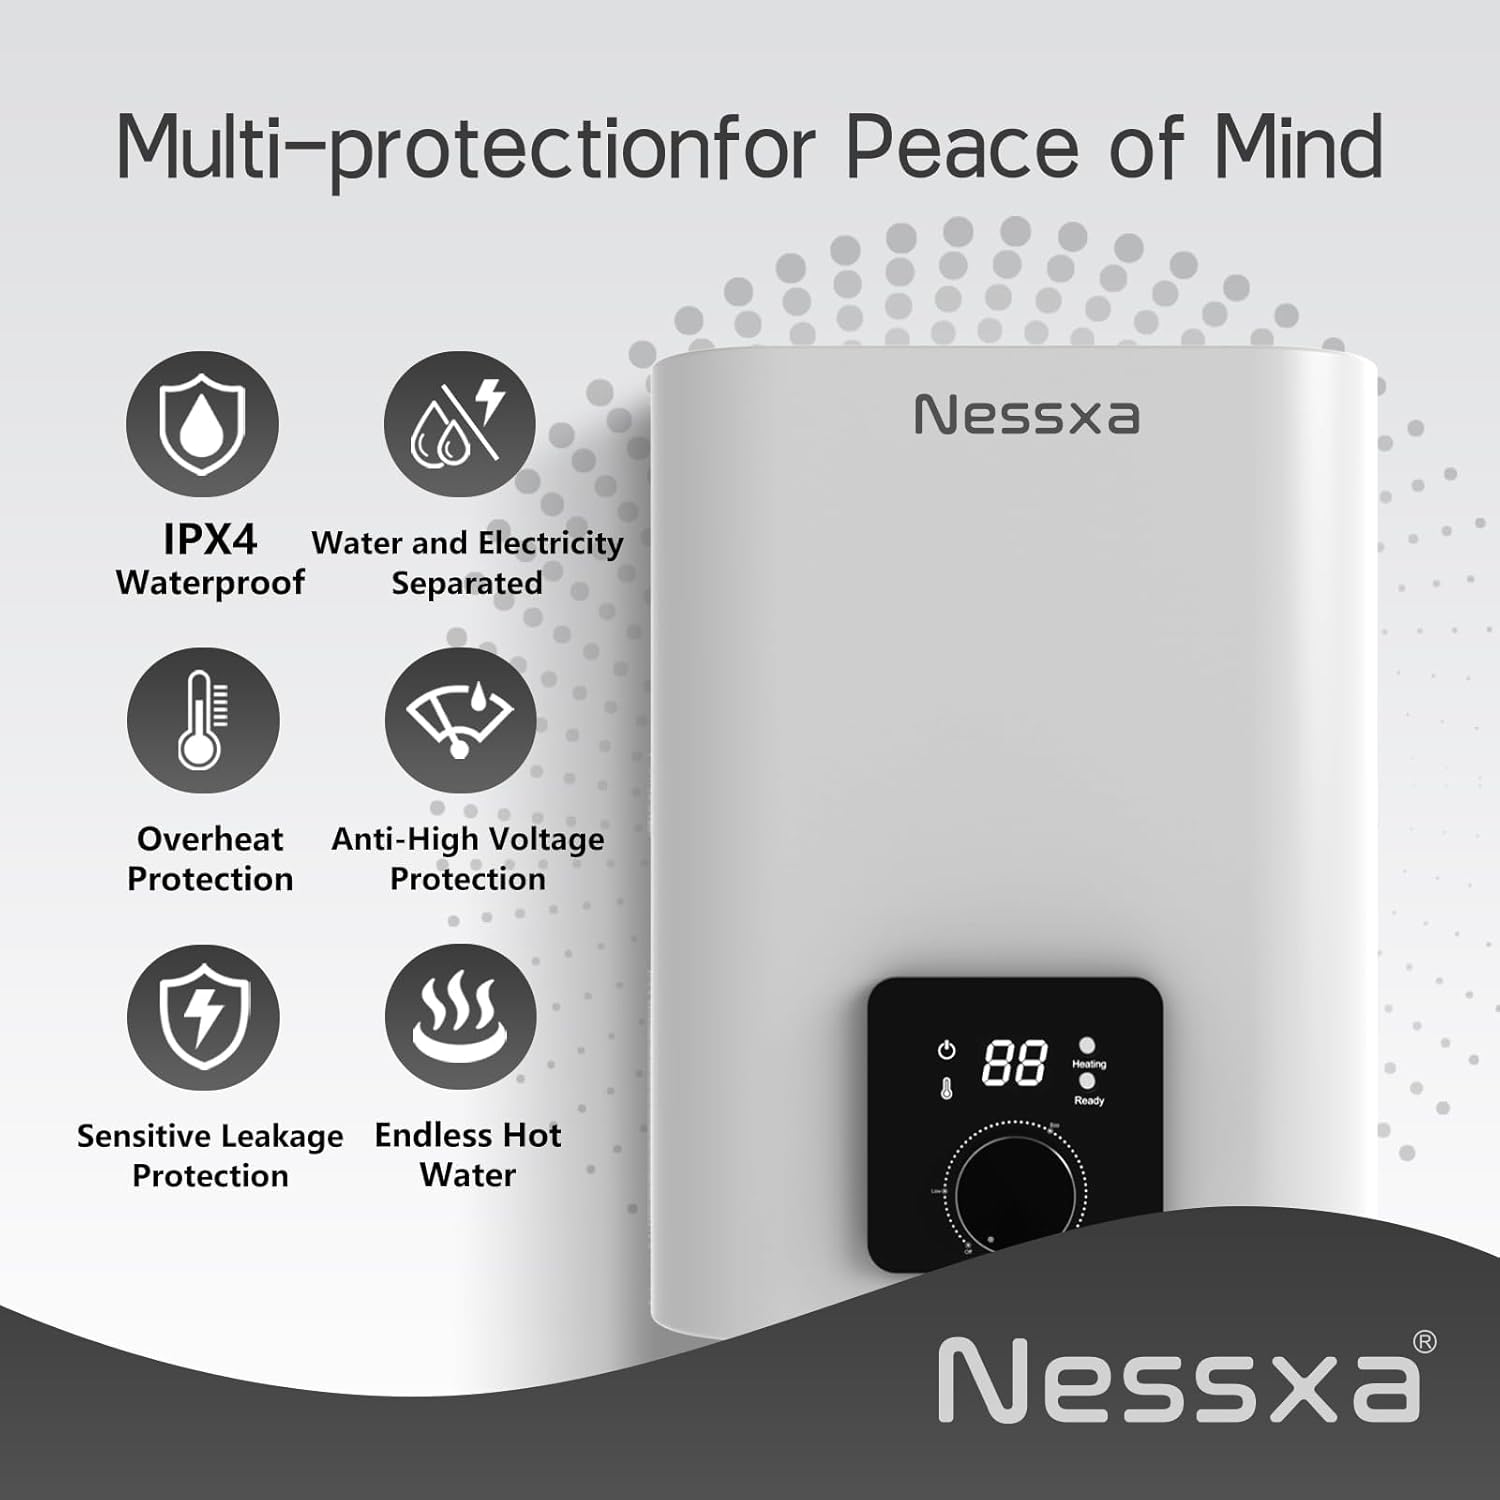
Figure 1: Multi-protection features including IPX4 waterproof, water and electricity separation, overheat protection, anti-high voltage protection, sensitive leakage protection, and endless hot water capability.
2. Product Overview
The Nessxa 2.65 Gallon Electric Mini Tank Water Heater is a compact, point-of-use water heating solution designed to provide instant hot water for various applications. Its small footprint allows for installation under sinks or counters, reducing wait times for hot water and conserving water.
Key Features:
- Capacity: 2.65 Gallons
- Power: 110V, 1500W heating element
- Instant Hot Water: Delivers hot water on demand, reducing wait times.
- Adjustable Temperature: Temperature range of 77°F - 176°F (25°C - 80°C) via a rotary knob.
- Energy Saving: Automatically enters standby mode when water temperature is below 77°F (25°C).
- Durable Construction: ABS exterior and stainless steel internal tank.
- Compact Design: Suitable for under-sink or counter installation.

Figure 2: The compact size of the water heater makes it suitable for various applications including bathrooms, offices, garages, hospitals, salons, and kitchens.

Figure 3: User-friendly details include an LED display for easy water temperature viewing and a temperature adjustment knob for comfortable experience.
3. Setup and Installation
For optimal performance and safety, professional installation is highly recommended. Ensure all local plumbing and electrical codes are followed.
3.1 Unpacking and Inspection
- Carefully remove the water heater and all components from the packaging.
- Inspect the unit for any shipping damage. Do not install if damaged.
- Verify all included accessories are present: colloidal particle (x1), drain hose (x1), hook screws (x2), instruction book (x1), sealing washers (x2).
3.2 Mounting Options
The unit can be installed as either wall-mounted or floor-mounted, typically under a sink or counter.
- Wall-Mounted: Use the provided hook screws to securely fasten the unit to a sturdy wall surface. Ensure the wall can support the weight of the unit when full of water (approximately 2.65 gallons * 8.34 lbs/gallon + 17.6 lbs unit weight = ~39.7 lbs).
- Floor-Mounted: Place the unit on a stable, level surface under the sink or counter.

Figure 4: Multiple installation options are available, including wall-mounted and floor-mounted configurations, offering flexibility for compact spaces.
3.3 Plumbing Connections
- Connect the cold water supply to the inlet port and the hot water outlet to the fixture. Use the provided sealing washers to ensure leak-free connections.
- A pressure relief valve is typically required for water heater installations. While the product description mentions one is included, the connection point on the unit may not be explicitly marked. Consult a professional plumber for proper installation of the pressure relief valve, usually on the inlet side.
- Ensure all connections are tight but do not overtighten.
- After plumbing connections are complete, slowly open the cold water supply valve to fill the tank. Open a hot water faucet at the connected fixture to allow air to escape until a steady stream of water flows. Close the hot water faucet.
3.4 Electrical Connection
- Ensure the unit is properly grounded.
- Plug the water heater into a dedicated 110V, 1500W grounded electrical outlet.
- Do not use extension cords or adapters.
4. Operating Instructions
4.1 Powering On
- Once the tank is filled with water and electrical connections are secure, plug in the unit. The LED display will illuminate.
4.2 Setting Water Temperature
- Rotate the knob on the front panel to adjust the desired water temperature. The temperature range is 77°F - 176°F (25°C - 80°C).
- The LED display will show the current water temperature. Note that the display may show Celsius.
- Allow time for the water to heat to the set temperature. The unit will indicate when it is heating or ready.
4.3 Energy Saving Mode
- When the water temperature inside the tank falls below 77°F (25°C), the water heater will automatically enter standby mode to conserve energy. It will reactivate to heat water when needed or when the temperature drops further.
5. Maintenance
Regular maintenance helps ensure the longevity and efficient operation of your water heater.
- Exterior Cleaning: Clean the exterior of the unit with a soft, damp cloth. Do not use abrasive cleaners or solvents.
- Descaling: The manufacturer's instructions suggest descaling the heating rods yearly. However, specific instructions on how to perform this are not provided in the general manual. It is recommended to consult a qualified technician for descaling procedures to prevent damage to the unit.
- Draining the Unit: If the unit will not be used for an extended period, especially in areas prone to freezing, it should be drained. The manual does not specify a drain plug location. Consult a professional plumber for safe draining procedures.
- Leak Inspection: Periodically check all plumbing connections for any signs of leaks. Address any leaks immediately.
6. Troubleshooting
If you encounter issues with your water heater, refer to the following common problems and solutions. For complex issues, contact a qualified technician.
| Problem | Possible Cause | Solution |
|---|---|---|
| No hot water / Unit not heating |
|
|
| Water not hot enough |
|
|
| Water leaking from unit or connections |
|
|
7. Specifications

Figure 5: Product dimensions and key specifications for the Nessxa 2.65 Gallon Electric Mini Tank Water Heater.
| Feature | Detail |
|---|---|
| Brand | Nessxa |
| Model Number | YYJ24039-2 |
| Capacity | 2.65 Gallons |
| Voltage | 110 Volts |
| Wattage | 1500 Watts |
| Maximum Temperature | 176°F (80°C) |
| Product Dimensions (W x D x H) | 11.8" x 11.8" x 13.4" (based on image PT02) |
| Item Weight | 17.6 pounds |
| Mounting Type | Wall, Floor |
| Special Features | Dry Combustion Protection, High Water Pressure Protection, Leakage Protection, Overheat Protection |
| Waterproof Rating | IPX4 |
| Max Water Pressure | 0.8 MPa |
| Amperage | 10A |
| UPC | 631060186856 |
8. Warranty and Support
Warranty Information: Specific warranty terms and duration are not provided in this manual. Please refer to the product packaging or contact the seller/manufacturer directly for detailed warranty information.
Customer Support: For technical assistance, troubleshooting beyond this guide, or to inquire about parts and service, please contact Nessxa customer support or your authorized dealer. Contact information can typically be found on the product packaging or the manufacturer's official website.