Paaxido CV-D902
Paaxido 8WD Stunt RC Robot Dog Toy User Manual
Model: CV-D902
Introduction
This manual provides detailed instructions for the safe and effective operation of your Paaxido 8WD Stunt RC Robot Dog Toy, Model CV-D902. Please read this manual thoroughly before use and retain it for future reference.

Image: The Paaxido 8WD Stunt RC Robot Dog Toy in silver, accompanied by its remote control, rechargeable battery, and USB-C charging cable.
Package Contents
Verify that all items listed below are included in your package:
- RC Robot Dog (1 unit)
- Remote Control (1 unit)
- Rechargeable Battery (1 unit)
- USB Type-C Charging Cable (1 unit)
- Screwdriver (1 unit)
- User Manual (This document)
Safety Information
No specific warnings are applicable beyond general toy safety. Always supervise children during play. Keep small parts away from young children to prevent choking hazards. Do not operate near water or in hazardous environments. Ensure the product is used in an open area to avoid collisions and damage.
Setup
1. Battery Installation
Robot Dog Battery:
- Locate the battery compartment on the underside of the robot dog.
- Use the provided screwdriver to open the battery compartment cover.
- Connect the rechargeable battery to the robot dog's battery connector.
- Carefully place the battery inside the compartment and close the cover, securing it with the screw.
Remote Control Batteries:
- Locate the battery compartment on the back of the remote control.
- Open the battery compartment cover.
- Insert 2x AA batteries (not included) into the compartment, ensuring correct polarity (+/-).
- Close the battery compartment cover.
2. Charging the Robot Dog Battery
- Ensure the robot dog's power switch is in the "OFF" position.
- Connect the USB Type-C charging cable to the charging port on the robot dog.
- Connect the other end of the USB cable to a standard USB power adapter (5V/1A recommended, not included) or a computer USB port.
- The charging indicator light (if present) will illuminate during charging and turn off or change color when fully charged.
- Charging typically takes approximately 60-90 minutes. Do not overcharge.

Image: A child charging the robot dog using the Type-C USB cable. Note: Power adapter is not included.
3. Pairing the Remote Control
- Turn on the robot dog using its power switch.
- Turn on the remote control.
- The remote control and robot dog will automatically pair. A successful connection is usually indicated by a solid light on both devices.
- If pairing fails, turn both devices off and repeat the steps.
Operating Instructions
The Paaxido 8WD Stunt RC Robot Dog offers a variety of movements and interactive features.
Remote Control Functions

Image: Detailed diagram of the remote control buttons and their corresponding functions for the robot dog.
- Directional Controls: Use the joystick or directional buttons for forward, backward, left, and right movement.
- Stunt Buttons: Dedicated buttons for 360° rotation, climbing stunts, and racing mode.
- Music/Dance Button: Activates pre-programmed music and dance routines.
- Storytelling Button: Initiates the built-in storytelling function.
- Programming Button: Enters programming mode to record custom action sequences.
- Volume Control: Adjusts the sound output.
- Gesture Sensing: (If applicable) Activates control via hand gestures.
Stunt Performance
The 8-wheel drive system allows for dynamic stunts:
- 360° Rotation: Press the designated button to make the robot dog spin in place.
- Climbing Stunts: The flexible wheel design enables the robot dog to climb over small obstacles.
- Racing Mode: Engages high-speed movement for exciting races.
- Obstacle Avoidance: The robot dog can detect and adjust its movement to avoid certain obstacles.
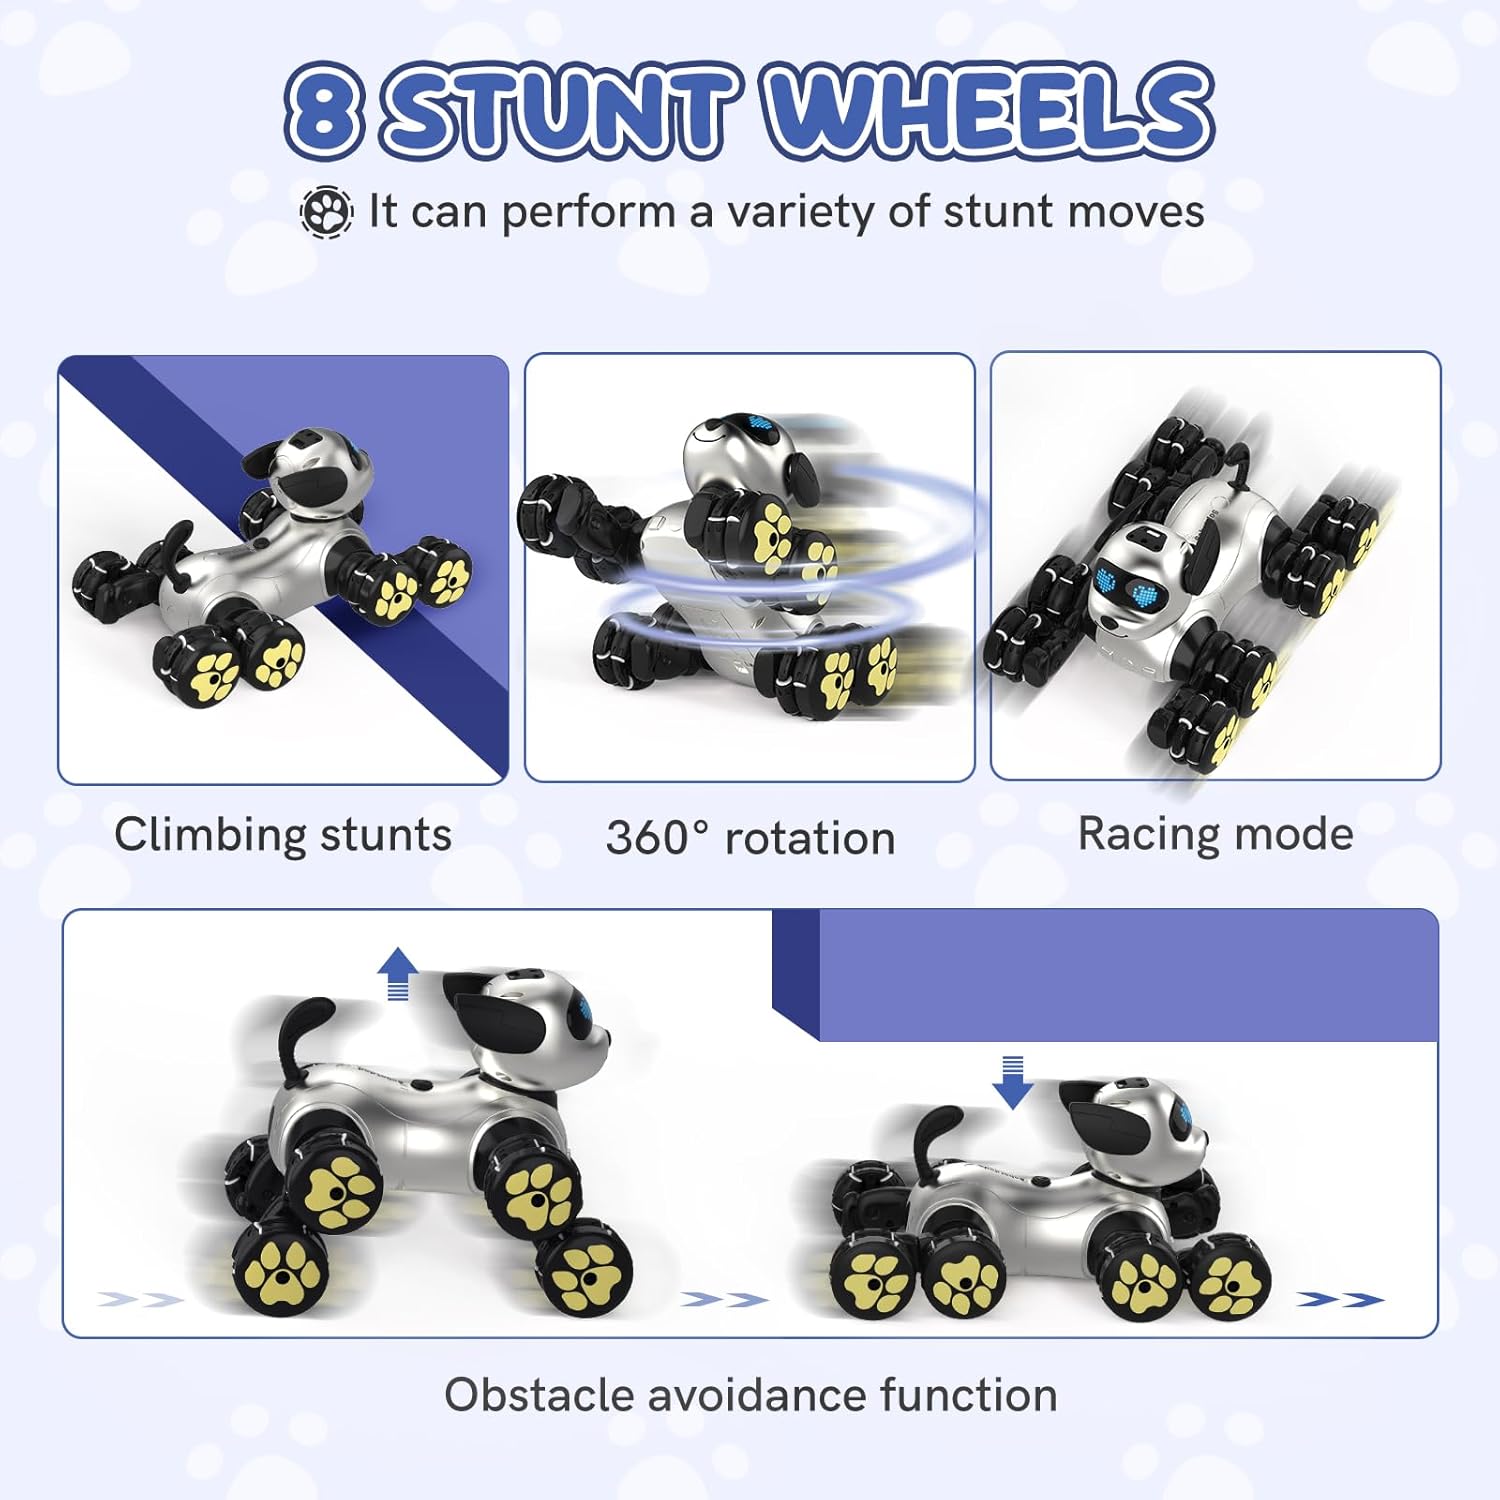
Image: Visual examples of the robot dog performing climbing stunts, 360° rotation, racing mode, and obstacle avoidance.
Interactive Features
- Music and Dance: The robot dog can perform dance routines synchronized with music. Its LED eyes will animate during these performances.
- Storytelling Function: Activate this feature to hear classic tales narrated by the robot dog.
- Programmable Mode:
- Press the "Programming" button on the remote.
- Input a sequence of desired actions (e.g., forward, rotate, dance).
- Press the "Programming" button again to save and execute the sequence.

Image: The robot dog engaging in its storytelling function with a child and adult.

Image: The robot dog performing a dance routine with music.
All-Terrain Capability
The robot dog is designed to operate on various surfaces:
- Hardwood floors
- Carpet
- Grass
- Pavement
- Light sand/dirt

Image: The robot dog demonstrating its ability to traverse various terrains including road, rock, grass, and sand.
Maintenance
- Cleaning: Wipe the robot dog with a dry, soft cloth. Do not use water or chemical cleaners.
- Battery Care: Remove batteries from the remote control if not used for extended periods. Fully charge the robot dog's battery before long-term storage.
- Storage: Store the toy in a cool, dry place away from direct sunlight.
Troubleshooting
| Problem | Possible Cause | Solution |
|---|---|---|
| Robot dog does not turn on. | Battery is not charged or incorrectly installed. | Ensure battery is fully charged and correctly connected. Check power switch. |
| Remote control not responding. | Remote control batteries are low or incorrectly installed. Not paired. | Replace remote control batteries. Ensure correct polarity. Re-pair the remote control with the robot dog. |
| Short operating time. | Battery not fully charged or aging. | Ensure battery is fully charged before use. Consider replacing the battery if performance significantly degrades. |
| Robot dog moves erratically or loses connection. | Interference from other 2.4GHz devices. Out of range. | Move to an area with less interference. Ensure the robot dog is within the remote control's operating range. |
Specifications
- Model Number: CV-D902
- Brand: Paaxido
- Product Dimensions: 2 x 2 x 2 inches
- Item Weight: 2.07 pounds
- Control Frequency: 2.4GHz
- Power Source (Robot Dog): Rechargeable Battery (included)
- Power Source (Remote Control): 2x AA Batteries (not included)
- Charging Type: USB Type-C
- Recommended Age: 6 years and up
Warranty and Support
For warranty information or technical support, please contact Paaxido customer service through the retailer where the product was purchased or visit the official Paaxido website. Please have your model number (CV-D902) and purchase details ready when contacting support.
Paaxido Official Store: Visit Paaxido Store on Amazon
Ask a question about this manual
Ask about setup, troubleshooting, compatibility, parts, safety, or missing instructions. Manuals+ will review the question and use this page’s manual context to help answer it.