1. Introduction
This manual provides detailed instructions for the installation, operation, and maintenance of your saiqing Solar Wireless Backup Camera. Designed for a variety of vehicles including cars, trucks, RVs, trailers, and campers, this camera offers a convenient and reliable solution for enhanced rear visibility. Please read this manual thoroughly before using the product to ensure proper function and safety.

Image 1.1: saiqing Solar Wireless Backup Camera with its solar panel and antenna, alongside a smartphone displaying the camera's live feed.
2. Package Contents
Verify that all items listed below are present in your package:
- 1x saiqing Solar Wireless Backup Camera
- 1x Antenna
- 1x Metal Plate and Screws (for optional installation)
- 1x Type-C Cable
- 1x Charger
3. Key Features
- Solar Charging: Integrated solar panel for continuous power, supplemented by a 9600mAh rechargeable battery.
- 1080P HD Real-Time Image: Provides clear, high-definition video feed with minimal delay.
- Magnetic Installation: Strong neodymium magnets allow for quick and secure attachment to metal surfaces.
- Dual Charging Options: Supports both solar and Type-C cable charging.
- IP69K Waterproof: Durable construction resistant to water, dust, and harsh weather conditions.
- Smartphone App Control: Compatible with iOS and Android devices for live viewing and settings adjustment.
- Advanced Infrared Night Vision: Automatic night vision mode for clear visibility in low-light conditions.
- Wide-Angle Adjustment: Flexible lens with a 150° wide-angle view, manually adjustable to cover blind spots.
- Extended Signal Range: Stable wireless signal up to 115 feet without interference.
4. Installation
4.1 Magnetic Installation
The camera features a strong magnetic base for easy, drill-free attachment to any metal surface on your vehicle.
- Ensure the desired metal surface on your vehicle is clean and dry.
- Attach the camera firmly to the metal surface using its magnetic base. The magnets are designed to hold securely even at highway speeds.
- Adjust the camera's angle to achieve the desired viewing perspective.

Image 4.1: Illustration of the camera's strong magnetic base and wide viewing angle.

Image 4.2: Steps for magnetic installation and initial app connection.
4.2 Optional Screw Installation
For non-metallic surfaces or permanent mounting, use the provided metal plate and screws.
- Position the metal plate on the desired mounting location.
- Mark the screw holes and drill pilot holes if necessary.
- Secure the metal plate to the surface using the provided screws.
- Attach the camera magnetically to the installed metal plate.
Video 4.1: Demonstrates the magnetic installation of the camera and its live view on a smartphone.
5. Charging the Camera
The camera is equipped with a 9600mAh rechargeable battery and supports two charging methods:
- Solar Charging: The integrated solar panel charges the battery when exposed to sunlight, providing continuous power during daytime use.
- Type-C Charging: For faster charging or when sunlight is unavailable, connect the camera to the provided Type-C cable and charger. A full charge via Type-C takes approximately 5 hours.

Image 5.1: Dual charging methods: solar and Type-C.

Image 5.2: Visual representation of solar and Type-C charging.
6. App Setup and Connection
The saiqing Solar Wireless Backup Camera operates via a dedicated smartphone application.
- Download the App: Search for "MH CAM" in the Apple App Store (for iOS) or Google Play Store (for Android) and install it on your smartphone.
- Power On Camera: Press the power button on the camera to turn it on.
- Connect to Wi-Fi: Go to your phone's Wi-Fi settings. Find and connect to the camera's Wi-Fi network, typically named "SONiX_XXX" (where XXX are unique characters).
- Open MH CAM App: Launch the MH CAM app. The live camera feed should appear on your screen.
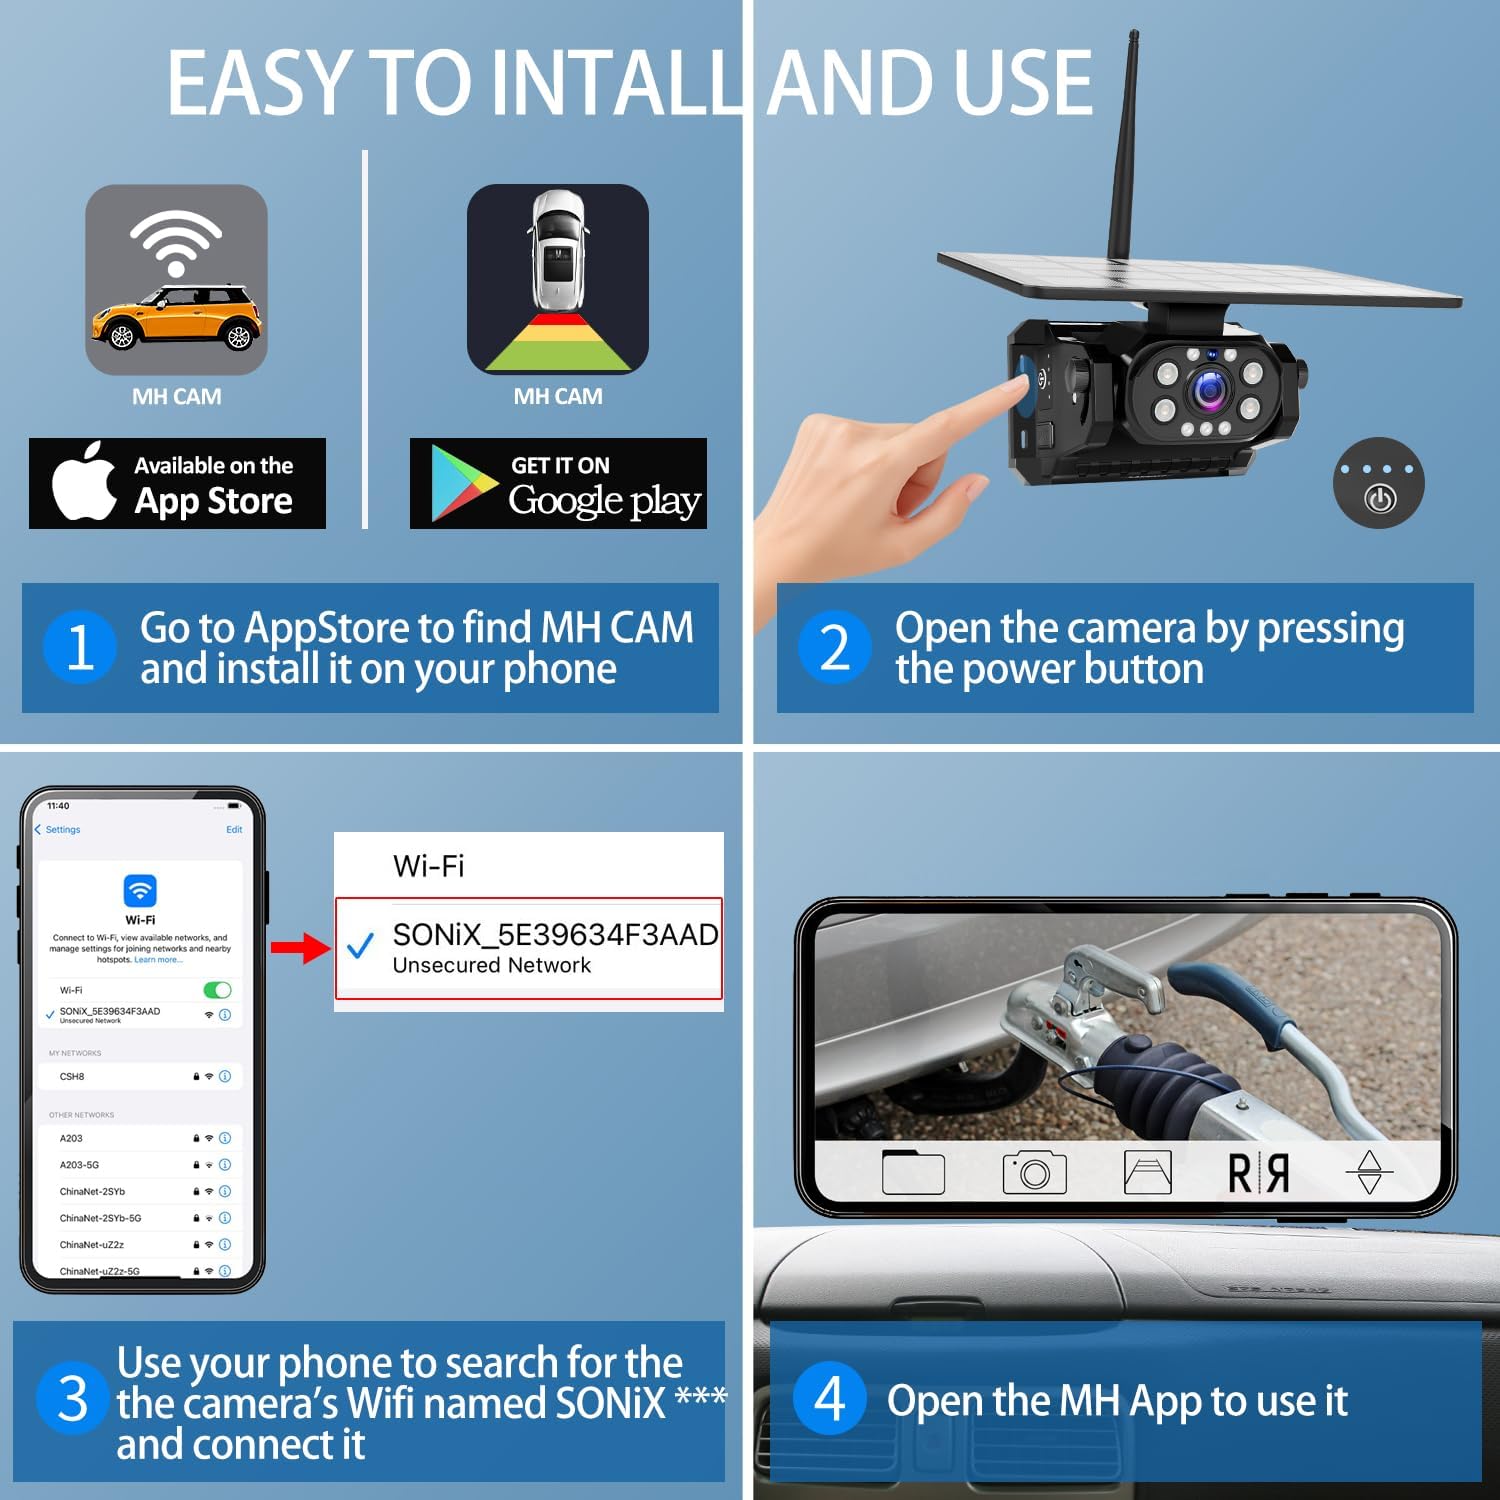
Image 6.1: Step-by-step guide for app installation and Wi-Fi connection.
Video 6.2: Demonstrates connecting the camera to a smartphone via Wi-Fi and using the app.
7. Operation
7.1 Real-Time View and Guidelines
Once connected, the MH CAM app displays a live 1080P feed from the camera. You can activate adjustable parking guidelines within the app to assist with reversing and parking maneuvers.

Image 7.1: Real-time 1080P image with adjustable parking guidelines.
7.2 Adjustable Viewing Angle
The camera lens offers a 150° wide-angle view and can be manually adjusted to optimize your field of vision, helping to eliminate blind spots.
Video 7.2: Demonstrates the adjustable viewing angle and real-time image with guidelines.
7.3 Night Vision
The camera automatically switches to infrared night vision mode in low-light conditions, providing clear and detailed footage after dark.

Image 7.3: Night vision functionality for clear visibility in darkness.
8. Maintenance
The saiqing Solar Wireless Backup Camera is designed for durability with an IP69K waterproof rating. To ensure optimal performance and longevity:
- Regularly clean the camera lens and solar panel with a soft, damp cloth to remove dirt and debris.
- Ensure the Type-C charging port cover is securely closed when not in use to maintain waterproofing.
- Avoid using harsh chemicals or abrasive materials for cleaning.
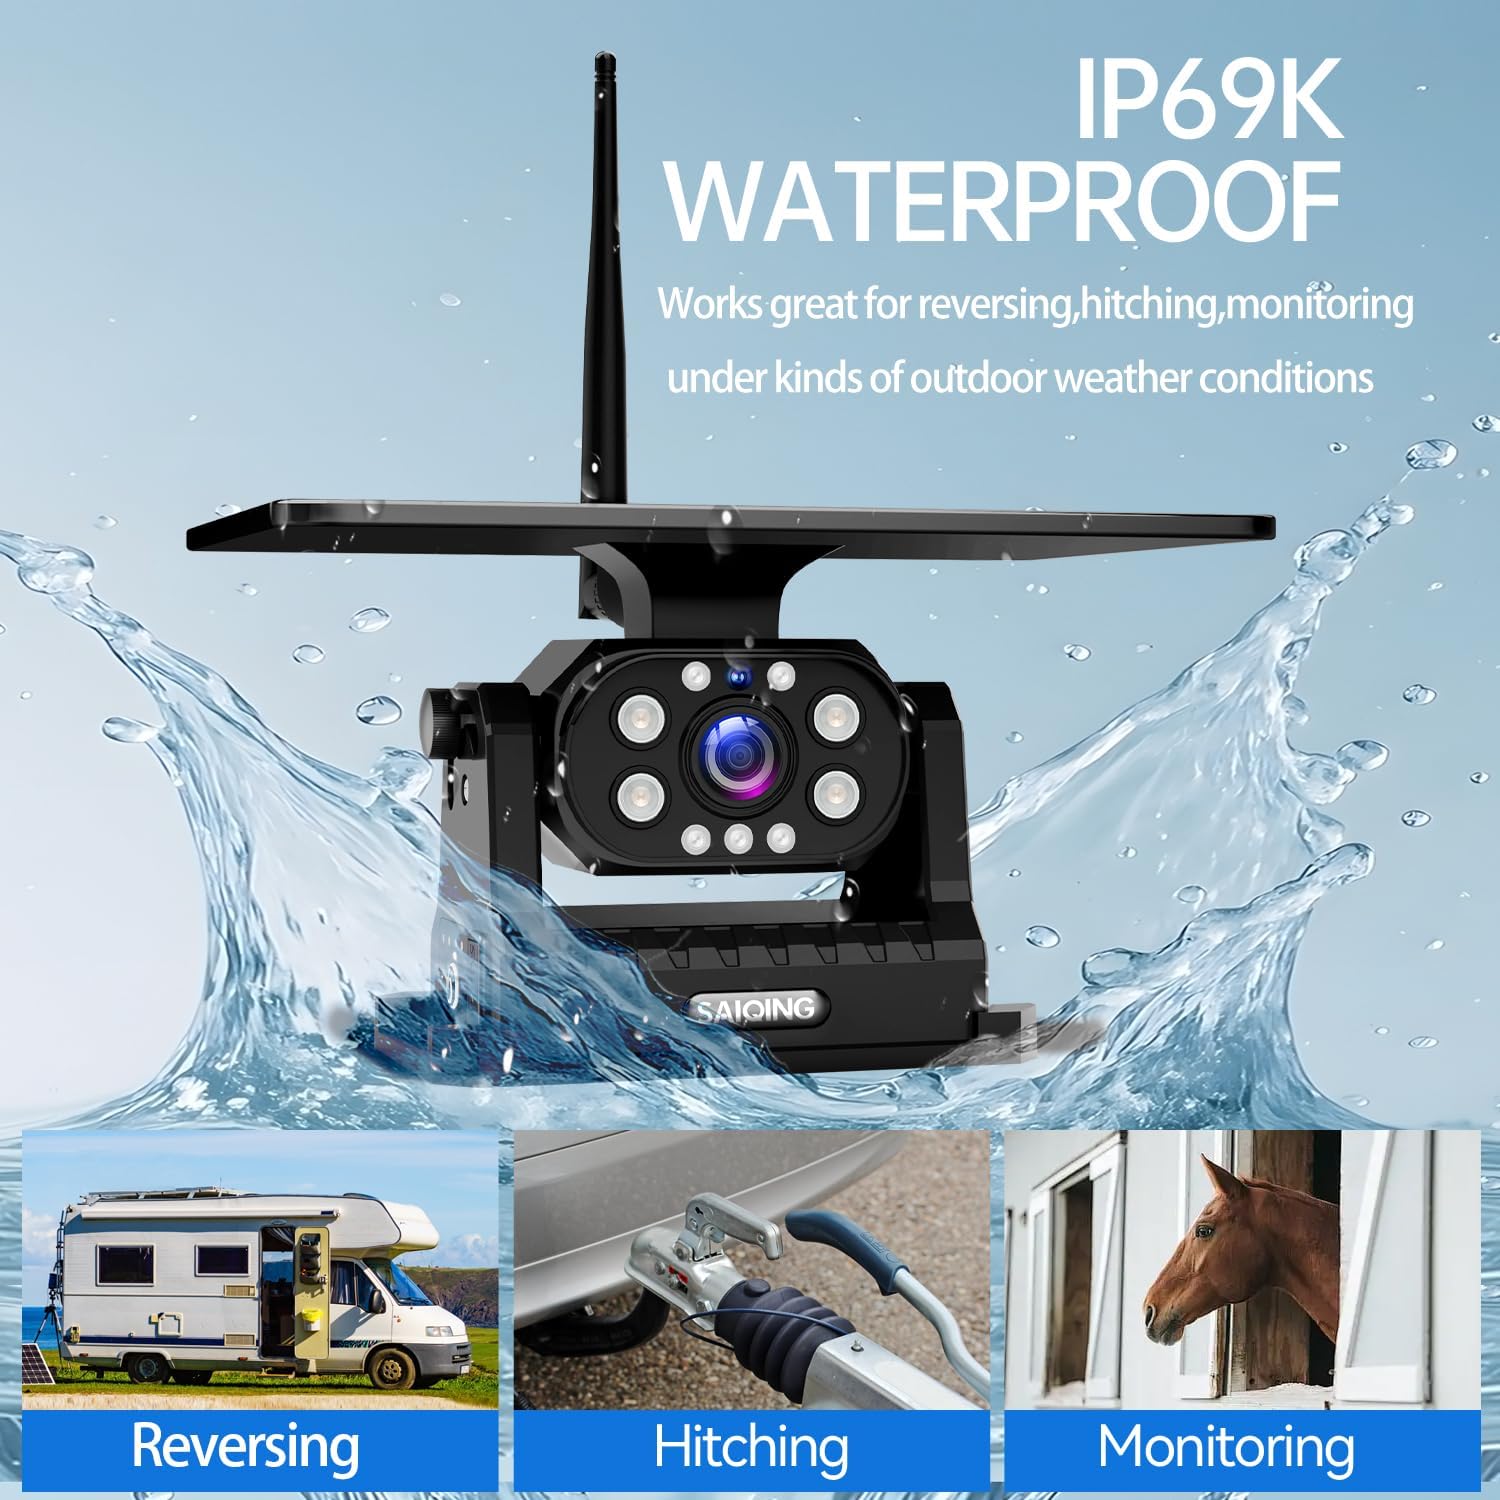
Image 8.1: IP69K waterproof design for all-weather endurance.

Image 8.2: The camera's robust waterproof construction.
9. Troubleshooting
If you encounter issues with your saiqing Solar Wireless Backup Camera, refer to the following common problems and solutions:
| Problem | Possible Cause | Solution |
|---|---|---|
| No image on phone screen / App crashes | Incorrect Wi-Fi connection, app malfunction, low camera battery. | 1. Ensure your phone is connected to the camera's Wi-Fi (SONiX_XXX). 2. Restart the MH CAM app. 3. Fully charge the camera using the Type-C cable. 4. Reinstall the app if issues persist. |
| Intermittent signal / Lagging video | Distance from camera, obstructions, Wi-Fi interference. | 1. Reduce the distance between your phone and the camera. 2. Ensure no large metal objects are blocking the signal path. 3. Try to minimize other Wi-Fi activity in the area. |
| Camera not charging via solar | Insufficient sunlight, dirty solar panel. | 1. Ensure the solar panel is exposed to direct sunlight. 2. Clean the solar panel surface. 3. Use Type-C charging as an alternative. |
10. Specifications
- Product Dimensions: 7 x 5.5 x 10.25 inches
- Item Weight: 2 pounds
- Battery: 9600mAh Lithium Ion (included)
- Display Features: Wireless
- Compatible Devices: iPhone, Android
- Installation Type: Magnetic Mount
- Voltage: 12 Volts
- Optical Sensor Technology: CMOS Infrared
- Lens Type: Wide Angle, Fixed
- Real Angle of View: 150 Degrees
- Connector Type: USB Type-C
- Waterproof Rating: IP69K
11. Support
For further assistance, technical support, or warranty information, please contact saiqing customer service through the retailer where you purchased the product. Please have your product model number (B0FF3KF2GD) and purchase date available when contacting support.